In Switzerland, Elna sewing machines were initially developed and manufactured. The well-known variety of sewing equipment is known for its long-lasting and high-quality features. In addition, they are often regarded for their dependability and precision. You must learn how to thread the Elna sewing machine before you can begin stitching. It only takes a few minutes to complete.
- Sewing Basics: How Big Is 46 x 60 Blanket?
- How To Fill and Thread An Old Sears Kenmore Sewing Machine? Step by Step Instructions
- How To Thread A Morse Sewing Machine Correctly?
- How To Use An Old Sewing Machine? Tips for Selling a Vintage Sewing Machine
- How To Use Decorative Stitches On Sewing Machine?
How To Thread An Elna Sewing Machine
Things You’ll Need
- Spools of thread
- Spools can be stored in this capsule (for horizontal pins for spools)
In Switzerland, Elna sewing machines were initially developed and manufactured. Known for its endurance and quality, the well-known range of sewing machines For their dependability and accuracy, these sewing machines are widely regarded as the best. To begin using an Elna sewing machine, you must first learn how to properly thread it. It only takes a few minutes to complete.
Bạn đang xem: How To Thread An Elna Sewing Machine Correctly?
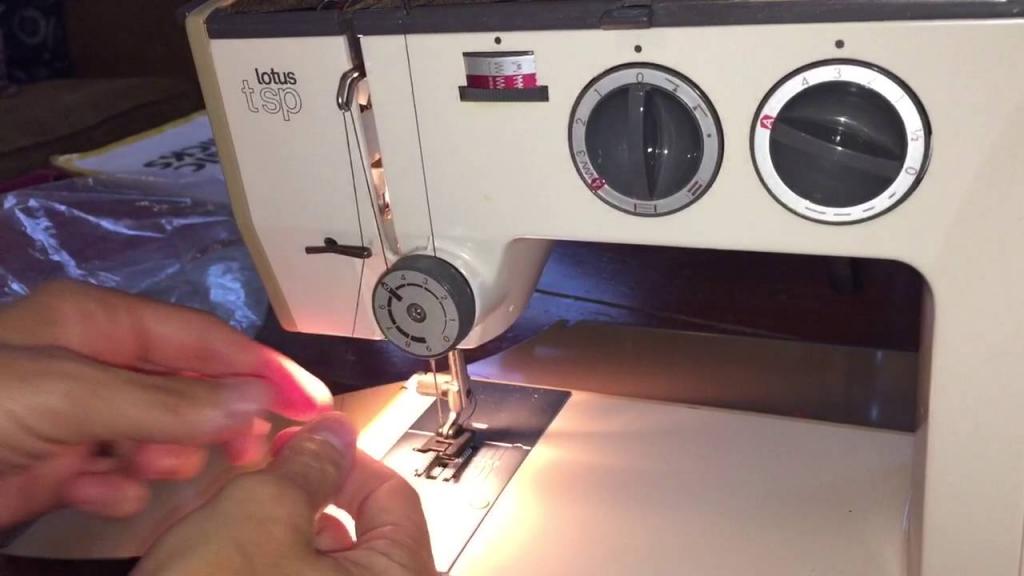
Step 1
Thread the spool, then the first guide with the thread. Keep an eye on the spool to make sure that the thread isn’t getting tangled up. If your spool pin is horizontal, you’ll need a spool cover. A slightly larger cap than the edge of your spool is necessary to help lift your thread off the edge of the spool.
Step 2
See the left-hand side of the guide for your next threading guide. There might be up to four thread guides on the Elna sewing machine, spread throughout its sides, top, and back, as well as at the front and front of the machine.
Step 3
After going through the guides, insert the needle into the tension discs. Older models have their tension discs located on the front, which makes finding them simple. Newer variants include tension assemblies hidden beneath the machine’s covers.
Step 4
Start threading the tension discs by lifting the presser foot lever on your machine. Work your way up to the sewing machine’s needle by doing this.
Step 5
Using the upper thread guides and the tension discs on the lower side, guide the thread down the length of the piece. Two or more discs with a flat surface make up the tension discs. When you sew, they’ll put tension on your thread as they push against it. After passing through your take-up lever and your tension springs, let the thread travel down the tension guides until it reaches the needle’s eye.
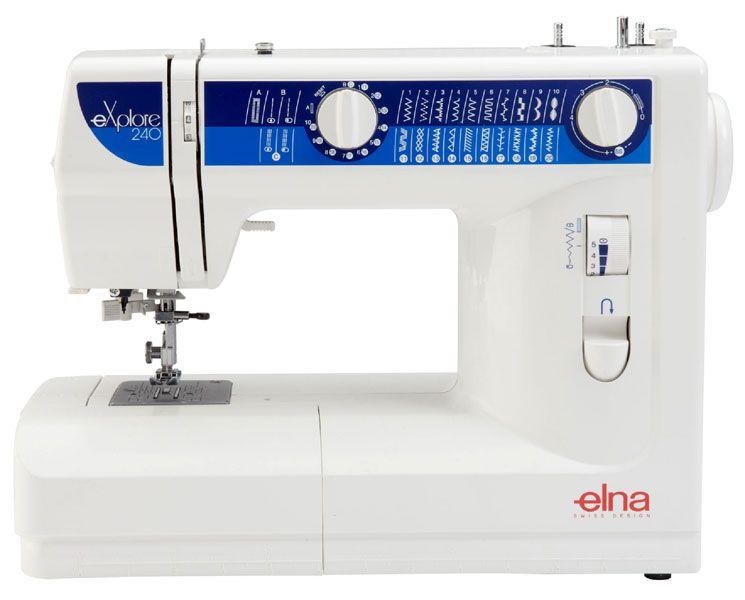
How Do You Thread An Elna eXplore 240?
- Examine the diagrams in Elna eXplore handbook 240.
- In order to lift the needle, press the needle up and raise it.
- Using the thread guide, pull the thread down into the tension area and around the spring check holder, then cut the thread.
- To take up, pull the thread from right to left and then over the lever.
- Take-up is accomplished by threading the thread through the lever’s eye.
- There are arrows that indicate the proper way to turn the knob.
- To wrap the thread around a guide, insert the hook into the needle’s eye and secure it with a knot.
- Hook the thread around the hook.
- Pull the thread loop through the needle after adjusting the knob in the stated direction.
- Threading the needle’s eye
- Lift the needle as much as you can, and then turn the needle threader knob down as far as you can, in order to use it with needles between #11 and #16.
- In accordance with the manual’s recommendations, adjust the knob.
- Put the hook into the needle’s eye.
- Make a loop with the thread and then slip it under the hook.
- Thread the needle by turning the knob.
- Insert the needle’s eye into the thread.
How Do You Thread An Old Elna Bobbin?
- Go through the instruction manual for your Elna model.
- Remove the flywheel to halt the needle’s movement.
- Set the thread spool’s pin on its pin.
- Check to see that the thread is being drawn off the spool in the proper manner. Then, make your way to the bobbin winder’s thread guidance.
- In order to wind the bobbin, you first need to insert the bobbin into the winder’s spindle from the outside in.
- Right-click the spindle. Keeping the thread’s end in your hand, press the foot control to begin winding.
- Complete winding of the thread should be completed by cutting the thread tail close to the threaded hole at the same level.
- It’s time to wind up the spindle.
- snip the thread
- Put the flywheel back in its proper place.
Xem thêm : What Is Welting In Sewing? How to Make a Welt Pocket?
To further understand what a bobbin is, familiarize yourself with its definition.
How Do I Set My Old Elna Sewing Machine?
The needle should be changed
- Shut down the sewing machine if necessary.
- To verify that the needle replacement is in good shape and free of damage, perform a thorough inspection.
- The needle should be lowered and the foot of the presser should be lifted.
- The needle clamp screw should be turned counterclockwise.
- Remove the needle and place the flat backside of it inside the clamp.
- The needle should be pushed as far inside the clamp as possible.
- After tightening the clamp screw, make sure the needle’s flat surface is parallel to the flat surface of the work surface.
Speed of sewing
The foot control on your sewing machine should be set to the pace you choose. The more pressure the machine has, the faster it will run.
The thread of the bobbin is drawn up
- After threading the machine, lift the presser foot, and then lightly secure the tread of the top one.
- Lower the needle, then raise it again.
- As high as you’re able, raise the take-up lever.
- Loop the bottom thread around the upper thread to make a connection.
Machine setting
- Stitch length and width knobs, needle position dials, and stitch width dials are all located on the right side of the machine.
- Adjust the tension dial to match the material and the project.
- When the thread that is lower is visible on the fabric’s surface, the fabric’s tension is not adequate.
- The strain is loosened. If you can feel the upper section of the thread under the fabric, you’ve found it.
- To increase the degree of tightness, turn the tension dial all the way up to the highest setting and then back down again.
Should I Wind the Bobbin Manually or Use Prewound Bobbins?
An efficient pre-wound bobbin minimizes the amount of time needed to wind since it is more efficient and saves you time. Manual winding may necessitate frequent bobbin changes, which might be inconvenient.
They use high-end winding machinery to prewound their products, and the wound is smooth and homogeneous. More threads are generated by them than you could manually.
Can I Get a Single, Universal Bobbin Style?
Bobbin styles vary from manufacturer to manufacturer, therefore there isn’t a single standard. Specific machines can only utilize certain bobbin designs, whereas others can be used on a wide range of machines.
Additionally, it is not advisable to buy a machine primarily on the bobbin style, but rather to consider the fundamentals such as stitch count when making a purchase.
How To Thread An Elna Sewing Machine Correctly
Turn the flywheel toward you and elevate the thread take-up height to the highest setting before adjusting the presser foot level.
Xem thêm : How To Monogram A Shirt With A Sewing Machine?
You should always be sure to keep your thread spool horizontally when holding it in place with the spool cap. The spool’s nick should now be pointing to the right.
Insert the thread into the loop by moving the thread to the left and pressing firmly. There is an oval thread guide on the other side of this loop. Wrap your thread around the spool and secure it.
When you look at the sewing machine, you can see what appears to be two cracks on either side. These are the tension discs. Pull the thread down through the right-hand side crack, then back up through the left-hand side crack, until you reach the top of the cliff face.
The level of take-up for silver threads should be seen when it reaches the peak of the fracture on the left side. 5. As you move the thread through the top loop, keep your attention on what you’re doing and don’t get distracted.
In order to return the thread to the left crack, it should be redirected via the extra silver guide and then through the thin silver guide at the bottom.
There must be a continuous movement of the needle.
To make it look like the letter P, set the bobbin on top of the case. Draw the thread from the right side to the left through the case crack and drag it straight towards the back of the device. This is how it should look like:

Why Is My Bobbin Thread Not Catching?
- The upper portion of the thread should be examined for tension. If the fit isn’t snug enough, it’ll cause problems.
- Incorrect threading is causing the machine to malfunction.
- There is a problem with or damage to the needle.
- There is an issue with the needle’s installation.
- Incompatibility of thread, needle and fabric
- There are a few damages on the needle foot or presser footplate.
- It appears that the needle foot or presser footplate has been damaged.
- Incorrect winding of the bobbin is the cause of the problem.
- A mistake has been made with the bobbin.
Conclusion
Do you think this post was useful to you? All you have to do to learn how to thread an Elna sewing machine is look at the diagrams in the handbook and learn the order in which the thread guides come before the needle. In order to avoid threading issues, it is imperative that you use the appropriate thread for your project.
Check out the sewing blogs for extra information if you have additional questions.
Nguồn: https://spasifikmag.com
Danh mục: Sewing Tips


