When it comes to monograming a shirt, did you know that it just takes two simple steps? In the beginning, we’ll cover the basics of setting up your sewing machine, and then we’ll go over some techniques for making sewing machine embroidery simple. Even if this is your first time monogramming a shirt, you shouldn’t be scared because the instructions in this guide are straightforward.
Sewing is one of my favorite hobbies, is it? A instruction on how to use a serger sewing machine is also available for your perusal.
Bạn đang xem: How To Monogram A Shirt With A Sewing Machine?
What is a Monogram?
Before learning how to use an embroidery machine to monogram a shirt, it’s important to understand what a monogram is. Basically, a monogram is essentially a pattern embroidered onto clothes with special symbols or words that symbolize your personal brand. Consider these as a replacement for your t-shirts’ logos, if you wish.
It also answers your question of why you should learn to monogram in the first place, as stated in the previous section. In order to be able to sell shirts under your own name and brand, you must have the ability and knowledge to do so.
How to Monogram a Shirt With an Embroidery Machine
If you know how to Monogram and how to operate a machine to embroider the pattern, you may easily monogram a shirt using an embroidery machine. The method includes drawing the monogram, setting the machine, and then embroidering it. Isn’t that intriguing? Let’s learn how to use an embroidery machine to add a monogram on a shirt in the next part.
Steps to Monogram a Shirt With an Embroidery Machine
Design a Machine in your Mind
When creating a monogram embroidery, you must begin with this simple step. You’ll need to come up with a concept. It is incredibly simple to design and embroider a design on an embroidery machine because it comes with pre-made designs, lettering, and a user-friendly software.
When creating your monogram, you must first select the font and size of the letters that will appear on your finished product. Make sure the monogram space on the garment is the correct size for the monogram to appear.
Decide on a Location
Before or after creating a design, this stage might be taken. You must decide where you want to place your monogram on your shirt. Make a baseline for your alphabets by drawing a straight line at the spot.
Choose the color of the thread while you’re at it. Consider the shirt’s base color when choosing a color that stands out. Your embroidery should be undetectable.
Put the Hoop in the Air.
The hoop on an embroidery machine usually determines where the design will go on the fabric. Hoop should be placed in the middle of your monogram’s center point. This task necessitates some familiarity with the machine’s operation. Stabilizer can be placed on the backside of your chosen region if you are concerned about the cloth moving as you monogram. In order to avoid concerns such as puckering, the fabric should be stabilized with this product.
Get to Work on the Embroidery Project!
Start the machine and secure the hoop. You can sit back and relax for the time being; the machine will take care of everything. Make sure everything is in order before turning on the machine, as this is a completely automated process. Make sure to remove the hoop when you’re through stitching. Remove the stabilizer from the rear by snipping the excess thread (if you had placed one). You’ve used an embroidery machine to effectively monogram a shirt.
How to Avoid Embroidery Puckering?
Machine embroidery is notorious for causing a lot of squeaky noises. When the fabric shifts around throughout the embroidery process, it causes the stitches to fall out. During sewing, if the needle moves slightly, the fabric will bunch up in one location. Keep the fabric as flat as possible to prevent it from puckering. To alleviate this issue, try adjusting the thread tension.
What Kind Of Fabric Do You Use For Embroidery?
In order to keep the stitches and design intact even after the cloth is used, embroidery, whether done by hand or machine, necessitates a tightly woven, even-weave fabric. It is possible to classify cotton, linen, rayon and polyester mixes as even-weave because of the way they are woven. It is also known that hemp and bamboo are even weave materials.
What are the Other Methods of Monogramming on a Shirt?
Xem thêm : What Does With Nap Mean In Sewing? What You Need To Know
To monogram a shirt, you don’t need an embroidery machine. Shirts and other clothing were monogrammed by hand for a long time before embroidery machines were invented. Another way of monogramming is the use of a stencil. An effective monogram can be achieved with this technique that’s not quite embroidering. It’s called vinyl monogramming and requires a computer and software to perform. You can either embroider a monogram by hand or use vinyl to print it.
Monogram Embroidery by Hand
Hand embroidery is a simple procedure, but it takes a long time to complete due to the method’ complexity. An embroidery hobby could be just what you need if you’re looking for a creative outlet. This is how it’s done.
It is possible to make a monogram.
The ability to go beyond the box is essential when coming up with a monogram design. You’ll need to use your imagination and a free hand to make a gorgeous monogram that includes one or more letters. Make your monogram stand out by playing around with different fonts and cases. Stylize the letters by adding borders and shaddling to specific areas.
It doesn’t matter how or what you write as long as you remember to account for the page size. The monogram must be drawn in the precise size that you desire it to appear on the shirt.
On the Shirt, finish the area.
Once you’ve completed your design, you’ll need to decide where you want the monogram to go on your shirt. Select a location with a border of at least two inches all around the design. The hoop needs to be fixed in this area.
The design is now ready to be transferred to the cloth. By inserting a piece of carbon paper between your shirt and the design, you may trace over the design. Make sure that you trace this on a hard surface before moving on.
Make Your Own Embroidery
To complete the project, all that is needed to do is to embroider the design onto the shirt. Tighten the embroidery hoop by wrapping it around the pattern. Start with a color of thread. Split stitch is used to outline the letters, then satin stitches are used to fill them in. Cut the extra thread after you’re done, and your monogram is complete. Split stitch and satin stitch tutorials are available online.
Monogramming With Vinyl
What if I told you that you can monogram your shirt with vinyl? This method does not necessitate any sewing abilities, but rather requires a computer, a vinyl machine, and software. The Vinyl approach makes it easy to create complex designs. Here’s how to apply this technique to a shirt to produce a stunning monogram.
Initiate an Idea
You can construct a monogram using a computer software. Monogramming software can be downloaded and used in your design, and there are numerous to choose from. Though your monogram includes more than one alphabet, the ‘Weld’ option will make them appear as if they are all part of a single unit.
The Design Can Be Reduced.
A vinyl cutting machine and vinyl sheet are required for this phase. The vinyl sheet is inserted into the machine, and a design is fed into it. With the correct software and an easy-to-use vinyl machine, you’ll be able to complete this operation with ease.
Glue the Vinyl to the T-shirt
It’s now time to apply the vinyl monogram to your shirt, the final stage in the procedure. Put the vinyl design on the shirt and press down. To avoid crooked monograms, locate the center of the design. Before applying heat, cover the vinyl with multi-purpose paper and press or iron it into position. As soon as the transference is complete, a beeping sound is heard from the heat press machine. What you’ll have to do with an iron is guess. Your design is ready to be checked once you remove the paper backing and the second layer of vinyl. And that’s it.
If you can master one of the ways listed above, you can take up monogramming as a pastime. An added benefit of this approach is that it can help you establish a business.
An Alternative Way to Monogram a Shirt with an Embroidery Machine
Xem thêm : How To Thread A Shark Sewing Machine?
Let’s say you’ve got a computer, a vinyl player, and some software on your hands. You wouldn’t bother acquiring a sewing machine if you didn’t need one. Using these items, you may quickly add a monogram to your shirt.
There is no limit to the designs that may be created using this method of vinyl.
Creating a monogram design using computer software is the first step in this process. Then use vinyl cutters to cut out the design from a vinyl sheet. The procedure for operating this equipment is straightforward. With the help of your own design, it creates a printed monogram on a piece of vinyl that you may keep.
Apply your design on the shirt using the final step of this simple process. Once more, focus on aligning the centers to acquire the exact placement for your monogram. Place a hot object on top of your design vinyl sheet to seal it in. I’d advise pressing it with a hot iron.
To ensure that the monogram has been inserted correctly, check back after a while. If this is the case, congratulations! You now own a custom-made monogrammed shirt.
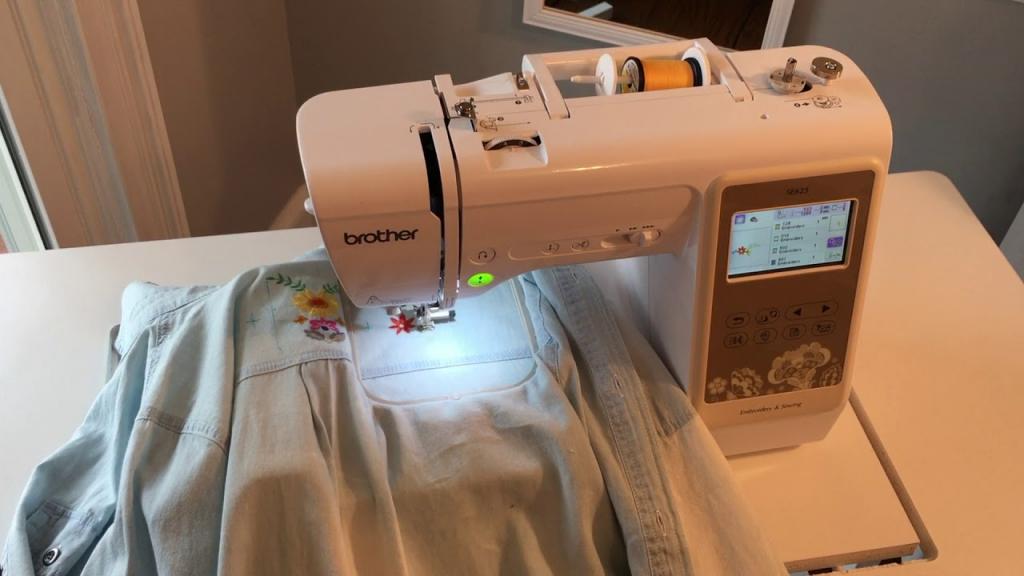
Can You Embroider A Shirt With A Sewing Machine?
Even if you don’t own an embroidery machine, you can embroider a shirt using a sewing machine. For starters, some manufacturers provide machines that can embroider a design on a garment while also functioning as a sewing machine. When embroidering with a conventional sewing machine, here are the supplies you’ll need:
- a water-soluble stabilizer that can be used to transfer a design onto a shirt
- Marker with a permanent tip for drawing out the pattern
- Use glue to keep the stabilizer in place.
- Thread
- Embroidery feet in free motion.
- Foot with a straight stitch.
- Appliqued clear feet
Using the stabilizer and a sewing machine needle, you can stitch along the lines you’ve drawn on the stabilizer to create your desired design on the shirt. Also, since you’ll be using several presser feet, take a look at this guide on how to swap out a Singer sewing machine’s presser foot. However, the technique is comparable for most machines, even though it’s for a specific brand.

How Long Does It Take To Embroider A Shirt?
The amount of time it will take you to embroider a garment depends on its dimensions. It will take more than 10 hours to embroider an adult garment by hand. However, if you use a sewing or embroidery machine, you can cut the length down even further.
An embroidery pattern, for example, typically has 4,000 stitches. Hand embroidery will take far longer than a machine capable of running at 6000 SPM. 6,000 stitches can be completed in less than 10 minutes by some commercial machines.
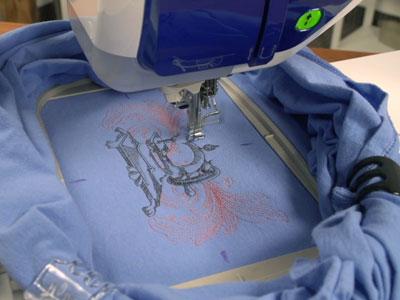
How Do You Stabilize A Shirt For Machine Embroidery?
Using a cut-away mesh stabilizer will prevent the lettering from showing through on a light-colored shirt. However, if you’re working with thick designs, you should exercise caution while employing tear-away stabilizers. When you remove the stabilizer, you risk ripping away the stitches.
What Can I Use Instead Of Stabilizer?
Stabilizers for embroidery projects include fleece, cotton, and flannel. Dryer sheets can also be used as a cheap substitute for stabilizers. Baking paper, a coffee filter, and wax paper can all be used as stitching stabilizers.
Do You Need A Stabilizer To Embroider Clothes?
When embroidering a shirt, you need a stabilizer. Keep in mind that textiles are flexible, so if the shirt is twisted, the stitching will be uneven. Stabilizers that stiffen your material will also help to keep it from puckering.
Embroidery Vs Monogram
Because the process of monogramming and embroidery on a shirt are so similar, we’ve included instructions for both in this post. A brief distinction is that monograms are utilized for little logos, whereas embroidery is used for larger ones. When it comes to monograms and embroidery, initials are the most common motif.
FAQs – How to Monogram a Shirt with an Embroidery Machine
Do you need to know about a shirt embroidery machine?
Assume you’re one of the old school sewers who sews everything by hand. You should upgrade as soon as possible if this is the case. It takes a long time and a lot of patience to sew by hand using needles. The process of making a bespoke monogram with a shirt embroidery machine can be completed in a matter of minutes.
What else can you do with embroidery machines?
Machines for embroidering aren’t limited to personalizing clothing with monograms. Beautiful embroidered designs can be created on your shirts using these shirts as well. This means that embroidery machines are a great way to release your creative side.
What should be the size of the monogram on the shirt?
It is common for monograms to be between 14 and 3/8 inches tall. A good rule of thumb is to keep the monogram about an inch out from the center of the cuff. It should be pointing in the direction of the buttonhole, by the by.
Conclusion
It’s done! Embroidery on a shirt can be done the same way as sewing a monogram on a piece of clothing. Sewing machines that can also embroider, such as some two-in-one versions, are an option.
It will take less time to complete monogramming than larger embroidery patterns. We really hope that you found this information to be clear and understandable. You can ask us anything else in a comment.
Nguồn: https://spasifikmag.com
Danh mục: Sewing Tips


