One definition of a casing is an enclosure created by folding over the edge of the cloth or an externally connected application. The end product resembles an elastic band or a tie. Ankle, waist, and wrist casings are common locations for casings in clothing, but they can also be seen at the top of totes and clutches. There are a wide variety of casings available to choose from, each optimized for a certain function. Invisible casings, connected casings, topstitching, multiple rows of elastic, and drawstring casings are just a few of the options.
Casings (which is just an etymology phrase for an opening in cloth!) may be made in two simple ways, and I’ll show you both of them today.
- How to Hem Your Curtains Without Sewing? Step by Step Instructions
- How To Make A Chair Slipcover Without Sewing? Things You Will Need
- What Is The Best Sewing Machine For Embroidery?
- How To Sew A Cylinder Pillow? Easy Step-by-step Guide
- What Is The Best Industrial Sewing Machine? Which Is Best For You?

1. Edge Casings
What options do you have if you wish to lengthen a strip of elastic along the border of the work in question? The obvious solution is to create a shell for the edges. I’m making a doll skirt very quickly. I’ve finished the hem at the bottom but haven’t attached the casing to the elastic yet. Just follow these steps:
Your fabric’s edges twice, first at 1/8″ and then at 3/8″, leaving a gap large enough to accommodate one 1/4″ elastic piece.
A casing is created by stitching down the center of a folded piece of fabric. To finish, sew both ends of the elastic to the inside of the casing. When you need to be very accurate, you can get fancy by marking your fold lines before you put them inwards, as I did in the preceding example.
2. Applied Casing
Putting a casing on fabric is as simple as it sounds. Pre-made bias tape can make quick work of this task. After cutting a narrow strip of self-fabric, I tucked the unfinished ends under. Either way, it’s fantastic. 🙂
The casing is then positioned on the fabric and the edges are stitched closed. Leave enough room between your stitch lines to insert ribbon or elastic.
Is it your intention to cut a hole in the housing? Do you need a hole in the dress for the ribbon to thread through so you can tie the elastic around your waist? Nothing to worry about!
Assemble the case by cutting it to size, folding the raw edges under, and pinning the folds together. Stitch as usual, leaving an opening large enough to thread the ribbon through.
How do you sew a casing?
In reality, it’s a breeze to do. Simply said, when you fold or “roll” fabric, you reduce its size.
Bạn đang xem: What Is Casing In Sewing? Everything You Need To Know
Smallly, you fold to the incorrect side. Then, increase the amount you fold by.
As an example, we would fold fabric in quarters, then again by an additional inch. Thus, not only are the raw edges hidden, but also elastics, ribbons, or ties can be threaded through.
Xem thêm : What Is A Facing In Sewing? Sewing Facing Tips and Techniques
After folding and pressing, the bottom edge of the casing is stitched together.
Located on the side seam, each casing serves as an opening for a drawstring pouch. You may find the casing’s opening on pajama bottoms on the side. That’s where they insert the elastic, so to speak.
The width of the ribbon or the circumference of the elastic will decide the length of the casing. In order to calculate how long the casing needs to be, add 1/4″ to the whole length of the ribbon or elastic.
Materials Needed:
- Pattern for a no-cost drawstring bag.
- Ribbons, or shoes.
- 12 yard of material.
- Thread.
Step 1
It’s a quarter fold until the other end “.
Whenever you see “fold 1/4,” “If you want to make sure the case is even and not asymmetrical, you should check it all around.
Step 2
Xem thêm : What Size Needle For Sewing Jeans? Tips to Make Sewing Denim Hassle-Free
Add another 1 fold to the first fold “in addition to exerting considerable force.
Keep in mind that the width of the elastic ribbon will dictate the length of the casing. Here, I’m holding a 1/2 “rack and pinion. I have a 1/2-inch casing and need to make a 1-inch case.
Step 3
Fasten your container to the machine’s extension arm. Continue stitching all the way along the base of your casing. Make sure there’s a gap of at least one and no more than three. The width of the slit will change based on the scale of your project and the length of the elastic or ribbon you’ll be using.
Step 3
The machine’s arm is where the enclosure goes. Finish up the casing by stitching around the hem. Make sure there’s a gap of at least one and no more than three. The opening’s size will change depending on the overall size of your item and the width of the elastic or ribbon you’re using.
Step 5
After the case’s walls have been cut away from it. They can be fastened together or separately, and then you’ll be ready to go.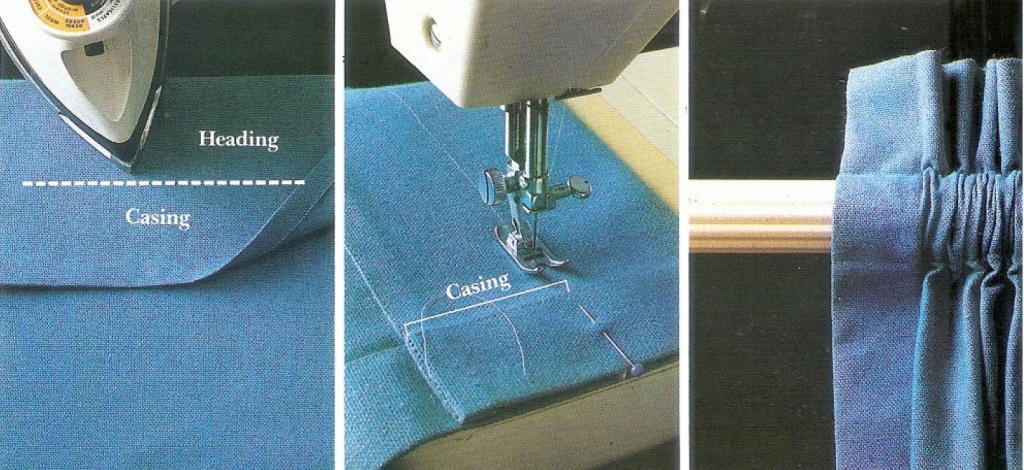
Conclusion
How useful do you think this article was? We just learned how to sew a casing, which encloses elastic, ribbon, or a drawstring by folding the cloth in half and stitching the two halves together. It’s not hard to sew, but keep in mind that the casing needs to be an extra 1/4 inch wider than the cloth you plan to use.
Check out our blog for more sewing guides, and if you have any questions, leave them below or send us an email.
Nguồn: https://spasifikmag.com
Danh mục: Sewing Tips