The Bicor VX1005 machine has three phases for threading. We’ll also go through how to thread the bobbin and set it up for sewing machines in great detail.
Why don’t you seek up instructions for other Brother models as Brother makes the Bicor VX1005? Step-by-step instructions are available on how to thread the Brother sewing machine.
Bạn đang xem: How To Thread A Bicor Vx1005 Sewing Machine?
It’s always helpful to learn how different sewing machines are set up. Although their instructional films share certain similarities, it’s always best to consult the instructions that came with your exact model.
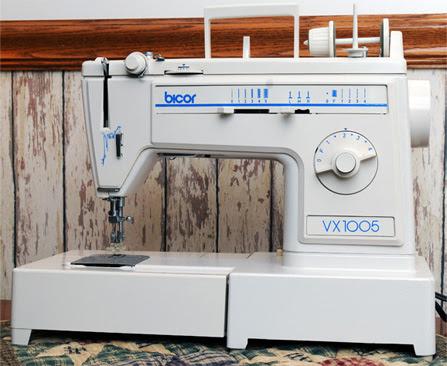
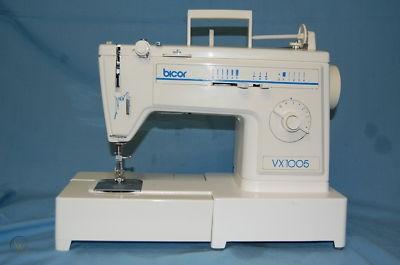
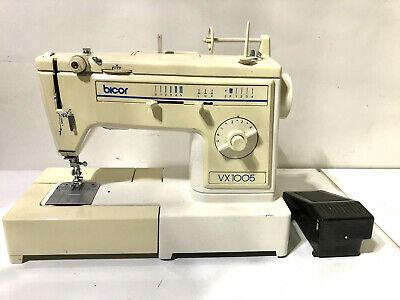
How To Thread A Bicor VX1005 Sewing Machine
Step 1. Thread the needle
- The VX1005’s spool pin on the high side is where you’ll attach the thread spool.
- In the front of the machine, there are two thread guides: one for dragging the thread through and one for feeding it through.
- If you need to adjust the tension, you should wrap the thread around your disc.
- The needle’s hook, placed directly above the needle, is where the thread should be guided.
- About two inches of thread should be threaded into the needle’s eye.
Step 2. Set the needle and bobbin
- In order to feed a bobbin into the shuttle, you must first unlock the bobbin case.
- Two inches of thread should be snagged from either end of the hook.
- In the same manner, insert the sewing machine’s needle.
Step 3. Lift the thread of the bobbin.
- To lower and raise the needle, turn the handwheel counterclockwise.
- Keep the needle thread in place while the needle pulls the bobbin’s thread through the needle eye.
- Pull both threads toward the back of VX1005.
- Make a test stitch on a scrap piece of fabric.
- Make sure the machine is threaded correctly if you’re having issues with stitches.
- Check to see that the bobbin and other parts are properly attached.
How to Use a Bicor VX1005 Sewing Machine
Things You’ll Need
- VX1005 Sewing Machine by Bicor
- Thread
- Needle
- Cloth
- Scissors
As long as you know the essentials, stitching on a sewing machine is a simple operation. Each machine is unique in that it has its own set of options and features. The Bicor VX1005 was manufactured in England in the 1970s. On the front of the machine, there is a dial that allows you to select between straight and zigzag stitches. The VX1005 has a foot controller that plugs into the machine next to the electricity cord because it is an electrically run machine.
Step 1
Connect the Bicor VX1005 to an electrical outlet on the wall. Because it was made in England, a different power cord is required for use in the United States. Cords for sewing machines are readily available at any sewing machine retailer. To turn the machine on, press the power button on the right side of the machine, directly above the power wire.
Step 2
Place the spool of thread on the metal bar on the machine’s right side. The spool pin can be found here. Pull the thread around the machine’s first thread guide hook. Feed the thread through the second thread guide on the front of the machine, which connects to the tension disc’s inner. Wrap the thread around the tension disc and into the needle hook on top of the needle, as shown in the illustration. When you’re done with your needle, leave a two-inch lead.
Step 3
When you press on the raised ridges on top of the case, you will be able to open it. To get a 2-inch lead, thread the shuttle with a full bobbin and pull the end of the thread through the shuttle hook.
Step 4
Unscrew the presser foot bar’s pin. The needle will be able to go in easier this way. Insert the needle with the flat side toward the right into the slot. Adjust the presser foot bar by tightening the screw.
Step 5
When the needle reaches the presser foot, raise the wheel toward you and then lower it again. With your left hand, grasp the 2-inch lead of the top thread. The 2-inch lead will be pulled up by the needle as it goes around the bobbin thread. Take the bobbin lead, along with the top thread lead, and draw it back toward the back of the sewing machine as soon as the needle reaches the top of the bobbin.
Step 6
Place the cloth under the presser foot, then lower the presser foot onto the cloth to begin sewing. Press the foot controller just a little bit. This will slow down the sewing machine. Sew slowly at first until the motion becomes natural to you.
Step 7
Cloth should be fed through the presser feed to the end to finish stitching. Remove your foot from the controller. Pull the fabric out of the presser by raising the feed rollers. Tie the threads to the material by cutting them and tying them off. Pull the top and bobbin threads back 2 inches and begin over.
Tip
If the stitch is loose, check the tension disc. A tightening of the tension disc may be necessary to ensure proper operation.
Push-button bobbin winding release, built-in plastic cam, and access slide plate are among the VX1005’s features.
Xem thêm : What Is A Stretch Needle For Sewing Machine? Choosing the Right Machine Needles
Aluminum and plastic combine to construct this device, making cleanup a breeze.
When it comes to support, Brother is a well-known corporation that should be able to help.
How Do You Wind A Bobbin In A Bicor VX1005?
There are no manuals available for the Bicor VX1005 or on the Brother website at the time of this writing. For this older model, it is suggested that you contact your dealer or Brother to receive the proper configuration instructions.
The Brother XL-5500 is a replacement for a much older Brother model known as the Brother XL-5500.
- The correct bobbin for your Brother sewing machine is the SA156 SFB (XA5539-151), which is the model number for this bobbin.
- Wind the thread wrap around the bobbin’s winding disc after attaching the thread spool to its pin.
- Thread the bobbin hole from the inside out.
- Slide the bobbin to the left to activate the winding mechanism after placing it on the bobbin’s winding shaft.
- To keep the bobbin in place, twirl it in a clockwise direction.
- Gently press the foot controller while holding the thread end in position to finish the stitching procedure.
- Breathe in and out for a few seconds, then let go.
- Remove the thread from the bobbin that is dangling there.
- Another press of the controller keeps the winding going.
- When the bobbin is full, the machine will automatically stop.
- In order to disconnect the winding mechanism, cut and then pull bobbin left.
- Remove the bobbin tangles
The Brother sewing machine comes with detailed instructions for how to thread a bobbin.
When Was The Bicor VX1005 Made?
In the 1970s, Brother created the Box VX1005 as a zigzag sewing machine. It’s impossible to find instructions or even working parts for this device because it’s so old.
It was also difficult to understand Brother’s timeline from the 1970s because the model from the 1970s was not included.
There are still some positive reviews of the Bicor VX1005 on the internet from owners of other variants. For less than $100, you can get your hands on a good one.
How Do You Thread A Sewing Machine Spool?
Sewing machines with vertical bobbins should follow the following guidelines:
- Using the spool cap, attach the thread spool to the pin at the top of the spool.
- If your machine has one, place the cone or felt underneath the spool.
- Take a look at your guide’s instruction booklet to find out how to draw the thread to produce tension.
- As an alternative to connecting your bobbin to the spindle of the bobbin winder, you may need an additional step.
- Take a pair of scissors and snip the thread that is left over from the bobbin numerous times.
- The winding system for bobbins can be started as needed.
- To begin winding the thread, keep it secured in place while pushing the pedal.
- When most machines reach their maximum capacity, they will shut down automatically.
- After cutting the thread, you can attach the sewing machine.
- Removing the bobbin case and inserting the bobbin
- Using the instructions in the manual, insert a piece of thread into the corresponding slot. Make sure the slot is completely filled by pulling on the thread.
How Do You Thread A Horizontal Bobbin?
Sewing with a horizontal bobbin is identical to sewing with a vertical bobbin, which was described in the preceding paragraph. Here’s how to thread the bobbin on this type of sewing machine: :
- Make sure to follow the instructions for removing the needle plate from the sewing machine.
- Observe the instructions in the manual or on the machine’s bed for bobbin injection and threading.
Here Are 10 Most Common Trouble Areas Of A Sewing Machine:
1. Change the Needle
Sewing machine needles are the cheapest and easiest component to replace, yet they account for half of all seams. A sewing machine will not function properly until it has a new needle. Everything has been spoken.
2. Clean the Machine
The throat plate of sewing machines must be cleaned monthly, if not daily, to remove lint and fluff. Take off the throat plate and bobbin case first to reveal the regions where lint accumulates. When you’re done cleaning, make sure you eliminate all of the visible dust and hair. Add a drop of oil to the machine after cleaning if it needs it. Use only fresh air.
The Sew Ready: Machine Basics with Amy Alan session on Craftsy is especially beneficial for beginning sewers because it is completely free.
Take care not to spoil your needlework with broken needles or missing stitches This free Craftsy session teaches you how to solve some of the most common sewing machine issues.
3. Check the Top Threading
Xem thêm : What Is Muslin Used For In Sewing? What You Need to Know
This means that the problem is not with a lack of tension, but rather with a lack of top thread. Make sure you’re threading the machine with a GOAL in mind. I don’t want to see any sluggish threading! Place the thread firmly in each of the machine’s groves and guides. Sewing is impossible if the machine isn’t threaded correctly.
4. Quality Thread
Good thread is appreciated by sewing machines. Checking for quality in thread might be difficult. In the 1950s, Grandma used to sew with old thread. 2/$1.00 thread isn’t great thread. To ensure you’re getting high-quality thread, go to a quilt shop or a place that offers sewing equipment. Low-quality thread can be used in sewing machines, but keep in mind that the thread is responsible for the other half of the seam. Are you certain it will remain intact after several washings? Take no chances. Use high-quality thread at all times. Your sewing machine will reward you, and you’ll have fewer headaches as a result of this.
5. Bobbin thread not in the bobbin tension
Each thread has its own internal tension system. The stitch will appear out of balance if the bobbin thread is not in the proper tension. You must ensure that the bobbin yarn is properly “snapped.”
6. Not having your machine cleaned annually
Sewing machines, like automobiles, necessitate frequent tune-ups. Taking your sewing machine to a local sewing machine shop for a thorough cleaning might alleviate a variety of problems. Precision stitching requires sewing machine specialists to keep all the moving elements perfectly aligned. An annual service on your sewing machine can help it last longer.
7. Wrong bobbin
Because there are so many various types of sewing machines, it’s simple to mistakenly use the wrong bobbin. There’s no guarantee that a plastic bobbin will fit your sewing machine just because it’s made of plastic. Sewing machine service centers can help determine what size bobbins you need if you are unclear of your machine’s capacity. They’ll gladly verify that you’re utilizing the correct size. The machine should be serviced if it hasn’t been serviced in the last year or two.
8. Needle not high enough
Stitches won’t form correctly if the needle isn’t all the way up in position. This issue can be difficult to detect. Lift the needle by loosening the screw. You can also use the integrated needle threader to double-check. Needles are too low if the needle threader does not match the needle’s eye.
9. Needle too small for thread
A larger needle is required to thread a thicker thread. The thread size must match the needle’s groove on the front of the needle. It is a poor idea to use little needles and thick thread at the same time.
10. Nicks in the throat plate
Look for needle strikes or small rough nicks in the sewing machine’s throat plate aperture. The throat plate may have little burrs if you’ve been breaking needles recently. It is possible for thread to get trapped in these rough regions, resulting in thread breaks or uneven stitching. These blemishes can generally be smoothed out by a sewing machine expert.
The most frequent sewing machine difficulties may typically be resolved by following these ten ideas for troubleshooting. You might need to seek an expert for help if these solutions fail. Mechanics who service sewing machines are trained to identify and fix typical issues. Every day, they witness machines that are sick.
Say a quick prayer and then SMILE…you get to go sewing machine shopping for a NEW one if your sewing machine has reached the end of its life.
SewingMastery’s video library of sewing and embroidery machine reviews will help you narrow down your search for the perfect machine.
Conclusion
This is all you need to know! We’ve just figured out a three-step method for threading a Bicor VX1005 sewing machine.
Before setting up the Bobbin, it is essential to thread the needle. There is no easily available information on this sewing machine model..
To meet other owners of this model, we recommend participating in forums. Please check out our blog for additional Brother sewing machine tutorials.
Nguồn: https://spasifikmag.com
Danh mục: Sewing Tips


