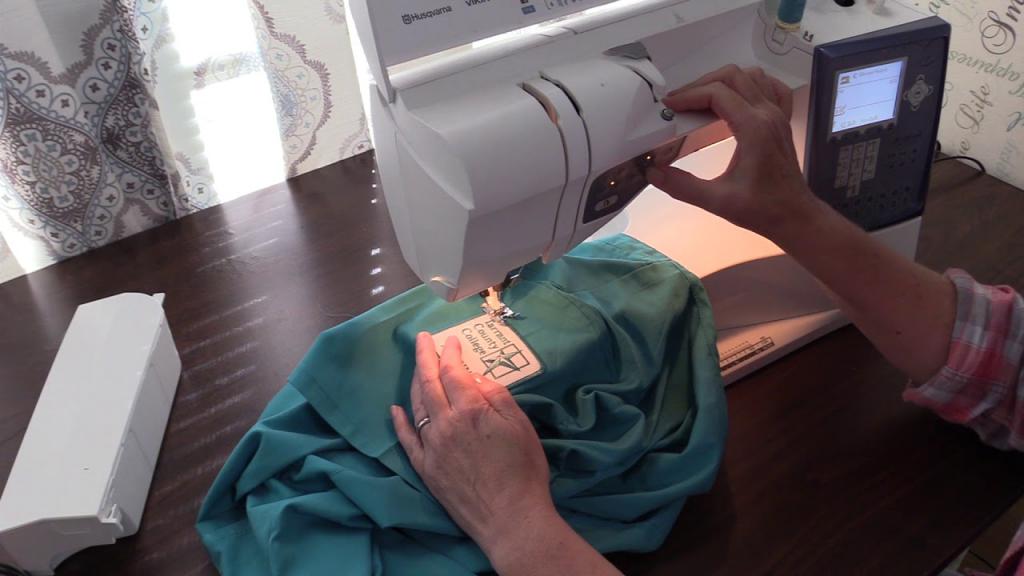
In only two stages, you’ll learn how to sew patches onto sleeves with a sewing machine. Throughout the process, you’ll learn tips and tricks that will make the process easier for even complete beginners. Patches and whether or not they can be applied without stitching will be covered as well.

THE OLYMPUS CAMERA
Sequins, on the other hand, can be a bit of a challenge to work into projects. However, if you have a sewing machine, you can still follow this tutorial on sewing sequins. they can be completed quickly and neatly.
How To Sew Patches On Sleeves With Sewing Machine
Step 1. Apply the patches
- Put the patches on your clothing’s sleeves.
- Check the amount of time and effort you’re devoting to your design. Particularly when the sleeves of your patch have a specific design to follow.
- The pins’ pins’ pins’ edges should be facing towards the center of each patch when pinning.
Step 2. Sew
- Patch by patch
- Set the machine to the narrow zigzag stitch and thread it with the same thread color as the patch to provide a consistent appearance when sewing.
- Zigzags must have their longest edges sewed to the patch’s outside edges.
- Make sure to remove the pins whenever you’re working near them so that the needle of your sewing machine doesn’t hit them.
What Stitch Is Used To Sew On Patches?
To make embroidery patches, you can experiment with the running stitch, the tatami stitch, the solid stitch, or the jump stitch. Which one you choose depends depend on whether you’re looking for a smooth finish or a more textured look for your patch.
Running stitch
- Inexperienced patch-sewing novices should start with this stitch.
- In the case of patches with little or minute details.
Solid stitch
- Stitching through the solid areas
- To sew a section of the patch to the garment completely
Jump stitch
- That’s about as near as you can get for patch-related information.
- Using thread of the same color to link letters
Tatami stitch
- Get rid of the lines that are separated
- To ensure that the patch is completely covered
How Do You Sew Patches On Clothes?
Making patches for clothing repair is a lot different than sewing decorative patches, such as embroidery, on to the garment. To begin, the patch must be tailored to match your garment in order to be seamless. This can only be achieved by precise measurements and color discernment.
- Cut a piece of fabric that matches the color and style of your damaged apparel.
- Make a 3/8-inch fold on each of the patch’s edges, then press the patch into place.
- Pin each corner of the patch into place before applying it to the garment. Folded edges should face downward.
- Set the machine to make a zigzag stitch with the correct thread, and then sew the patch for repair.
How Do You Put On A Patch Without Sewing?
Use iron-on patches
- Fabrics ranging from heavy to medium can be ironed. However, you must ensure that your cloth can be ironed before applying patches.
- For fragile textiles like silk, iron-on adhesive patches are not the best option.
- Put the patch in its proper location.
- Wrap the clothes in bath towels and place them on an ironing board.
- Adhesive side of the patch should face the fabric when it is positioned.
- After preheating the iron, apply an absorbent cloth to the affected region.
- After pressing the patch for 10 seconds, allow it to cool.
- Make sure the patch is attached properly.
With Velcro
- Clean and dry the fabric.
- Velcro tape should be cut to match the patch’s dimensions.
- Remove the liner from the patch, then attach Velcro to it. To attach the patch, use Velcro.
- Sew the patch onto the cloth.
With the help of fabric glue
- Prepare a flat place for the fabric and lay it out. Glue the patch and the fabric together with a glue stick.
- Place the patch on the fabric when the adhesive has dried for two minutes.
- Allow the adhesive to dry for 24 hours after applying the patch.
How Do You Sew A Patch By Hand?
- Wash, dry, and iron the piece of clothing you plan to patch before you begin.
- Make certain there are no creases in the patch before pinning it to the wall.
- 20 inches of thread should be on the needle. In terms of color, it’s exactly the same as the patch.
- Make sure the needle is about 1/8 of an inch from the patch’s edge. The first step is to make straight stitches.
- Remove the pins before you get to them, and then tie the thread around the patch when you’ve completed stitching.
- Check to see if the fabric is done by removing any loose threads.
How Do You Make A Professional Patch?
- Then, load the design you want to embroider into the machine.
- Place the stabilizer that is water-soluble into the correct size hoop
- The water-soluble stabilizer should be placed in the appropriate-sized hoop.
- Sew the patch pieces together with a satin border after removing the extra fabric
- By soaking the stabilizer until it is completely dry, you can remove it.
- Placement of the patch necessitates the use of adhesive.
How To Sew On a Patch: 11 Methods
Perhaps your daughter has just earned her first Girl Scout badge, or perhaps you just noticed a hole in the elbow of your favorite flannel shirt after moving out on your own. The need to sew patches on clothing is still prevalent in this age of ready-to-wear fashion! To put it another way, how do you sew a patch on?
Using a sewing machine or a robust hand-sewing technique is the best approach to attach a patch. Using a set-in patch or an appliqued patch can also be used for more decorative patches. A running or appliqué stitch is the best way to attach an embroidered patch to a uniform, headgear, jacket, or backpack.
Sewing on a patch can be done in a variety of ways, and we’ll show you eleven of them here. A patch can be permanently attached to a clothing using either ironing or stitching. On the final page of this guide, you will learn where to get patches for various types of clothes.
How Do You Sew a Patch on Fabric?
Sewing a patch onto fabric can be accomplished in a variety of ways, from the simplest of needle and thread to the more complex of sewing machine. In addition, you’ll find that you can employ a variety of patches to meet your specific needs.
An embroidered badge is one of the most popular patches to sew on clothing. On a military uniform jacket or shirt, you may need to place this in a certain location. Your child may need to wear the badge if they are a member of Girl Scouts, Boy Scouts, or any other group that gives badges in honor of achievements.
Aside from using a specific type of patch, you can also employ wackier and more funky designs. In order to spice up your patchwork, use appliqué or reverse-appliqué techniques and other decorative hand stitches, such as the herringbone stitch.
Finally, if you have a hole in your garment, a patch may be all you need to cover it up. You can learn a variety of darning techniques to almost completely close the hole!
How To Sew On a Patch: 11 Methods
Sewing with a sewing machine or a needle and thread is one of the most common methods of attaching a patch, but there are also various unique appliqué and darning methods included in this list.
Begin by securing your patch in place before moving on to any of the following ways.
In most circumstances, you can use sewing pins or safety pins to accomplish this. Having a second look at things before putting in a lot of effort can save time and money in the long run. In addition, it will help keep the badge or patch in place while you sew!
1. With a Sewing Machine
To stitch a patch on quickly, you can use a sewing machine. As an added bonus, machine-made stitches will provide a more secure adhesion.
While a sewing machine may be ideal for attaching a patch, it isn’t always the greatest option. An artistically formed embroidered patch, for example, may be difficult to thread precisely around the edge. For some inset or appliqued patches, you may prefer the look of a hand-sewn blanket stitch applique over a machine stitch.
Finally, a sewing machine works best on a flat object, such as a shirt or jacket, that you can simply insert under the needle. Patches for backpacks and hats will almost certainly require manual sewing.
A patch sewn on using a machine can save you a lot of time and effort in many situations.
Machine-stitching an iron-on patch:
- You can use sewing pins, or safety pins, depending on the thickness of a patch, to secure it in place. An embroidered insignia may necessitate the use of a strong safety pin.
- To sew an embroidered badge, use a heavy-duty needle, while a universal medium-weight needle can be used to sew a fabric patch. You’ll also want to use a narrow zigzag stitch, which creates the appearance of a flat stitch line.
- The outer border of the patch should match the thread used to thread the machine.
- When inserting the patch over the needle plate, orient it such that the needle is resting on the outer edge of the patch, and then insert the patch. In order to ensure that your narrow zigzag stitch covers your patch’s edge as well as any fabric outside the edge of your garment, sew around its perimeter.
- It’s best to work slowly along the perimeter of the area. Because this stitching is going to be visible for a long time, you want it to be clean and tidy.
- Remove the garment from the machine when you’ve finished circling the patch.
- Hand-sew the upper thread through a needle to bring it to the inside of the garment for a neat finish. If you do it this way, your patch won’t be marred by a stray thread end.
2. With a Sewing Machine and Iron
An ironing step can be helpful in some situations before sewing on a patch or insignia to clothes.
The back of many embroidered badges has an adhesive layer that is activated by heat. An iron set to a low setting can be used to adhere a badge like this to a piece of clothing.
In spite of its flaws, this procedure can be useful as a pre-sewing technique for attaching badges. As you sew, the adhesive will keep the badge in place!
Xem thêm : How To Service A Pfaff Sewing Machine? Troubleshooting and Repair Guide
Because of the size of the embroidery badge, you may require iron-on tape to attach it to the back of your garment. Place numerous strips of this tape in the center of the large badge, activate them with an iron, and then sew the badge together according to your preference.
To keep the jacket from bowing out in the middle, apply hem tape to the hem.
3. By Hand
It takes a little longer to put a patch on by hand than with a sewing machine, but the results are much more impressive. Even tiny patches or beautiful appliqued patches can be applied with ease using this method!
While hand sewing is ideal for small, delicate, or decorative patches, there are some disadvantages to this method as well. It’s obvious that this takes longer. In addition, even the tiniest of hand stitches will not be able to provide the same level of durability as machine stitching.
You’ll probably need to learn how to do fancy stitching by hand before you try this method, though. Runny stitch, blanket stitch, and catch stitch are all popular hand-sewing stitches.
Determine the location of your badge or patch and fasten it with pins first, before attempting any hand stitching.
Stitch in the Ditch
Runny stitches are amongst hand sewing’s simplest and fastest options. Patches made from simple rectangles or circles work well.
- In order to secure the end of your needle, you must first thread it. Embroidery floss and cotton or polyester spool thread are are acceptable options for this project. If you want your stitching to stand out even more, consider using a complementary or contrasting color thread.
- Draw the needle up to the surface of the fabric and begin stitching from the inside out. Your knot will be hidden from view on the outside of the patch if you do it this way.
- Push the needle back into the fabric and out the other side to create a stitch. These stitches can be made as large or little as desired. Stitch length should be consistent from one end of your fabric to the other, and this is especially important when sewing a garment.
- Continue stitching up and down with the needle, making straight stitches of the same size on both the front and back of the fabric.
- Take the needle back to where you started and tie a knot to keep your stitching in place once you’ve completed the patch or badge.
Stitching a Blanket
A patch’s decorative edge can be enhanced using a blanket stitch. Intricate and simple patches and badges can both benefit from this method. It can also be used on appliques and patches of fabric.
- Tie a knot in the end of the thread after you’ve threaded your needle. You often want your decorative blanket to catch the eye, so you may want to choose a color of thread that contrasts nicely with the color of the patch. You may also want to use embroidery floss for this technique.
- Knot the end of the thread after you’ve threaded your needle. If you want your decorative blanket to stand out, consider using a thread color that contrasts nicely with the patch color. In addition to using embroidery floss, you may also wish to try this method.
- Place the needle tip inside the edge of the appliqué or patch now. The length of the blanket stitch can range from a quarter inch to a half inch, depending on how large you want it to be.
- In order to get the needle and thread to come out on top of the piece of fabric, you must draw the needle and thread through the patch and cloth. After sewing the patch to the fabric, you’ll have a thread loop that extends back to the top of the fabric. You should now have a vertically aligned stitch at the patch’s edge.
- To complete this stitch, wrap the thread around the needle’s tip and pull the needle and thread all the way through a loop that has formed.
- Repeat this stitch by moving down the edge of the patch, pulling the needle down through the patch and back up through the fabric at equal intervals. Every stitch should have a thread loop.
- Stitching a perfect row of vertical and parallel stitches around the patch’s perimeter will be your reward.
Stitch in the nick of time
Catch stitches, also known as herringbone stitches or broad cross stitches, are used to produce a form of zigzag around the edge of a patch, emblem or applique. If you want to make a dramatic or delicate statement with this stitch, go for it!
- Using a needle and knotted thread, bring the needle through both layers of the cloth until you feel a tightening of the thread as you go.
- Using the needle and thread, move it a quarter-inch to the right and scoop up a small portion of the fabric outside the patch’s edge, then slip the needle and thread all the way through. Inside the patch you will see a diagonal stitch that extends outwards and a little stitch that extends inwards. Additionally, the material will be free of needles and threads when this method is used.
- Moving from right to left, pick up a little stitch inside the patch’s edge and move it a quarter inch to the right with the needle. The needle and thread should be drawn all the way through. Over the patch’s edge, you should not see an upside-down V form.
- V-stitch around the edge of the patch, repeating this technique.
- The thread should be knotted on the inside of the fabric when you have completed the full circumference.
Instead of collecting only a few threads, you can increase the size of your parallel stitch to create a more X-shaped stitch. When the threads cross over each other, this will make the stitch more visually appealing.
You can also form alternating larger and smaller X or V shapes with your stitches if you want a sloppy, whimsical look. In most cases, normal stitching around the edge is preferable.
4. By Hand Appliqued Patch
Quilters and expert sewers typically utilize multilayer applique techniques that are fairly intricate. It’s important to note that mastering the foundations of appliqué does not require a lot of time. Once you’ve mastered this technique, you’ll be able to add artistic patches to just about anything, including your clothes, bags, and caps.
- In order to make your patch stand out, choose a color that contrasts with the rest of the item. Adding a quarter-inch allowance around the outside of your shape is necessary since the edge will be turned under. If you’re just learning to sew, it’s best to start with something simple with straight or slightly curved edges.
- Pin the patch in place if you can. To fill a hole, pinning might not be the best option. If this is the case, sew on the patch first with a rough tacking thread and then remove the tacking.
- In order to secure the end of your needle, you must first thread it. Using thread that closely matches the fabric of your patch is essential for this type of repair.
- Using the underside of the needle to draw up the thread, leave a knot on the inside of the fabric.
- Next, use your thumb to turn under the outer edge of your patch, just a quarter-inch or so. This will create a smooth finished edge on the outside of the patch. You will want to continue turning under as you go, keeping the edge smooth. You may find it easiest to fold with the edge of your needle or with a tiny knitting needle or stick.
- Your patch should now have a quarter-inch or so of space behind your thumb to help prevent fraying. This will ensure that the patch’s outer edge is done to a high standard. Continue flipping under and smoothing the edge as you go. When folding, you may find it easier to use the edge of your needle or a small knitting needle or stick.
- A little perpendicular stitch can be made by bringing the needle back down just beyond the folded edge of the fabric. The folded edge will be firmly attached to the clothing underneath.
- Bringing the needle back up is the next step, but this time slide it a short way between the garment fabric and the folded patch edge before bringing it back up through the patch’s border. Make this region as small as possible because you’ll need roughly ten or twelve of these tiny stitches per inch along the edge of your shape.
- Stitch in the same direction as before.
- Apply this stitching pattern around the patch’s perimeter by folding the edge over and sewing it in place.
5. By Hand Set-In Patch
When you cut out a shape from an existing clothing, you may then glue the patch to the inside of the fabric, creating a cool contrast in shape and color. This approach is also known as reverse applique.
A beautiful hand stitch is usually preferred, but you can also use a fancy machine stitch to sew around the inset patch’s edge.
- Use a pair of scissors to create the form you like in your jacket, pants or other garments. A heart patch can be made by cutting a heart shape out of your garment and sewing it together.
- Patch the hole from the inside out with your patching material. Iron-on hem tape can be used to finish the fabric’s edges. Alternatively, you can use sewing pins to secure the patch in place.
- You may choose to choose a decorative hand or machine stitch to sew around the edge of the hole if you want the patch to appear good. For example, a herringbone or a blanket stitch will work. If you want to keep your outfit from unraveling or looking sloppy, make sure your stitching overlaps the cut edge of the fabric.
- Even if the inset fabric is strong enough, you might want to consider adding a square of interfacing to the patch’s back such that it overlaps the patch and the garment, providing a second layer of stability.
6. Over a Hole By Hand
Many various methods can be used to hand-patch a hole in your clothes, depending on whether or not you want the patch to be noticeable.
- Darning the hole with a needle and thread is an option as well. Simply thread horizontal stitches over the entire width of the hole until you can no longer sew it. The next step is to cross over the horizontal stitches and sew vertically up and down the hole.
- Use a fun appliqué to cover up the hole you just fixed to show off your handy work. From a sweet heart or flower to a rough skull and crossbones, any design is possible with cloth!
- You can use tiny hand stitches in a running stitch or blanket stitch pattern to hold a matching patch in place over the hole in your clothing, such as a denim patch on a jean jacket.
7. Darning with Machine
Darning is a sort of patchwork that involves the use of many threads stitched or woven together to fix a hole in a garment. Although you can darn by hand, it is more faster and easier to do so with a machine.
For those of you who enjoy hand needlework, ornate darning is an excellent option. With skill, darning with a sewing machine can make these repairs practically undetectable!!
Darning is a stitch that is incorporated into some sewing machines. However, this capability is typically found on more expensive computers. If you have a less advanced machine, you’ll want to use a straight stitch instead. If you use an authentic darning stitch, make sure you use a buttonhole maker instead of the regular presser foot.
- Sew the clothing with thread that matches the color of your machine.
- Using an iron, press a small part of a fusible interface into the hole on the opposite side.
- Darning stitches can be used if your machine has one; otherwise, simply sew over the hole and through the interfacing with a series of darning stitches. Darning stitches may need to be layered numerous times for a huge hole.
- Stitch a series of straight lines from the top of the hole to the bottom of the hole until the space is completely covered with vertical stitches if your machine does not have a darning stitch setting available to you. Then, sew a diagonal line over the hole, making a second series of lines across the hole.
- Up order to complete the project, you should not be able to see the interfacing through the hole since your stitches have completely filled it in!
8. On a Military Uniform, Shirt or Jacket Sleeve
When sewing a patch on a military uniform, shirt, or jacket sleeve, you must take special precautions to ensure that all standards are followed.
- Badge placement may necessitate a certain location on the clothing. Make certain that you adhere to the correct steps for this particular placement.
- The sort of thread you utilize may also have its own set of regulations. A tight match to the embroidered edge of the badge is ideal in most circumstances, so your stitching won’t be seen.
- Stitches that are not too noticeable will be ideal for this task. If you have a sewing machine, attaching the military insignia is as simple as using a straight thread or a zigzag stitch. Use a running stitch or blanket stitch if you need to sew by hand, and use thread that is now visible.
- To make things even more difficult, you may have to sew the emblem onto the uniform in a spot where your sewing machine cannot reach it, such as the arm. In this situation, all you need to do is sew a few tidy hand stitches around the badge’s perimeter.
9. On Jeans
Any of the procedures outlined in this article can be used to sew a patch onto a pair of jeans. An inset patch, for example, looks good if your jeans have a hole at the knee. Use a matching blue thread to neatly patch the hole in your pants to make it disappear if you want an invisible fix.
Xem thêm : Parts Of A Sewing Machine And What They Do? Everything To Know!
Sashiko patches, another method that looks great on jeans, are another option. As with the inset patch procedure, you apply your patch fabric to the interior of the hole. It isn’t enough to merely sew around the patch’s perimeter; instead, you must sew horizontal and vertical rows of stitches over the patch.
Make your jeans stand out from the crowd with this beautiful Japanese art form!
10. On a Hat
As long as you’ve got enough room in your sewing machine needle to accommodate the patch, sewing it in place is the finest approach to attach it to a cap. Ironing or hand sewing patches onto curved hats may not be as effective as machine stitching in preventing them from shifting.
The needle plate of your sewing machine may not be able to accommodate a three-dimensional object like a hat. To keep the insignia affixed to the cap, use a tidy, simple hand stitching technique like the blanket stitch.
11. On a Backpack
In order to attach patches to a backpack, you will most likely have to do so manually.
- Hand darning is an option if you’re looking to cover up a little hole in your backpack. Another option is to utilize the inset patch approach, but with a matching material instead of a different one!
- Simple hand stitching stitches, such as the blanket stitch, can be used to keep commemorative patches from concerts and events sewn to your rucksack.
- Applique patches are a great way to give your bag a new look and feel. In terms of design, you can use any form or color.
What is the Best Way To Sew On a Patch?
In terms of how you want your patch to look, there are a number of different techniques you can use. On the other hand, it all relies on how much effort you’re willing to put into the process
Use a sewing machine for a quick, dependable solution. To add military patches, Girl Scout badges or even to repair a hole in your favorite trousers, you can use precise machine stitches.
An applique patch or an embroidered emblem can be embellished with a contrasting color around the edge using hand-sewing stitches such as a catch stitch.
When it comes to stitching on a patch, what is the best method to use? It all depends on the method of patching you choose!
Is it Better to Sew or Iron on a Patch?
As far as how long you want the patch to last, the answer depends on the sort of patch and how much you want it to stay in place.
When it comes to attaching something to something, stitching is a better option. On a curved surface such as a hat or backpack, the edges of the badge may tear away if you just iron it in place. This is especially true.
Some fabrics can be ruined by ironing. If you don’t follow the care directions on a garment, you could end up with a hole in your jacket or bag if you use excessive heat on it!
Finally, ironing is an excellent technique to keep a patch in place while you stitch it down. To put a patch on an item of clothing, stitching is the preferred way.
Where Can You Find Patches for Clothes?
Craft supply companies like Etsy and chain stores like Hobby Lobby and Joann Fabric have a wide variety of patches.
- Try a sewing store like Joann Fabric for basic denim patches or fabric for appliques. Fabric shops may be scoured in person to find the perfect match for your garment.
- Etsy may be a better place to look if you want embroidered badges. Etsy sellers sell everything from little ice cream cone badges to gigantic twelve-inch dragons or skulls for jacket back decoration.
- Patches given out in recognition of achievements or as a memento of a special occasion are common, and many come from groups with a specific focus. For example, your military badges will be provided by the military. If you plan to visit every state park throughout the summer and want an embroidered patch from each one, you’ll probably have to buy the badges from the gift shop at each one.
FAQs
What is the best stitch to use to sew on a patch?
Use a basic backstitch to connect the patch and create a clean, uninterrupted line using this method. Stitch about 18 inch from the patch’s edge to keep the patch flat against the fabric.
Is it better to sew or iron on a patch?
There are some wonderful sewn-on patches out there. They give the clothing on which the patch is sewn more mobility. To avoid the patch becoming too rigid, you can have the iron-on backing removed and the patch can be sewed on with ease, allowing it to flow with the cloth.
What is darning stitch?
An ancient needlework technique known as pattern darning uses rows of running stitches that are reversed at the end of each row to weave contrasting thread into and out of the ground fabric. Stitch length can be adjusted to create geometric patterns.
Do iron on patches come off?
Place a piece of wax paper or a clean towel over the iron-on patch to begin the process of removing it. After that, use a hot iron to melt the adhesive on the patch for 15 seconds at a time. Remove the iron after 15 seconds and peel off the patch.
What material do you use to make patches?
Clothing and textiles are embellished with patches, which are embroidered designs sewn on a stiff background. The following are the items you’ll need: Top material: twill (sailing cloth), sailcloth, or other suitable fabric (typically cotton, polyester, or a combination). Crinoline and/or Tear Away Backing Material: Apply a sealant to the surface.
Can you embroider with a sewing machine?
Is it possible to embroider with a standard sewing machine? Yes, absolutely! To perform this, you don’t even require a special foot. A conventional sewing machine may embroider by simply following the needle’s path as it is drawn on a stabilizer.
Can Cricut make patches?
Different materials can be cut using the Cricut. Plastic, cardboard, paper, cloth, fleece, and a slew of other materials are all examples. I played with cutting with heat bond on a piece of paper today. The back of the cloth is pressed using this product, then the patches are cut out and ironed onto the jeans.
Do you peel off the back of an iron on patch?
Once the patch has been ironed on, the paper backing will be removed. Using a fusible webbing, make sure to place the backing of the fusible web on the cloth. Using a patch designed to blend in with the fabric may necessitate applying it to the garment’s reverse side.
Conclusion
Is that all? In only two simple steps, you now know how to stitch patches onto sleeve using a sewing machine. A zigzag stitch with the same color thread can be used to make the patch on the machine by positioning it in a zigzag pattern.
Velcro and iron-on patches can be used to apply patches to a garment without stitching. It is our sincere hope that you found this post to be both interesting and educational. Visit our site if you’d like to learn how to quilt on a sewing machine.
Nguồn: https://spasifikmag.com
Danh mục: Sewing Tips


