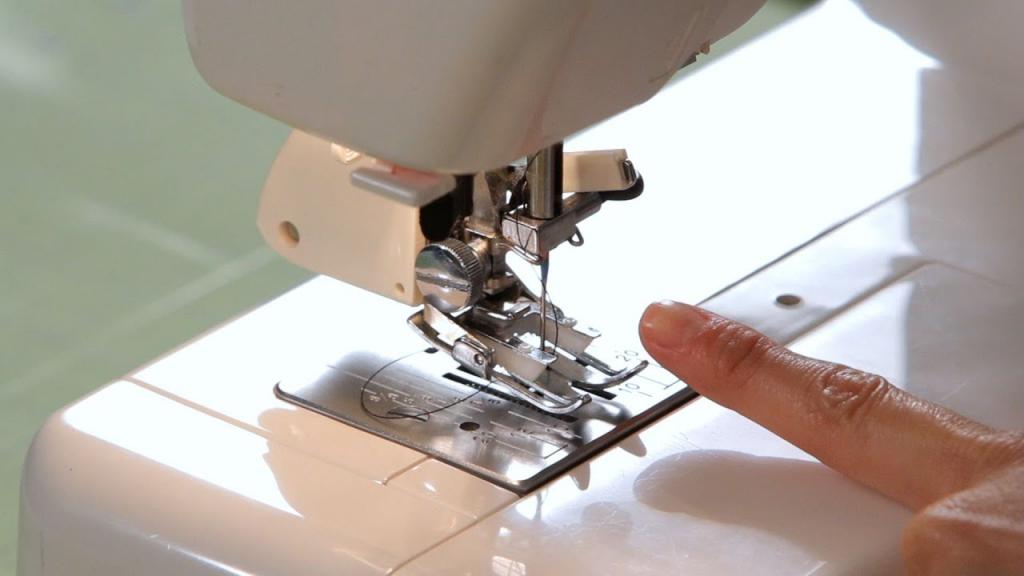
Are you interested in knowing how to place feet on a sewing machine in two steps? It’s a simple installation procedure because the majority of sewing machine feet are snap-on types.
Do you want to learn how to put feet on a sewing machine in two simple steps?? It’s a quick and easy process because the majority of sewing machine feet are snap-on designs.
Bạn đang xem: How To Put A Foot On A Sewing Machine?
Despite the fact that this approach can be used on any sewing machine, you should always refer to the instruction booklet for the model you own. In order to get exact and beautiful stitches, it is critical that the presser foot of the machine be properly positioned.
Step 1. Set the foot of the new one in the correct position
- To release the presser foot, press the button behind the foot holding for the presser.
- Place the foot you need on top of the shank of your sewing machine and start stitching.
- Your sewing machine must be able to accept the attachment you intend to use.
- Take care to ensure that the machine’s holder snaps snugly into place at the bottom of the foot.
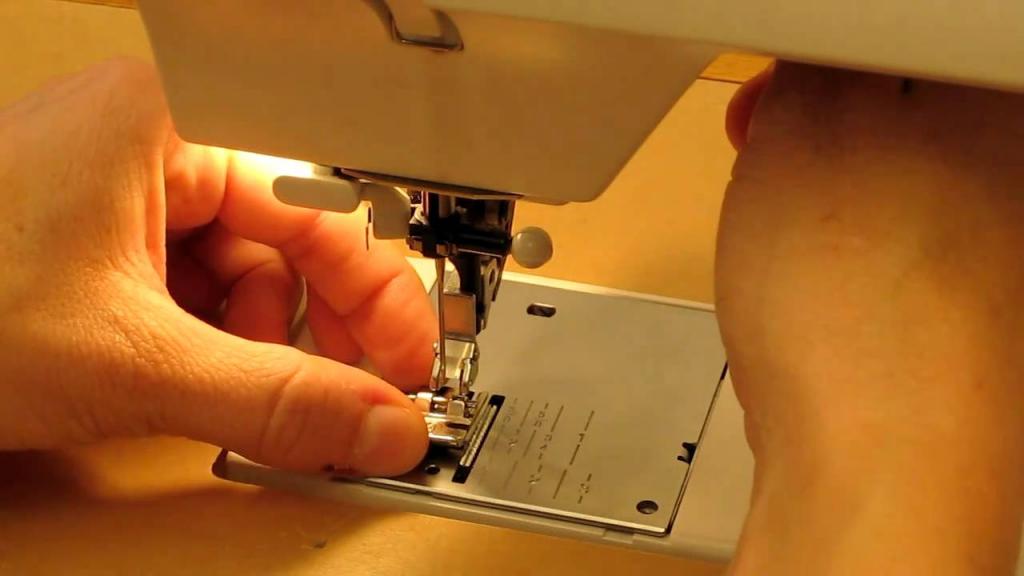
Step 2. Install the foot of the sewing machine with utmost care
- Lower the presser foot holder by pressing or pulling the lever on the presser foot.
- As a result, the presser’s foot will be securely fastened to the machine’s shank in an instant.
- The presser foot that snaps on, as the name suggests, will make a snapping sound once it is in place.
- It is important to lift the presser’s foot holder with the newly-installed foot in order to ensure that it has been done correctly.
Find out how to replace the presser foot on a Singer sewing machine if you have one.
How Do You Put A Screw-on Foot On A Sewing Machine?
Rather than using a snap-on foot, older sewing machines use an attached foot that screws into place. Although this type of attachment to a sewing machine takes more time to set up than a simple snap-on, the process is remarkably straightforward.
Adjust the screw that keeps your foot in place on the machine. In order to keep the screw in place, this will remove the present foot, but keep the screw in place.
Then, follow the directions and screw in the replacement foot as instructed. Detailed instructions on how to turn this screw can be found in your sewing machine’s instruction manual.
Screw-on presser feet can be replaced in the same way that Brother sewing machine presser feet holders may be removed and replaced.
Snap-On Vs Screw-On Presser Feet
Snap-on presser feet
Because it can be used on both low and high shank sewing machines, the snap-on presser foot is the most common type of presser foot. To make things even easier, it has an adjustable back bar that can be moved. To attach the foot holder to the machine, simply lower it.
If you want to get rid of it quickly and easily, all you have to do is press one button. If your machine has an on-demand system, you can look in the handbook to see if this is the presser foot it is utilizing.
Screw-on presser feet
The process of removing and replacing screw-on presser feet is more time consuming because the screw that secures the foot must be rotated. You’ll also need a screwdriver of the right size to get the job done.
A screw-on presser foot from a lower-shank machine cannot be used on an upper-shank machine and vice versa. Using a snap-on sewing machine foot has the added benefit of limiting the screw-on attachment.
Are you not aware of the difference between a shank sewing machine and the low shank sewing machine? Think about skimming this article.
Are presser feet universal?
The universal snap-on mechanism is used by some sewing machines. You can use any sewing machine that is compatible with the snap-on foot for pressing if the foot is universal.
It’s also possible to evaluate whether or not you’ll need an adaptor to use presser foot made by different manufacturers. Doing business with an identical manufacturer’s pressing foot will ensure your peace of mind.
5 of my Favorite Sewing Machine Feet:
1. Walking Foot
Quilting is one of the most common uses of walking feet, but I’ve found that they’re useful for many other sewing crafts. If I’m going to stitch multiple layers of fabric together, I’ll reach for these needles every time. Using them to make purses is a great benefit!
2. Zipper Foot
Make sure you have a zipper foot if you plan to sew anything with a zipper. The foot is designed differently by each manufacturer, but they all do the same thing. That is, allow you to sew a thin zipper into the cloth while holding it in place beneath your foot. The normal foot that came with your sewing machine is too broad and won’t keep the zipper in place while you’re stitching.
3. Cording Foot
I’m a sucker for piping and cording. It’s the finishing touches, no matter how small, that set your project apart from the others. When it comes to sewing cording, you don’t have to be an expert. All you need is the right foot for your machine. If you’re looking for the proper positioning of piping or cording, then you’ll need a cording/piping foot with a groove underneath.
4. Teflon Foot
A Teflon foot is a must-have if you want to sew with coated fabrics such as leather, oilcloth, laminate, or vinyl. This foot has an unique coating that makes it easier for the cloth to slide under it. Time and irritation will be saved.
5. ¼″ Quilt Piecing Foot
If you’ve ever done any form of quilting, you know that getting a flawless 14′′ seam is really essential. The quilt won’t fit together properly if your seams are out of place (think of it as a giant puzzle). Using this foot, you’ll always obtain a 14′′ seam every time.
7 Indispensable Presser Feet For Your Sewing Machine
#1: The Teflon (or Non-Stick Glide) Foot
Stitching vinyl, leather, foam and PUL can benefit greatly from this type of foot! You can use clear vinyl to make clear pockets and other accessories when sewing with this foot, and it’s great.
To make all of the pockets, we needed a lot of vinyl, therefore a non-stick foot was a necessity!
#2: Edge Stitching Foot
Extra points if you can see the toe! This foot has a guide on the side that makes it easy to attain consistent top-stitching distances by pressing the fabric right up against it. As a result, you may use this foot in various stitching positions and with bigger ornamental stitches. Sewing hand-folded tucks is also possible using this method. (I use a same all-metal foot as my 1/4-inch piecing foot.)
The metal version of the same foot is shown here. I use this foot for adding binding to quilts because I can vary the location of the needle to achieve the correct depth (depending on the batting I’m using) and get a fairly consistent stitch distance with this foot.
Did you realize that the horizontal line on your stitch plate is directly in line with your needle? Whenever I need to stop stitching in a specific location, I mark it with a horizontal pin, and stitch until the pin is on top of that line. With one more stitch, I’ll be able to pivot my needle at that position in this picture. For the sake of demonstration, and because many people who have been stitching for years were unaware of the significance of this phrase, I’m including it here.
3: Clear Open Toe Foot
To see where you’re heading, this is the ideal foot to put forward. This foot has a broad groove under the Viking version so that it does not get caught on the ornamental stitches as it glides over them. This foot is the one I turn to most frequently when I need to see exactly where the needle is in relation to the fabric.
#4: Narrow Zipper Foot
Although I’m aware of other feet that are better recognized for topstitching, I can’t let go of my zipper foot! I use it for zippers, but when I need extremely narrow topstitching, this foot is my go-to.
You can put this foot to the left or right of the needle because it’s a snap-on (which is incredible — changing feet has never been faster!) foot. It’s always possible to keep the bulk of a project like a quilt to one side of the machine and just move the foot to where it’s needed. Here, you can clearly see how the foot holds the cloth in place, allowing me to topstitch right up to the edge.
#5: Pintuck Foot (with Raised Plate)
Everyone should have at least one wacky toe in their shoe collection, I believe. I adore this song, and it’s one of my all-time favorites. The pintuck foot is available in a variety of configurations, including a 3-, 5-, 7-, and even a 9-groove!
A raised seam plate and a twin needle (the strange forked connection shown) are two essential tools for perfect pintucking. Using the pintuck foot and raised guide, you may achieve a more detailed pintuck by scrunching the fabric as the pintucks move through the grooves in the foot.
Simple tasks benefit greatly from the addition of this flourish. The front of a bag or plain blocks can be given a dimensional element by using this technique, even if you don’t generally embroider much. A grid can be pintucked! If you’re going to be doing a lot of pintucking, my recommendation is to do it first and then cut it down to size. Pintucking shrinks your pieces, but it doesn’t require a lot of cloth.
#6: Joining Foot
Similar to the Edge Guide Foot but with the needle positioned in the center, this foot has a guide in place. When sewing in the ditch, I use this foot to put together scraps of batting so that I may create larger pieces for projects. Batting practice will no longer be a waste of time. I used to stitch bindings by machine with this foot, but now I prefer foot #7.
#7: Left Topstitch Foot
I’ll admit that this foot is new to me, but now that I know what it can accomplish, I’ll be using it a lot more often. Using this foot, I was able to complete the binding of nine quilts in the month of January.
This is a difficult-to-photograph foot, so bear with me. The bottom of the foot is not flat. As seen from the front, the right foot is elevated more than the left. As a result, the foot sits on a little shelf, preventing fabric distortions while stitching on various fabrics of varying thicknesses.
These days, I finish my bindings with a narrow zigzag stitch, but I’ve been experimenting with a straight stitch finish as well. This used to be such a pain, but after using this foot for a while, I’m starting to feel more comfortable with it. Take a look at that neat little stitch there!
A Quick Guide to Your Sewing Machine Presser Feet
Xem thêm : How To Replace Spool Pin On Brother Sewing Machine? Comprehensive Guide
Learn more about the numerous types of foot attachments for your sewing machine here, including the different types and how to tell if a certain foot will work with your machine.
To get you thinking about what you might be able to do with a new presser foot for your sewing machine, here is a quick article about various presser feet.
Evenfeed Walking Foot
One of the most commonly used feet for sewing many layers of fabric together is the “walking foot.” Machine quilting and attaching bindings are the best ways to achieve this goal.
Large patterns like checks, stripes, and plaids can also be easily matched because to this tool’s ease of use. Using a walking foot when stitching on the bias or with “fluid” fabrics like silks and satins will result in a smoother finish.
Attaching the walking foot is made simple with the help of this tutorial (same method applies to other screw-on feet).
Adjustable Binding Foot
“Universal Adjustable Tape / Bias Binding Foot” is the full name of the product. Adjust the foot with the settings to fit different binding widths.
To place bindings around the edge of the fabric (sometimes in a different color, or even a different weight / type), this foot is a VERY specialized tool.
Using this foot ensures that your binding is always tidy and professional-looking, without the need for any hand tacking or excessive pinning;
1/4″ or Quarter Inch Foot
This quarter-inch foot, sometimes known as a “Patchwork Foot,” features a built-in guide to keep your fabric in line… a 1/4-inch (or 6.3mm) seam allowance every time, no matter how fast you stitch!
For curved edges like armholes and collars, a 1/4″ (or 6.3mm) seam allowance is ideal in dressmaking. Additionally, it is quite easy to get clean and precise results every time.
Making fabric purses and caps with an iron-on interfacing necessitates a narrower seam, which is easy to achieve with this foot. To make fabric dolls, “softies,” or teddy bears, this is a useful tool.
Free-Motion Darning Foot
To avoid using the feed dog by dropping or covering it, this foot is sometimes called a “Stippling Foot” or a “Free-Motion Embroidery Foot.”
Between stitches, there is no touch between your quilt and the machine. This allows you to quilt or embroider any type of curve.
This foot is essential for free-hand machine quilting, often known as “stippling,” if you’re a quilter. Make sure to check out the Darning Foot “Open Toe” variant for enhanced visibility.
Open Toe Applique Foot
“Open Toe Embroidery Foot” is another name for it (there is a snap-on version too). Stitching area is big enough to provide maximal stitch width without sacrificing control; it includes an open front for enhanced sewing view.
The rectangular depression on the foot’s bottom makes it ideal for applique since it prevents satin or blanket stitching from dragging.
The toes of the foot are shorter, compared to a regular zigzag foot. This makes it easier for those who would like to try machine embroidery before completely going free-hand on the darning foot (kinda like a training wheel for learning machine embroidery… if you like).
Roller Foot for Denim / Velvet / Leather
When compared to a normal zigzag foot, the toes of this one are shorter. This makes it simpler for people who want to attempt machine embroidery before going free-hand on the darning foot (kind of like a training wheel for learning machine embroidery… if you like).
Sewing Machine with Rollers In order to avoid the upper layer from slipping or puckering or jamming under the foot, the presser foot (and the more popular snap-on version) rotates to feed the upper layer together with the lower layer. Suitable for use with denim, velvet, or leather.
Adjustable Blind Hem Foot
To ensure that your blind hem is always neat and gives your garment that tailored-finish without having to painstakingly hand finish it, you may use this foot.
Your sewing machine’s blind stitch makes it easy to create professional-looking seams in a matter of minutes. Knowing how to do this is a piece of cake.
You’ll save a lot of money on alterations if you have this foot and know how to use it.
Super Slim Zipper Foot
The form and size of this foot make it easier to insert zippers, press-studs (or “snap”) tape, and stitch pipings and other trims, unlike the squarish, broader snap-on zipper foot that frequently comes with your sewing machine.
“The bump” (the zipper teeth or piping cord) is what this foot does, and it does it while still keeping your fabric in place so you don’t have to worry about losing control or breaking needles.
Ultra Glide Teflon Foot
Teflon on the sole of this foot makes it glide over sticky rubbery textiles that “grip” or anything else that is difficult for a metal foot to deal with.
Designed to keep fabrics like leather and vinyl / oil-cloth from getting stuck to the bottom of the foot and the sewing machine foot plate, this foot is a must-have for any machine that sews with leather or suede.
Straight stitch / zigzag / all-purpose foot shape is the same for this foot, thus you can use it in any situation.
Button Sewing Foot
Is it time consuming to sew buttons on by hand?
That much is undeniable.
With this foot, you can now use your sewing machine to stitch buttons onto almost any clothing. Yay!
Imagine how much time you’ll save with this foot if you’re constructing a shirt-dress with button-through features!
Button Hole Foot
Buttonhole markings aren’t necessary with this foot; instead, utilize the red measures to create the right size buttonhole, whether it’s corded or not.
Feeding your fabric is made easier by the underside grips of the foot.
The foot’s movable structure improves fabric guidance while sewing buttonholes.
When using a basic machine without automatic button hole functions, the red marker (slide) makes it very simple to create identical buttonholes.
All-Purpose Foot
Because it’s so versatile, the “All-Purpose” foot is the one you should keep on your machine for everyday stitching.
Straight stitch and zigzag may be done with this foot in practically any situation. And this implies that you’ll be able to sew just about anything you can think of!
Cording Foot
One to three cord lengths can be placed in place using this foot.
Xem thêm : How Do You Control A Foot Pedal On A Sewing Machine?
This foot is so simple to use that you can use it to embellish cushions, clothing, or anything else you can think of.
To create a one-of-a-kind piece, experiment with different threads, cords, and fabrics. Enjoy yourselves…
Gathering Foot
Use this foot to quickly and easily attach a gathered edge to an ungathered flat cloth while also lightly gathering the fabric.
You can use a gathering foot to softly ease or slightly gather fabric for numerous garment and home decoration uses.
It’s preferable to use a “ruffler” if you want to create larger / heavier gathers or ruffles.
Narrow Hem Foot
You’ll be able to give your creations a unique finish with this foot, which creates attractive thin rolled hems on lightweight fabric that would be hard to achieve by hand.
Before beginning, test your fabric, thread, and needle to ensure that your thin hem will look as professional as possible, just as you would with any other specialty finish.
Clear Zigzag Foot
To ensure a flawless feed when sewing heavy weight materials, this flexible foot may be used for a variety of stitches, including straight stitch, zig zag, and satin.
You may also use it for applique, embroidery, cutwork, and monogramming with this foot.
When working with complicated motifs or delicate laces, being clear gives you the best visibility and control.
Low Shank Snap-on Foot Adaptor
“Snap-On” or “Clip-On” presser foot are the most common in sewing machine supply kits. If you bought a new machine, it would already have one of these.
In the event that you misplace your original after removing it to put on a “screw-on” foot such as your walking foot or darning foot, this one serves as a fallback.
If you don’t have an adaptor, you can’t use any of your sewing machine’s snap-on feet, which includes the majority of them.
Can you live without one?
“Snap-On” feet are almost always included with your sewing machine.
The “Screw-On” type is replaced by our “Satin Stitch / ZigZag” Foot, Overedge Foot, and our Quarter 1/4 inch Foot” (your Walking Foot, Darning Foot and Binding Foot belongs to this group, so is your ruffler).
Would this Presser Foot be right for my machine?
This means that some feet can be attached to your machine by simply “snapping-on” or “clipping-on.” All machines that accept a snap-on foot can use this type of foot.
Then there are the “screw-on” feet.” The “Shank Height” of your machine must be taken into consideration because there are two options:
Low Shank & High Shank – what’s the difference?
High-Shank (left) Anatomy of a Short Shank (right)
Low shanks are common in home machines. Our low shank presser feet are sold at a rate of around ten per high shank foot.
Because of this, if you don’t know what type of shank your machine has, it’s probably a low shank. People that invest in “fancy” embroidering devices like High Shank machines prefer to know exactly what shank type they’re dealing with.
samsung’s certification body
A clip-on (or snap-on) foot allows you to have a wide range of options without having to worry about the shank type of your machine.
Hope this answers any questions you had about sewing machine feet!
Sewing machine kinds and how to check if a foot will fit are explained in more detail in this tutorial:
If so, can I use it on my machine?
For more “Behind the Scenes” information, check out THIS:
Presser Feet Don’t All Have to Be Created Equal
Now that you know how to detect if a foot is compatible with your machine, which foot would you like to check out?
FAQs
What are the different feet on a sewing machine for?
The most basic are the all-purpose, zipper, embroidery, and buttonhole sewing feet. You can put your money into other companies that have a special focus. Having the right foot on the machine makes it easier to get the best possible outcome for the task at hand.
What does this presser foot do?
With a presser foot, you can keep the cloth flat as you feed it through a sewing machine and stitch it.
What is a straight stitch foot used for?
The straight stitch foot is most commonly used on fine or heavy textiles, respectively. A rounded needle hole and a flat underside make this foot ideal for equal pressure on the feed dogs, while the flat underside helps prevent skipped stitches and puckering.
Are all sewing machine feet universal?
All universal snap-on feet can be used on high shank machines if a high shank adaptor is utilized. The knit foot, which has a portion of the foot meant to rest over the needle bar, may be the lone exception to this rule. Whether or if this lines up will be determined by the particulars of your computer.
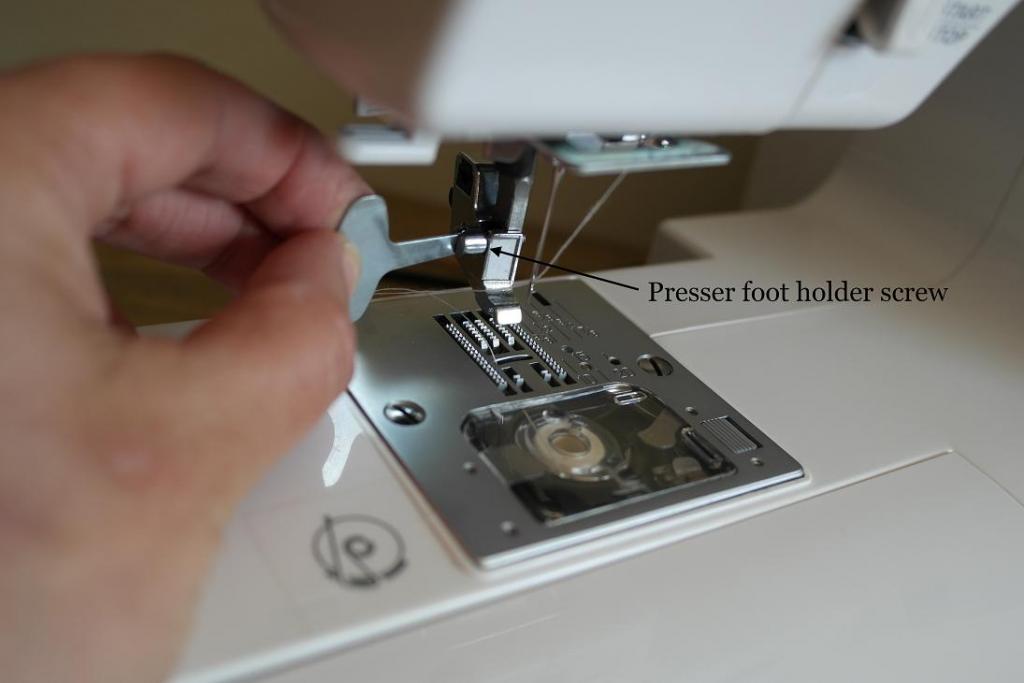
Why does my presser foot keep falling off?
Ensure that the presser foot holder screw is tightly tightened to prevent the presser foot holder from falling off and causing the needle to bend or break. Faulty thread tension can be caused by incorrect installation of the presser foot holder.
How do I adjust the pressure on my presser foot?
You may alter the presser foot’s pressure by turning the dial on the back of the machine. There are four degrees of presser foot pressure to choose from (between 1 and 4). – The greater the setting, the more intense the pressure is applied. Thick fabrics should be set to 1 or 2, whereas thin fabrics should be set to 3 or 4.
Conclusion
That’s all there is to it! As simple as adjusting the sewing machine’s bar with the holders, you’ve just learnt to walk on it.
Once the foot holders have been removed, the connection will click into place securely. Older sewing machines may include foot kinds that require insertion and removal.
We hope this was easy to understand. If you have any questions or concerns, please feel free to contact us.
Nguồn: https://spasifikmag.com
Danh mục: Sewing Tips


