The price of a Western electric sewing machine varies greatly from one seller to the next. The reason for this is because we discovered that these devices are exclusively available on eBay, where they sell for between $50 and $100. If you’d like a better idea of what to expect, please read on.
You can also check out this guide on buying a sewing machine for more information. It explains what to look for in a machine to ensure that you get the best one for your needs.
Bạn đang xem: How Much For A Western Electric Sewing Machine? A Must Read!
How Much Is A Western Electric Sewing Machine?
Because it’s an antique sewing machine, it’s difficult to locate a Western Electric. As a result, you need to check out internet marketplaces like eBay to find bargains. Even so, finding a Western electric sewing machine before it is sold will be difficult.
The most important step is to thoroughly review the seller’s description and images. If you’re buying something used, you have the right to ask the seller as many questions as you like. If you’ve done your homework on the model you’re considering, you’ll have a better idea of what questions to ask.
The challenge with buying an antique sewing machine
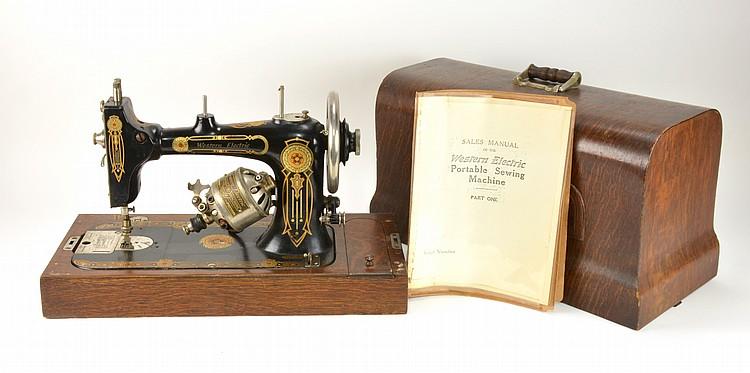
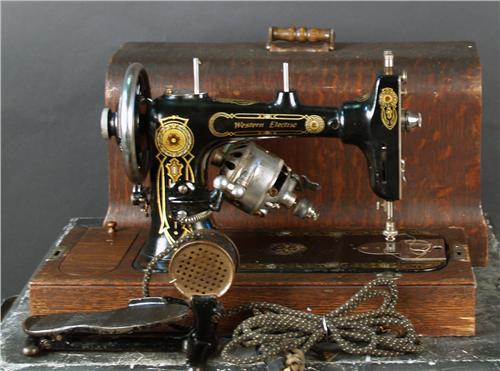
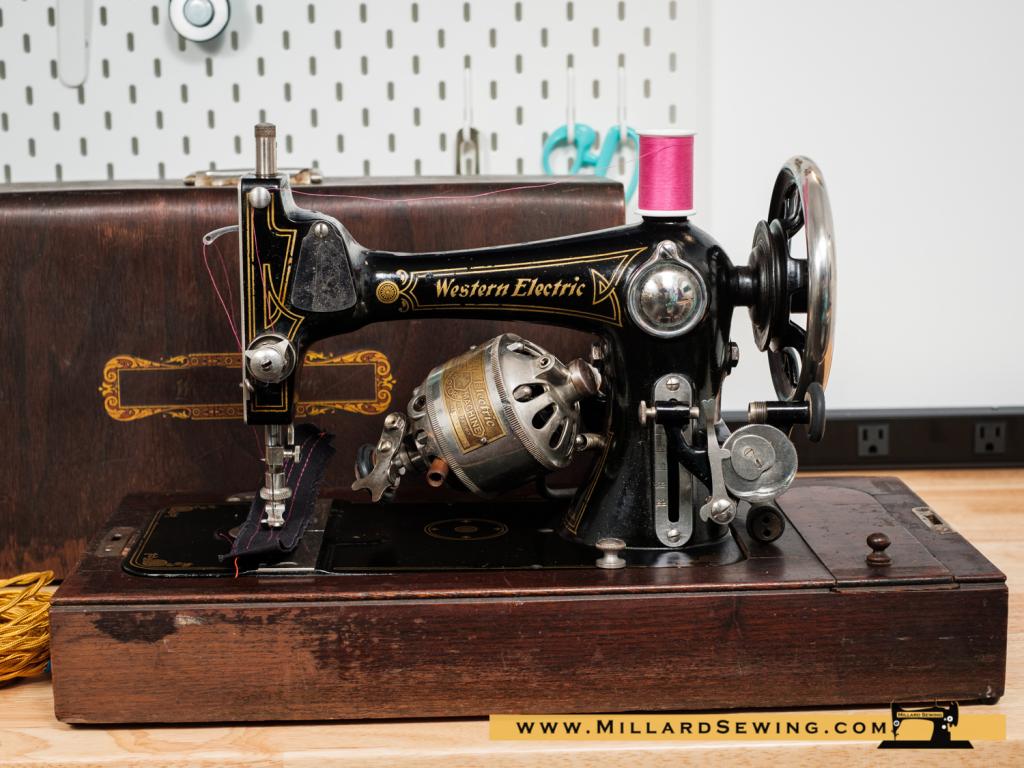
On eBay, you can get Western electric sewing machines for as little as $38 to as much as $125. The Sew E-Z Motor model with serial number 2987715 is an ancient Western electric sewing machine with the lowest price. The wood has been damaged, the drawer will not open, and the cord needs to be replaced, all for a low price.
Another $125 Western electric sewing machine is available on eBay. The seller claims that it is a working treadle sewing machine with a working light and engine. He will also include the original cover, the handbook, the bobbin holders, and all the attachments with the sale.
Who Made Western Sewing Machine?
Only the wealthy could afford multiple outfits before the sewing machine was invented. Because they are the only ones who can afford hand-sewn customized clothing, these garments are regarded a luxury in and of themselves. Sewing machines were first sold by Western Union and Western Electric, which had a strong reputation in the telegraph sector and were linked to the American Telephone and Telegraph Company.
For this reason only were these machines branded with Western Electric decals by the National Sewing Machine Company in Belvidere, Illinois. However, the sewing machines’ electric motors are built by Western Electric, thus they can be given credit as well. Sadly, the machine was only in use for a short time until it was destroyed in 1918.
What Is A Reasonable Price For An Antique Sewing Machine?
There is a wide range of prices to be expected when purchasing an antique sewing machine. $100 is a fair starting point, but there are other factors to consider. An extremely uncommon antique sewing machine is unlikely to be as inexpensive as a more common antique sewing machine.
When purchasing an antique sewing machine, here are some helpful hints:
- To find out how much your sewing machine is worth, talk to an antique shop as if you were trying to sell it.
- There are some dealers that sell their vintage sewing machines at inflated costs in markets, so be cautious while making a hasty purchase.
- You should always study the description and listing of the antique sewing machine carefully, but be mindful of any mistakes and deceptive information.
- Because some internet auctions are meant to entice buyers with price predictions, be careful.
- If you don’t mind paying extra for a professional value of the sewing machine, do so.
- decreased market value for refinished antique sewing machines
How Much Does An Average Sewing Machine Cost?
Sewing machines can cost anything from $60 to upwards of $5,000. Mechanical sewing machines cost less than $100, whereas computerized and electronic ones can cost upwards of $150. Learn how a sewing machine works to gain an idea of what to expect from a common sewing machine before making a purchase decision.
Please consider spending on a quality model rather than something cheaper that might also not last as long. Expect to pay at least $150, but expect to pay $1,000 or more for an industrial or professional-grade product from a well-known brand. It’s possible to get started with an inexpensive sewing machine for $60, so that your youngster can get used to it before you invest in anything more expensive.
What Is The Most Expensive Sewing Machine?
The 10 Best Sewing Machines for All Skill Levels
Instead of saving a few dollars by buying a less expensive model, think about investing in a higher-quality model that will likely last longer. Expect to pay at least $150, but expect to pay $1,000 or more for an industrial or professional-grade product from a well-known manufacturer. When purchasing a sewing machine for your child, you can start with a $60 model so that they can have a feel for the machine before you invest in a more expensive model.
As the top selection, the SINGER 7258 features a well-known brand, 100 stitches, multiple buttonhole designs, and a comprehensive accessory set for sewists of all skill levels.
The best sewing machines are listed here.
In our opinion, these are the best products on the market.
Best Overall : Singer Stylist 7258 Sewing Machine
There are 100 stitch options, six buttonhole options, eight included feet, and a drop-in bobbin type on this machine, which weighs 14.6 pounds.
What We’re Into
- Six buttonholes are included in the 100 stitch possibilities.
- Stitch parameters are automatically recalculated.
- Needle programmability
- Stitch selection is a breeze.
- Owner’s training is available online.
Xem thêm : How To Thread A Babylock Sewing Machine?
What We Hate About It
- With no hardcover
Regardless of whether you’re a novice or an expert sewer, the Singer 7258 is a great choice. There are 100 distinct stitches included in the computerized model, which is created by a well-known sewing machine manufacturer. These stitches range from basic zigzags to more sophisticated ornamental stitches. This sewing machine’s automatic stitch length, width, and tension adjustment was a big hit with us during testing, but you can also alter these settings manually if necessary.
The Singer sewing machine comes with eight different presser feet, including a general purpose foot, a zipper foot, a blind hem foot, and a buttonhole foot. Buttonholes can be made in six different ways with the machine, including the traditional bartack form, the round end, and the keyhole. If you’re looking for a buttonhole machine that’s easy to use, you’ll be pleased to know that the brand offers online video materials and an owner’s class to teach you through the many functionalities of the machine.
In addition, there are a number of additional notable aspects. You may choose whether the needle stops in the up or down position when you use the Singer 7258’s built-in needle threader and programmable needle. It also includes a free arm and a mechanical speed control. If you want a hard cover to safeguard your investment, you’ll have to buy one separately from the machine. This is our one genuine gripe. As a solid and reasonably priced solution, this sewing machine will appeal to both newbie and experienced crafters alike.
Best Budget: Janome Easy to Use Sewing Machine
There are 15 stitch options, 1 buttonhole option, 4 included feet, and a front-loading bobbin with dimensions of 16 x 7 x 12 inches and a weight of 12 pounds.
What We’re Into
- In a variety of hues
- One buttonhole and 15 basic stitches.
- Adapts to any type of thread.
- On-screen instructions for loading bobbins onto the machine.
Xem thêm : How To Thread A Babylock Sewing Machine?
What We Hate About It
- Threading a needle by hand
- There is no thread cutter.
If you’re a beginner sewer or just want a machine that can do the basics, the Janome Easy to Use Sewing Machine is an excellent choice. There are dials on the front of the machine that allow you to manually change the stitch length and tension. The machine has 15 distinct stitch possibilities and one four-step buttonhole. It’s also available in an array of vibrant hues, in case you forgot. You won’t regret adding it to your sewing area.
There are two retractable spool pins on the top of the Janome Sewing Machine, and it is capable of handling all sorts of thread including huge thread cones. If you’re new to sewing, this machine offers an easy-to-follow loading guide in the bobbin compartment, making it ideal for novices. The machine comes with four different presser foot, including ones for zippers and blind jewels, and a retractable storage section allows you access to a free arm. Apart from that, you’ll need to thread your own needles and cut your threads by hand. There is no automatic needle threader or thread cutter, however.
Best Splurge: Bernette B77 Sewing and Quilting Machine
There are 500 stitch options, 17 buttonhole options, 8 included feet, and a drop-in bobbin type on this electronic machine that measures 14 x 22 x 17 inches and weighs 32 pounds.
What We’re Into
- A total of 500 stitches, including 17 buttonholes, 133 ornamental options, and 35 quilting possibilities
- Controls can be accessed using a touchscreen.
- Projects requiring multiple layers can benefit from a dual fabric feed.
- Automated securing
- For tasks that require a large amount of throat space.
Xem thêm : How To Thread A Babylock Sewing Machine?
What We Hate About It
- This is a significant investment.
- Electrical components are covered by a two-year guarantee only.
Xem thêm : How To Stitch In The Ditch With A Sewing Machine? A Few Tips to Remember
The Bernette B77 is an excellent choice for more experienced sewers wishing to make the leap to a higher-end machine. In addition to 500 stitches, this high-end machine has 17 buttonhole options, 133 decorative stitch options, and 35 quilting stitches, as well as a deep throat that can handle thick projects. It also features a touchscreen interface. This machine is up to the task of everything you put at it, whether it’s sewing clothes, quilting, or doing crafts.
This sewing machine has a 5-inch color touchscreen for selecting and optimizing stitch length and breadth, but it also has knobs on the front for doing so. With its built-in dual feed, commonly known as a walking foot, it guarantees that your material is supplied evenly from both the top and the bottom of the printer bed. To avoid puckering, this function is great for stitching multiple layers of fabric or fine fabrics. An automatic tie-off/thread cutter, as well as the ability to configure foot control with a back-kick, are also notable features.
Although this sewing machine comes with a 10-year warranty on the materials and workmanship, only a 2-year warranty is offered on the electrical components. It’s also more expensive to fix because of the touchscreen’s high-tech nature.
Best Heavy-Duty: Sailrite Ultrafeed LS-1 BASIC Walking Foot Sewing Machine
There are 1 stitch options, and no buttonhole options. Feet are included and the bobbin is a drop-in type. The machine weighs 47 pounds and is 17.38 by 15 by 14.6 inches.
What We’re Into
- Thick fabrics like canvas, denim, leather, and more can be sewn with this machine
- system with two feeds
- A lever with a spring-loaded action that can be used to change directions.
- consists of a wooden frame
Xem thêm : How To Thread A Babylock Sewing Machine?
What We Hate About It
- Tension adjustment has a steep learning curve.
- With only one thread,
The Sailrite Ultrafeed LS-1 sewing machine is ideal for heavy-duty applications. You can upgrade to the Sailrite Ultrafeed LSZ-1 if you want the ability to generate zigzag stitches. However, this sewing machine is unrivaled in terms of durability, and it is capable of sewing up to 10 layers of canvas at the same time.
Mechanical walking presser feet feed fabric evenly through the Sailrite Sewing Machine and a spring-loaded lever makes it quick and easy to change the sewing direction. A built-in welting tunnel and an offset needle on the presser foot allow you to sew zippers without having to switch feet. You’ll also get an accessory kit that includes a thread stand and bobbins, in addition to the sewing machine itself.
To become used to the tension setting on this sewing machine, it may take some time. Additional accessories, such as a binder attachment or different presser foot, can extend the machine’s versatility, although these tools can be pricey.
Best Portable: Magicfly Portable Sewing Machine
There are 12 stitch options, 1 buttonhole option, and 3 feet included in the package. The machine weighs 7.4 pounds and is 10.8 by 4.5 by 10.2 inches.
What We’re Into
- Budget-friendly
- Lightweight and compact
- There are two potential sources of power.
Xem thêm : How To Thread A Babylock Sewing Machine?
What We Hate About It
- Thin fabrics should be avoided.
- Insufficiently feeds cloth
With the Magicfly Portable Sewing Machine, you can carry your sewing with you everywhere you go. While this sewing machine is small enough to fit in your suitcase, it also comes with two power options, allowing you to either connect the machine to an outlet or use four AAA batteries. We recommend this option to everyone who wants to sew when disconnected from the Internet.
The Magicfly’s design is straightforward, with only 12 basic stitches and three presser foot for working with buttons and zippers. The machine comes with an extension kit and three needles to accommodate a variety of fabric thicknesses, but the manufacturer cautions that the machine will not function well with thin or soft fabrics. There is a threading guide that is printed right on the body of the machine that is beneficial for beginners, but bear in mind that it doesn’t feed your fabric.
Best for Quilting: Singer 7285Q Patchwork Quilting Machine
It is an electronic sewing machine that measures 14.5 x 7 x 12 inches and weighs 14.6 pounds. There are 100 stitch options, six buttonhole options, and 11 feet included.
What We’re Into
- Good value for your money.
- Six buttonholes and 100 stitches
- Presser feet for quilting are included.
- Included is a fold-out extension desk.
Xem thêm : How To Thread A Babylock Sewing Machine?
What We Hate About It
- There isn’t enough light.
- There is room for improvement in the throat
It’s important to seek for a sewing machine with customizable stitch settings, various presser foot, and a wide throat capacity if you intend to use it for quilting. If you’re a quilter, the Singer 7285Q Patchwork Quilting Machine has all the features you need. It has 11 presser feet, including a quarter-inch foot, a walking foot, a satin stitch foot, and a darning/embroidery foot, as well as 100 stitch options. It also has an extra-high presser foot lifter to suit thick fabrics.
Stitch length and breadth can be adjusted, as well as the maximum sewing speed, using the LCD panel on the machine. For larger tasks, the machine includes an extension table and the needle may be set to stop in either the up or down position. Additionally, the Singer 7285Q includes six buttonhole options, a tie-off button, and high-speed stitching of up to 750 stitches per minute when you’re working on other sewing projects.
If you’re a quilter, you’ll love this Singer sewing machine, but there are a few drawbacks. When working, you’ll probably want to use an external light source because the device’s built-in illumination isn’t the best. Its throat is 5.5 inches wide, which is ideal for most jobs but might be a touch constricting when working on larger quilts.
According to Our Experts
“Quilting requires a sewing machine with a wide range of settings so that you may choose the type of stitch you want, the tension of the string, and the distance of the needle. In order to perform many sophisticated stitches, you’ll also need the ability to shift feet. As an amateur quilter, Kate Ellsworth –
Best for Making Clothes: Janome 4120QDC Computerized Sewing Machine
Stitch Options: 120 | Buttonhole Options: 7 | Feet Included: 7 | Bobbin Type: Drop-in | Dimensions: 19.8 x 12 x 16 inches | Weight: 22.4 pounds
What We’re Into
- A total of 120 different stitch patterns and seven distinct buttonhole designs are available.
- Large, easy-to-read display
- Having a free arm for tiny spaces
- Included are seven feet for pressing.
- able to recall stitching patterns from experience
Xem thêm : How To Thread A Babylock Sewing Machine?
What We Hate About It
- Adjustment of the thread tension is performed by hand.
The Janome 4120QDC sewing machine is an excellent choice for folks who enjoy making their own apparel. 120 stitches include alphabet fonts in American, European and Cyrillic as well as seven presser feet—basically everything you need to make stunning handcrafted clothing —and the machine comes with seven presser feet.
With a touchpad on the side for simple navigation, this sewing machine has an LCD screen. When you need to sew small gaps, you may remove the storage container and use the machine as a free arm, and the Superior Plus Feed system produces more equal stitching. In addition to stitch patterns, the machine can remember whether the needle should stop in the up or down position. Although the machine does not automatically adjust tension when you swap stitches, depending on your skill level, this may not be a problem.
According to Our Experts
An entry-level machine with possibly one or two more features is best for a beginner. A machine that can do buttonholes is a fantastic investment if you’re going to be sewing clothes. — Stitch Clinic’s Marissa Lakir
Best for Beginners: Brother XM2701 Sewing Machine
There are 27 stitch options, one buttonhole option, six feet included, and a drop-in bobbin type on this manual machine. It measures 12.1 inches by 5.9 inches by 15.3 inches and weighs 12.6 pounds.
What We’re Into
- There are a total of 27 different stitch types to choose from.
- Portable and light in weight
- bobbins that are resistant against jams
- For lesser projects, you can use your own muscle.
- a guarantee of twenty-five years
Xem thêm : How To Thread A Babylock Sewing Machine?
What We Hate About It
- The contents of the storage chamber spill out.
- Unsuited to large-scale tasks
If you’re in the market for your first sewing machine, look no further than the Brother XM2701. In spite of the fact that this isn’t an inexpensive option, it’s great for novices because of its limited stitch variety and simple operation. A simple-to-use machine with essential features like a jam-resistant bobbin, automated needle threader, and an auto-size buttonhole impressed us throughout testing.
An easy-to-follow threading diagram is included on this machine to help you set up the machine’s stitch settings. An easy-to-access free arm is perfect for sewing through small openings like those on the sleeves or legs of clothing. The machine’s top controls let you to fine-tune the stitch length and tension. Because of its small size, this sewing machine isn’t the greatest choice for huge tasks like quilts. Additionally, our tester found that the storage box was prone to accessories falling out.
Best for Embroidery: Brother SE1900 Sewing and Embroidery Machine
Stitch Options: 240; 138 embroidery designs; 11 fonts; Buttonhole Options: 10; Feet Included: 8; Bobbin Type: Drop-in Dimensions: 23.19 x 13.43 x 11.54 inches; 22.1 pounds
What We’re Into
- Fonts and stitch patterns totaling 138 for embroidery
- embroidery area of 5 x 7″
- Designs can be previewed in color using a touchscreen.
- My Personal Stitching Design
- a guarantee of twenty-five years
Xem thêm : How To Thread A Babylock Sewing Machine?
What We Hate About It
- Expensive
- Flash drives aren’t all created equal.
This sewing and embroidery machine from Brother isn’t inexpensive, but if you want to create beautiful embroidered items, you should consider it. 138 embroidery designs and 11 fonts are included with this machine’s 5 x 7-inch embroidery area. A built-in memory allows you to load new patterns and the touchscreen allows you to change the size, color, and orientation of your motifs.
Other than embroidery, this sewing machine offers 240 stitches and eight presser foot, which include buttons, zippers, overcasting and blind stitching as well as other features. The machine comes with a knee lifter and an automatic needle threader, as well as the option to design your own unique sewing stitches. The computer has a tendency to reject certain flash drives, necessitating a reformat. But if you can find a device that works with the machine, you shouldn’t run into any problems. [*]
Best Serger: Brother Serger 1034D Heavy-Duty Metal Frame Overlock Machine
It is a manual machine with dimensions of 10.98 x 11.73×13.19 inches and a weight of 13.45 pounds. There are 22 stitch options and three feet included. The bobbin type is not specified.
What We’re Into
- A total of 22 stitches
- Stitching aides in different colors
- Uses the same needles as a sewing machine.
- The free arm is also included.
Xem thêm : How To Thread A Babylock Sewing Machine?
What We Hate About It
- It does not contain a hard case
- There is no thread cutter.
The Brother 1034D Serger has a maximum stitching speed of 1,300 threads per minute, making it ideal for sewing seams in a jiffy. In addition to the rolled, ribbon lock, and thin hems that can be made with the machine’s three supplied presser feet, you can also accomplish blind hemming, pin tucks, and flat-lock hems with the purchase of additional feet.
When sewing denim or other thick fabrics, this serger has a sturdy metal frame and can withstand numerous layers of the material. Stitch width and thread tension can be adjusted according to your project with the help of a color-coded upper thread guide. You can remove the free arm for stitching cuffs, and the machine uses ordinary sewing machine needles so you don’t need to purchase specialised ones. In terms of disadvantages, the serger does not come with a sturdy case and does not have a built-in thread cutter, so you’ll need to have your scissors close at hand.
Final Verdict
The SINGER 7258 Sewing & Quilting Machine is an excellent choice for your sewing needs, regardless of your ability level. It has a built-in needle threader, free arm, and automated stitch adjustment in addition to 100 stitches, six buttonhole options, and eight presser feet. All of this, and it’s surprisingly affordable. With 15 basic stitches and one buttonhole option and numerous vibrant colors to select from, the Janome Easy to Use Sewing Machine (see at Joann) is a great entry-level option for sewing basics.
What Are the 3 Types of Sewing Machines?
Three primary types of current sewing machines are all powered by electricity, although they differ in other aspects:
- Sewing machines that are operated by hand. Manual sewing machines employ knobs and levers to set stitch lengths and widths, making them the most affordable.
- Sewing machines that use computers. Stitch lengths and widths can be determined by pressing a button on an electronic machine.
- Sewing machines that are controlled by computers. A touch-screen interface on computerized machines determines stitches, making them the most expensive and complicated machines available. Memory cards are now available for computerized sewing machines, allowing you to save and download stitches and patterns.
11 Sewing Machine Parts and Their Functions
Your sewing machine’s parts must be studied in order to understand how it functions properly. Despite the fact that each machine is unique, the essential components are the same and serve the same job across the majority of them.
- The power switch and the cord. To power the machine, every sewing machine has an on/off switch and an electrical cord attached to the back.
- A foot pedal. You can stitch a line in a short amount of time by pressing hard on the foot pedal; by pressing lightly, the needle moves more slowly and takes longer to stitch one line. The foot pedal controls how rapidly your machine operates. The cord that connects the foot pedal to your sewing machine is used to operate it.
- Needle. To sew, you need a needle, which is the portion of the sewing machine that guides the top thread through the fabric. In most sewing machines, you’ll be able to switch needles at any time.
- The spoolpin. For threading the needle, a pin or spindle at the top of the sewing machine holds the spool in place while you operate the machine.
- Using a foot pedal In order to keep the fabric in place, you lower the presser foot onto the fabric with a lever.
- Case for bobbins There’s a bobbin container under the needle and presser foot where you stash a bobbin, a tiny spool of thread for sewing projects. Stitching machines use bobbins to provide lower threads for your stitch, which are used by a bobbin driver to secure the upper threads in place when the needle punctures fabric. It’s common for bobbin cases to come with bobbin winders, which make it easier to wind thread onto bobbins.
- Knob for adjusting the needle’s location. Your sewing machine will feature a hand wheel or button that you can use to manually adjust the needle’s height (for example, when you wish to remove your cloth).
- Button with reverse stitching. When you step on the foot pedal, your machine will begin stitching. There will be a button on your sewing machine that allows you to reverse the direction of your stitching, for example, to finish the end of a line and prevent it from unraveling.
- Knob with a stitched appearance. From straight stitch to zig-zag stitch, most sewing machines offer numerous stitch options for you to choose from. Computerized equipment will have a touch-screen display, whereas manual ones will use a knob.
- Knob with a stitch-length. This knob determines how far your needle may travel before piercing the fabric again—long stitches indicate fewer holes, while short ones result in more close-packed holes. (When using a computerized machine, you can select the stitch pattern on the screen.)
- A stitch-width wheel. If you’re using zig-zag stitches, the stitch-width wheel can be turned up to give you a wider stitch, but if you’re using straight stitches, the stitch-width wheel should be set to zero. (The stitch width can be set via the computer display on machines that are computerized.)
How to Set up a Sewing Machine
After a few sewing tasks, the first set-up of a sewing machine will become second nature to you, so don’t worry.
- Thread the sewing machine. It’s necessary to thread your sewing machine before you can sew anything. To do this, you’ll need to drag thread from the spool via a series of thread guides and take-up levers or hooks until it reaches the needle’s eye. When threading for the first time, make sure to refer to your machine’s handbook for specific instructions. If you are stuck, search for the little guides and diagrams that are printed on the machine itself. Don’t worry, you’ll get the hang of it after a few tries.
- Load a bobbin with windings. In sewing machines, a bobbin is a second spool of thread that sits beneath the needle. The bobbin must be set in the correct orientation on your machine to unwind properly.
- Take up the slack. As soon as your top thread and bobbin have been properly set up, you are ready to begin sewing by connecting the two. In order to create a loop in the bobbin thread, lower the needle all the way down and then raise it back up again by using your needle position knob or button. When you’re ready to sew, grab both ends of the thread with anything flat, like a ruler, and move them away from the area where you plan to stitch.
How to Use a Sewing Machine
Your sewing machine is ready to go as soon as the machine has been set up. The following is an overview of what you may expect from the process:.
- Check to see if your needle has been elevated. You may use a knob or a button to elevate your needle, depending on your machine.
- Place the fabric where you want it. Lower the presser foot to keep the cloth in position while you sew and set it beneath the needle where you’d like to make your first line of stitches.
- Step on the gas pedal slowly and gently. Pressing the foot pedal begins the stitching process, which can be sped up or slowed down according on your preference.
- Secure the first stitch you’ve made. You should backstitch at the beginning or end of a seam, to keep your stitches from unraveling, to ensure a strong seam. Make a few forward stitches before pressing the button on your machine to reverse (or “lock stitch”), and then press the button again to go ahead.
- Your fabric will thank you. Keep the edge of your cloth aligned with the seam allowance guideline on your machine to stitch a straight line (recommended for beginners). With the help of feed dogs, your sewing machine will do all of the work of stitching the cloth for you.
- Sew a knot in your last stitch. Using your machine’s reverse button, reverse sew the last few stitches of your line to ensure that your seam doesn’t unravel (or lock stitch button, if it has one).
- Raise the presser foot and the needle. Lift the needle and presser foot away from your fabric after you’re done stitching.
- Remove the fabric by sliding it out of the way. When you’re done sewing, remove your fabric by hand. Using scissors or the built-in thread cutter on the side of the needle case, cut the excess thread from both the top spool and the bobbin, if necessary.
What to Look for in a Sewing Machine
Stitch options
When shopping for a sewing machine, the number of stitches available is an important consideration. High-end versions often include hundreds of fancy stitches, whereas entry-level machines may just have one or two simple stitches.
Start with an entry-level model that has only a few simple stitches and see how it goes: The only functions a sewist or quilter needs in a basic sewing machine are a straight stitch, a zigzag stitch, and the ability to reverse stitch.” Lakir adds that “any more features are a plus.” You may want to seek for a sewing machine with decorative stitches, several buttonhole options, and even embroidery capabilities once you’ve moved on to more complex tasks.
Presser feet
In the same way, most sewing machines come with a variety of presser foot, which may be used for a variety of stitching projects. Buttonholes, zippers, and blind hems are all common uses for the basic sewing foot on most machines, although more modern models may include additional speciality feet, such as darning and overstitching choices.
Look at different presser feet based on the types of jobs you expect to work on It’s not a good idea to buy a system just on the basis of how many functions it has, says Lakir. “Determine what you want to sew and then shop for it.”
Type
In today’s market, computerized (or electronic) sewing machines and mechanical/manual machines are the two most common types. Cheryl Hoffman, Manager of Product Education for Brother, adds that “computerized models establish stitch tension automatically and stitch settings are also pre-programmed.” “Each of these settings must be manually modified when using a mechanical machine with each stitch selection. You may spend more time stitching instead of fiddling with the machine’s settings when you use a computerized model. Computerized models, on the other hand, feature more complex internal workings, making repairs more expensive.
Weight
A lightweight sewing machine may only weigh 10 pounds, whereas a heavy-duty machine may weigh up to 25 pounds. Sewing machines that are easy to transport are ideal if you plan on attending sewing classes or retreats. Another benefit of a lighter sewing machine is that it’s easier to transport and store after you’re through using it.
Durability
The sewing machine you choose should be able to handle the weight of the materials you plan to work with. Quilting and upholstery require greater power and thicker needles, and if you don’t have them, you risk damaging your machine’s needles or stitching unevenly.
Local servicing
Sewing machines, like automobiles, require routine maintenance to operate at their best, so check your local area to see if there is an authorized service center. In Lakir’s words, “higher quality brands have their own dealer stores with superior maintenance and repair choices.” Find a local dealer and inquire about their used models; many include sewing lessons in the price of your purchase.
Standout Features
Automatic needle threader
Many people prefer sewing machines with automatic (or at least semi-automatic) needle threaders because the eye of a sewing machine needle is often relatively small. Instead of guiding a thread through the machine’s needle by hand, you simply place the thread in the correct position and the machine does the rest for you. This feature saves you time and effort.
Built-in thread cutter
A built-in thread cutter is a common addition to modern sewing machines. Using a thread cutter is as simple as cutting threads as you go along. Some high-end sewing machines automatically cut the threads, while others have a little blade with which you can manually slice the threads. Either way, it eliminates the need to sew with a pair of scissors.
Hard case
There are many types of storage cases for sewing machines, which help keep your machine clean. A dust bag or soft-sided case will not provide the same level of protection as a hard case. Having a protective case for your sewing machine will allow you to store or travel it more conveniently without fear of it being damaged.
FAQ
How do you thread a sewing machine?
Sewing machines might be difficult to thread, but the technique becomes second nature once you get the swing of things. Put the little spool of yarn under the presser foot on the bobbin and place it in the compartment. The bobbin thread should have arrows pointing in the right direction.
You’ll need to insert your thread spool into the thread pin of your sewing machine and then thread it through the left thread guide. From here, the thread typically needs to go around the U-shaped guide then through the take-up lever. Pull the thread down to the needle’s eye and thread it through there after that. Finally, to catch the bobbin thread, drop the needle all the way down and raise it back up using the needle position knob or button.
Nguồn: https://spasifikmag.com
Danh mục: Sewing Tips


