Do you ever wish you had a way to keep your facets from poking out of your clothing? My name is Nikki, and I’m going to show you how to sew through the ditch with the use of a sewing technique.
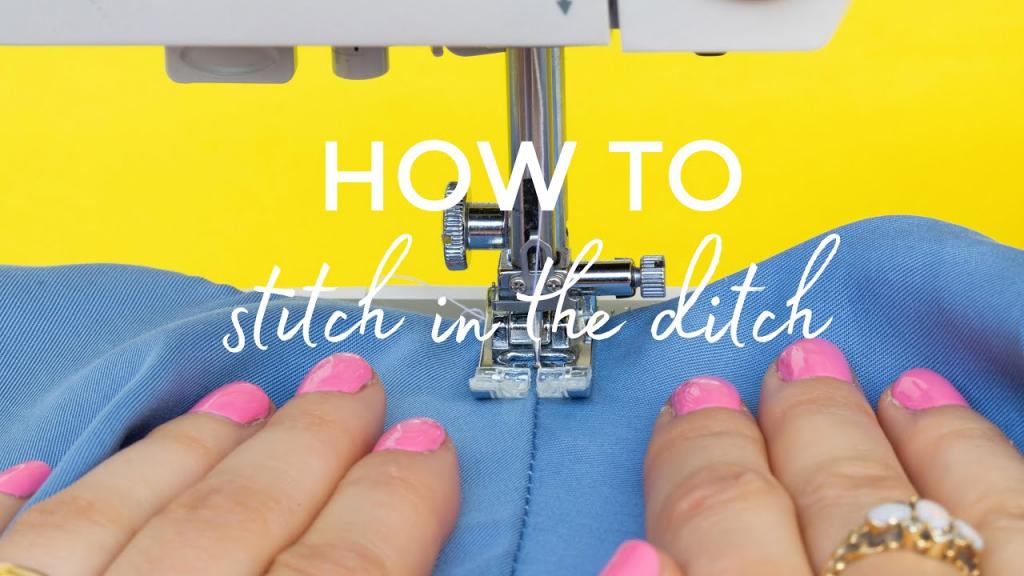
HOW TO STITCH IN THE DITCH
The stitching ditch can be used for three basic purposes.
- Quilts are being completed. If you have a walking foot, you can use this sewing technique to complete your quilt. The quilt is finished with this stitch, which stitches between the batting and the lining to secure the quilt. To describe the indentation that occurs when two separate textiles are sewn together, the phrase “ditch” is used.
- Invisible finishing on any part of the garment, from the neckline to the cuffs to the waistbands. Binding the garment’s edges using stitch in the ditch finishes is an excellent option.
- Through the ditch stitching is used to attach gathered waistbands.
What You’ll Need
Equipment / Tools
- machine for sewing
Materials
- Two different types of fabric that are sewn together
Instructions
Examine the Quilt
Before you begin stitching, create an outline of your stitching by looking at the quilt to decide the direction in which the majority of the seam allowances will be sewn.
Bạn đang xem: How To Stitch In The Ditch With A Sewing Machine? A Few Tips to Remember
Don’t Use That Needle
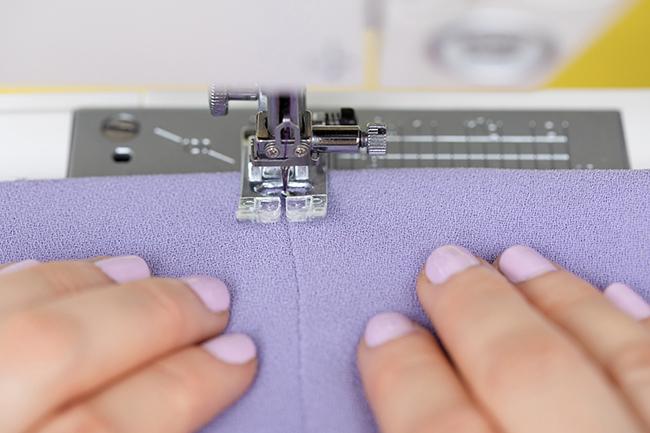
The first step is to place the needle of the sewing machine in the seam of two fabrics that meet. Make sure the thread is above the fabric.
Place the Needle
To choose which side of the seam to set your seam allowance, find the side that is higher than the rest. On the other hand, it’s crucial that stitches slip down on the lower line. You may need to tweak your needle a little to acquire the best possible alignment, depending on the situation.
Stitch a Straight Line
Xem thêm : How To Shorten Curtains Without Cutting Or Sewing? Easy Step-by-step Guide
As you sew, pull the fabrics apart on both sides of the seam to create a slit. Completely sew through the quilt’s top fabric. It’s possible that your seams are uneven. Don’t be alarmed if any of your stitches go over the seam allowance; all that matters is that you sew in a straight, even line.
Sew Additional Quilting Motifs
In some cases, you may need to sew additional machine-stitched lines away from the seams of your patchwork, depending on the size of your quilt. Check the instructions in the quilt’s batts to determine the minimum distance of stitches needed to keep the batting intact while the quilt is being used and washed.
Tip
While sewing, if you are having trouble dividing the fabric, take a break. Once you’ve learned the technique, you’ll be more comfortable with extended quilting sessions. Wearing gloves during quilting can make it easier to maintain control of the quilt.
What Is Stitch In The Ditch?
As a result, ditch stitch is also known as a seam stitch, and it involves stitching straight to or between two pieces of fabric at a seam line. In addition to bindings, this technique is utilized for stitching waistbands and quilting. When sewing a seam within the ditch, the goal is to ensure that the wrong side of the fabric is secured and that visible stitches are not visible on one side of the fabric.
WHY DO YOU STITCH IN THE DITCH?
Why? Invisibility! To make the stitch look like an invisible sewing line, stitch in the ditch is used. In order to ensure that the stitches blend in with the material, they are frequently done using thread of the same color as the cloth.
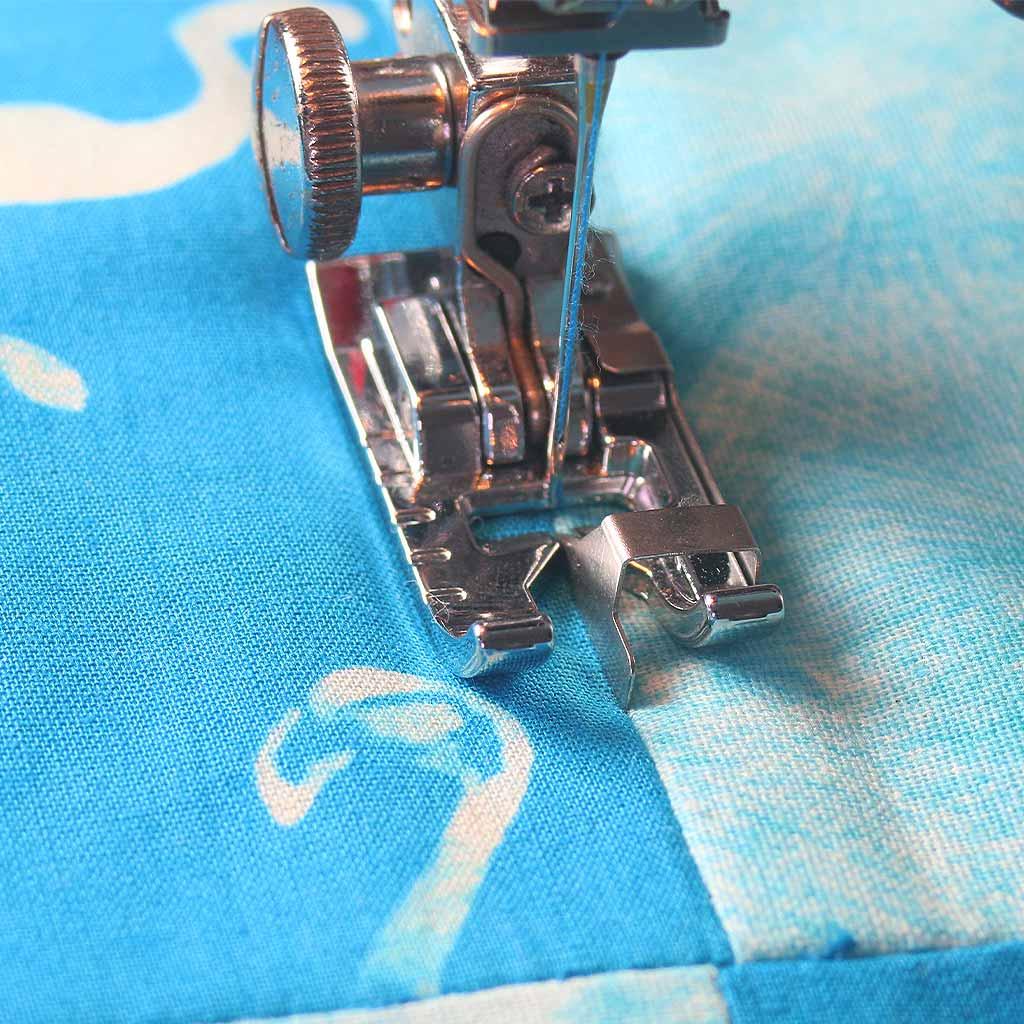
What Foot Do You Use To Stitch In The Ditch?
Xem thêm : What Are The Types Of Sewing Machines? How To Buy A Sewing Machine?
Foot for stitching in the ditch can be found. The “stitch-in-the-ditch” foot is the name given to it. It’s a good investment, especially if you frequently sew the ditch stitch, also known as the edge stitch, because it’s designed to assist you sew precisely within the ditch. A walking foot can also be used to sew a stitch through the ditch, allowing you to control the operation without the risk of dense layers of cloth clumping together.
The ditch can be stitched using a regular sewing foot if you don’t have any special sewing machine feet.
Stitching is used within the foot of the ditch
Topstitching is much easier if you use a stitch-in-the-ditch foot that runs over the seam. However, it may also be used for a variety of other purposes, allowing you to get the most out of your sewing machine foot.
- Understitching completed in a flash and without error.
- Use a double-needle stitch to neaten up your seams.
- two pieces of cloth or lace are joined using this technique.
- To sew zigzag stitches and to hold appliques in place
TIPS TO MAKE DITCH STITCHING A ‘WALK IN THE PARK! ’
- Focus on the ditch, the place where the needle will go through the fabric.
- Secure your stitches at the start and finish of your stitching process.
- When sewing, open the seam slightly so that you may sew into the fold.
- Make use of a smaller needle in order to get into hard-to-reach places.
- Slow and steady wins the race, so begin by taking a stroll down the street. Slow down your car if you’re driving too quickly!
- Take care when working with big and bulky pieces of fabric, such as a large quilt. There is a risk of harm to the needle because of the additional fabric.
STITCH IN THE DITCH – BY HAND
Depending on the thickness of the quilt, it may be required to use a needle to sew the ditch. Thick and spongy quilts can’t go through a conventional pressing foot or machine since they’re too thick and pliable.
Conclusion
That concludes our discussion. Simply stitch your fabric correctly and you’ll be ready to examine how to execute a Stitch in the Ditch with a Sewing Machine. In order to knot quilts, bindings, and waistbands, you’ll need to know how to do a ditch stitch first. For most tasks, a basic stitch-in-the-ditch needle is all that’s needed; however.
Nguồn: https://spasifikmag.com
Danh mục: Sewing Tips


