Cut on the bias is the solution to the issue of what is meant by cutting on the bias in sewing. In the following post, we’ll go into greater detail, including how to cut bias for sewing projects.
Explore our site for more sewing words. Do you, for example, understand the meaning of grainline sewing?
Bạn đang xem: What Does Cut On The Bias Mean In Sewing?
To be able to follow the various sewing patterns, you must be familiar with the words used in the industry.
What Is A Bias In Sewing?
Diagonal grainlines are referred to as biases. Bias really refers to the 45-degree diagonal lines that cross the fabric’s length and cross-grains.
There are two genuine biases perpendicular to each other in each piece of fabric. Because the warp and weft are used interchangeably, it’s important to keep an eye out for them when you’re reading about cloth.
How Do You Cut On The Bias?
- To ensure that the fabric is flat, place it on the mat and cutting table.
- You should ensure that the fabric’s longitudinal and cross-grains are aligned with the selvages.
- Fabric must have a consistent lengthwise grain throughout its length.
- Tape the selvage and horizontal cuts using painter’s tape after adding weights to the material.
- Using a fabric marker, draw a 45-degree angle from the selvage on the cutting mats.
- Use weights to keep the pattern in place on the fabric while you stitch it.
- If you traced a diagonal line, double-check that it is aligned with the pattern’s centerline. When in doubt, tack it down.
- Use a rotary cutter to cut the fabric, being careful not to lift it too much.
- Line up the notches on your notch template with the seam allowance before cutting.
Bias cuts can also be used to form pipes in sewing. When sewing, learn more about piping.
How do you cut bias strips to be bound and pipe
- Make a square out of the fabric you’ve chosen.
- Cut the cloth strips to the desired length at a 45-degree angle.
- While cutting, avoid stretching the material.
- Pin the strips together at right angles.
- Join the raw edges with diagonal seams after aligning the raw edges
- Using a 1/4-inch seam allowance, remove the extra material.
- Make sure that the seams are not obstructed by anything.
If you have a square piece of fabric, you can also use it to make a continuous bias-binding, but it’s more challenging.
How Do You Know If Fabric Is Cut On The Bias?
When the gap between the warp and the weft disappears, it is clear that the fabric was cut on the bias. It’s also noticeably less brittle, thinner, and less prone to fraying than other materials of the same type.
In addition, the material can be draped because of the stretch. As a result, cutting the two biases perpendicular to each other is essential.
Where is the bias grain in fabric?
Crosswise, the selvage is aligned with the grain by folding the selvage at an angle. With the fabric selvage, the bias grain will produce a 45° angle.
Why Do You Cut Fabric On The Bias?
Cutting fabric on the bias in the 20th century could aid in the creation of drapes or curves in clothes. Stretching can also help to draw attention to the body’s best features, resulting in a more attractive appearance. It is common to use bias tape as a finishing touch on projects when the fabric has been cut on the bias.
When it comes to clothing, stitching on the bias might be excellent because of the silky drape and precise finish it provides. As a beginner, use an easy-to-follow pattern and lightweight fabric to make bias cutting more manageable.
Which fabric is ideal to cut in the bias?
Among the best fabrics for cutting on the bias are satin silk and velvet. Fabrics such as crepe and Chiffon are ideal for bias-cutting if you’re looking for a softer, more flowing drape.
Do all materials have a bias?
Cutting on the bias with some materials, such as muslin or microfiber, is not recommended. Canvas, polyester, and other fabrics with an extremely tight weave can be difficult to cut using the bias.
Bias 101
Straight grain vs. bias
Muslin and microfibers aren’t good candidates for bias-cutting. It is difficult to cut bias on canvas, polyester, and other textiles with a tight weave.
By cutting the fabric on the bias, you can create a more ethereal effect. Starting with a stripe, you may also create chevron effects at the seams. A corded piping or bias binding can also be used to contrast the neck edge. Laura White took this picture.
When it comes to woven textiles, grain refers to the direction of the straight and crosswise direction of the threads, with bias running at any angle to these grains, as seen above, and genuine bias running at a 45-degree angle to these grains. They appear softer and more fluid, with greater elasticity and flexibility than garments cut on the lengthwise or crosswise grain. In addition, it seems “thinner” than the same fabric cut on the straight grain when viewed from this angle.
Bias garments need more fabric than the same garment on the straight grain, and are best cut one layer at a time so the grain doesn’t distort. Working on the bias requires a bit more time, a careful selection of fabric, as well as some alternate fitting and sewing techniques, which I’ll explain in detail.
It is recommended to cut one layer at a time to avoid distorting the grain of bias clothes, which require more fabric. Some more time and effort are required for bias-cutting projects, which I’ll go over in greater depth in the next sections.
Safe fabric choices for bias
At the fabric store, unroll a few bolts of fabric and fold each one in half so you can get a sense of how the fabric responds and feels when folded on the bias. Compare the weights and textures of various fibers, yarns, and fabrics. You’ll see how a plain weave changes texture, a twill weave blurs, and plaids and stripes take on a new dimension when stretched on the bias.
A good starting point for making bias-cut shirts is to choose a fabric with “teeth” (the layers tend to grab each other), such as linen, silk broadcloth or wool challis, for the first few garments you make. Fabrics with a basic weave and minimum texture are what I’m looking for, and I’m a fan of the bias-cut effect. It is best for beginners to select a 1/4-in. or smaller stripe so that it does not have to be perfectly matched.
It is best to stay away from silks, polyesters, and twill weaves, as well as heavy or stiff fabrics like duck or poplin, while working with bias. These materials tend to stretch out of control and can be difficult to work with. Even though silks and sheers like crepe de chine, charmeuse, and georgette look stunning pressed, they’re not the best choice for a beginner’s project. Once you’ve conquered the more stable textiles, go on to silky ones.
Adapt a pattern for bias
The straight grain of a simple V- or round-neck shirt pattern can be easily converted to bias grain if you can’t locate one already written out that way. It’s your choice whether you want a sleeveless shirt, or one that has a cap or extended sleeve, drop sleeves, or the classic set-in sleeve. With some fabrics, you may want to add center-front and back seams.
Including ease, adjust the template to your desired length and bust and hip measurements. Make sure you leave plenty of room for movement when sewing a bias-cut shirt, as the fabric will stretch and contract as you wear it. It’s hard to forget Jean Harlow’s white satin gown that hung like wallpaper. Unless this is the style you’re going for, add an additional half to one inch of ease to each cutting line. Additionally, the width of each seam allowance will be increased.
Check the fit by pinning the parts together and putting the garment on, then making any required adjustments. A bust dart should be added to the armhole or side seam if you have a large bust for a more comfortable fit.
Xem thêm : How To Fix A Singer Sewing Machine Bobbin Case?
Cut the fabric in a single sheet, arrange the stripes where you want them, and produce entire pattern pieces for bias-cut clothes by eliminating foldlines and/or making separate left-and-right body and front-and-back sleeve pattern pieces are all options.. Since piping or binding is better at finishing edges than facings (facings tend to “battle” with the outer layer in a bias garment), use the main pattern pieces exclusively.
Change straight of grain to bias
To re-mark the grainline on a pattern piece, use this method.
The new bias grainline is formed by the diagonal fold of the fabric.
- Grains should be drawn perpendicularly.
- When folding the tissue, make sure that the two fold lines are parallel.
- To create a new bias grainline, mark the diagonal fold. Fold the paper in half and draw lines on both sides of it.
A “complete” design is one in which the front and back sleeves, as well as the right and left body portions, are each made as individual pattern pieces. Eliminate foldlines and make a pattern of the entire garment portion for a garment without center-front and rear seams. The extra-wide seam allowances are necessary because bias edges loosen and open.
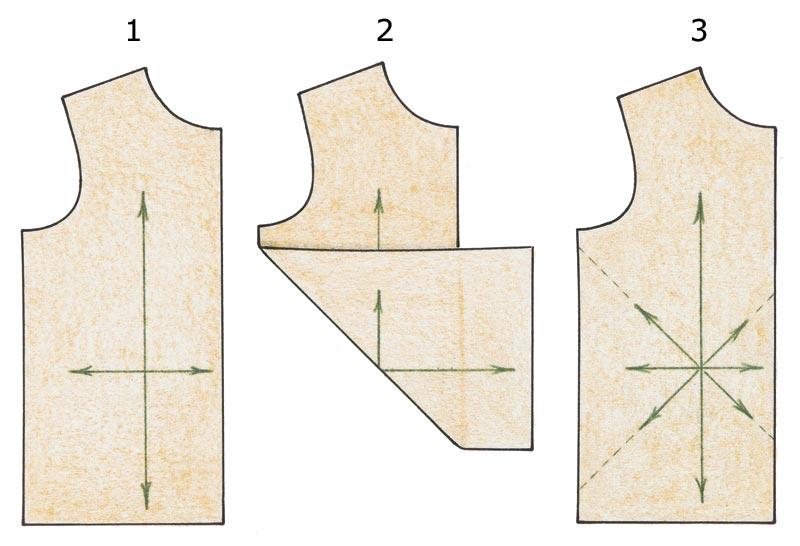
A 45-degree ruler can be used to convert straight-grain lines into bias markings (available from quilt- or art-supplystores). Fold the pattern as illustrated in the figure above to draw the new lines.
Yardage and layout
Bias clothes require 1 yd. of fabric for each major pattern piece, therefore I “guesstimate” this amount while purchasing fabric. This indicates that a long, sleeveless tunic top could use up to four yards of fabric.
However, you can use a gridded cutting board to more precisely determine the yardage once you’ve adjusted the pattern. The amount you’ll need is determined by the fabric’s width, the pattern’s repeat, and the pattern’s piece size. For narrow or big pattern parts, piecing may be required.
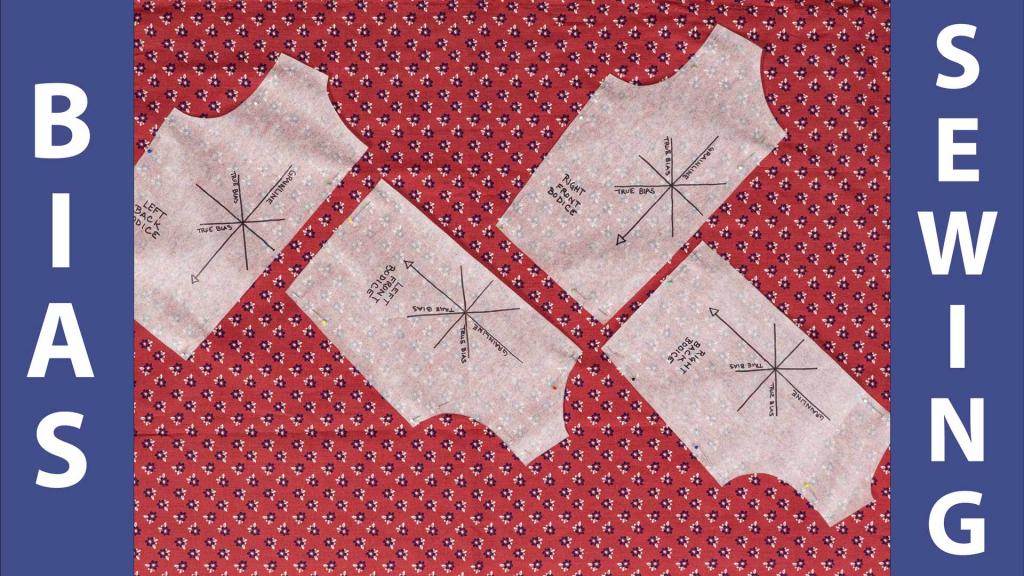
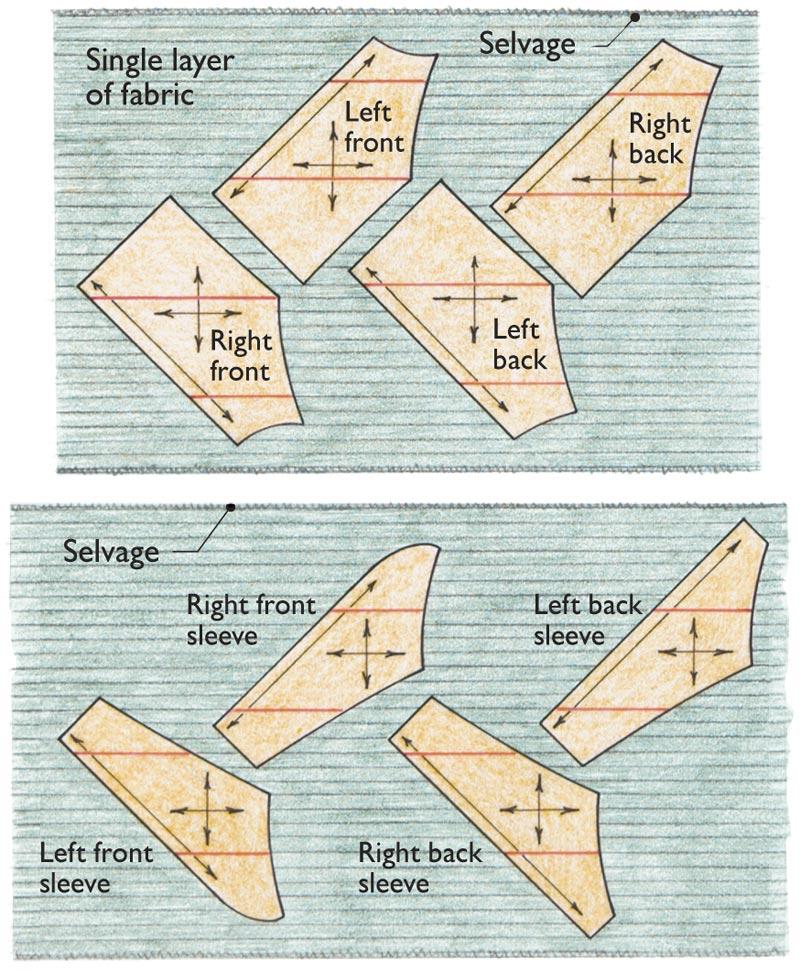
For a well-balanced outfit, I normally cut the pattern on a single sheet of fabric with each pattern piece at a right angle to the next one, as seen in the pattern layout below. To simulate a nap in the cloth, I arranged the pieces in a single direction. It’s possible to cut two layers of cloth at once if your design has center-front and center-back seams and the fabric is wide enough.
Sample layout for bias
Pattern components should be aligned at right angles to each other when cutting out bias garments such as the raglan-sleeved shirt on one layer of cloth.
Center seam or not?
It’s possible to add a center front and rear seam to the garment depending on the fabric you choose. Modern wovens have more lengthwise threads than crosswise threads, which are stronger and more frequent. When a full pattern piece is positioned on the bias, one side of the garment will have the longitudinal grain dominant and the crossgrain dominant. To avoid twisting, rippling, and an uncomfortable tug-of-war while wearing your garment, make sure your fabric is stable before sewing it.
Center seams allow for the right-angle bias to be slanted, while left-angle bias is slanted, as illustrated in the diagram below, so both side seams hang the same way. By matching stripes or plaids along the central seam, you may also create a chevron or diamond pattern. To make it easier to match the next piece at the stitching line, I draw a few stripes immediately on the pattern piece as shown.
Check your fabric’s strength and amount of threads by raveling the horizontal and vertical cut edges to check whether there is a noticeable variation in the lengthwise or transverse threads. It’s fine to cut the garment in the middle of the fold if the fabric is sturdy (like many linens, cottons, and wools).
Widen seam allowances
Because the fibers on the cut edges of bias cuts loosen and open up, even 5/8 in. away from the cut edge is not an exact stitching line. In addition to the extra ease, add 1-1/2-in.-wide seam allowances to the center, side, and shoulder seams of your reworked pattern pieces. The neck should have seam allowances of 5/8-inches. Stitching lines should be marked as soon as the fabric is cut and the pattern pieces are removed.
Remove excess stretch
To prevent bias-cut clothing from stretching as they wear, pressing each part of the pattern before assembly is a good idea. When pressing, the garment is more stable since it mimics the effects of gravity. In the case of silky or loosely-woven materials, this step comes in quite handy indeed.
Before sewing, press each piece of fabric firmly but softly and equally from the top to the bottom. Repin the pattern to the cloth and, if necessary, redraw the seamlines to accommodate the shrinkage.
Sewing bias seams
Using a 2.5- to 3-mm stitch, you may create smooth vertical bias seams that won’t pop when the garment is worn. After stitching, the seam will appear wavy, but it will press out perfectly. Because shoulder seams aren’t cut on the real bias, they don’t stretch as much, therefore you don’t need to stretch as you sew them.
If you want to get a finished look, start by sewing the center seams together, then pinning along the stitching line and adjusting the side seams until they fit. Trim the seam allowances to 3/4 in. after the garment is finished and sewn. Because bias does not ravel, seam finishes are unnecessary. As a rule, I avoid serging because it can result in rippling and visible seams.
With a straight-grain edge and a bias edge to join, stitch the straight grain on top, which is more sturdy. The straight grain will remain the bias edge as the bias layer is fed in.
Interfacing can be used to stabilize buttons and buttonholes on a bias-cut garment. To prevent it from straining, sew a strip of straight-grain interfacing through the buttonhole.
Finish neck and armhole edges
Bias binding or piping gives a fine finish at neck and armhole edges of bias garments. Bias molds smoothly around curves, lies flat, stabilizes edges, and eliminates the need for interfacing.
To give bias-cut clothing a polished look around the neck and armhole edges, bias binding or piping can be used. Bias is a great alternative to interfacing since it conforms well to curves, is flat, and prevents fraying at edges.
As an added bonus, the corded piping on the neckline and armholes adds a subtle decorative element. To pipe a neck, start by making sure it’s big enough to go over your head comfortably and easily. Be sure to remain stitch the front and back together before attaching the shoulder seam, then clip every 1/2 inch to the stitching. It’s easier to turn and press the edge to the inside if you serge near to the stitching. With no serger, you can reduce the seam allowance to 1/4 in., then stitch the shoulder seams after pressing.
To fill the piping, I often use a thin, 1/8-inch filler cord. Piping can be done in two ways: by covering the cord and sewing it in place.
Once the neck is done, you may put the top back on and see whether it fits. Before sewing the seams, pin the side seams, wrong sides together, and make a final fitting.
If you’re going to store bias clothing, I recommend folding and flattening them rather than hanging them because they can “expand” on a hanger. The more you learn about bias stitching, cutting, and fitting, the more you’ll like adding bias clothes to your sewing repertoire. And when you do, you’ll discover that wearing them is the most enjoyable aspect of the experience.
FAQs
What does it mean if something is cut on the bias?
Xem thêm : How To Make A T-Shirt Blanket Without Sewing? Complete Step-by-Step Guide
Cutting on the grain is what we mean when we say something is “bias cut” (from the French). The bias cut sets the pattern at a 45° angle on the woven cloth rather than following the straight line of the weave. The ‘warp’ and ‘weft’ threads give the fabric a more elastic’stretch’ when viewed from this perspective.
Why do you sew on the bias?
It’s a great method to produce a flowing garment that flows lightly over your body if you cut your fabric at a 45 degree angle to the straight grain or selvedges. If you’re looking at the cloth at an angle, it looks like it’s been stretched out of shape! May 13th, 2016.”
How do you know if a dress is biased?
What is bias-cut clothing, and how is it used? Bias-cutting occurs when a piece of clothing is cut and fashioned at a diagonal angle. Holding a corner of the fabric and folding it over toward the selvage will help you discover the bias grain in your textiles. The real bias is along the fold line, which is formed.
Are bias cut skirts flattering?
The following are some things to keep in mind. If you’re looking for a flattering cut, anything on the bias is a good bet. It’s also critical to use a high-quality fabric like silk to minimize visible flaws.
What are the 3 types of bias?
An information bias, a selection bias, and confounding can all be identified. Various examples are used to illustrate the three forms of bias and the potential solutions to each.
What is the difference between bias tape and binding?
Like cloth cut on the straight grain, bias tape is naturally supple and able to conform to the contours of a garment. What makes it great for completing curved seams is the fact that it has this feature. This is because bias binding merely wraps around the raw edge, whereas bias facing turns the seam allowance inward.
Which threads are the strongest?
Nylon is one of the strongest threads on the market, making it an excellent choice for sewing upholstery, leather, and vinyl. Sewing at high speeds requires a thread that has been specifically treated to produce smooth stitches, such as this bonded 3-ply nylon thread.
What is the most common way to put together your fabric pieces when sewing seams?
The answer is: Right sides together.
When should you cut on the bias?
The answer is: Right sides together.
Where is the bias on fabric?
Right sides together is the answer.
Do you cut stretch fabric on the bias?
No, you should not cut a stretch fabric on the bias if you intend to use it for sewing. Knits and other elastic materials don’t appear to have a bias, therefore attempting this cut could result in disaster. Weft and warp are joined at a 45-degree angle, which is known as the bias.
Is a bias-cut dress flattering?
A bias-cut garment can be attractive if it is cut full enough to slide over your contours without overfitting, even if you don’t feel comfortable in a tube dress.
How do you identify a bias-cut?
Bias cut refers to cutting the fabric on a diagonal bias to create the garments. To put it another way, the pattern pieces were angled at a 45-degree angle to the fabric’s straight and cross grains.
What does it mean when a skirt is cut on the bias?
Bias-cut skirts are the newest addition to your go-to wardrobe. Rather than cutting the fabric parallel to the weave, it is cut on the diagonal, creating a garment that drapes more gracefully than a straight piece of cloth.
What is a tulip skirt?
At the waist, Tulip Skirts are belted skirts with a tapered hemline that gives the wearer unique style. It was Christian Dior, the famed French fashion designer, who first brought these skirts to the world’s attention in 1953 and they quickly became fashionable.
What is bias and example?
Having a bias is a belief that is not supported by any known facts about someone or a certain group of people. For instance, a prevalent stereotype is that women are weak (despite many being very strong). Another notion that blacks are dishonest (while in reality, most are not).
What are the two main types of bias?
Selection Bias is one of the most common types of bias. Bias in information.
Is bias the same as prejudice?
Prejudice — an unfavorable and/or intolerant opinion of a group or an individual that is based on a lack of information. In contrast to prejudice, bias is a more subtle form of discrimination. Biased people typically refuse to acknowledge the existence of viewpoints other than their own.
What is the point of bias tape?
Bias tape is used for piping, binding seams, securing raw edges, and more. Instead of a facing, it is commonly used on the borders of quilts, placemats, and bibs, as well as around the armholes and necklines of garments and bags for everyday use.
Does bias tape have to be cut on the bias?
Quilts with a square shape can be bound using fabric strips cut on the cross or lengthwise grain. To bind a quilt with curved edges, you’ll need to use bias binding strips. Binding around a quilt’s curving edges is made easier by bias’ elasticity.
Do I need single or double fold bias tape?
One fold is all it takes to complete some projects that call for bias tape. This is because bias tape isn’t applied to the product’s edge, thus four layers of fabric aren’t necessary.
What is a bias when sewing?
Warp (long grain) and weft (cross grain) of a woven cloth are intersected at a 45-degree angle, and this is what is meant by “true bias.” Two genuine biases run parallel to each other in every woven cloth. It is easy to shape woven cloth because of the bias, which provides both stretch and malleability.
Conclusion
This is all you need to know! When it comes to stitching, we’ve figured out what “cut on the bias” means. The cloth is cut at an angle that is perpendicular to the fabric’s straight grain.
When making garments that need flexibility, soft drape, or to avoid fraying, cutting the bias on the bias is a good idea. The bias-cut textiles appear softer and more pliable.
Please feel free to leave a comment in the space below if you have any questions or feedback.
Nguồn: https://spasifikmag.com
Danh mục: Sewing Tips


