If you want to learn how to replace the bobbin box of a Singer sewing machine, start by learning how to repair it. What to do if the Singer Bobbin Case is disclosed will also be discussed. In addition, we’ll go over some pointers on how to properly care for the bobbin case.
For information on how to repair various Singer machine issues, please see our article on Singer machine issues. Do you already know how to solve the Singer sewing machine’s timing problem, for example?
Bạn đang xem: How To Fix A Singer Sewing Machine Bobbin Case?
How To Fix A Singer Sewing Machine Bobbin Case At Home
- Check out the graphics and troubleshooting suggestions in the Singer manual for the model you are using.
- The bobbin’s case should be replaced if there are any problems with it.
- Unplug the sewing machine after turning it off.
- The Bobbin Case has a release lever that you’ll need to remove the bobbin cover to access.
- Let go of the bobbin’s lever so that the case can be released from the case by the hinge.
- Secure the lever after attaching the bobbin case to the spool.
- Before installing a new bobbin cover, make sure the old one is secure.
Signs That Your Singer Bobbin Case Is Broken
The machine makes clicking sounds. machine
When you stitch, you may hear your sewing machine click. The problem could be caused by a broken bobbin casing, which necessitates a new one. The bobbin case can also be re-wound to see if this fixes the problem.
Bobbin Case is moving
The sewing machine’s bobbin casing isn’t meant to be moved about. When winding a bobbin, a thread becomes caught in the case and causes it to move. If your bobbin is horizontal, you’ll need to secure the bobbin casing with safety pins and apply the correct tension to it.
How Do You Put The Bobbin Case Back In A Singer Sewing Machine?
- Find a bobbin casing for your Singer sewing machine that will fit your bobbin.
- Consult your Singer sewing model’s instruction booklet to determine the bobbin mechanism type.
- Replace the old one. Underneath the fabric, a Bobbin Case.
- Before placing the case’s edges under the plate, make sure the split side of the bobbin case is properly oriented to the feed.
- After searching for the correct plate, make sure that you can easily move your bobbin through a race of hooks without snaring your thread.
- The bobbin case holder moves forward to secure the bobbin case in proper place.
- Turn the handwheel to see if the bobbin’s case moves appropriately and if it was installed correctly.
- Insert the Bobbin after replacing the needle plate.
- Replace the machine’s feed cover.
How do you take a bobbin case removed?
- Shut down and unplug the machine. a sewing machine.
- In order to lift the needle, press the needle up and raise it.
- In order to remove the needle plate, lift the sliding plate from above your bobbin and loosen the screw that secures it to it.
- The bobbin holder should be facing the back of the sewing machine when this is done.
- Pinch one side of the bobbin cover with your fist to remove it from the sewing machine.
Why Does My Bobbin Case Keep Popping Out?
- There is a problem with the bobbin case’s installation.
- An old or damaged bobbin case is to blame.
- The bobbin casing was improperly connected.
- The bobbin casing has a tangled thread in it.
- You can’t tell where the bobbin starts and ends by looking at its housing.
- Some machines’ horizontal bobbins can pop out quite quickly.
- Accumulation of dust or lint in the rotary hook and race.
- For your sewing machine, you’re using the wrong bobbin type
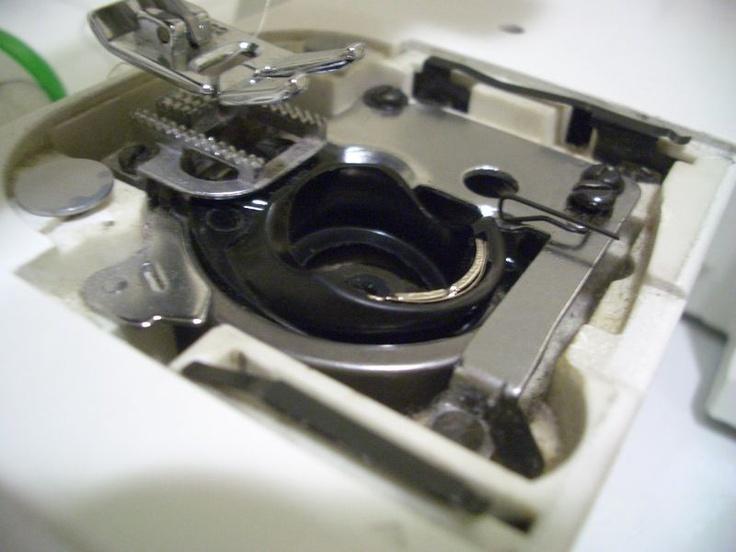
What Does The Bobbin Case Sit In?
The bobbin’s winder, which is responsible for winding the thread onto the bobbin, contains the bobbin casing. Place the bobbin casing on it so that the thread can be distributed evenly and problems avoided. However, winding a bobbin by hand is also an option.
Are Bobbin Cases Universal?
There are two basic types of bobbin cases: inset and detachable. In addition, you should examine your sewing machine’s instruction manual to see which bobbin case is installed.
Cases for bobbins that are removable
If the bobbin casing is removed, you can remove the bobbin. Using springs or levers, they are able to remove or replace the bobbins more quickly and easily. Removable bobbins may also be front- or side-loading, depending on the model.
Inset Bobbin cases
The most prevalent type of bobbin casing on today’s sewing machines is the inset one. Taking them out is unnecessary. Drop-in bobbin casings are what they are called. They are easier to use and enable for bobbin changes in a short period of time.
When Should I Replace My Bobbin Case?
- If you discover any damage to the Bobbin Case, please contact us right once.
- Keep an eye out for thread that is getting tangled or getting stuck.
- Always, the casing will come out of the sewing machine
Singer Sewing Machine Bobbin Holder Came out Solution
Sewing machine problems are an unavoidable part of being a sewer. It’s possible that the bobbin holder will fall out of your Singer sewing machine.
It may appear difficult, but it can be fixed. My top bobbin holder solution will be shared in this article after I’ve had a few mistakes in the past.
Singer Sewing Machine Bobbin Holder Came Out?
When you remove the bobbin holder and then try to put it back, you’re likely to encounter this issue. If it doesn’t fit, filth, worn-out bobbin cases, or the improper bobbin cases for your machine model are likely culprits. To avoid this problem, make sure the bobbin holder’s finger is put in the little groove on the needle plate. Make sure your bobbin holder finger fits exactly in the needle plate as the best solution.
The bobbin holder on your Singer sewing machine may not stay in place for a variety of reasons. Look at the issues and see if there are ways to fix them.
How to Fix a Bobbin Holder
- If the bobbin does not fit your machine, then you are not using the real deal. If you use the wrong bobbin holder, your sewing will not be safe.
- Your sewing machine’s manual will tell you which way the bobbin should go while threading it. A Singer sewing machine’s typical bobbin direction is out clockwise. The bobbin thread should always face the direction the holder rotates in when the bobbin is set up in the correct direction.
- After winding the bobbin, return its spindle to its original position, or the needle will not pick up on your bobbin thread. This is the most important step. While you’re doing this, be sure to keep your presser foot firmly planted.
- There are numerous problems that can arise when you don’t maintain the cleanliness of your sewing machine bobbin holder, the most serious of which is that it won’t fit snugly in its place. Remove the bobbin holder and clean up the lint that has built up. Consider cleaning the complete machine as well, since this will make your task even more efficient and streamlined. Finally, remember to return everything to its proper place after cleaning.
- Bad Threading: If your thread does not pass through the bobbin’s center hole, you have not threaded it correctly and will have to start over. Otherwise, your work may appear uneven and sticky due to the incompatibility of the upper and lower threads on the bobbin holder.
- When winding the bobbin, keep your thread from becoming entangled. The best approach to keep the thread taut is to pass it via tension disks wound around a spool. The bobbin thread will not be picked up by the machine if this is the case.
- Double-check to make sure your needle is in good shape and is the proper size for your machine. A medium-sized needle should be used for this project. In addition, the fabric you choose may affect the final fit.
- Bobbin Thread Length: The bobbin thread should measure 3-4 inches in length at the longest point. Also, make sure the bobbin holder was wound appropriately with the thread.
- Regular Machine Servicing — Be sure to have your machine serviced completely at least once every six to twelve months.
- To keep your bobbin from falling out, I’ve talked about how to secure it, but your bobbin itself must be in perfect functioning order. I can’t stress this enough. Inspect your plastic bobbins, for example, to see if they have any cracks or other imperfections. if found “guilty,” use a new bobbin and thread to replace the holder.
- If you hear strange noises coming from your bobbin holder, follow tip 4 and thoroughly clean your holder!
- If your bobbin holder seems loose, it’s most likely because the bottom plate of your machine is loose and has to be tethered back into place. If it doesn’t help, double-check that the bobbin holder is properly inserted. When you insert, if you hear a click, it’s in the correct spot.
A Guide to Bobbin Holder Operation.
- User manuals for new sewing machines are included in the box with the machine. You can learn which bobbins work with your machine by consulting this page. Each bobbin is designed to work with a specific sewing machine model. Your tension settings and machine could be damaged if you use a different one.
- Wind at least three bobbins in advance if you’re working on a large sewing job. There will be no interruption in your work flow because you won’t have the need to wound another bobbin. This is a time-saver that will save you hours!
- In case you missed it the first time, be sure to clean the bobbin case when you clean your sewing machine. On a regular basis, thoroughly wipe the surface. The less probable it is that your machine may malfunction, the more thoroughly you should clean it.
- When it comes to purchasing bobbins, there is no such thing as “too many.” Because you’ll always need them, buy as many as you can afford. Get used to buying odd packs of bobbins everytime you go shopping for sewing supplies.
- Machines can be configured to use either a light plastic bobbin or a heavier metal bobbin. To utilize one of these bobbins in place of the other requires a precise tension setup. By holding the bobbin by its thread, you may check the bobbin’s tension. That way, you’ll know if you need to change the tension or not.
- If you overfill your bobbin, you’ll end up with a towering machine that won’t provide the results you want.
- When sewing, always clip the thread tail off so that it doesn’t get tangled with the top thread and the bobbin thread.
- Consider picking up some manicure separators the next time you’re in the market for new office supplies. To keep your bobbins neat and tidy, these boxes are ideal. Additionally, ice cube trays can be used to store bobbins. To keep your threads and bobbins in place, you can simply wrap rubber bands around them.
- Make sure you have your bobbins with you at all times by purchasing a pill holder. You can keep your bobbins in place with the help of multiple sections and a snap-on closure.
- Always rethread when in doubt. Rethread your sewing machine if you find a problem. In order to make sure everything is going well, remove the bobbin and inspect the thread to make sure it hasn’t tangled.
A final piece of advice: Even if you rigorously follow to the “rules,” there are bound to be a few mishaps. When sewing, the only tension you should feel is from tightening your machine’s settings. Learn new inventive methods to tackle it with less stress in order to get the most from your work!
Bobbins are a godsend when it comes to keeping your stitches in place as you feed the thread through your machine. Stitching just got a whole lot easier and more enjoyable thanks to the helpful hints presented above. Enjoy your sewing!
How to Replace a Bobbin Case in a Singer Sewing Machine 2517
Things You’ll Need
- Bobbin casing that can be used as a spare
- Screwdriver, small
Using the Singer 2517 sewing machine, you can remove and replace the bobbin case with ease because to its drop-in design. Because bobbin casings cannot be swapped, a new bobbin for the Singer 2517 sewing machine is required. Sewingpartsonline.com and eBay are good places to look for replacement parts for your Singer sewing machine.
Before Removing the Bobbin Case
Step 1
Before dismantling or cleaning the sewing machine, unplug it.
Step 2
To lift the needle, use the machine’s side-mounted hand wheel.
Step 3
To elevate the presser foot, raise the lever behind and above it.
Step 4
Remove the bobbin case by removing the plastic slide plate that’s been attached to the case.
Step 5
With a little screwdriver, unscrew the needle plate. To make room for the presser foot, raise and move it to the side. Place the needle plate in a safe place.
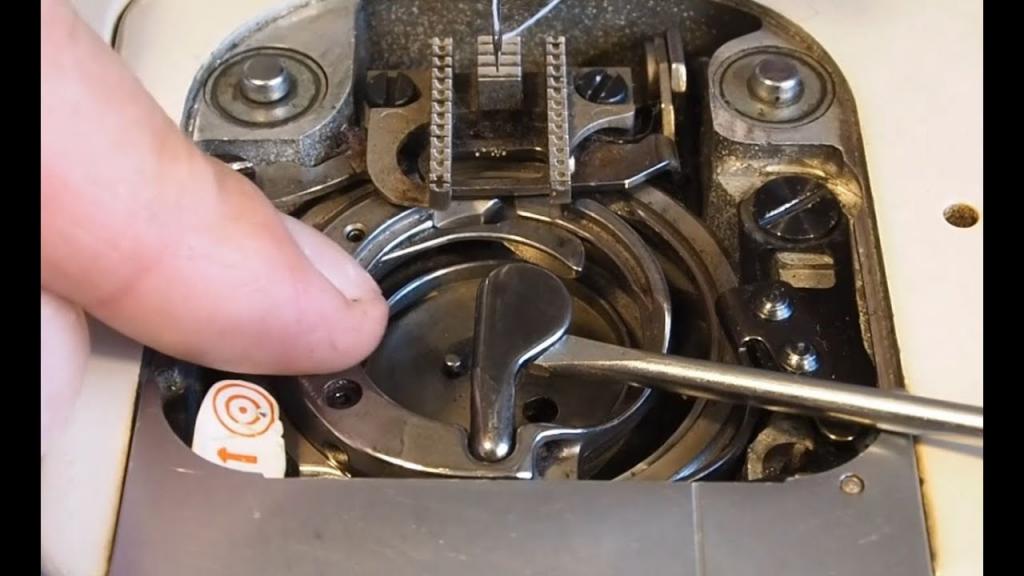
Remove the Bobbin Case
Step 1
With a screwdriver, turn the bobbin case holder toward the back of the machine as far as it will go.
Step 2
Xem thêm : How To Restore Antique Singer Sewing Machine?
With your thumb and forefinger, grip the bobbin case on the left side.
Step 3
Slide the casing out by lifting it up.
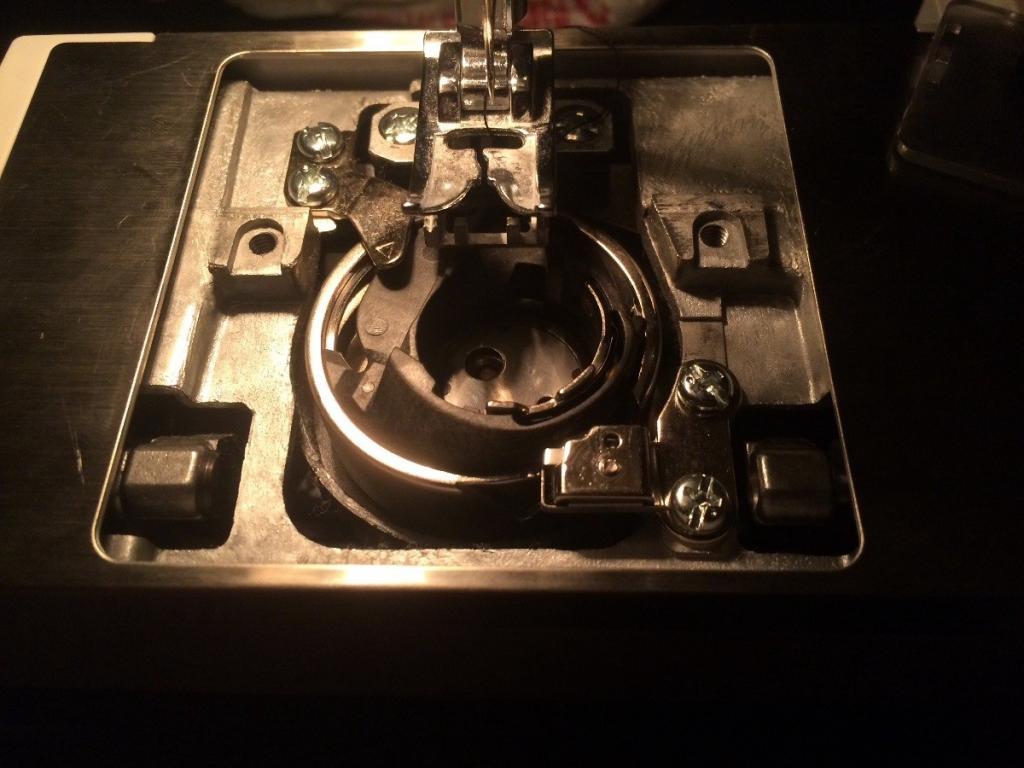
Replace the Bobbin Case
Step 1
Replace the bobbin case on your Singer 2517 sewing machine with a new one that works. The Singer 2517 requires a bobbin of the bobbin class, 66, to replace the original bobbin.
Step 2
Slide the split side of the new bobbin case under the fabric feed.
Step 3
Using the bobbin case as a guide, slide it under the bobbin case position plate at the bobbin case opening corner. Allow the bobbin to move freely on its hook race.
Step 4
Turn the bobbin case holder forward to secure the bobbin case in its place. Check the bobbin case’s movement by turning the hand wheel and making sure it is correctly inserted.
Step 5
The needle plate should be screwed back into place over the bobbin case’s hole. The case is now ready for a bobbin. Put the machine’s plastic feed cover back on top of the plastic feed tube cover.
Related Questions
My sewing machine keeps making a grinding noise?
This is a common symptom of a machine that is grinding against itself. Your machine’s mechanical parts should be lubricated.
What is the difference between a bobbin case and a bobbin holder?
A bobbin case and a bobbin holder are interchangeable. The meanings of the two terms are the same, therefore they can be used in the same sentence.
FAQs
Why is my electronic machine beeping? Why won’t my machine sew? Why will my machine start to sew then stop?
It’s possible that the buttonhole lever, which is just to the left of the needle bar, was mistakenly depressed. Place your finger under the lever and press up to ensure that it is in the correct position for sewing.
Make sure the needle is set to the highest position and the bobbin winding spindle is pushed to the left before you begin.
As a reminder, turn the hand wheel toward you so that it moves the needle to its highest point.
Finally, a few presses of the reverse button will clear the machine.
A SINGER Service Center can diagnose and repair your computer if none of the above methods worked.
How do I sew denim and heavy fabrics?
We recommend using a SINGER denim style 2026 needle for sewing denim. Tension problems can arise if you use a different kind of needle. To accommodate the thicker fabric, you’ll want to use a straight stitch with a stitch length of between 4 and 5 stitches per inch on your sewing machine. When you first take the machine out of the box, be sure to use the metal all-purpose foot that was attached to the shank. In order to utilize top-stitching thread, use it exclusively in the upper tension; in the bobbin, use all-purpose thread.
We recommend using a size 16 or 18 SINGER needle to stitch heavier fabrics. Using a straight stitch with a length of between 3 and 4 will be necessary. Using the metal all-purpose foot that was attached to the shank when you first unboxed the machine will also improve your results.
Moderately fast stitching over numerous layers is necessary.
Why is my bobbin not winding evenly?
bobbin winding tension spring may not be positioned correctly if your bobbin is winding unevenly. Try wrapping the thread a second time around the tension spring — a standard sewing procedure – if you think the thread is in the right location.
If none of the following fixes the problem, please call a SINGER Service Center so that they can adjust the tension for you!
Why won’t my machine pick up the bobbin thread?
A lot of people ask us this question. Don’t worry, we’ve got some simple fixes for you right here!
Put the top of your sewing machine’s bobbin-winding spindle back to the left before you begin sewing. The needle will not descend and pick up your bobbin thread if it is not in the correct place.
When the needle is placed, be sure that the flat side is facing backwards and that the needle is inserted as far as possible. The upper tension disks of your machine should also be threaded correctly, so check to see if the bobbin is in the correct position. Seating the thread through the higher tension requires that the presser foot be raised.
Your bobbin thread should be ready now.
Using the needle thread, crank the handwheel (towards you only, never turn the handwheel away from you). As the needle drops and then rises, start tugging on it. In this case, you’ll need to use a pencil or scissors to lift your bobbin thread out of the needle plate. Once you’ve done so, you’ll want to tuck your top and bobbin threads beneath your foot and toward the back of your machine.
There may be a problem with the timing of your machine if the above fixes don’t work. It’s impossible to make a stitch if the needle thread doesn’t touch the bobbin thread in time.
Why is my machine skipping stitches?
Xem thêm : How To Use Decorative Stitches On Sewing Machine?
There are two possible causes of missing stitches: needle problems or a problem with the stitching schedule.
A dull or damaged needle, for starters, necessitates immediate replacement. You should also make sure you’re using the right needle for the cloth you’re working with. A ballpoint SINGER needle, for example, is needed for knit and synthetic fabrics (style 2045). After that, make sure the needle is properly implanted. As far as practicable, the needle should be pushed up the needle shaft. A needle placed only half-way can be mistaken for being correctly inserted. In addition, the needle’s flat tip should face the back. Incorrect insertion of the needle will produce skipped stitches if the bobbin thread is not properly pulled up.
You should bring your machine to a SINGER service center if none of the suggested fixes worked. It’s possible that anything has messed up with the machine’s timing, in which case it has to be reset.
Why is the thread looping/bunching under my fabric?
- You should be using SINGER needles. The bobbins that came with your machine are they the ones you’re using?
The most common cause of thread loops under your fabric is a misplaced higher tension.
Using the threading guides/graphics on the machine’s top as a guide, place the presser foot lever to the UP position and set the tension to 4.
- To make sure the thread doesn’t unravel, use a thread spool cap to cover the spool pin.
- Using your left hand, take the thread down into the tension channel, around the bottom, and up the other side while keeping it in your right hand at all times. The thread must be slid from back to front into the take-up lever as it ascends the opposing channel and reaches the top. Thread the machine as usual, but don’t worry about the needle.
Use this quick check to ensure that the upper thread is properly threaded before beginning to embroider. Pull the thread while making sure the presser foot is high. It should be a breeze to get it out of there. Now that you’ve lowered the presser foot, try pulling on the thread. It should resist your efforts. The tension of the thread should rise significantly. The machine has been threaded incorrectly if the tension is not increased.
Why is the thread looping/bunching on top of my fabric?
It is a clue that your bobbin is not properly threaded if you see thread loops on top of your fabric.
Bobbins for front loading:
Please click here for detailed instructions on how to insert your front-loading bobbin.
Take a look at this visual walkthrough.
Here’s a quick tutorial on how to properly insert and remove a bobbin winding machine.
PRO TIP: The factory sets the bobbin tension, so it rarely needs to be changed. The bobbin cover can be removed and the screw on the side of the bobbin can be adjusted in small increments if the problem persists. Adjust as necessary until the loops are eliminated.
Why doesn’t my stitch pattern match what is on my machine?
Depending on the pattern, different stitch lengths are required. Decorative stitches like the crescent or bead stitch may necessitate a lesser setting on your machine’s Stitch Length dial, depending on the model (between 0.5 and 1.5). Reduce the Stitch Length as necessary to achieve the desired result. The stitch length dial on your machine may need to be turned to the “S” or Stretch setting if your machine offers stretch stitches.
Your stitch’s appearance can also be influenced by the width option. The best results are obtained by turning the Stitch Width dial all the way up.
How often should I oil my machine?
That’s a good one! It’s possible that your machine was pre-oiled at the manufacturer and doesn’t require any further lubrication, so check your handbook to be sure. Sewing machine oil in the bobbin case and on the needle bar, for example, will not affect the machine. You can also apply a few drops on the handwheel where it meets the machine’s side.
We recommend that you lube your machine once a week if your handbook calls for it and you use it every day. Lubricate your machine once a month if you only use it once a week. Lubricate your sewing machine once every three months if you only use it once a month.
Every three to four years, you should have a skilled SINGER technician perform a tune-up on your machine.
Our recommendation is to perform a tune-up, exactly like you would do with your automobile, if the machine hasn’t been used for a long time. When the lubrication isn’t being used, the machine’s parts can break because of the lack of movement.
What types of thread should I use?
All-purpose sewing thread is designed for use with home sewing machines. From your local sewing or fabric store, you may get this thread. Polyester is the most used thread for most general-purpose applications. Cotton thread can be used for quilting.
Use a heavy-duty thread or a buttonhole twist on rare occasions. However, if you use this thread on a regular basis, your machine’s tension will eventually be damaged. When using heavy thread, use a needle size of 16 or 18 and increase the stitch length accordingly.
I can’t see the take-up lever?
Your machine’s take-up lever is hidden behind the front panel, out of sight.
In order to begin, make sure that the needle is in its highest position, insert a piece of thread through the opening between the front cover and the machine’s top cover, and then pull the thread back toward you. The back of the take-up lever features a hole that allows the thread to slip into it from the backside.
Conclusion
Was this article helpful to you? We’ll go over how to fix a Singer bobbin case on a sewing machine in this article, as well as how to replace and inspect it. No sounds or pops should be heard because this could mean your case needs to be repaired.
We strongly advise you to familiarize yourself with the process of sewing machine bobbin insertion. When sewing, be sure to put it in the appropriate spot.
Nguồn: https://spasifikmag.com
Danh mục: Sewing Tips


