Only four steps are needed to learn how to sew a zipper into a pillow. The ability to stuff or replace the pillowcase with a zippered pillow is a handy one to have. You’ll be able to personalize your pillow and use it for a longer period of time.
Be confident in sewing the pillow zipper yourself because the process is simple. When compared to other closure methods, this is a safer technique to close a pillow than leaving it open. You may improve the quality of your pillow with such a simple method.
Bạn đang xem: How To Sew A Zipper In A Pillow? Complete Step-by-Step Guide
How Do You Sew A Zipper On A Pillow?
Step 1: What You’ll Need
In order to construct your own zippered pillow case, you will need the following:
- (Fabric can be purchased online, and it’s quite high-quality). Here are my top five picks for where to buy fabric online.) It’s recommended to choose a thicker, home decor-type cloth because it will keep its shape better. For each cushion, you’ll need two sections cut to the same size as the insert.
- A Pillow Filler: I prefer 18-inch pillows for my bed. They look their finest on a sofa, which I realize is somewhat large. Also, if you’re trying for a high-end aesthetic, I recommend using down fillings.
- Zipper length: 3-4 inches shorter than the bottom edge of your pillow. Zippers are purchased here.
- In terms of home decor projects, this is my go-to sewing machine. It is easy to use, affordable, and can sew through thick or several layers of fabric without difficulty. –
- a zippered footbed
- Thread, scissors and an iron are required.
- (optional) I highly recommend getting a self healing cutting mat and rotary cutter to make your cuts perfect. Your project will be flawless, and you’ll save yourself a lot of time and frustration.
Step 2: Mark and Cut Your Fabric
For an existing pillow, measure from seam to seam both horizontal and vertically if necessary. To each measurement, add one inch.
Two 16×21-inch pieces of cloth would be needed for a 15×20-inch pillow.
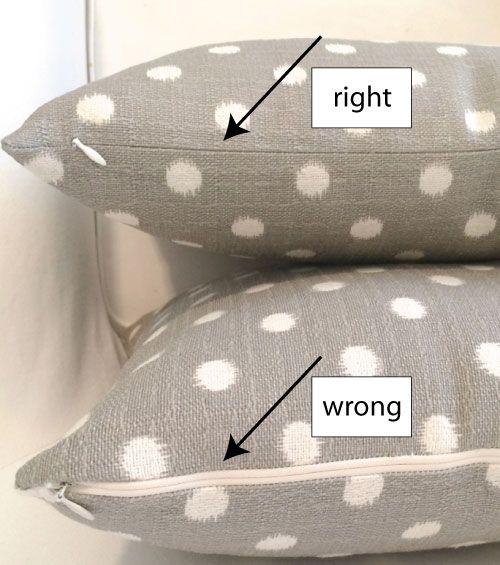
Step 3: Sew Across the Edge Where You Want Your Zipper
You must decide where the zipper will go in this step.
When using a patterned cloth, be sure it’s facing the correct direction!
Then, with the right sides together, pin the two sections together. Using a vertical pin, mark a line just inside the zipper’s perimeter on both sides.
A seam allowance of 1/2 inch will be used to sew this.
Step 4: Placing the Zipper Into the Seam
The seam you just sewn will now need to be pressed open.
Make sure the zipper is centered before placing it right side down into the seam. As demonstrated, use a safety pin to secure the object in place.
Step 5: Sew the Zipper Ends
The zipper foot can make this more difficult, so stick with the ordinary presser foot.
Step 6: Sew in the Zipper
Zipper feet can now be installed on your sewing machine. To make sewing your cushion easier, roll up the pillow’s edges.
How to sew a zipper
Xem thêm : Steps To Sewing Your Pillow By Hand. Best Answers To FAQs!
Close the zipper all the way. You’ll need to sew down one side of the garment until you’re about a few inches from the zipper.
Stop stitching down the fabric with your needle. Open the zipper by lifting the presser foot and placing it on top of the foot. Press the foot down.
Make your way up the zipper and sew the line you sewed across it back up.
Zip up the hoodie.
You can’t continue any further because of the zipper being pulled, therefore you’ll have to stop sewing. Make a reversible stitch and take out the fabric from the sewing machine after sewing it back together.
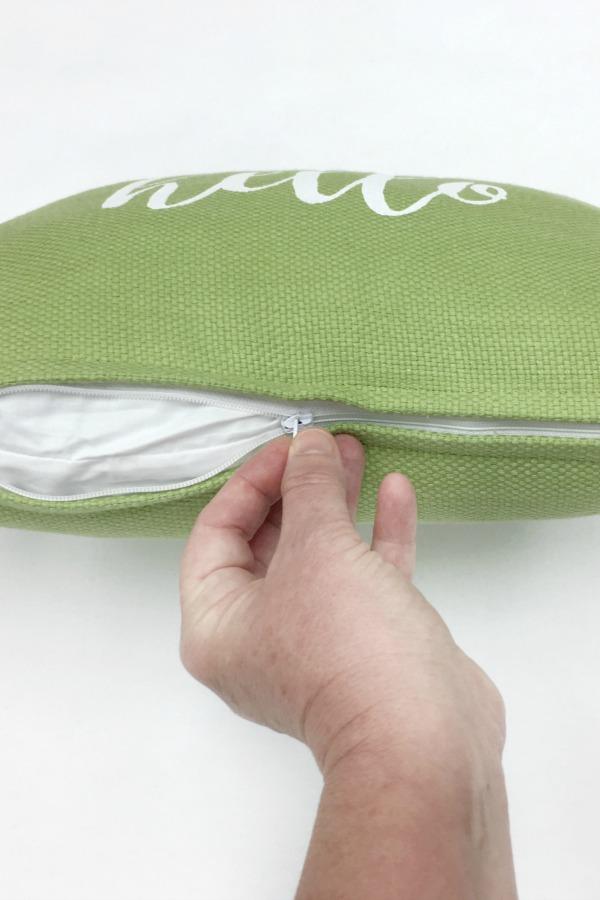
Step 7: Rip Open the Seam to Expose the Zipper
Insert your seam ripper and carefully remove the stitches between the two vertical rows of stitching at each end of the zipper, starting at the end where all three ends are sewed.
Use extreme caution when using your seam ripper, as it is possible to accidentally cut through the zipper if you press it too hard.
Verify that everything looks good and that the zipper pull slides freely when it’s been opened up for inspection.
This will leave a lot of strings behind, but if you use a lint roller, you can simply remove them.
Step 8: Finish the Zipper
Zip it up so that you can stitch the final portion simply. Begin where you left off sewing and work your way through to the end.
It’s a good idea to add a little backstitching at the beginning and end of the zipper because it will be under a lot of stress.
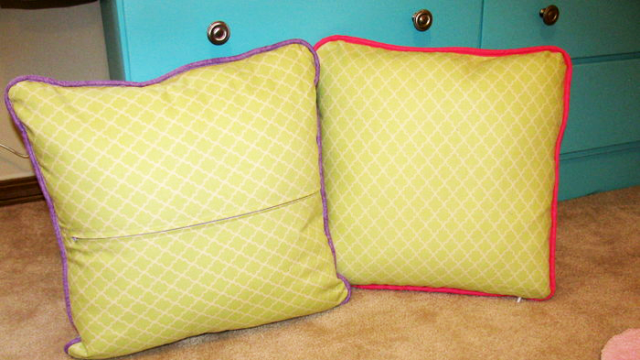
Step 9: Sew Up the Pillow Cover
To make a quick and effortless turn, unzip the zipper at least halfway.
Use pins all over the cover’s edges to keep it in place while you work.
Xem thêm : What Thread For Sewing Leather? Interesting Must Read Facts!
Using a half-inch seam allowance, sew around the edges, backstitching at the start and conclusion.
Using a pair of scissors, cut the corners of the pillow cover as seen in the second photo.
Step 10: Turn Right Side Out and Stuff!
The final step is to insert your pillow insert.
Other Ways To Close A Pillow
In addition to utilizing a zipper to shut a cushion, you can also experiment with different designs and techniques. There are a variety of ways to attach these closures, although some prefer to use a separate pillow protector.
Stitches
The easiest approach to complete a pillow is to sew the opening closed. You can hand-stitch the pillow’s unfinished seam after you’ve finished stuffing it. Because the contents cannot be removed, stitches will also give the pillow a more consistent appearance.
Envelope
The pillow fill or the pillow itself may need to be replaced over time. Instead of stitching all the sides together, use an envelope type closure on the pillow liner or pillowcase. With an envelope closure, you can add buttons to keep the pillow closed by securing the flap.
The pocket is a closure method that is reminiscent of envelope closures. A cushion with a pocket-style closure, on the other hand, has overlapping flaps on the back. Fabrics such as these will help to keep the interior safe.
Why Pillow Closures Matter
To keep things simple, you can’t ignore your pillow closure if you care about keeping your pillows clean. Our health is at stake if we don’t keep our pillows clean. A pillow or pillowcase with a hole might allow allergens and germs to build up inside and cause a reaction.
Dust mites, bed bugs, germs, and even fungi are all examples of pathogens. It’s not enough to simply replace your pillowcase with a new one if it’s been opened, as the pillow inside can also become contaminated. The quality of support and comfort you receive from your pillow will be compromised if it leaks stuffing.
What Does An Invisible Zipper Foot Do?
A curled edge and teeth that disappear when the zipper is opened distinguish an invisible zipper from a standard zipper. When stitching close to the zipper’s edge, a special ‘invisible zipper’ foot is required to roll back the zipper’s edge while sewing. If you don’t have an invisible zipper foot, you can get the same effect by following the instructions below.
Conclusion
At home, making pillows is a practical and rewarding pastime. A pillow’s lining or cover can be improved and its contents better secured if you know how to sew a zipper in a pillow. You may retain your pillow filling in the pillow or pillowcase by using a zipper closure.
To begin, prepare two pieces of fabric and the zipper. Before sewing the seam and inserting the zipper, place the zipper on top of the pinned fabric pieces and sew. Using a sewing machine, you can quickly add a zipper to your pillow by following the instructions above.
Nguồn: https://spasifikmag.com
Danh mục: Sewing Tips


