A sewing machine can now be learned in just two steps. Beginners’ smocking will be made much simpler in this article.
- What Does Cut On The Bias Mean In Sewing?
- How To Sew Cushions For Wicker Loveseat? A Few Tips to Remember
- What Is A Whip Stitch In Sewing? Whip Stitch To Join Seams Tutorial
- How To Make Curtains Longer Without Sewing? Step-by-Step Tutorial
- How To Adjust Presser Foot Pressure On Brother Sewing Machine?
In addition, as smocking is a means of gathering and streching fabric, we recommend reading up on sewing machine techniques for gathering fabric. After that, you can put the skills you learned in the sewing tutorial to use.
Bạn đang xem: How To Smock Fabric On A Sewing Machine? Step-by-Step Tutorial
Our blog is also a good place to find sewing advice.
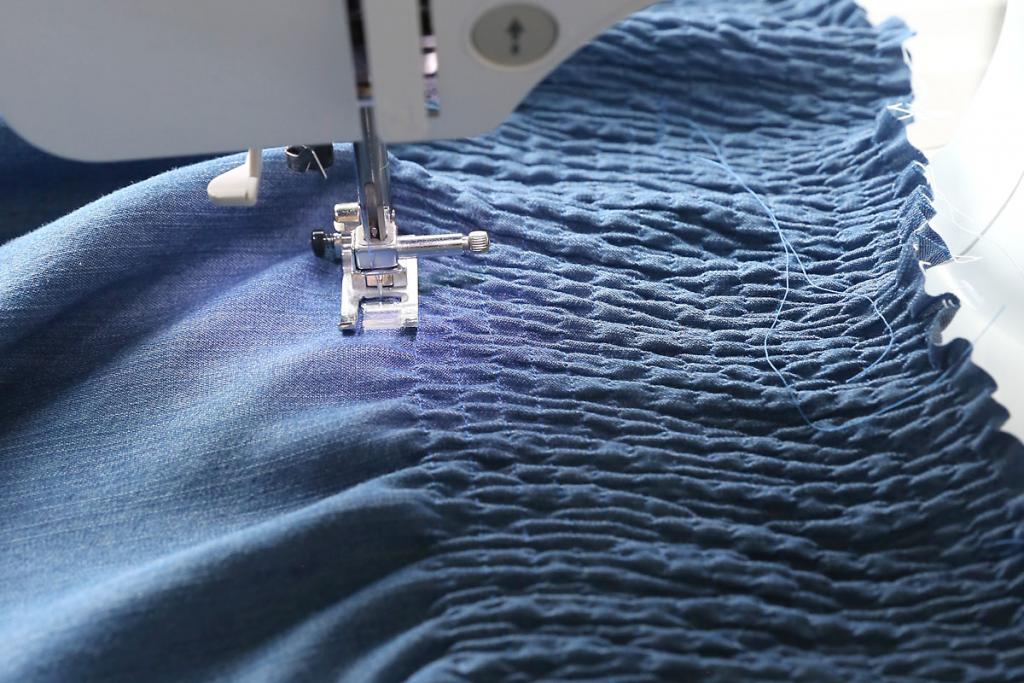
How To Smock Fabric On A Sewing Machine Easily
Step 1. Fabric preparation
- Make a note of where you’ll need to sew on your fabric.
- Using a yardstick and pencil, draw parallel lines on the right side of the material that are half an inch apart.
- Use a standard thread or one that is compatible with the fabric you’re sewing to thread the needle of your sewing machine.
- Use an elastic thread to thread your sewing machine’s bobbin. Check to see if the thread is tangled.
- Afterwards, lay the material on the right side of the walking foot.
Step 2. Sew using the sewing machine.
- For added safety and durability, backstitch at the beginning and end of each row.
- Sew the cloth along the lines you drew, but be sure to hold on to the bobbin thread because it will stretch as you sew.
- While going through the feed dogs, the elastic thread will help gather the fabric.
- In order to smock the following row, the material must be rotated by 180 degrees.
- Do not press the pleats until you’ve finished sewing them in.
Can You Do Smocking On A Sewing Machine?
If you don’t have a sewing machine with a variety of fancy stitches, you can still accomplish smocking. The zigzag stitch can be used to replicate a diamond pattern, while the stretch stitches can be used to mimic cable stitches.
Using a sewing machine, here’s a fast tutorial for making smocking stitches:
- Marking the fabric in this manner is essential. build a pattern by sewing the lines you made
- Take a moment to tug your stitches before securing the ends.
- Distribute the gathered materials to make certain that everything is in its proper place.
- Put two needles at the top of the sewing machine to thread it. Then insert a topstitching needle into the sewing machine.
- Instead of using your standard sewing machine attachment, use a walking foot.
- Before sewing each basting stitch over the previous one, check the stitching on a scrap of fabric.
- Remove the stitches used for basting and you’re done with faux-smocking.
Smocking tips for an embroidery machine
- Choose gingham fabrics since the pattern serves as a means of identification.
- Allow for easy pleating and gathering by selecting lightweight fabrics.
- Use cotton thread or embroidery floss to thread the machine. Make sure the color of the thread you use matches that of your fabric.
- Stitching smocks need needles with sharp edges yet that are still thin enough to work with.
To learn more about smocking, have a look at the purpose of it throughout the sewing process.
Which Stitch Is Used In Smocking?
The stitches you’ll use to smock on your sewing machine must match the pattern. Alternatively, see your handbook for the manufacturer’s recommended stitching techniques. Even if you’re sewing with two threads on a basic machine with limited settings, the zigzag stitch can still be handy.
Smocking stitches include the following:
- To identify the beginning and end of stitching rows as well as to keep stitching rows in place, backstitching is employed.
- Tiny embroidery threads that repeat themselves over and again are called straight stitches or running stitches.
- Using a whipstitch, you can work along the fabric’s edge.
- Smocked fabrics can benefit from cross-stitching to provide visual interest.
Difference Between Shirring And Smocking
In the fashion industry, these names are used interchangeably, thus newcomers to the profession are unsure of what they signify.
In summer dresses, blouses, etc., these techniques are used to make the garment fit comfortably. When it comes to folding fabric arrangements and decorations, these are your finest bets.
By reshaping the fabric, smocking creates an appealing visual effect. Shirring, on the other hand, requires at least two rows to embellish the fabric. Zippers will no longer be necessary as a result of this design.
Smocking, as opposed to shirring, involves making pleats with embroidery stitches, either by machine or by hand. In terms of distinctions, here are some of them:
1. In terms of Usage
Professionals are free to use any method they see fit, as long as the end result meets their expectations. As a rule, smocking is preferred in places where buttons cannot be inserted (cuffs, necklines, bodices). Shirring, on the other hand, can be used on the sleeves, yoke, and entire bodice of a garment. As a result, you can proceed with the decision in accordance with your preferences.
2. In terms of Looks And Flexibility
Smocking can be used to avoid the decorative appearance of tuck patterns. Shirring is a great way to get a custom fit and a little bit of flexibility in your wardrobe. Each of the strategies has now been explained to you in detail.
It’s up to you now to select which method to follow and when. Shirring produces round tucks, whereas smocking produces pleats. Shirring.
3. Usage of Elastic Thread
When sewing smocks, there is no need to use elastic thread, but it is employed in the machine shirring process to create an inch of extra bulk. When it comes to your fabric, you have a few options. As a result, you have the option of using or avoiding elastic thread.
To avoid thread breakage, use use high-quality thread when sewing. It’s possible that after stitching, the threads have begun to come out. Low-quality threads are should be avoided for this reason, among others.

4. Difference in adding patterns
Shirring gives the design some definition by removing the need to fiddle with modifications. Smocking, on the other hand, is all about varying the pattern.
It’s important to know what you’re looking for before making a decision.
5. Different Ways Of Collecting Fabric
To get exquisite pleats during smocking, you must collect the cloth in a variety of ways. Shirring, on the other hand, is the process of securing multiple rows of fabric together in a specific pattern.
6. Difference in Reduction Of Garment Size
Sharring reduces the length of the fabric by one-third, although the tightness varies with the type of cloth. Smocking narrows the original garment’s width by using the material as a guide.
When the treatment is completed, both of them have a distinct appearance. To begin, you can benefit from knowing the aforementioned distinctions. You may easily complete the process on your own, and it isn’t difficult at all.
7. Difference in Material
When it comes to shirring and smocking, the two procedures have a lot of the same characteristics. Cotton and silk are the ideal fibers to choose if you want a clean weave.
The final result may not be what you expect if you apply this procedure on a thick garment. Because of this, you should go for lightweight materials.
How To Carry Out Any Of The Processes?
If you’d like to follow along, here’s a list of the steps you’ll need to take to complete both processes.
Shirring
Determine the precise length of the finished object first. Then, depending on your demands, sew allowances must be added to all edges. Now that you’ve figured out how to use the sewing machine, it’s time to lay down a pattern of lines.
Elastic thread may be used for both zigzag and straight stitches, so go ahead and get started. Pulling out the elastic stitch while doing so will guarantee that you have appropriate tension. Cut the bobbin’s excess thread.
After adjusting the tension and spacing of the thread, secure it with a knot. Once the process is complete, you can rest easy.
Smocking
Using a light marker or pencil, mark the cloth with dots and a grid, which will disappear when washed. Dots and grids should be evenly placed and in a straight line.
It is entirely up to you how far apart you want to keep your spacing. Integrated smocking is possible with a lower gap, but smocking is not possible with a wider spacing.
Using a needle and thread, begin stitching the points on the template. To avoid looking out of place, use thread that is the same color as the fabric. A knot at the end of a method will ensure that everything is secure.
To finish the grid, make a last cut and read the instructions. The smocking procedure will be finished with this.
6 Things You Will Need For Shirring And Smocking
1. Lightweight Fabric
If you begin with a thick cloth, you will come to a halt. If the material is too heavy, you won’t be able to finish the job, and the finished product will look terrible.
2. Pencil Or Erasable Pen
Stitching with grids makes it easier to keep track of where you are in relation to the pattern. If you don’t, you’ll have to wait, ponder, and decide which path to take, which will take up valuable time. It creates a consistent look, which is tough to achieve otherwise. The time it takes to perform a task is cut in half when grids are used.
Xem thêm : How To Take Apart A Husqvarna Sewing Machine? Step by Step Instructions
Some people use erasable pens that are erased after a predetermined amount of time has elapsed. Everything you own can be put to good use. You don’t need to draw any patterns if you’re an expert with the pattern; you can start without it.
3. Ruler
It’s possible that you won’t need this piece, depending on the pattern. With the use of a ruler, you may achieve a uniform appearance by maintaining a straight line.
4. Thread And Pin
Shirring necessitates the use of high-quality elastic thread. It’s important that you have a variety of thread colors on hand for this project. The elastic thread is more pliable, allowing it to fit more snugly.
Keep a few pins on hand in case you need to attach anything. Smocking does not necessitate the use of elastic thread because there is no necessity for stretching.
5. Pattern Template
The underside of the cloth can be sketched with the use of a pattern template. Following the pattern’s instructions, you may next begin stitching.
6. Sewing Machine
It is possible to sew smocks by hand or with the help of a sewing machine. With the machine, you may get a finer finish that appears to have been applied by professionals. As a result, before you begin, double-check that you own a sewing machine.
Fabric manipulation is a term used to describe both of these processes, which can be used to embellish a garment. Its texture and volume are enhanced through imaginative gathering.
You should be ready to go now that you understand the difference, the process, and the requirements. Smocking embroidery is a technique that allows you to use any type of stitch you like. Both operations can be carried out in a variety of ways as well.
Starting with the color of the fabric, choose the thread color that will match it the best. Go ahead and check out some YouTube videos for additional information.
What Are The Necessary Things You Must Have For Smocking And Shirring Techniques?
Fabric, chalk or a detachable pen, ruler, sewing machine and thread are some of the tools you’ll need for smocking. Everyone who sews has all of these at their disposal.
Thus, there is no need to purchase the goods again. It is simple to learn how to do shirring and smocking. It should be simpler for you now that you’re aware of the distinction.
FAQs
What stitch do you use for smocking?
The conventional cable stitch can be recreated using a stretch stitch. Rows of zigzag stitches create a diamond pattern by passing two threads through the guides and needle and stitching the fabric in a bold ‘v’ form.
How do you prepare fabric for smocking?
To allow for gathering, your pattern should be cut 5 times wider than the pattern piece. Prepare the fabric by drawing lines about 12″ (12mm) apart. Pull the threads up and fix them at the sides by machine basting along these lines. Make sure the finished garment’s pattern size is the same as the finished gathers.
What are the two basic methods that can be used in smocking?
In order to add decoration stitches to smocked cloth, a fiber (often floss) is used. Pleats can be made by printing or pressing a pattern of dots onto the fabric. Hand pleats can then be created using the dots as a guide.
What are the materials and tools needed in smocking?
Lightweight, smocking-friendly cloth is needed for this technique. Lavender or voile fabrics made of cotton and silk are among the most common options. Cotton or silk thread in crewel embroidery needles is used to create smocking, which requires three times as much fabric as the finished product.

Conclusion
Finally! A smock may be sewn on a sewing machine in two simple stages.
Using elastic thread for the shirring makes this the simplest method. Smocking, on the other hand, can be done more conventionally by utilizing embroidery stitches to give the garment a little elasticity.
Thanks for reading and we hope you found it useful. Questions for us are always welcome.
Nguồn: https://spasifikmag.com
Danh mục: Sewing Tips


