Sewing a pillow closed is a simple process that only requires a few simple steps to learn. You’ll appreciate the convenience of being able to seal a pillow yourself to safeguard its filling. There may be times when you need to open your cushion and change the stuffing, even if you hand sew it.
Why is the closing of the pillow important? It’s important to safeguard the pillow’s interior if you want to keep it looking neat and tidy. Additionally, sewing a pillow shut will allow you to experiment with various closure methods.
Bạn đang xem: How To Sew A Pillow Closed? A Step-by Step Learning Guide
If you’re having trouble closing a pillow cover, one of the simplest solutions is to leave it open. The back of a pocket-style pillow cover includes fabric flaps that overlap one another. Pull the flaps closed over the pre-made pillow and place it between them. This is a simple way to hem a rectangle long enough to cover the entire pillow, with a little extra length to spare. Right side of cloth should be inside and hemmed ends should overlap when folding rectangle. Turn the casing right side out and sew the sides together.
Hand Stitching
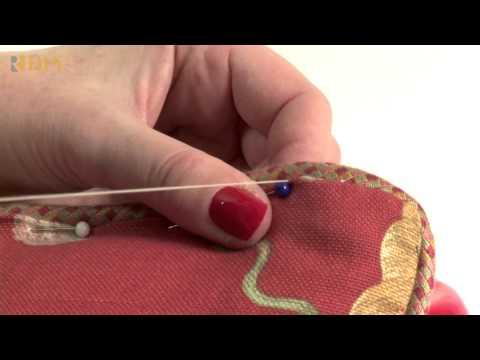
It is typical to hand sew the fourth side of a pillow to seal it shut. If you don’t plan on removing the cushion or prefer to use stuffing instead of a pillow form, this is the ideal way to employ. One side of the pillowcase must stay open while the other three sides are sewn together. Place a pillow inside or stuff the pillowcase after ironing the edges of the opening to the inside of the pillowcase. The slip or blind stitch, blind catch stitch, falling stitch, and whip stitch are just a few of the various options for securing the fourth side.
Flap
Make a pillow case that is more like an envelope rather than encasing the cushion. To close the pillow, pull the case’s top over the pillow’s top and tuck it inside. The complexity level is comparable to that of the pocket type, but the amount of fabric required is slightly more. This approach has the advantage of allowing you to embellish the pillowcase’s flap. The flap can be held closed by, for example, a set of beautiful buttons. Another good option for keeping the flap closed is hook-and-and-loop tape. Because it doesn’t necessitate the creation of a buttonhole, the tape has the advantage of being easier to use and perhaps undetectable if buttons aren’t to your liking.
Zipper
Xem thêm : How To Make A Shirt Pillow Without Sewing? Step-by-Step Tutorial
Adding a zipper can be a bit of a challenge, but it’s worth the effort because it makes it easy to remove the inner pillow for cleaning or to replace it with a new one. When constructing pillow covers, closing the pillow is usually the final process, but with a zipper, the zipper is one of the first tasks. Right sides together, sew one edge of two identical pieces of fabric for your pillow. The zipper should be placed in the middle of the seam once the seam has been ironed open. Sew the zipper to the garment. A zipper foot is required for stitching with a sewing machine. This will give you access to your zipper by ripping off the stitches that hold the pillow together. Simply sew the remaining three edges of the two pieces of cloth together after this step.
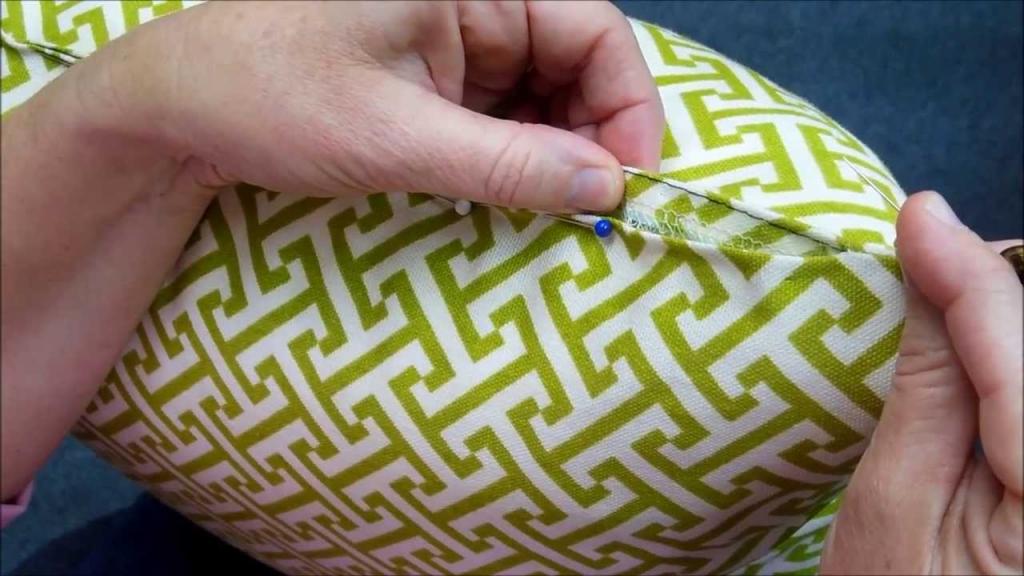
How to ladder stitch
Push your needle through one of the seams from the back to the front to conceal the knotted end of the thread within the seam for hand-closing a pillow. To begin your stitch, insert the needle into the opposing seam and pull it back up. You may now do the same thing on the other side of the seam crease.
The final step is to pull the threaded needle back and forth to tighten the stitches. To produce a clean seam finish on the pillow, conceal the ladder of connecting stitches. Finally, tie a knot by threading a short piece of the seam opposite where you emerged through the loop.
How To Sew A Pillow Closed By A Sewing Machine
Using a sewing machine to finish a pillow isn’t common because it’s difficult to place a partially finished pillow under the feed dogs. It’s more customary to sew thick stitches and then double-stitch the pillow’s seam to make it more secure. For those who must sew on the machine, you must leave a gap in the seam and instead utilize alternative techniques of closure to secure the pillow.
To ensure your sewing machine is ready to stitch, check the bobbin case and presser foot for any obstructions. To save time and frustration in the future, thread everything that requires threading while you’re at it. The final step is to close your pillow with an envelope.
Various methods of closing pillows exist, but an envelope closure allows you to rapidly swap out the insert. This makes it easier to clean your pillow, and if your pillow starts to lose its shape, you can always replace the stuffing.
How To Make A Pillow With Envelope Closure
Xem thêm : How To Make A T-Shirt Blanket Without Sewing? Complete Step-by-Step Guide
To begin, you’ll need to set aside about a quarter of the pillow’s width for a fabric flap. Create a flap out of the extra material on the pillow fold or cut and sew the piece separately. Afterwards, fold the wrong side of the pillow’s back panel by half an inch.
Pinning the front and back pieces together with their right sides together and the hemmed edges of the rear panels overlapping will make stitching easier. Cut the corners of the pillow in half and sew them together. To finish, sew the liner’s raw edges before reversing it.
The envelope closure can be changed to suit your preferences at any time. Buttoning the closing is a common approach to increase its security. In order to attach them, sew them to one final edge paired with one of the holes.

Conclusion
Making your own cushion is a fun way to personalize it. However, if you learn how to sew a pillow shut, you’ll have a clean seam and the pillow won’t end up spilling its stuffing after daily use. Before sewing a ladder stitch on the pillow, use a serger to prevent the fabric from fraying.
In such case, how would you go about it? A different type of cushion closure is an option in this situation. Because filling a pillow gap under the sewing machine is difficult, an envelope closure would be more appropriate.
If you don’t like the look of a finished seam on your pillow, you can always experiment with various methods of closure. An envelope closure, for example, makes it simple to remove the filler later. You may sew this type of closure with a sewing machine.
Nguồn: https://spasifikmag.com
Danh mục: Sewing Tips


