To make your handmade clothes look polished and well-made, you’ll need to master the fundamental sewing method of understitching. It’s also a lot of fun! (IMHO). As part of this tutorial, you’ll learn about the importance of understitching and how to complete this sewing task using photographs and videos.
What is an Understitch?
Necklines, armholes, and waistbands can be dressed up in a variety of ways. Most commonly, a lining or facing is used to create pockets, waistbands, and armholes.
The linings are usually the same size as the garment, but you can also have a half-lining that extends only halfway through the garment.
Bạn đang xem: What Is Understitching In Sewing? Preparing a Seam for Understitching
Usually a couple of inches thick, the facing is a little piece of cloth inserted into the garment.
Faced and lined garments have their right sides facing each other when they are sewed together and then folded to fit inside the garment. This is where you want it to stay, right?
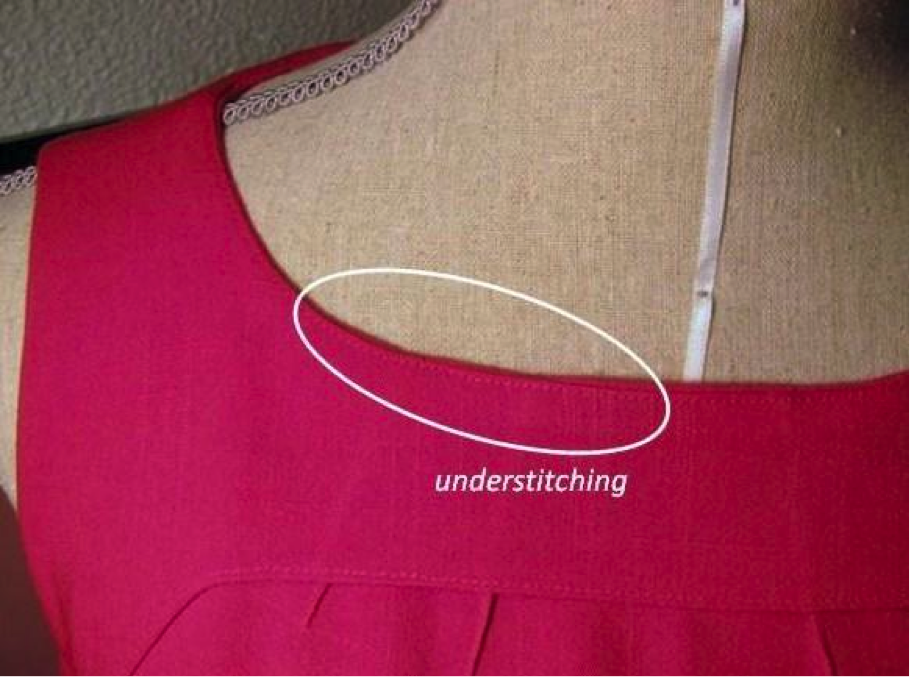
In order to keep the lining or facing in place, an understitch is stitched along the edges of the facing or lining closest to the neckline or armhole. This guarantees that everything is securely tucked away inside the garment, rather than peeping out from the right side and drawing attention.
You’ll Need:
- Thread
- Iron
- Fabric
- Scissors
On the right side, stitch the two pieces together in accordance with their seam allowances using a zigzag stitch.
Push the seam allowance to the lining or facing after the seam is sewn. It’s a great time to clip or notch any curves you’ve noticed in a neckline or neck area.
To the seam, sew at a distance of 1/8″ and 1/4″. This time, I guided the stitching using an edge stitch foot.
Press the facing towards the garment’s inner side.
You’ve finished! The interior should look similar to the image shown. For safety reasons, you’ll want your face to be flat and with a sharp edge.
Preparing a Seam for Understitching
Attach the main fabric, right sides together, to the facing or lining using a straight stitch.
Xem thêm : How To Thread A Singer Sewing Machine? 7 Easy To Follow Steps
To finish the seams, fold the lining or facing in half and cut it to the desired length of the two halves. Here you may find a video tutorial on how to grade and trim seams.
The seamline will be curved in numerous areas where sewing is required, such as the neckline and the armholes. Then you’ll have to cut 1/4-inch seam allowances along the line of stitching, being careful not to cut the stitching itself.
Sewing an Understitch
The fabric should be positioned on the machine such that it is facing the machine’s feed rollers. Main fabric to the left, lining or facing to right, as shown.
Make sure the seam allowances are tied into the lining or facing.
Stitch 1/4′′ from where the two fabrics meet, which is the point where the main fabric and the lining meet. Sew from the facing or lining side, ensuring sure to catch the seam allowances. Make sure you’re well-secured with a backstitch on both sides.
When stitching, you should gently pull the two pieces of fabric apart so that the seam allowances may be folded into the lining or facing.
It’s also a good idea to check under the lining facing every now and then to make sure the seam allowances are still in the correct place.
5 Tips For Neat Understitching
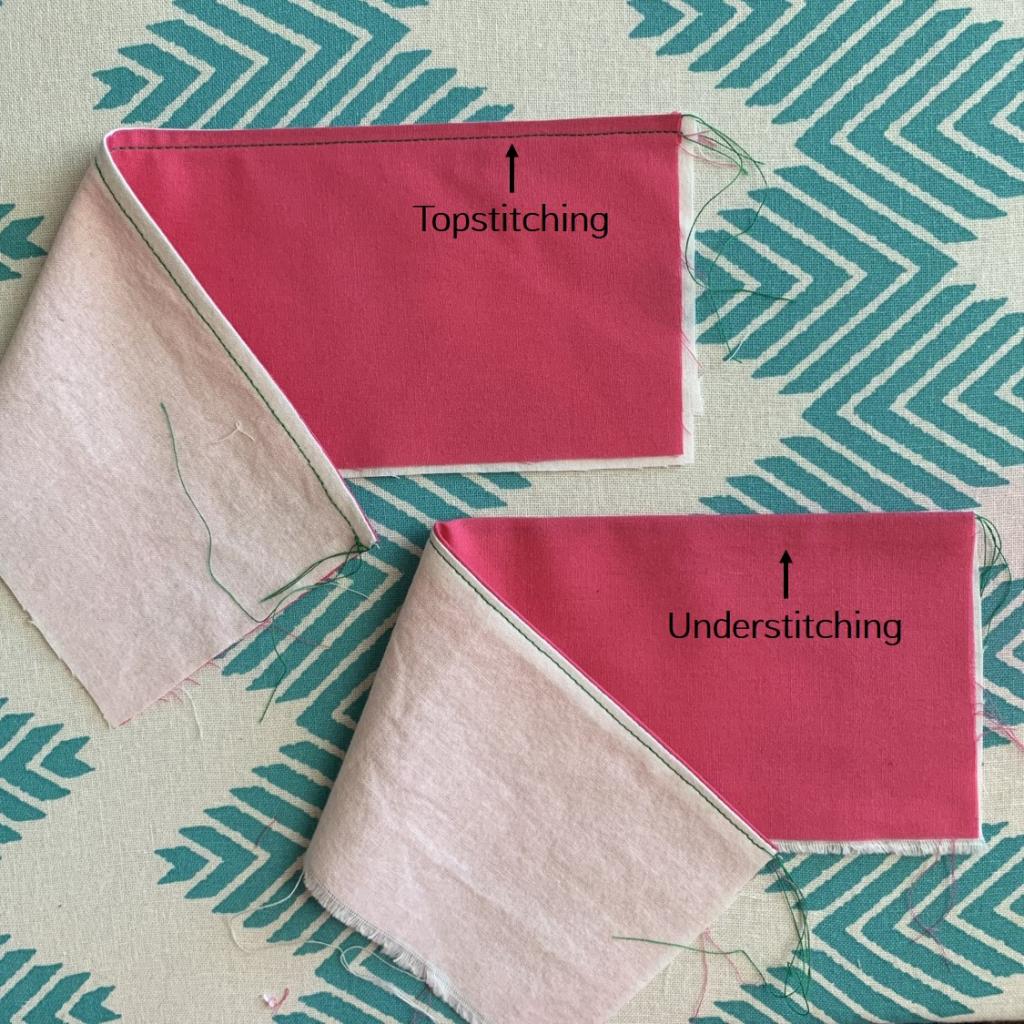
A dressmaker at home will need a variety of stitches in their toolset, including staystitching, topstitching, and edge stitching… Understitching is important, too!
Are there any significant differences between the two methods of stitching? As soon as the face or lining has been sewn into place, the seam allowances on both pieces are stitched to the facing or lining to be attached.
The reason why you understitch is a mystery to me. Stitching near to the seam allowances prevents the lining or facing from stretching out when the cloth is flipped on its side as the name implies.
It’s easy to forget about this step in the race to the finish line. In contrast to this, understitching will give your hand-made garment a more polished appearance. There are also no annoying internal components poking out of your garment when you wear it.
1) Grade the seam allowances
The lining or facing seam allowances should be trimmed somewhat smaller than the garment seam allowances before understitching begins. When the item is pressed beneath the presser’s foot, the smaller seam allowances on the facing or lining will be sandwiched between the remaining (wider) layers, making it less likely that they will get caught and tangled, resulting in smaller seams.
2) Avoid ridges
Xem thêm : Who Makes Baby Lock Sewing Machines? Is Baby Lock A Good Sewing Machine?
While stitching, be sure that the fabric doesn’t get caught in the seam that connects the lining or facing of the garment. Using your fingers, keep the fabric away from the seam while the project is pushed under the presser foot.
Understitching images are often included in our patterns’ instructions, so that you can see exactly what I’m doing when I’m stitching. Alternatively, you can sew with the right-side facing up to keep the cloth from puckering at the seam.
3) Keep the needle parallel to the seam line
If you can keep your understitching at a consistent distance from the seams, it will look more professional. As a last resort, when I’m exhausted or pressed for time, this is the one thing I’ll do to get the job done. It’s true that it’s hidden on the inside of your clothing, where no one else can see it. If I want a flawless finish, I’ll spend extra time cleaning up my understitching. To address this, there are several options.
The first option is to remove the presser foot and measure 3mm (1/16-1/8in) from the needle’s edge. A ridge can be used as a reference point. At this point, the seam should be aligned and held in place while sewing.
Allow yourself to sew from one side if you have a sewing machine that lets you do so. Your seam allowances should now be a distance of roughly 1/16-1/8in away from your needle point.
4) Sew into corners, not out of them
If you’re sewing a round neckline, you can go all the way around until you get to the end of the round. The button stand face is grafted into the neckline facing, so if you’re sewing anything similar to Seren’s outfit, you won’t be able to insert your needle right to the edge.
Once you’ve gone as far as you can, you can change direction and start over at the other end of your corner. An effective way to secure the lining or facing is by understitching.
5) Know when not to bother
Finally, when is understitching necessary?
There’s no need to sew under the facing if the fabric is well-pressed and you’re not convinced that the facing will appear to jump out. As a precaution, if the fabric doesn’t press well after flipping the facing to the inside, I’d probably understitch.
As a novice, if you aren’t comfortable sewing close or even from a distance, you may want to consider taking a course. Stitching understitching is not a problem at all. If you’ve never used a sewing machine before, this step will be challenging. In fact, I frequently exclude it from beginner-level instructions (such as the Bettine dress) because of this.
When my sewing instructor told me to sew the neckline of my first dress during a class, I was a little taken aback. Because of the more experienced teacher’s reminder, I was able to finish my sewing project! When I was granted an exemption from this requirement, I couldn’t help but sigh contentedly.
Conclusion
Is this article useful to you? An additional straight stitch is applied after attaching the fabric’s lining with its edges, and this is understitching and sewing. That manner, especially on clothing, the lining is not apparent.
Nguồn: https://spasifikmag.com
Danh mục: Sewing Tips


