A Serger is a handy tool for reducing excess fabric and sewing neat, attractive hems along the cut edges of your fabric. However, not everyone can afford to purchase one of these machines. Consequently, you’ll need to come up with some other way to complete the assignment.
A regular Singer sewing machine will do the job for you. What follows is further instruction on the Serge technique, which involves the use of a sewing machine.
Bạn đang xem: How To Serge With A Sewing Machine? Everything To Know!
How To Serge On A Sewing Machine Easily
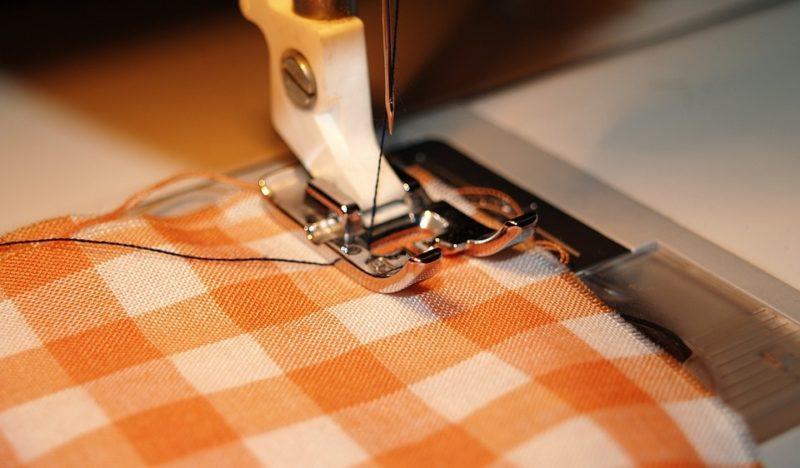
Step 1. Attach the foot to the machine and install the machine
- Trim your seam allowance to about 1/4 inch before you sew.
- Remove the regular presser foot by following the instructions for your sewing machine.
- Serging requires a special zigzag or overlock stitch, so switch to an overcast foot and use your machine’s stitch selector to make the appropriate choice.
- Any presser foot with a large hole in the centre can be used in place of an overlock or overcast foot.
- Stitch width and length should be adjusted appropriately, usually between 2.5 and 3.5 mm.
- First, position the fabric under the foot, and then double-check that the machine’s guide is lined up with the fabric’s raw edge.
- Seam allowances are finished together for lightweight to mediumweight textiles, and in a different manner for heavierweight fabrics.
Step 2. Begin sewing
- When you feel the needle striking your foot, slowly turn it toward yourself and adjust the breadth of the stitch.
- If you want perfectly equal stitches, line up the needle with the bridge. In addition, zigzags can be stitched along the hem of the fabric.
- Before stitching, check that the raw edges line up with the foot’s guide.
- Double-check that the rightmost zigzag edge just grazes the edge of the fabric.
- To reinforce the zigzag stitching, backstitch at the beginning and end of each seam.
- After you’ve finished stitching, you shouldn’t tug on the fabric in any particular direction to avoid ripping out your stitches.
- Pressing open the seams will help to seal them.
Can A Sewing Machine Serge?
It is possible to serge with a sewing machine in the absence of a dedicated serger. Using the overlock foot, you can achieve a professional-looking finish on your edges, just like when using a serger. When using an embroidery machine to finish seams, it is important to know whether or not an overlock or overedge stitch is included in the machine’s features.
Master the serger. the sewing machine to learn more about this serger. Serging with a regular sewing machine seems pointless.
How Do You Serge With A Regular Sewing Machine?
Make sure your ordinary sewing machine has an overlock stitch and that you are using it to serge. However, the serger look may be achieved using a ladder stitch finish if you don’t have access to a serger.
Do you know that a sewing machine may be used for quilting as well? Seek to Understand
the use of an embroidery machine in the production of a quilt
In our user-friendly guide.
Do You Serge Before Or After Sewing?
You can serge either before or after you sew the seam. There are seamseamsewers who also serge. A common point of debate among sewers is whether one should begin with sewing machines or sergers. But in the end, it comes down to personal inclination and the nature of the task at hand.
Anyone who has never sewn before should do so before attempting to serge. There may be less room for error, especially when dealing with challenging seams. Sewing zippers, for instance, is much easier if you have access to a serger.
Do I Overlock Before Or After Sewing?
You should secure your overlocks whenever you feel they are snug when sewing, however this will vary according on your preferred sewing posture. Remember that pushing the seams open after sewing or overlocking the edges before sewing might help reduce bulk in some designs. In other styles, the edges are secured after being basted or sewn on a sewing machine.
Overlocking the seams before topstitching is another option when making garments. This will allow you to try on the clothing and make any necessary alterations before you finish sewing the seams.
How Do You Finish The Edges Of Sewing?
- Serging
- Backstitching, or topstitching, or edge stitching
- To sew in a zigzag pattern
- Hemming
- Using pinking shears, you can trim the edge.
- Hemming
- A potentially biased audio recording
- France seam
How Do You Finish The Edges Of Fabric Without Sewing?
Hem tape
Tape should be applied over the folded edge of the fabric after it has been ironed in place. The fabric is then ironed while folded over the tape.
Fabric glue
For items that won’t be worn or washed often, fabric glue can be used to seal the cut edge and avoid fraying. Run a bead of glue along the raw edge of the fabric, press, and then seal.
Pinking shears
Pinking shears, often known as zigzag scissors, are a quick and secure way to finish an edge. Just make a straight cut as close to the edge as you can get, and you’ll be done.
Can You Serge With A Sewing Machine?
With three to five bobbins, most sergers can accommodate multiple threads at once for a neat and professional finish. A serger is an indispensable tool for quilting and clothing construction, allowing for cleaner seams and a more polished final product. But what if you don’t sew often enough to warrant the expense of a serger? Never fear, your sewing machine is there for you!
Understanding Overlocking, Pin, and Ladder Stitches
Even though they both do the same thing, overlocks are an alternative to sergers. Machines of this type are called “overlockers” in the United Kingdom, but “sergers” in the United States. However, an overlock stitch can achieve the same result without the need for a separate, more expensive machine.
Using a serger properly will result in a polished look for your seams. However, an overlock foot can simulate the look of a serged edge while effectively closing off raw edges. Only you should notice the difference between a genuine, high-end designer bag and a great replica.
An overlock foot is required for overlocking, but it’s a little price to pay for professional results. However, having a machine with an overedge or overlock stitch would be quite useful. This is the standard method used by most sewers, so naturally, most gadgets adhere to it.
Instead, you may use a ladder stitch or a pin stitch. The ladder stitch, also known as the “invisible” stitch, can also be used to elegantly finish seams and edges. Attaching lace tape to cloth typically entails using a pin stitch, which is both decorative and reliable.
All of these variations on a common theme—the bolstering of security through the design of the stitch—have one thing in common.
How Stitch Width and Stitch Length Can Impact a “Serged” Edge
Stitch width and length are important factors to think about while completing an edge. Most sewing machines achieve optimal results in the range of 5.5 when using an overlock stitch. For ladder stitches, even shorter lengths are preferred (1.5 is possible). Learn how your machine works by cycling through various test strips to see which produces the most consistent and precise final product.
Overlocking Feet – Do You Need One?
The majority of the time, you will require an overlock foot when using an overlock stitch. Either one came with your machine or you will need to buy one separately. Whenever you go shopping for afoot, it’s a good idea to buy the same brand as your sewing machine.
The ladder stitch, however, might be the most visually similar to a serged one. The ideal approach to finish the edges of your project may depend on the fabric you’re using, but overedge and overlock stitches are always a good option. To avoid seeming like you used a serger, ladder or pin stitches are your best bet.
Serging and Overlocking at Home
While an actual serged edge requires a serger, the same principle and effect may be achieved with a regular sewing machine and an overlocking foot. The foot is essential for the creation and reliability of overlocking stitches and pin and ladder stitches. It’s up to you and the capabilities of your sewing machine to decide which stitch will give you the desired serged look.
Try folding a scrap of fabric to see which you prefer in terms of appearance or snugness if you can’t make up your mind. Developing proficiency in this manner of quilting and edging does take some time, so be patient with yourself as you learn.
Our online shop has everything you need to get a professional-looking overlock stitch.
How to Serge With a Singer Sewing Machine?
Since Sergers may be quite pricey, you may be wondering whether there is another way to finish the edges of your fabric.
That being said, you may achieve the same result on the edges of your fabric by using your singer sewing machine. The two most prevalent approaches are outlined here.
Step 1: Removing Your Standard Presser Foot
For this procedure, you’ll need to make extensive use of a presser foot holder. Singer sewing machines allow you to do this by removing your foot from the holder.
Step 2: Attaching the Overcast Foot
Here, the strategy is essentially identical. To free your foot from the shadowed foot holder, you’ll need to work slowly.
Step 3: Choosing Your Overcast Stitch
Next, decide on the stitches you’d like to use for your work. Both zigzag and overlock stitches are frequent options.
Step 4: Position Your Fabric Beneath the Foot
The method you employ to fasten your clothing to the sewing machine will be based on the type of fabric finish you use. Check that the guide on your sewing machine is lined up with the edge of your fabric before you begin stitching.
Step 5: Creating Zigzag Stitches
If you want perfectly equal and constant stitches when sewing a zigzag pattern along the hem of your cloth, make sure the needle of your sewing machine is aligned with the bridge.
Step 6: Do Not Pull Your Fabric in Either Direction
If you want to be able to snip the threads fast when you’re done stitching, you may want to lightly pull your fabric in the opposite direction. Keep in mind that if you tug too hard on your fabric, you could end up ripping the stitches.
2 Different Ways to Serge With a Singer Sewing Machine
1. Using Zigzag Stitch
Using a zigzag stitch, you may make designs along the hem of your fabric that are both elastic and long-lasting. Make a note that these one-of-a-kind stitches can be made with your bare hands.
Step 1: Create a Hole Using Your Needle
The thread needs to be pulled through the fabric using the needle. For this style of stitch, you’ll need a much smaller needle. Since this is the case, it will aid you in keeping the fabric’s natural grains.
If you want to sew zigzag stitches all the way to the end of your fabric, you’ll need a good long piece of thread.
Step 2: Make a Vertical Stitch Line
Start stitching vertically from where you pricked. Keep in mind that the space between your paints should stay the same while you stitch. A quarter of an inch is the most suitable width.
Step 3: Begin From the Initial Point
Create a new line of stitching, but this time you’ll be stitching in the opposite direction, back toward the origin. Also, remember to tighten the thread a little.
The starting point of the stitching project will serve as a reference for the rest of the work. Take care to keep your stitching even and straight.
Step 4: Make Diagonal Stitches Along the Hem of Your Fabric
Make sure that there is a consistent space of about a quarter of an inch between the diagonal points on your fabric.
You need to do this over and over again, being sure to keep the same space between any two spots of stitching. Zigzag stitches are easier to make if the fabric is flat, therefore that’s what you should do.
2. Using an Overcast Presser Foot
Using a standard singer sewing machine, you can give your garment’s hems the finishing touch they deserve. There are a lot of components in a regular sewing machine whose roles you might not fully understand.
You can avoid buying expensive Serger machines if you learn how to properly use an overcast foot, for example.
Keep in mind that before beginning your serging project, you may need to understand a few tricks on the usefulness of this component.
So, how does one go about using a regular Singer sewing machine? Reading on will provide you with more information that should help answer your issue.
How to Serge Using the Lock Cutter Machine Attachment in a Singer Machine?
In the absence of a Serger, this instrument becomes indispensable. Lock cutter devices for sewing machines are easily repaired and ready for use again.
Xem thêm : How To Finish Sewing A Pillow After Stuffing? Comprehensive Guide
The attachment produces results that are comparable to those of a standard serger. Continue reading to learn how to install and use this accessory with your sewing machine.
First, hook up the gadget and set the Singer sewing machine to the stitch type you like to use. Using a stitch width of roughly 5 mm, or a more appropriate width, will help immensely.
We recommend using a stitch length of between 2 and 3 mm. Keep the fabric’s edge from covering the presser foot, as this can cause your stitches to become distorted.
For use as a benchmark while trimming cloth, make a marking at the cutting gauge’s front. Also, you can use this instrument to finish the stitch line with a clean, uniform edge.
As a second step, you should consider making a cut of about an inch along the edge of the fabric before inserting it into the device. The optimal width for this situation is between 2 and 5 millimeters. Keep in mind that this is the size of the fabric that needs to be cut down to.
When you’re satisfied with your cut, move on to Step 3 and load the fabric into the machine. Now is the time to make sure the presser foot and needle are raised just a tad. Drive the fabric to the left through the plastic surface of the machine.
Finally, with the fabric where you want it, slowly lift the presser foot to release it. It’s best to get started stitching slowly and carefully, watching where the presser foot is at all times.
If you don’t want rings to form on the fabric while you sew, you may need to give the thread a gentle tug.
Be aware that this method is only useful if you want to accomplish a great job regardless of whether or not you have a Serger. The completed Serge will look exactly the same as a Serge made with a serger.
Important Tips to Note
- Stitch steadily along the edge of your cloth by aligning the edge with the guidance on the overlock foot. If you want specific outcomes from your equipment, you must take full control of it.
- With curved hems, a uniform and constant stitch line can be achieved by carefully centering the fabric and repositioning it in the appropriate line after a few stitches.
- When removing the fabric from the machine, handle with care. To protect the stitches you’ve already done, try tugging in the opposite direction and at a slower pace.
- Lightweight materials are notoriously difficult to overlock. Using excessive power to pull a lightweight material could wreak havoc on the fabric’s alignment. Therefore, take extreme caution when dealing with such information.
- Cloth stabilizers are recommended to prevent further wear and tear on your fabric.
- When opposed to a straight stitch, overlocking stands out more visibly on your fabric. When overlocking, it’s important to use a thread that weighs as little as the fabric.
- If you want to, you can over-lock the seam of your cloth after you’ve finished the rest of the project. It would be a shame to ruin your fabric and have to start over.
- Before you begin to overlock, you should cut the edges of the fabric to a uniform length. Maintain a moderate width; a quarter of an inch is ideal for a polished end result.
Can You Serge Using a Regular Sewing Machine?
Despite the high cost of sergers, you may want to experiment with alternative methods of serging using your regular sewing machine.
Actually, a sewing machine can be used for serging. However, you might need to pick up certain skills if you want to succeed.
Is There a Serger Attachment for a Singer Sewing Machine?
If you’re looking for an alternative to utilizing a serger, the Singer Lock Cutter may do the job just as well. Due to the high cost of sergers, this machine can be used instead.
All you need to do is pick up a few tips on installing it on a regular computer, and you’ll be all set.
13 things you need to know about a serger (overlocker)
Now and again you come across the term “serger,” and you find yourself wondering, “What is a serger and do I need one?” Isn’t an overlocker an option, too? Does that mean you have two different machines? Or are these just additional features of the common sewing machine?
I’ve compiled a list of the most frequently asked questions I get regarding the serger sewing machine and how to operate it in this article.
1. What is a serger/overlocker?
Multiple thread cones are used in an overlocker/serger sewing machine. Two needles are used to create the stitches, and the loopers are used for the remaining threads.
The overlocker typically includes a serging knife. It finds widespread application in industrial sewing, particularly for knits.
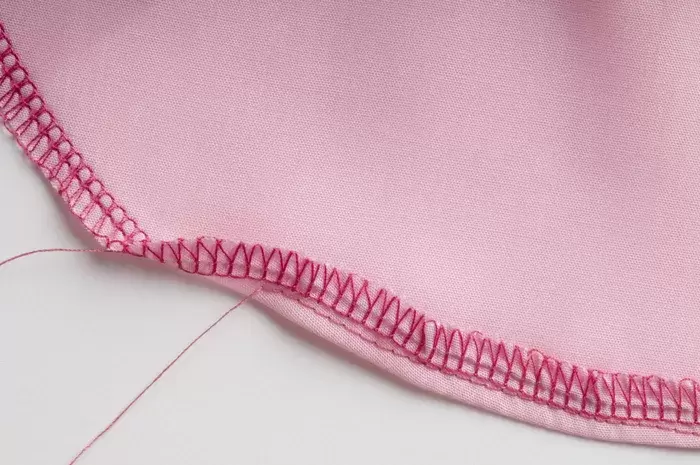
In this picture, you can see a seam that was sewn with a serger on both sides of the fabric.
In order to provide stronger and cleaner seams on woven materials, 5-thread sergers add a chain seam slightly in from the overlocker seam.
2. What is the difference between a serger and an overlocker machine?
The serger can overlock seams, trim the cloth, and cut the fabric’s edges all at once. Overlock stitches are the ones most people picture when they hear the term “overlocker.” Typically, the main feature of a serger is its capacity to serge. Overlockers without a serging knife are the exception rather than the rule.
There is no difference between the two terms, and they are often used synonymously. Although “overlocker” is more common in Europe, “serger” is more popular in North America. In any case, it appears that any name may work.
Therefore,
In this essay, I will refer to the same machine by both names, as it is a sewing machine that overlocks and cuts at the same time.
3. What is the difference between a serger and a regular sewing machine?
The stitches produced by a standard sewing machine (also known as a lockstitch machine) only require two threads. A spool of thread is in the bobbin while the needle is full. They work in tandem to produce a stitch that secures the fabric.
The standard stitches on most sewing machines are the zigzag and the straight stitch, but there are many variations available. The zigzag stitch is typically used on elastic textiles. The straight stitch is the most common and versatile stitch for home sewing.
There is no bobbin in a serger. For each seam, it uses a variable amount of loopers. In either case, it prevents the pieces of fabric from unraveling and helps them stay joined.
Overlocking a seam makes it stronger and more adaptable. The seams of knit textiles, upholstery, etc., can be joined with this method, and the results will be strong and durable. The serger seam is strong and elastic because of the way the threads join. Because of this, knits tend to favor it over other textiles.
4. What is a serger/overlocker used for?
The overlocker is a versatile sewing machine that is most often used to finish raw edges of woven fabrics and to sew knit fabrics together. Overlocker-made seams tend to last a long time. They’re able to withstand significant amounts of stretching without breaking.
5. Can I learn to sew with a serger?
There are some differences between learning to sew on a standard straight stitch machine and learning to sew with a serger machine.
Due to the serging knife, there are some nuances and a need for skill and extra care.
Adopting the machine’s movements into your own will require some practice, but with the help of the manual and your own diligence, you can master it. You’ll find it simpler to use as time goes on.
I’m the one operating the serger on the right. I prefer this machine to the straight stitch and use it whenever possible.
Although this is how things are now, that was not always the case. This was originally put to use on some T-shirts that we had stamped and were ready to put up for sale, and they were my first foray into the medium.
In passing,
There were a couple of them whose side seams developed into something peculiar. No, they were unable to reach the store in time.
Take some time to hone your abilities on bits of material, as suggested by yours truly. Then, attempt to stitch together a couple of pieces of fabric. Experiment until you master it; try cutting with a curved blade and then one without.
Experiment with different speeds and look at the density and suppleness of the stitches on various textiles. This is not nearly as difficult as it may seem at first.
I think this Serging for Beginners course is perfect if you’ve never used an overlocker before and want to learn the fundamentals. Chris James’s “The Complete Serger Handbook” is another excellent resource for learning more.
6. Can I sew without a serger?
Without a serger, sewing is still possible. Without it, you can still finish your sewing project and come out looking good.
But I won’t sugarcoat it; I absolutely rely on mine. Sewing proficiency and outcomes improve as a result. In the same way that having quality tools is essential to mastering any other skill, the same holds true here.
7. How to use the overlocker machine?
You naturally want to put your shiny new gadget through its paces as soon as you get it.
But,
Wow, that’s a lot of work! No matter which way you turn, there is a thread heading up or down. If you want to know how to do something, reading the handbook is your best bet.
Manufacturers vary in how they arrange the components, how they thread the needle, and how they control the size and spacing of the stitches (tension).
Before their initial usage, many sergers need to be oiled.
There will likely be tension and differential feed changes required (if your serger support feed options).
Aside from those exceptions, using a serger for sewing is simple and uncomplicated. All of the information can be found in the user handbook.
8. Can a serger replace the regular sewing machine?
Due to the need for straight stitches in many sewing applications, a serger is not a suitable substitute for a traditional sewing machine.
Xem thêm : How To Thread A Morse Sewing Machine Correctly?
The primary functions of a serger are to finish seams and eliminate cloth fraying.
Therefore, A serger is useless for regular sewing projects like hemming, curtain repair, zipper replacement, etc.
As applied to textiles, If you just use a serger to sew two pieces together, the seam and the fabric’s raw edges may eventually tear. Alternatively, the seam can look a little off from the front.
Therefore, the existing straight stitch is supplemented with one (a five thread overlocker will do both).
For starters, there’s the standard straight stitch. Adding a different kind of sewing machine to your repertoire is like leveling up. With just the standard machine and some basic tools, you can accomplish a lot.
But, A serger machine is a useful addition to the sewing gear of anyone who sews frequently, especially if they sew a lot of knits.
9. What types of overlockers/sergers are there?
The amount of threads used to create the loops is the key differentiator between overlockers. Four-thread and five-thread overlockers are the most popular.
The five-thread versions are popular because they add a straight stitch to the standard serger seam, which is especially useful when working with woven fabrics.
Overlockers can be used in both industrial settings and at home. For many tasks, a domestic one will serve just well if you take care in your selection.
It’s important to think about things like how high the pressing food is lifted, how stable the machine’s body is so it doesn’t move about while you sew, how simple the machine is to maintain and repair, and so on when making your purchase.
Most crucially, the scope of the project and your ultimate goals.
10. Do I need to own a serger?
That, of course, is a matter of taste.
While a serger will make your sewing life easier, you can complete most projects without one. It provides a seam the look of being constructed and increases its longevity. For me, it’s an absolute necessity because of how much time it saves. Using my trusty overlocker, I work with knits on a daily basis.
Regardless, the cost of an overlocker is significantly lower than it was previously portrayed to be. For roughly $200, you can purchase a decent one.
11. Should I pick a domestic or an industrial serger?
A home serger is enough for hobbyists, those who occasionally do alterations, and those who produce a few items at a time for sale. Everything you make comes out looking polished and professional.
Heavy-duty industrial sergers can handle multiple layers of thick fabric and a wide variety of materials, including sequins, upholstery, and several layers of denim.
I recommend investing in an industrial model if you plan on using the machine frequently for a variety of tasks and materials. Industrial sergers are, without a doubt, the best option.
But,
They represent a big financial commitment that you may not even require.
When compared to home sewing machines, industrial sergers have less possibilities for creating different sorts of seams (such as rolled hem and speciality stitch capabilities) and require extra accessories to accomplish this. This can quickly increase the total cost.
Additionally, you should think about the fact that they need additional room. An individual stand and pedals are included.
Domestic sergers are a good option if you conduct most of your sewing at home and use the serger for things like clothing and crafts.
12. How to thread a serger?
Threading is a major pain point for people who use sergers. Don’t be scared; I’m not enjoying this any more than you are.
Threading a serger is notoriously difficult, and it seems to be the norm. But, like with anything else, all you need is practice.
It’s unfortunate that there is no one correct method for threading a serger. A user’s handbook or YouTube instructional tailored to the specific serger model and make can be helpful for instruction.
QUICK TIP
Anytime you switch colors on the serger, you won’t need to rethread it. There’s a foolproof, time-saving method that functions with any serger. Check out the clip down below to get an idea of how.
FAQs
Can you Serge with regular thread?
A serger can utilize regular thread, but it’s more expensive and not essential. In around 20 minutes, you’ll use up all of your supplies. Unless you’re completely out of thread at midnight and have no choice, you probably shouldn’t use overlock thread on a standard computer.
Can you overlock on a normal sewing machine?
Sewing with an overlock stitch The thread can wrap around the edge of the fabric, which stops it from coming undone. The tiny miracle that is this sewing machine foot makes it possible to achieve an overlocker-style finish on any sewing project. An overlocking foot is available for purchase.
Can you do basic sewing with a serger?
When compared to stitches created by a standard sewing machine, the ones produced by a serger are more robust and stretchy, which means your finished garments and accessories will last longer. When you’re done stitching, a serger’s built-in blade may trim away any remaining fabric. Perfect hems can be achieved without any additional trimming.
Do I really need a Coverstitch machine?
A coverstitch, however, is an excellent investment if you often sew knits or plan to start. You can use it to make jeans, as well as to finish off necklines, create decorative seams, and connect elastic. Because of this, the machine is adaptable to your needs as they change.
What stitch to use if you don’t have a serger?
Zigzag Is The Number One Seam Finish When working with thick or bulky textiles, the zig-zag stitch is often utilized as a seam finish instead of a serger. Use it with heavier materials if possible. When the color thread I require isn’t in my serger, I’ll zigzag the seams closed for speed.
Do Overlockers need special thread?
Using a high-quality, lint-free thread is crucial if you want professional results from your overlocker or coverstitch machine. Because of this, we stock only the finest Polyester 120 and 180 overlocking thread.
Do Sergers need special thread?
For the serger’s interlocking actions to work properly, special serger thread is required. In addition to passing through the machine without any hiccups, it will also keep the edges from becoming knotted up thick.
How many spools of thread do I need for a serger?
The thought of having to use FOUR spools of thread to sew the most typical 4-thread overlock construction seam is enough to make a new serger owner nervous.
Should you overlock before or after sewing?
Once you’re done sewing your garment together but before you add the last decorative stitch, you can use an overlocker to seal the seams. Before you finish the seams in this way, you should try on the garment to make sure the fit is perfect.
What is the difference between a sewing machine and an overlocker?
An overlocker, in contrast to a sewing machine, can use three to five cones of thread simultaneously. It is possible to make a wide variety of overlock stitches by using numerous threads. Although some more advanced models feature a twin needle mechanism and can use two threads at once, basic sewing machines only use a single thread.
Is it worth buying an overlocker?
If you plan on making a lot of apparel, working with stretch fabrics, and creating projects with a polished finish, an overlocker is a worthwhile investment. If you always use bindings to finish your seams or produce home decor projects that don’t call for overlocked seams, you don’t need an overlocker.
Can a serger sew a straight stitch?
Pintucks like this are often created on a sewing machine using a straight stitch and two threads serged together. Without using a knife, these pintucks were created by securing two threads along a folded edge. Compared to regular sewing, the serger produces a more attractive pintuck effect.
Are Sergers hard to use?
If you start putting pressure on your feet while operating a serger, you’ll quickly discover that the machine moves much more quickly than you anticipate, and that it’s much more difficult to maintain precise control over the path of your stitches when you reach curves or angles. If you make a mistake when using a serger, you won’t just sew in the wrong spot—you’ll actually CUT the cloth, which is far more difficult to fix.
What does coverstitch look like?
An expertly executed coverstitch resembles two rows of stitching on the front and a serger-like stitch on the back, giving the hem a polished appearance. Two needles create a double-stitched appearance, while three needles create a triple-stitched one while sewing a coverstitch.
What is the difference between a coverstitch machine and a serger?
While sergers have two loopers, the coverstitch machine just has one. Different from the coverstitch machine’s lack of a cutting blade, the serger’s two blades smooth out the fabric as you stitch.
How do I choose a coverstitch machine?
It’s a good idea to compare and contrast the available coverstitch machines before making a final purchase. Presser foot with added height; outside thread cutter; color-coded threading guide. Warranty period is 1 year (parts & labor) and 5 years (electric).
How do you finish the edges of fabric without sewing?
Nail polish is an efficient, low-cost method for preventing cloth from further fraying at the edges. The best results are achieved when using very light textiles. Using a small brush, a coat of nail polish is painted around the raw edge of the fabric, as you can see in the following example.
What raises and lowers the presser foot?
Accessories for Sewing Machines 3.01 The needle pierces the cloth and pulls the top thread through to make a stitch; the presser foot lifter raises and lowers the presser foot; the A B switch activates the machine’s light and power; and the stitch pattern control adjusts the width and spacing of individual stitches.
What is the easiest overlocker to thread?
The Babylock Victory is the machine for you if you need automated tension, a needle threader, and air threading. In terms of ease of use, this overlocker is without peer.
Is coats moon thread any good?
Coats seems to have slightly higher-quality threads, as would be expected from a luxury brand, and it’s cheaper per yard and per pound. While there may be fewer color options, you do not have to purchase three times as much.
What weight is coats moon thread?
2,78 Kilograms White and black polyester used as the material. Total 2.78-pound weight Product length, width, and height are all 30 x 30 x 15 centimeters. There are 48 of them.
Conclusion
Really, that’s all there is to it! An overlocking foot and either the overcast or zigzag stitch will give you a basic understanding of how to use a sewing machine. In case your sewing machine doesn’t have a lock stitch setting, you can always resort to the ladder stitch or pin stitch.
If you don’t have access to a serger, we hope this guide has been helpful. Complete the form below to contact us with any inquiries you may have.
Nguồn: https://spasifikmag.com
Danh mục: Sewing Tips


