There are four ways to learn how to sew a pillow after stuffing it. That way, you can find the best strategy to secure your cushion. Be sure to close your pillow when you’ve finished filling it. Failing to do so can reduce the pillow’s lifespan.
In addition, certain closures are fixed, while others can be repositioned. Products that function best with a specific closing approach may be what you’re utilizing. After reading this post, you won’t have to worry about your pillow anymore.
Bạn đang xem: How To Finish Sewing A Pillow After Stuffing? Comprehensive Guide
How To Close A Pillow After Stuffing
A pillow’s closure does not necessarily signify that the stuffing has been removed. A cushion can only be closed after it has been stuffed if it has been sewn closed on the open side. Following the shaping of the pillow with the stuffing, this instruction will assist you in closing your pillow utilizing several closure techniques.
Steps to Close a Pillow with a Sewing Machine
Pillows are among the simplest sewing projects that beginners can do in order to improve their skills. Closing pillows is a cinch now that you have easy access to all the necessary equipment. There’s a good reason why stitching the cushions looks so routine. They’re easy to use, quick, and open up a plethora of possibilities for experimentation and personalization.
Making your own pillowcases and pillows might save you a lot of money over buying expensive ones. It also allows you to use the fabrics that are best suited to your personal taste in interior design. It’s easy to sew a pillowcase, but when you need to fill in a gap in your cushion, things get a little more difficult.
There are a few things that must be in place before you start the project.
- A pillowcase in the same color family as the threads will do, but if you like a different shade, go for it.
- Prepare your sewing machine for use. Take a look at the bobbin and make sure it’s in the right place before you start sewing.
- It can be filled with whatever you like. It’s better to choose with something that can be washed in the machine, is soft, and can withstand stress.
According to the type of substance, The open side of the cushion is normally left open to fill with stuffing. To prevent the loss of fillings and threads from pillows, the open must be plugged.
The envelope closure method is the most widely used. Cushion foam can be easily removed and reinstalled because of the polished back. To make pillows that need to be washed, this is an excellent tool. You may also use this method to make an open-faced pillow without sewing zippers.
To begin, this is the first step
Trim the flap to a third to a fourth of its original size. For the flap, you can either cut and sew a separate piece, or you can simply lengthen the pillowcase.
The second step
Fold and press the opposing edge another half-inch (1.3 cm). Continually repeat this method for the remainder of the back panel. Fold each hem to the inner fold.
Xem thêm : How To Hem Stretch Fabric With A Sewing Machine?
The Third Step
Both the front and back pieces of the pillow have matching right sides and raw edges. There is an overlap of seams in the back panel’s hemmed edges in the middle. All of the corners should be sewed.
The fourth step is here.
Reduce the size of the corners by cutting them diagonally. Remove the cover and use a seam creaser to carefully manipulate the angles after sewing the raw edges. Your sewing machine will be ready for use at this point. Affixing the flap at the proper location The flap may be flipped around. Closing your pillowcase is done with this form of envelope or flap.
This is the fifth and last step.
The foam pillow can be inserted via the hole. You have the option of using the zipper or closing the seam.
It is possible to close your pillow in a variety of ways. The choice you pick is entirely up to you, based on your personal style, preferences, and needs. The next paragraphs will go through some other options for sealing your cushion.
Techniques to Effect a Good Pillow Closure
As previously noted, the options for creating a back pillow are varied and entirely dependent on your preferences. You should consider how you will use your pillow before deciding on the finest pillow-back approach. Is it necessary for you to be able to remove the washing cover? Do you require it to be firmly shut? A lock that is visually appealing or one that is plain and unnoticeable? It’s time to start working on your bed if you can answer these questions.
To seal your pillow, there are two more options you can use besides stitching it in an envelope.
Button Closure Method
Cutting an additional 6cm to go along with the first piece you cut is done in this technique It’s best to fold each edge twice at a 2cm slant on both sides. The hot iron can be used every time you fold pressing to keep the edges from unfolding and the ridge from being misplaced.
Button holes must be stitched on both sides if you want them to stay closed. On a textile, the spot where an eraser will be used to sew a seam. Make a note of where the buttons go on one side and the holes that go with them on the other.
Both edges should be hemmed. This style of stitching necessitates between 530 and 550 foot-pounds of sewing force per foot. Some buttonhole sensors may be found in shops. For the most part, they are constructed in regular lengths and sizes.
Using a sewing machine or a button-making program, you can either sew on the buttons or fix them manually. To sew the button bands to the inside of the loop, make sure the buttons are arranged in a tight loop first.
Set the two pillow pieces on top of one another. They should be arranged so that one band has buttonholes, while the other has buttons on the other side of the garment. Your buttons can then be inserted correctly once they have been stitched together.
Zip Closure Method
You’ll be prepared with a zip before you begin. To begin, cut off the two corners at the very end of the frame. From the top to the bottom, you’ll hem the edges. Using an underlock, or curly edge, the sides are sewed separately from the main body. Zip lines can be used to seal the pillow’s final end after this step.
There are 1.5cm and 1cm marks at the edge of the hem. Zippers will fit perfectly in this area if you press down on both sides. Sew the hems of the specified seams with a zipper foot.
Because the zipper is longer than the pillow, the trim is also longer. Using an embroidery machine stitch, create a 2cm gap before continuing. Using the zipper is now possible.
How To Sew A Pillow Closed
Since sewing the open ends is the sole technique of completing a pillow, knowing how to do this in the most time-efficient manner is vital. There are several ways to close pillows, however most of them, such as zippers, are added prior to stuffing in order to provide a neat appearance. Envelopes and pockets, on the other hand, can be used to cover pillows made from pillow forms that were stitched after filling.
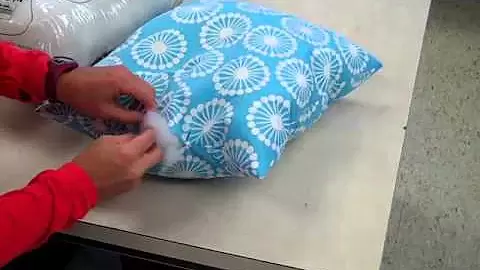
Stitching a ladder to seal the open ends of your pillow after stuffing it is the quickest and easiest method of closing it. All of the fabric’s edges should be stitched because they are more likely to fray over time. Stitch one little stitch on the left side of the seam allowance, using a one-quarter inch seam allowance. This stitch will go across the other side of the fabric.
Starting from the left and working my way up. You’ll be able to see how the stitches form an extended ladder after the material is removed. Your closure is secure if you tie a knot in the end. To ensure the sturdiness of the seam, tie as many knots as necessary.
Best Ways to Close an Opening when Making a Pillow
Before deciding how to close your pillow, there are a number of things to keep in mind. It’s crucial that you’re happy with the finished product, from the fabric used to the final look of the cushion.
- Pockets are one of the most efficient and effective ways to secure the cushion. Cloth flaps on both sides of the cloth are overlapping in the design of the cover. Using a pre-made pillow, insert it between the folds and then pull across the cushion. You may easily make one by sewing a rectangle big enough to cover all the corners and then hemming it on both sides of the cushion, leaving a pocket for stuffing.
- In addition to sewing the fourth edge of the cushion close, another option is to hand-stitch the pillow. Using this method is the safest because you want both sides of the cushion to be equal. Avoid cutting the shape of the pillow if possible, or use cushion padding instead of the actual pillow form while inserting. This method is ideal in both cases.
- Create an envelope-like casing for your cushions instead of a pillow case. In order to keep the pillow safe, the case’s cover is placed over the pillow’s cover. Compared to building a pocket, this approach isn’t as complex, but it does require additional materials.
As soon as you’ve stitched all three edges of the pillow with an embroidery machine, you have a variety of options for closing the pillow. The cushion will last a long time if you use the methods outlined above.
Related Questions
What is the aim of a closed seam?
As with open seams, closed seams have the same breadth on one side as open seams do. No need to divide the hands in half. As an alternative, you might combine them.
What is a Whipped stitch?
Using the sequence of stitches that encircle the fabric’s edges, the needle is moved both inward and outward.
Conclusion
When you can make a cushion by yourself, you should learn about the many ways to close it. Pillows can be closed after stuffing by sewing together, putting in a zipper, or making an envelope or pocket closure with the cover. Be aware that you can only stitch and close a pillow after stuffing it with a different way before stuffing.
If you’re using a pillow form, you can use an envelope closure or a cloth pocket to close the pillow cover. There are also stuffed pillows with closed corners or even zipped ends. When it comes to pillow closures, it all relies on the material and style of the cushion.
Nguồn: https://spasifikmag.com
Danh mục: Sewing Tips


