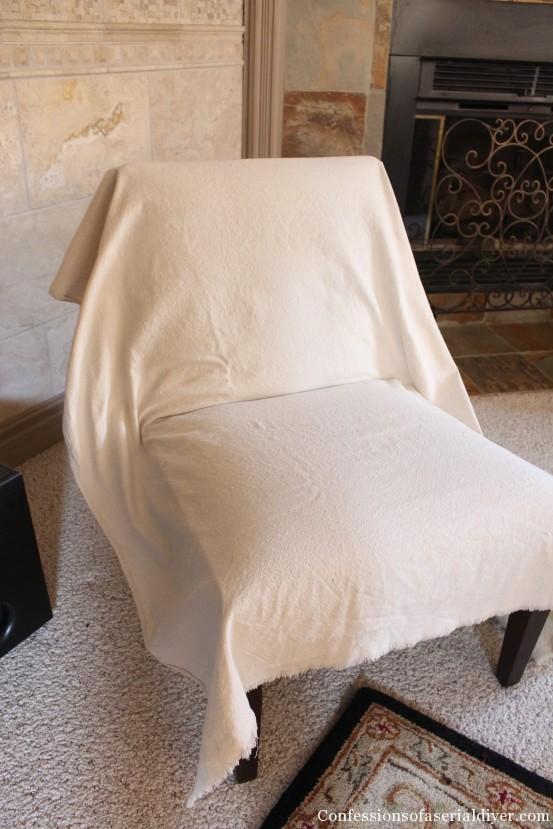
You may dress up your home and keep your furniture safe at the same time by making an arm covering without sewing. Tucking fabric or a blanket into the crannies and cracks in your seat is a quick and easy way to cover your chair in style. The most durable slipcover can also be made from scratch if you’re seeking for something unique. The fabric will need to be cut, measured, and connected.
- How To Polish A Vintage Singer Sewing Machine? A Step-by-Step Learning Guide
- How To Thread A Handheld Sewing Machine? 4 Easy To Follow Steps For You!
- How To Replace Tension Assembly On Sewing Machine? Step-by-Step Tutorial
- How To Hem Stretch Fabric With A Sewing Machine?
- What Is The Strongest Sewing Thread? Interesting Must Read Facts!
It’s possible that you’re seeking for ways to repurpose materials you already have around the house or that you simply want to make your home appear better. Making slipcovers for your chairs is an excellent way to accomplish both of these goals at the same time. Find out how to build your own chair covers without sewing in this article!
Bạn đang xem: How To Make A Chair Slipcover Without Sewing? Things You Will Need
Creating A Chair Slipcover Without Sewing
In order to protect the chairs from the sun, dust, or humidity, slipcovers or loose covers can be “slipped” on and off. Creating a strong slipcover is best done by making the cover fit the chair. One can be made without sewing as well.
Things You Will Need
Accented canvas slipcovers:
- Tape measure for determining dimensions
- T-shirt material
- For the bow’s fabric
- Strings of beads (optional)
- Pins for upholstery
- Hook and loop tape that adheres to itself
Xem thêm : How To Make A Buttonhole With A Singer Sewing Machine? Ultimate Guide
Drapes or sheets with slipcovers:
- Sheets for a queen-sized bed
- Pins for upholstery
- An sticky hook and loop tape that sticks to itself.
Tip
The majority of fabric and upholstery retailers carry additional products, such as upholstery pins and other accessories.
Warning
To avoid injury, make sure upholstery pins are firmly attached to furniture surfaces.
Step 1:
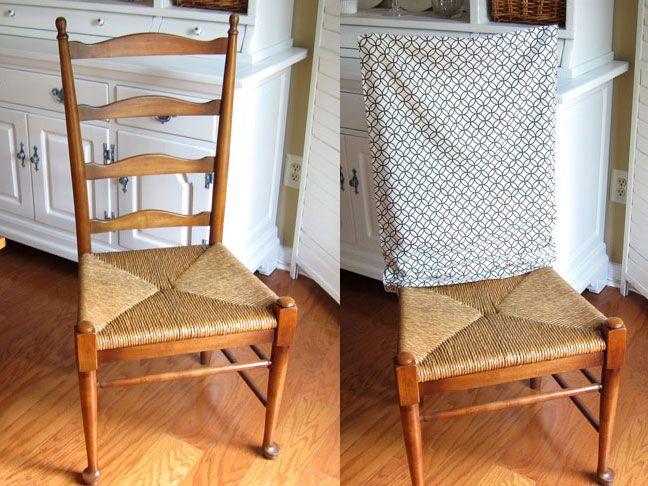
Create a slipcover for an upholstered chair out of a canvas material. In order to determine the length of a chair, measure from the floor to its seat back, from the seat back down to the ground. Starting at one end of the floor, take a measurement from the back of the chair to the top, across, and all the way down to the floor. To figure out how much cloth you’ll need, multiply the length by the width. Use two canvas drop cloths to make up the total. Place the canvas on the chair and cover the surface with a matching pattern of cloth.
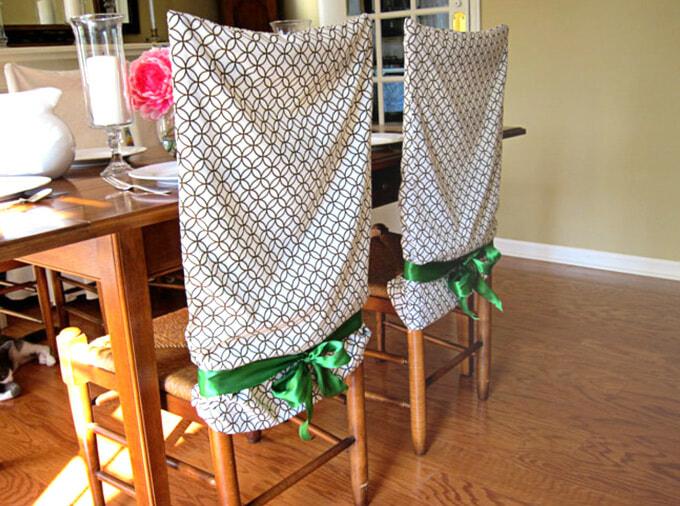
Start by smoothing the surfaces and tucking into the chair’s nooks and crannies. Pins or self-adhesive hook and loop tape can be used to fasten the cloth to the chair. The rear of the garment can be made more elegant by pleating the cloth. Use upholstery pins to hold the pleats in place, or wrap a contrasting piece of cloth over the seat and tie a simple bow at the back. This design is best suited to seats without arms. If you like, add a tassel for visual appeal.
Step 2:
Sheets can be used to make an easy covering. Using a queen-sized bedsheet in a color or pattern that matches the rest of the room, cover a love seat. Remove the cushions and then drape the sheet over the back and seat by tucking the sheet into the crevices, leaving enough room for the sheet to extend over the floor in the back. Reinstall the seat cushions and then cover the seat cushions with the sheet, making sure to wrap it across and beneath. Draw the fabric into and smooth the surface by pinning it into pleats. You can use upholstery pins and self-sticking hook and loop tape to keep the sheets in place.
Step 3:
If you already have a sofa, use old draperies to make a slipcover to match. Afterwards, remove the cushions from your sofa and arrange the drapery panels over the frame, making sure they are uniformly scattered across the entire piece of furniture. Fill up the voids on the back and sides of the garment with fabric. To give the appearance of a kick pleat, the front of the garment must be pleated. Add more drapery panels to the back and seat cushions after replacing them. Panels can be matched or contrasting in order to achieve a distinctive aesthetic. To avoid lumps, smooth up the extra fabric in the corners and underneath the cushions. Using upholstery pins or self-adhesive hook and loop tape, attach the cloth to the sofa.
The Drip Cap
- Cover an old chair or sofa with inexpensive slipcovers that don’t require sewing a single stitch.
- Create a canvas slipcover for a chair’s upholstery.
- Measure from one end of the floor to the top of the seat, then across and down to the ground on the other side to get the total length.
- Using upholstery pins or hook-and-loop tape, attach the cloth to the chair as needed.
- An optional tassel can be added.
- Remove the sofa’s back and seat cushions, then hang the needed number of drapery panels from the ceiling over the frame, making sure they are distributed equally.
How can you cover a chair with no slipcover?
Make the fabric into pleats for a beautiful back. Using a few inconspicuous upholstery pins or tying a long band of a different material around your chair, secure the pleats. Chairs with no arms are the ideal fit for this design.
What is the best way to put an uniform on sheets?
The cushions should be covered by the sheets you choose. One of them should be thrown to the floor. Remove the elastic from the edges of the sheets if they’re fitted and toss it. Tie the material around the cushion in the same way you would a parcel.
Conclusion
It’s a terrific way to reuse old fabric, preserve furniture, and decorate your house all at the same time by making an easy chair covering without sewing. To manufacture loose covers, all you need is fabric, scissors, adhesives, and some simple instructions. While patience, time, and effort are required to get the job done to a high standard, the ultimate effect is something that your visitors will be talking about for years.
Nguồn: https://spasifikmag.com
Danh mục: Sewing Tips


