Identifying the three most prevalent causes of zig-zags on a sewing machine will help you correct them. When sewing with a zig-zag stitch, loose stitches, broken zig-zag stitches, and fabric puckering can all be addressed by reading this article.
The most common problems and fixes for your sewing machine can also be learned while you’re there.
Bạn đang xem: How To Fix Zig Zag On Sewing Machine? Troubleshooting Tips
How To Fix Zig Zag Stitches On Sewing Machine
Loose Stitches
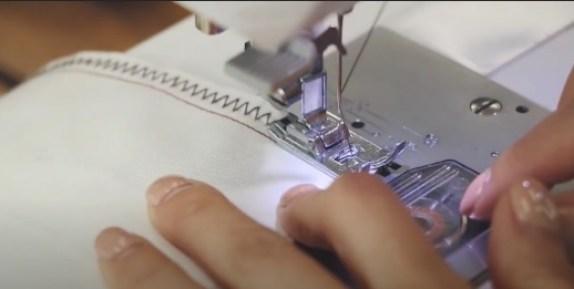
On the swatch, a Z-Z-Z-shape displayed several disconnected threads on the material’s outside. At the back, though, most of the sutures had come undone (in addition to appearing deformed).
Solution The machine’s threads need to be replaced. Alter the tension if that doesn’t work.
This is a sign that there is a problem with how the upper thread is threaded, and it should be corrected. Insufficient tension is applied to the thread. Thread tension or threading errors are two possibilities that could account for the issue.
For me, these are the things that worked best The simplest answer was to rethread the machine, so that’s what I did first. Both the front and back of the material had the loose stitches corrected. Adjusting the tension was unnecessary (at least, for this issue).
Puckered Fabric
Using narrower stitch widths resulted in the fabric swelling beneath the zig-zag, giving the impression of a tunnel.
Solution Use a stabilizer or add more fabric with a heavier weight as a solution.
Explain The swatch was made from a single layer of cotton that was lightweight. It couldn’t handle the weight of the stitches on its own.
For me, these are the things that worked best Because I needed to make two bean bags, I decided to do this. One was intended to be used to play Cornhole and the other to be used for juggling as well as a 3-D variant of Tic-Tac-Toe.
To make the bean bags for the Cornhole game From the remnants of an outdoor cushion, I made this pillow. The fabric has a tight weave and has the texture of canvas or duck down to the fingertips.
I used a lighter-weight gingham and muslin to line the bean bags I made for my sons’ school. In order to make each bean bag, there were four layers.
I couldn’t notice the puckering or tunnel effect while stitching the zig-zag thread on the leftovers of layers from the two bean bags. There was no need for a stabilizer because of the Sunbrella’s thickness and four layers of cloth, which allowed for strong stitches.
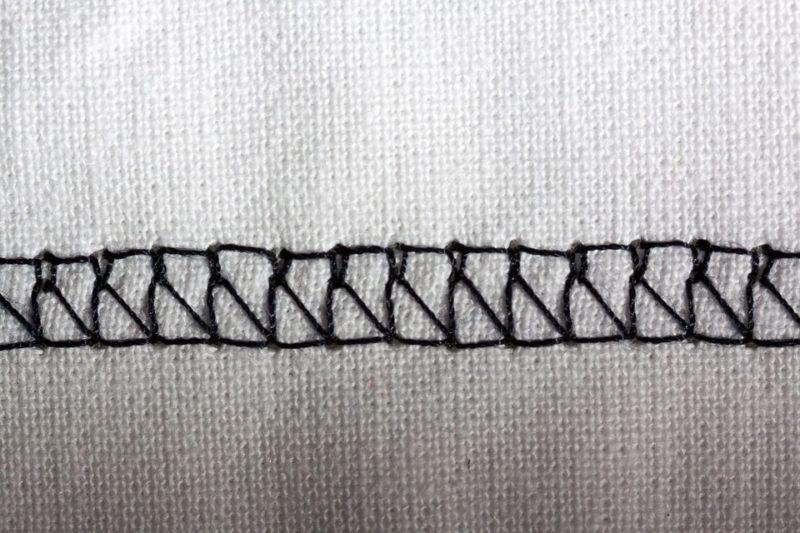
Deformed Stitches
On the material, the zig-zag appeared as if it were reversed, like a Y. The zig-zag pattern on the front and back of the material should be identical. Similar to rows 3 and 4, above.)
Adjust the tension as a workaround.
When stitches are completed, the threads of the top thread and the bobbin thread are entangled. As long as the needle or top thread is visible, the thread from the bobbin should be located at the bottom of a piece of fabric.
What worked for me. That’s how my first swatch went: I observed that both top and bottom threads were the same color. When I was stitching, I couldn’t figure out what was going on and how to tell the top thread from the bobbin thread.
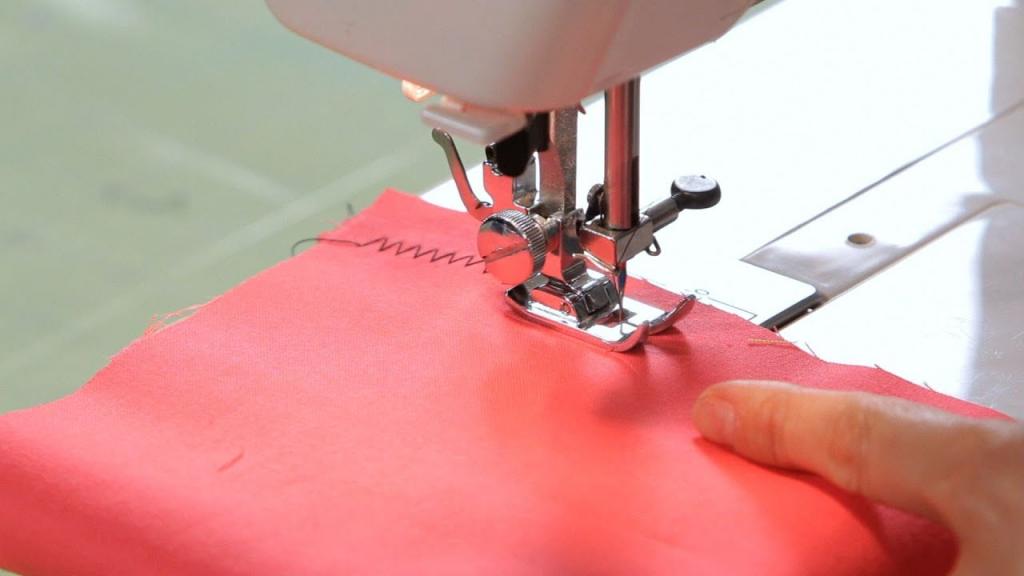
Top Thread Breaking
When I decided to zig-zag the straps to build my niece’s face mask, I had this experience. I made a swatch to see how wide and long I would need it to be.
Problem When you sewed two threads, you heard a crunching sound and the thread on top of the fabric broke.
Just before I took the swatch was placed in, I had just completed sewing using straight stitches and did not encounter any issues. Therefore, I rethreaded the machine then put the swatch into the machine, and then took a few straight stitches. Nothing went wrong.
Just before I took the swatch was placed in, I had just completed sewing using straight stitches and did not encounter any issues. Therefore, I rethreaded the machine then put the swatch into the machine, and then took a few straight stitches. Nothing went wrong.
Xem thêm : How To Make A No Sew Weighted Blanket? Step by Step Instructions
Just before I took the swatch was placed in, I had just completed sewing using straight stitches and did not encounter any issues. Therefore, I rethreaded the machine then inserted the swatch into the machine, and then took a few straight stitches. Nothing went wrong.
I had just finished sewing with straight threads without any difficulty before the swatch was placed in. As a result, I had to take a few straight stitches after rethreading the machine. There was no issue.
When the swatch was put in, I had just finished sewing with straight stitches without any difficulty before taking it out. When this was all said and done, I was left with a few straight stitches after having to reinsert the machine’s needles. There wasn’t a difficulty at all
My needle became bent when I was stitching through thick layers and over pins, and the burr formed at the end. This is something I didn’t even know until I started troubleshooting.
The broken thread may have been produced by a bent needle that was trying to zig-zag. As the needle moved up and down, the bobbin’s case was struck by the needle.
What worked for me. I tried a variety of things before switching the needle, one at a time:
- Rethread the uppermost thread.
- Spooling in situ is made easier by switching to the horizontal pin from the vertical pin.
- The stress level is lower.
- bobbin rethreading
- Different thread can be used both inside and outside of one’s bobbin.
The difficulty was that none of them prevented the sound of crunching or the breaking of the thread on top.
I consulted my sewing machine’s instruction manual to confirm that I was according to the specifications for the length, width, and thread tension of zig-zag stitches. (It was.)
After that, I flipped to the back of the guide to peruse the list of possible solutions. Another suggestion was to change your needle. When I removed the needle, I noticed that it was crooked. That it didn’t break and got stuck in the bobbin region was a blessing.
The problem was fixed when the needle was replaced with a fresh one!
Troubleshooting Tips
Make a note of your needle’s tension dial number in case you ever need to change it again to get the zig-zag stitch.
Make each adjustment one by one. What caused the changes will be clear when you figure out what caused them.
Troubleshooting Sewing Problems
First, if I can’t handle a sewing problem on my own, I’ll seek help from a friend or professional. It’s a blessing for my mother to be right across the street from me! She’s been sewing since she was a small child, so she’s well-versed in the process.
When I first saw my zig-zag problem in the bean bags, In order to get her opinion on what was wrong and the best course of action to correct it, I showed her the swatch. For the repair of the zigzag stitches, she provided me numerous ideas and a few recommendations.
My mother’s idea was based on the tension of the thread. For the first time, I had to examine the sewing machine’s handbook for instructions on how to adjust the thread tension. Basic sewing questions are well-served by this excellent resource.
I found the troubleshooting tips at the end of this document while reading this manual. Several of the problems I was encountering were addressed in the troubleshooting section. These weren’t made with a zig-zag stitch pattern in mind; instead, they were made in a more broad manner.
Seeing my mother’s advise mirrored that of the firm that sells sewing machines was a delight.
Why Is My Sewing Machine Not Sewing Zig-Zag Stitches?
The sewing machine isn’t properly set up
Check to see that the machine is clean and well greased. The zig-zag stitch settings may be affected by dirt and lint accumulation on the bobbin.
It’s also critical to keep the machine’s moving parts lubricated. The needle couldn’t move or make accurate zig-zag stitches without oil.
Make sure you’re using the right needle, thread, and even stitch settings for your project. Stitch width and length should be determined based on how closely they fit the material.
The tension of the sewing machine and timing needs to be adjusted
In order to generate zig-zag stitches, your sewing machine’s presser foot and feed dogs need to be timed appropriately. The timer may need to be restarted by using the designated screw or the instructions in the handbook.
However, if the sewing machine’s tension is improper, uneven zig-zag stitches might be produced. Before sewing on scraps of cloth, always put the tension to the middle position to get a better understanding of whether tension needs to be increased or decreased.
Why Is My Zig-Zag Stitch Bunching?
Xem thêm : Where To Buy Handheld Sewing Machine
The fabric’s lack of stability is the primary cause for the zig-zag stitches used to join the pieces together. The threads of zig-zag stitches will not be able to cling on to lightweight fabrics.
Additional options for dealing with the zig-zag stitch issue include:
- Rethread the machine after you’ve made sure it’s threaded.
- Check the sewing machine’s parts to see if they’ve been installed correctly and without any damage.
- No sharpness or bend in the needle is acceptable. Replace it if it’s broken.
- Fabric-friendly thread and needles are used throughout the project.
- Reduce the needle’s top thread or tension by a small amount.
- In the middle and at the end of the zig-zag stitches, use straight stitches to reinforce them.
- Shorter stitches are better.
- When sewing, put a stabilizer under the fabric you’re working with.
How Do You Adjust A Zig Zag Stitch?
The zig-zag stitch parameters you use will be determined by the project you’re working on. For instance, zig-zag stitching seams is a good choice using width and length that is medium.
The zig-zag stitch parameters you use will be determined by the project at hand. Using medium-width and medium-length zig-zag stitches for seams is a decent option.
Sewing Machine Zigzag Stitch Not Working
Whether or not you think your sewing machine’s zig-zag feature is tough to fix, it may not be. There are no straight lines sewn while using the zigzag technique.
Zig-zag stitches will not work properly when you can’t complete a considerable number of stitches, and this is something you can count on. Determine if the double-needle switch has been mistakenly pressed as a quick fix.
The sewing machine can only be used for straight-line sewing using this switch. For the zig-zag feature to work, make sure this switch is present on the system you’re using and that it is positioned correctly.
In addition, a dirty device may be interfering with your gadget’s ability to function. Another possibility is that you haven’t been keeping up with your machine’s routine maintenance. The zig-zag characteristic could be affected by a lack of oil.
Several factors could be causing your zig-zag functionality to malfunction. Make sure you read this section before you go to a professional and spend a lot of money. You may save a lot of time and work by following a few simple tactics.
How to Fix Zig-Zag on a Sewing Machine
As long as the problem you’re having with your machine’s zig-zag function is simple enough to correct and simple enough to fix, the solution will be the same. Simply doing a machine wash can solve a number of the more basic issues identified in the preceding section.
You can do this yourself, or you can hire a professional to do it for you. Many problems can be solved and the risk of harm reduced if it is cleaned properly.
Maintaining your machine and then adding a few drops of oil in the location where the owner’s handbook directs you to do so is also a good idea. Many other problems can be avoided by using this method.
If these methods don’t work, check the handbook for your specific model to find out what the optimal setting is for your particular model. Make adjustments to your zig-zag setting to ensure they are aligned with the guidelines in the manual. It’s best to remove any loose threads or lint that may have formed on the bobbin plate.
Make sure to consult the handbook for your specific model to see what the correct setting is if these solutions don’t work. To make sure you’re following the manufacturer’s instructions, check your zig-zag settings. The bobbin or bobbin plate should be removed to remove any lint, etc. from the bobbin plate.
Make sure your zig-zag function isn’t being affected by your tension. It’s easier to let go of tension if you relax your muscles. You can take your equipment to a technician if the procedure doesn’t help.
Why are My Stitches Loose on My Sewing Machine
This prevalent problem can be traced back to a variety of places. Lint can initially make it difficult for feeding dogs to get a firm hold on the fabric. Because sewing requires accuracy, even a small amount of lint can cause a mess and detract from your efforts.
Perhaps you’re not using the correct needle size. Alternatively, the needle may be too little for the fabric you’re sewing together. In this scenario, tension is the most likely culprit.
Check your tension to make sure you’re using the proper amount. Before you begin sewing, perform a brief test to ensure that all of the settings are correct. To avoid having loose stitches, it is essential to check the tension of each thread from the top and bottom.
Finally, the speed at which you sew can modify your stitches and cause them to unravel. This can happen if you’re not careful about how you pull or push the fabric. You must resist the desire to allow the dog to do its job for you. Manual aid can tamper with the precision required for sewing.
Conclusion
Was there a lot of useful information in this essay for you? On the subject of sewing machine zig-zag fixes, we discussed some of the more typical issues that might arise when using the stitch.
You may need to rethread your sewing machine if your zig-zag stitching is coming undone. There may be tension difficulties that have caused the stitches to distort, though. Sewing lightweight textiles often results in fabric puckering.
Sewing machines that don’t create stitch zig-zags can be remedied by doing a general setup and check. We hope this information has been helpful and educational. If you have any questions, feel free to leave a remark.
Nguồn: https://spasifikmag.com
Danh mục: Sewing Tips


