Traditional hand stitching has been adopted to repair and produce new garments, as well as to embellish existing garments with embroidery. Until sewing machines became widely available, the only way to sew was by hand. Stitches are used for a variety of purposes. Sewing can be made easier with the help of a few basic stitches. You may create magnificent designs with vivid threads and needles by utilizing a variety of ornamental stitches.
Step to Double Stitch Sewing by Hand
The double stitch hand stitch, as previously established, is a basic stitch used in both sewing and embroidery. You can follow along with these instructions to see exactly how to get it done with ease.
- A Needle and some Thread are needed.
To begin a sewing or embroidery project, this is the first step to take. If you’re sewing, you’ll know which needle to use based on the thickness of the fabric and the color of the thread. An embroidery needle and thread specific to your project are a must if you plan on needlework.
- The Needle Is Threaded
Xem thêm : How To Sew Fabric To Crochet Blanket? Complete Step-by-Step Guide
There are two methods for threading a needle. Put the threaded end of the needle through the eye hole and hang it there. Tie a knot at the opposite end and drag it through the eye hole to complete this method. If you go with option 1, make sure to tie the knot on the longer end. By pulling the loose end of the needle and undoing the stitches, you may simply rectify your mistakes.
- Fix the Hoops
A hoop isn’t always necessary when sewing, but it is when embroidering that you need one. Extend the fabric as far as it will go in the hoop before placing the design on it.
- Stitching with two needles
Push the needle into the lower layer of hooped fabric, which is on the wrong side of the fabric, to begin your double stitch. The stitch will be on the other side of the design this way. The thread should be pushed to its limit at the top. Pull the needle out of the same hole you used earlier, but this time from the front. At this point, there is no stitching on the front. The initial stitch must be made by going through the first hole and then returning to the front. Two holes are drilled in the front of the fabric, and a loop will be made there. Make a stitch by doing this. Two stitches or loops must be made in the same place by repeating the same procedure. You’ll need to do this three times for your first stitch.
You are free to use any stitch you like in this project. If you want to keep the double stitch all over it, repeat the steps above only once. To acquire your first double stitch, you must repeat the in-out procedures three times. and after only two repetitions, you’ll be able to complete a double stitch.
How Do You Sew A Double Stitched Seam By Hand?
- There should be markings on both sides of the seams. It is then time to attach both ends to each other by sewing them together.
- To match the fabric, choose the appropriate thread and needle.
- Make a hole in the wax and then thread the thread through it.
- Make a backstitch right before you begin stitching.
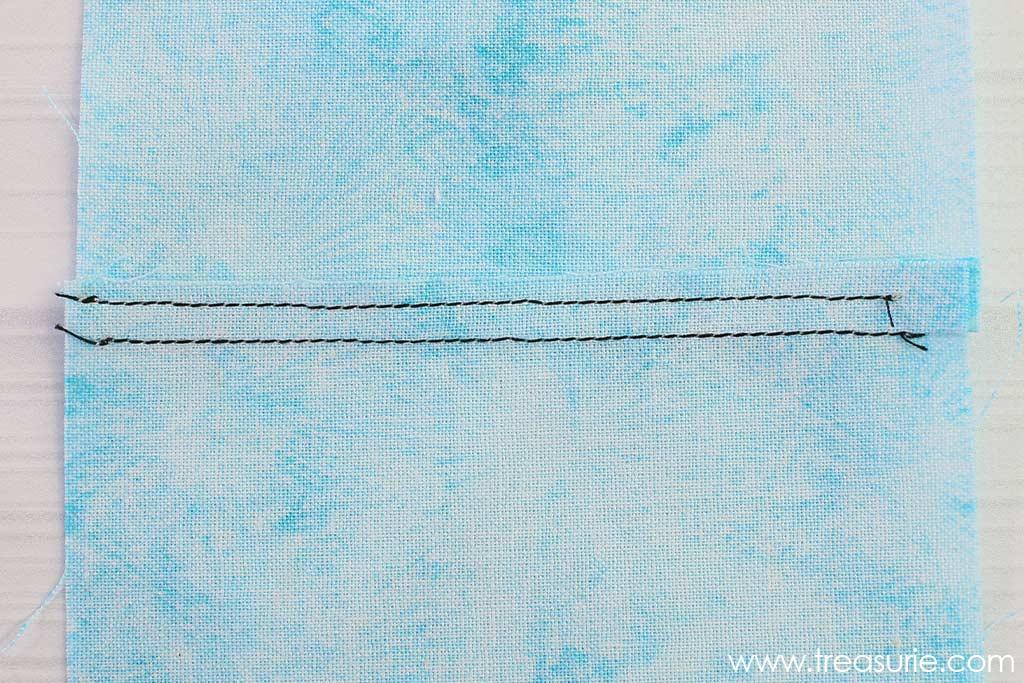
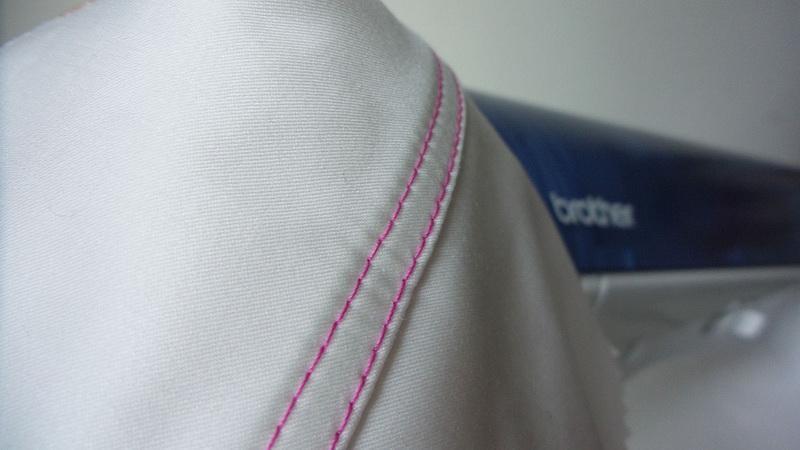
- To begin with, sew the first row of stitches along the seam, and then sew the second row of stitches approximately 1/8 of an inch further along the seam.
- Trim the seam allowance of any extra fabric.
- Keep pressing the seam until it’s complete.
How to Do Double Stitch on a Sewing Machine?
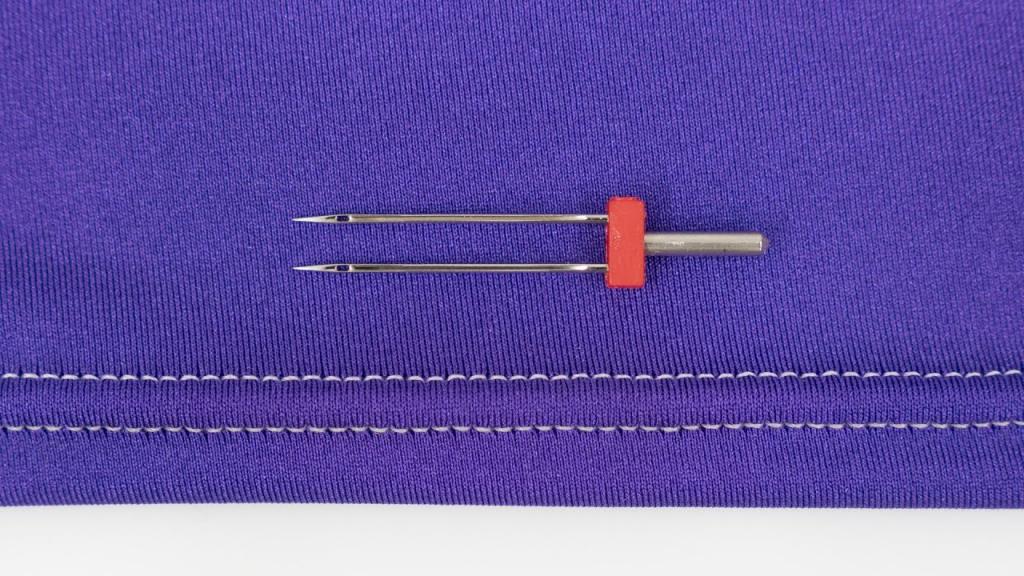
Two parallel lines can be used to make a double stitch on a machine. There is no limit to how far apart the lines can be positioned. Another way to make double-stitching is to switch out your needle shaft with a second one. Stitching two parallel lines has never been easier thanks to double-needle shafts. The double stitch creates two clean, parallel lines of stitching on the garment. Unlike a fat stitch, it doesn’t look like a hand-stitched double stitch. Embroidery designs can’t be created with machine double stitches, but they can be used to strengthen your garment.
Alternatives To Double Stitching
Make use of twin needles
Xem thêm : What Is A Mechanical Sewing Machine? 16 Best Mechanical Sewing Machine Reviews
Using twin needles for your sewing machine, you may replicate the double-stitched seam. Make sure your gear is compatible and place it where it belongs. Additionally, mark the stitching line across the seam for an exact line, then let your twin needle perform the job.
Make use of the serger
Serging seams can be done in a variety of ways, depending on how you want the seams to look. Because of the automatic trimming of the fabric edges, it is also a simple way to complete your edges when you are working on a big number of different sewing tasks. If sewing is your primary source of income, you should invest in a serger or overlocker.
Double Stitching Vs Single Stitching
It’s easy to tell the difference between a double-stitched seam and a single-stitched seam. In fact, a double-stitched seam is more resistant to wear and tear than a single-stitched seam, as the second stitching line indicates. Although both are made with the straight stitch, they are very different in terms of the stitching methods employed in their construction.
Conclusion
Do you think this post was useful to you? Double stitching, as we’ve been discussing, is simply sewing the basic stitch seam twice. There should be a 1/8-inch gap between the second stitching line and the first one.
Nguồn: https://spasifikmag.com
Danh mục: Sewing Tips


