If you’d like to learn how to reverse stitch on a Brother sewing machine, here is a two-step guide. We’ll go over the recommended settings and how to use the device in accordance with Brother’s guidelines. A few basic remedies to backstitching issues will also be taught in this course.
- How Old Is My Bernina Sewing Machine? Dating Guide
- How To Adjust Presser Foot Pressure On Brother Sewing Machine?
- How To Sew A Baby Blanket With Satin Binding? A Few Tips to Remember When Sewing With Satin
- How To Shorten Curtains Without Sewing? Complete Step-by-Step Guide
- How To Service A Sewing Machine? 8 Easy To Follow Steps For You!
If the problem is with the button, check out our article on sewing machine reverse switch repair. Knowing how to fix this problem in advance comes in handy if you ever realize that the backstitch setting isn’t engaged at all.
Bạn đang xem: How To Backstitch On A Brother Sewing Machine?
How Do You Reverse Stitch On A Brother Sewing Machine?
Step 1. Install the Brother sewing machine.
- Learn everything you can about your specific model of Brother by studying the handbook you received with it.
- Check to see if the needle has been dropped far enough to begin sewing.
- Begin and terminate your stitch with backstitching.
- To begin, press the foot controller and then, after four stitches, the Brother sewing machine.
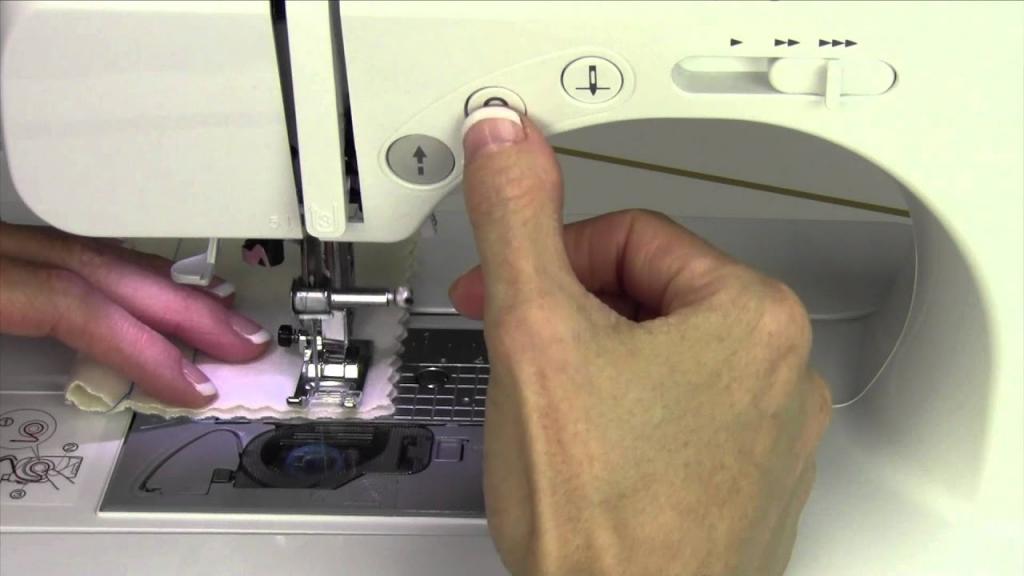
- When you press down on the foot controller, hold down the reverse button.
- You can stop stitching by removing the reverse button and the foot controller when you reach the beginning of your stitch.
Step 2. Sew the final seam
- To resume sewing in the forward direction after sewing the reverse stitches or reinforcement, use the foot controller or the stop/start button.
- Once you’ve reached the end of your material, you can use the reverse button to make about four stitches.
- When you press the foot controller, hold the button down until you hear a click.
- Continue working till the point of no return by pressing the stop/start button again.
How to do automatic reverse/reinforcement stitching on a Brother sewing machine
- Make use of the Brother sewing machine’s instruction manual to learn how to use it. It’s as simple as clicking a button to enable the automatic reverse option on some models.
- Using the symbol in the handbook, press the auto-reverse button.
- Begin sewing by loading the cloth into your sewing machine.
- Automatic backstitching is possible with this machine.
- Press the reverse button once more before stopping sewing after you’ve reached the end of the stitches.
How Do I Fix The Reverse Button On My Brother Sewing Machine?
- Remove the hat cap.
- Make adjustments to the screw by finding the screw’s inner section and adjusting the screw accordingly.
- Turn the screw a little at a time while pressing the reverse button to see if the adjustments you’ve made with the screw are working.
How do I repair My Brother’s sewing machine that is stuck in reverse
- Remove the needles from the fabric and close the machine.
- The reverse button can be tested to see if it is stuck by pressing it and releasing it back and forth several times.
- Because you did not select the correct stitch on the sewing machine, it may be stitching backwards.
- Make sure your stitch settings are accurate, as some stitches automatically add reinforcement stitches.
- Sewing reinforcement stitches does not necessitate holding the button because the needle stays in the same spot the entire time.
- Replace or clean the bobbin if necessary.
- While the device is off, press and hold the reverse button for five seconds. Shut down the Brother sewing machine, then switch on the machine again to determine if the stitching direction has reset.
Troubleshooting procedures that haven’t worked should be considered a last resort. The company’s customer support department or a local Brother service center can be contacted if none of these options work.
Where Is The Reverse Button On A Sewing Machine?
A switch, button, or lever can be used to turn on or off a machine’s reverse stitching feature. Front side of the machine, directly next to needle, lower right corner, or even center plate is most likely where it is. It doesn’t matter which machine you choose, you should always read the handbook to get a better understanding of the machine’s internal workings.
How Do You Do A Backstitch On A Sewing Machine?
- If you’re not sure how to use a particular piece of equipment, consult the instructions.
- See if you need to secure the lever or reverse button, or if you just need to constantly hit it.
- The foot control may be used to start sewing backwards, then the reverse button can be used to start sewing forward again.
Is your model a Singer? Learn how to use the Singer sewing machine’s reverse stitch correctly.
How do you make the backstitch with your hands?
- After you’ve finished sewing, you can leave a few threads hanging out of your needle.
- Sew immediately over the end of the stitching with a tiny stitch about 1/8 of an inch long.
- Six more stitches are required to ensure the stitching is secure.
- Severed the thread near the backstitch that hasn’t been cut.
What Does The Reverse Button Do On A Sewing Machine?
This button allows you to change the direction of your stitches, as well as reverse your sewing machine’s motion. When stitching, you’ll need to add reinforcement stitches at the beginning and end. Using the reverse button, the cloth is fed backward, so the stitches work backward as well.
When Reverse Stitching Do You Need To Hold The Reverse Button In?
Depending on the type of sewing machine you’re using, you may or may not need to hit the reverse button. Some Brother machines require you to push the reverse button as you press the pedal, while some Singer machines demand you to press the pedal once.
How to Setup and Use a Brother Sewing Machine: Beginner’s Guide
If you’re a newbie sewer who just picked up a Brother sewing machine, congratulations! Perhaps you’ve already made a trip to the local fabric store to stock up on gorgeous fabric for all the projects you have in mind to create! It’s thrilling, but it’s likely that you’re just getting started with learning how to use a Brother machine.
Brother sewing machines help many beginning sewers learn how to sew because they are simple to use. The sewing machine manual and diagrams on the machine clearly show how to thread the machine, turn it on, and begin to sew. Understanding the function of each part of the machine will also help a beginner get started.
Brother sewing machines help many beginning sewers learn how to sew because they are simple to use. The sewing machine manual and diagrams on the machine clearly show how to thread the machine, turn it on, and begin to sew. Understanding the function of each part of the machine will also help a beginner get started.
How Does a Sewing Machine Work, Step By Step?
Because Brother sewing machines are so easy to operate, they assist many beginners learn how to sew. In the instructions and on the machine, the steps for threading the machine, turning it on, and starting to sew are well outlined. A newbie will also benefit from learning the functions of each portion of the machine in order to get started.
An summary of things to look for when purchasing a new computer is provided below. It’s best to consult your product’s user manual or the manufacturer’s website for more information, or look for a demonstration video on YouTube.
Power Cord
Surely you’re rolling your eyes at this one! Your new Brother machine, of course, need a power source before it can be activated. When working on your computer, it’s a good idea to turn it off from time to time.
Pedal
The foot treadle was a common power source for the first sewing machines. When you press the gas pedal on your car, your sewing machine moves in the same way as well. When you press it, it starts working!
In order to use your pedal, you’ll need an extension cord that connects to the machine.
Thread Path
In sewing, the thread’s path from the spool pin to the needle is referred to as its “thread path”. The thread path on every sewing machine model is slightly different. Fortunately, it is always clearly marked on the machine and in your handbook!
In order to keep the thread and fabric taut, your sewing machine employs tension. While stitching, this keeps the thread from getting tangled or creating saggy stitches.
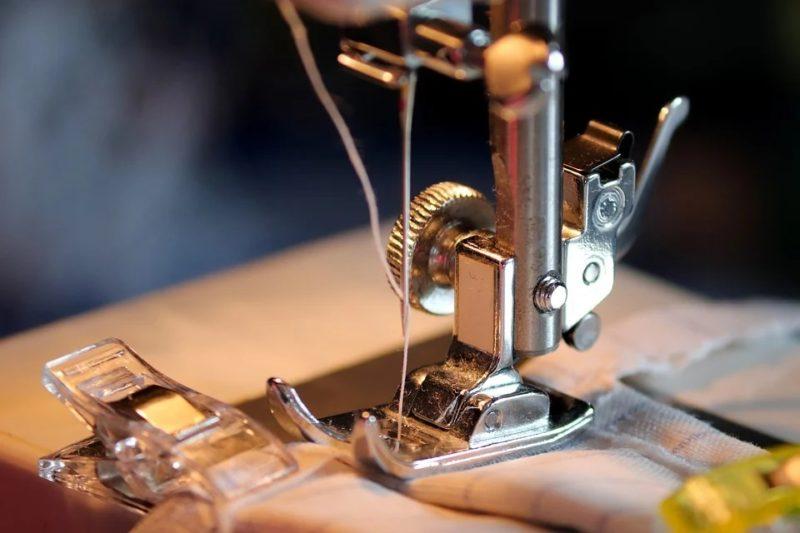
Needle
Your new sewing machine’s needle is easy to locate. Thread is placed into the needle’s eye once it has completed its journey through the thread path. It is possible to push the thread through the fabric quickly and frequently using sewing machines because the needle’s eye is focused on its pointed end.
Self-threading devices are available on some Brother models. Your needle-threading skills will come in handy if your machine doesn’t have this feature.
Presser Foot
This little, rectangular foot is the presser foot! It holds the fabric in place while you stitch by pressing down on it.
Bobbin
The thread for the bottom of the stitches is wound onto a bobbin, which is a little wheel.
The bobbin thread catches the thread as the needle descends and holds it in place when the needle is withdrawn from the fabric. Stitches abound!
Tension
Your sewing machine’s thread tension settings can help you fine-tune the tightness of your stitches. Different fabrics benefit from different levels of tension.
Stitch Settings
There are a wide variety of stitches that you can create with your new machine! You can choose from zigzag stitches, buttonhole stitches, and even designs like leaves and flowers in these stitching patterns. These controls allow you to tell your machine what stitches to use.
Reverse Button
The reverse button is typically found on the plastic shell of a sewing machine, just above the needle. It’s common to see a depiction of an arrow circling backwards on the label. Using the “backstitch” option, you can sew over your work to prevent it from fraying in the future.
How to Setup a Brother Sewing Machine
Flipping through the user’s guide is the first step. This is the large manual that will be included in your machine’s packaging. How to set up and use the equipment will be explained in detail here, as well as its capabilities!
Wind the bobbin and thread the needle before plugging in and turning on the machine.
Sewing Machine Manual
Before you do anything else, have a look at this. Even experienced sewers frequently refer to the manual to figure out how something works.
Check this out before you move on to anything else. Even seasoned sewers usually consult the handbook while trying to figure out a new feature or mechanism.
What Else Do You Need?
Before you can set up your sewing machine, you’ll need a spool of thread. When cleaning the machine, having a soft cloth and a pair of scissors on hand come in helpful as well.
In addition to the scraps of fabric that come with new sewing machines, it’s a good idea to find some discarded fabric so that you may practice using your new machine without wasting any of the fabric you purchased.
Wind the Bobbin
Before you can begin sewing, you must wound part of your thread onto a bobbin, unless you purchase preloaded bobbins in advance. Most of the time, you’ll want to wind your own bobbins in order to ensure that your thread and bobbin thread match perfectly.
Clear diagrams are printed in the user’s handbook for Brother machines. You only need to follow the diagram’s numbered instructions.
Your thread spool should be placed on the spool pin and secured with the spool holder. Afterwards, thread the machine’s three thread holders in the order they are numbered in the instruction booklet.
This secures the thread tail to your sewing machine’s upright pin, located on the right-hand side of the machine. Place the bobbin there and wrap the free end around the bobbin’s center a couple of times, passing it through one of the holes.
To secure the bobbin pin in position, shift it to the right. Instead of stitching, your machine will go into bobbin mode when you do this!
Press down on the pedal for a minute and watch the machine wrap thread around the bobbin as it fills it up!
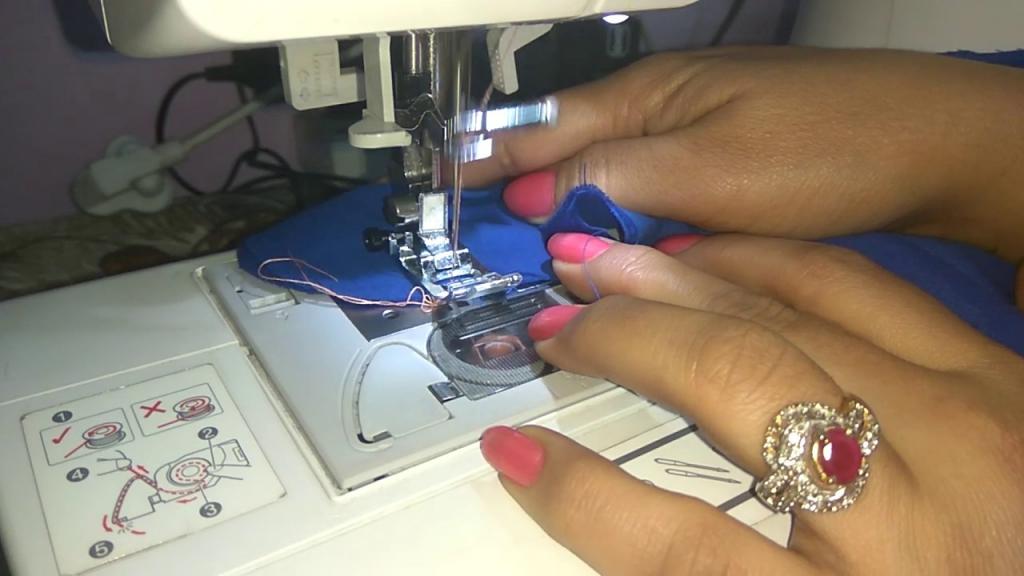
Install The Bobbin
From the front or from the side, some machines have bobbins that are loaded. The bobbin may also be housed in a tiny case. You’ll need to refer to the instructions in the manual to ensure that your bobbin is full with thread.
Before you begin sewing, make sure to leave a few inches of thread free. If your machine has a manual needle control, you can raise and decrease it by hand. The bobbin thread and the needle thread will be carried up together, resulting in two loose thread ends near the presser foot.
Thread the Needle
Insert the spool of thread into the spool pin at the top of your machine before you can begin threading the needle. Attach the spool holder to the spool pin like a cap. As you sew, the spool of thread will not fly away!
Then, using the graphic in your manual or the machine’s numbers to weave the thread through the path, unwind around ten inches of thread. In most Brother sewing machines, you will first thread the needle, then wrap the thread around the tension knob, and then wound it over the second thread guide.
A thread path is the journey a thread takes from the spool of thread to the needle, as you may recall. Think of this route as a winding racetrack with pit stops at each of the numbered intersections. These are the hooks and levers that provide tension as you stitch.
Once you’ve carefully wrapped the thread through the correct path, the loose end should be hanging near the needle. It’s at this point that you can use the automatic needle threading mechanism that comes with many Brother models, or you can manually thread the needle (front to back).
Getting ready to sew is the most difficult part of the process. Getting the hang of threading the machine is the first step in mastering the rest!
Adjust Settings
Xem thêm : How Much For A Western Electric Sewing Machine? A Must Read!
As you sew, you can choose your favourite stitch pattern and fine-tune your sewing machine’s tension.
You may wish to use a straight stitch while you’re just getting started. Using scraps of cloth, you can experiment with varying the tension settings to see what happens.
How to Use a Brother Sewing Machine
You can begin sewing as soon as you’ve finished setting up your machine. Here is a quick checklist of the steps involved in sewing on a garment using your sewing machine.
- Wind the bobbin.
- Using the thread path as a guide, thread the needle.
- If required, make adjustments to the tension settings.
- Make sure that your machine is plugged in and turned on
- Press the lever to lower the foot onto the fabric after placing the fabric under the presser foot.
- Apply a light downward pressure to the foot pedal. With this, you can have the machine going while the cloth is being fed through an area directly beneath the needle.
Ultimately, you may use the same sewing machine to make both simple and complex designs. As a beginner, it’s best to start with a simple project. Straight seams in items like a pillowcase, a curtain panel, or a circular skirt can give you an idea of how your machine performs.
Following a little practice, you’ll have no problem finding sewing designs for just about any fabric-related project imaginable!
How to Use a Computerized Brother Sewing Machine
With a computerized machine, many of the setup stages stay the same. Because of this, you must select your stitch design through touch screen.
Of course, you should consult your handbook for complete instructions, but most screens let you change the stitch width and length right there on the screen. You can also use it to adjust the tension of your strings.
Sewing machines that can link to a computer directly are becoming increasingly common. Fun embroidery software may be used in conjunction with a computer connection to send embroidered patterns to a sewing machine!
What Kind of Thread Do You Use for a Brother Sewing Machine?
The type of thread you need depends on the project and the fabric you’re working with. Your Brother machine does not require you to use Brother-brand thread. Much more important than the brand name is the thread’s weight and fiber content.
The most common thread weight for sewing machines is 40 wt, which is a thin, silky thread ideal for most home sewing projects. 50 wt. threads are used for denim and other hard-wearing textiles, and are thicker.
With polyester thread, most sewing machines are compatible. This thread has a small amount of flexibility that protects it from tangling and snapping. It also doesn’t produce a lot of lint buildup in your washing machine because of how little it sheds.
Polyester is a common thread used in rainbow rows found in most sewing stores. You can figure out what type of fiber the thread is composed of by looking at the label.
Cotton thread is frequently preferred by quilters. Quilting cotton, for example, is an excellent natural fabric for this project.
Quilting threads come in a variety of colors and textures. To make this thread more durable, it has an unique coating on it.
It’s possible to purchase a confusing selection of thread for different sewing projects as well. Polyester thread will work just well most of the time, however.
Many seamstresses prefer to use thread that matches the color of the fabric they’re working with. This explains the wide variety of thread colors available for purchase.
Brother Sewing Machine Models For Beginners
The Brother brand is known for its affordable sewing machines for beginners.
Multiple stitch settings and a variety of presser foot attachments are now standard features on even entry-level machines. There are a lot of great features out there that you don’t really need for your first machine.
What are the most important features to look for in a new computer? Starting with a low-cost model is usually a good idea. The more you learn about sewing, the easier it will be to figure out exactly what characteristics you need in a new machine and buy one accordingly.
To avoid becoming overwhelmed, it’s best to start out with a simpler machine and learn the essentials there. There is good news in that many entry-level Brother machines cost between $80 and $200.
Models from Brother come in a wide range of specialities. Here are some user reviews to give you an idea of what makes a good machine for a novice and what makes a wonderful machine for an advanced user.
Brother XM2701 Sewing Machine
There are 27 stitching possibilities, including stretch stitches and blind hemstitches, on this fantastic machine for beginners. An automatic threading device and an instructional DVD are included as well, making it a fantastic choice for first-time sewers. This machine is ideal for a wide range of sewing projects because of its compact size and lightweight design.
A variety of sewing feet and needles are included in your purchase, allowing you to tailor your sewing to suit your needs. For those who are just starting out, the machine is extremely easy to use and comes with detailed instructions and color-coded parts.
Brother SE600 Computerized Sewing and Embroidery Machine
Brother has you covered when your sewing endeavors require more advanced machines! The Brother SE600 can sew and embroider at the same time. It has an LCD touchscreen display, 80 pre-programmed designs, and a hoop measuring 4 x 4 inches.
Time-saving features like an automatic needle threader are included in this model. It’s also a wonderful choice for quilters because of its larger arm! In general, this model is an excellent pick for jobs requiring a high level of quality and professionalism.
Editor’s Choice: Brother CS6000i Computerized Sewing and Quilting Machine
This machine has a built-in free arm so that anyone who wants to mend sleeves on their own clothing can use it for every stage. An LED light and an automatic needle threader make it easier to sew and less time is wasted fumbling with the uncomfortable threads. You can also sew more accurately because of the LED light. The extra-large table on this machine makes it ideal for quilting with larger materials, and it opens up a slew of creative options. This is the greatest overall Brother sewing machine since it comes with as many presser feet as possible, making it a comprehensive package. It’s one of Brothers’ most popular items, and it’s also reasonably priced, making it an excellent choice for beginners. The LCD-display makes it simple to switch between the 60 included stitch patterns. Using the machine’s chart, you can see precisely what the stitches will look like as they are being made. It is simple to thread and has a powerful engine that can sew up to 850 stitches per minute.
PROS:
- needle threading machine
- On a chart, all 60 pre-programmed stitches are shown.
- 850 stitches per second
- Integrated free arm
- The large table makes it ideal for quilting.
CONS:
(none)
Best For Embroidery: Brother SE400 Combination Computerized Sewing and 4×4 Embroidery Machine
It comes with 67 pre-installed stitches and 70 pre-designed embroidered designs, but you may use any of the five included typefaces to make a truly unique gift. Easy-to-use accessories such as presser foot, scissor needles, and other tools are included with the automatic threading system. Like many of the greatest Brother sewing machines, it has a 25-year limited guarantee and can accommodate a memory card to allow you to upload additional designs. The advanced sewer will love the 7-point feed dog, and the easy-to-use drop-in bobbin feature will make anyone’s day. The Brother sewing machine has a wide range of features that may be appreciated and used by anyone from a novice to a professional. It’s one of the most flexible on this list and can embroider up to 4×4″. You can use internet patterns and update the machine to customize your embroidery by connecting it to your laptop through USB.
PROS:
- New embroidery designs can be uploaded via USB.
- 67 pre-installed stitches and 70 pre-designed embroidery designs
- capable of embroidering a 4′′ x 4′′ patch
- A lot of extras are included.
CONS:
- Disadvantages of using a screwdriver over an unscrewing tool
Best Quilting Machine: Brother Quilting and Sewing Machine, PQ1500SL
Thread tension may be adjusted with a dial and speed can be adjusted with a foot pedal. It has a wide range of options and can sew at high speeds so that you can finish larger tasks more quickly. An excellent Brother sewing machine for those who desire a more complex machine or who frequently quilt. With 1,500 stitches per minute of stitching power, this Brother Sewing Machine is perfect for quilting. Heavier projects will be a breeze to complete, and the spacious workspace provides plenty of room for larger supplies. The PQ1500SL includes four dog feed settings, an automatic needle threader, and a drop-in top bobbin for easy operation. In addition to an LED light that makes it simpler to work with dark materials, the machine comes with seven different presser feet.
PROS:
- A sewing machine that can sew 1,500 stitches per minute.
- 8.6-inch-wide extension table for large gatherings.
- With this set, you get seven presser feet
- It’s jam-proof
- An unrestricted arm
CONS:
- Some people may find the cost prohibitive.
Best For Alphanumeric Stitches: Brother Computerized Sewing and Quilting Machine, HC1850,
Backlit LCD displays make it easy for you to switch between the different stitches that are shown on the chart on the side of the machine. Many people think this is the best Brother quilting machine, and it’s easy to see why, given the amount of room and flexibility it provides. A broad table and 130 built-in stitches make the Brother HC1850 an excellent choice if you’re looking for a sewing machine that can handle larger projects. The 55 alphabetic stitches and 8 presser feet allow you to customize your products even more. When it comes to sewing machines, we love Brother since its advanced needle threader and instructional DVD make it simple to get started, while also teaching you about the more advanced features.
PROS:
- Stitch count: 130
- DVD-based training
- Quilting in the round using a free motion technique
- Large projects necessitate a table this size.
CONS:
- Beginners might find it a little difficult.
Best Affordable: Brother 1034D 3/4 Thread Serger with Differential Feed
Even though this Brother sewing machine only has 22 built-in stitch settings, you’ll have plenty of opportunities to use the 3/4 thread serger. For the price, you receive a lot of useful extras including an instructional DVD and a paperback book, as well as a sturdy metal frame that will last for years. The serger sewing machine you’re about to see is an economical and simple-to-use option for those in the market for one. A wide variety of textiles may be accommodated by this machine, allowing you to use it on linens, knits, and even formal attire. Functionality allows expert sewers to make their products stand out by adding ruffles, decorative edges, spaghetti straps and more.
PROS:
- Suitable for a wide range of textiles
- Serger sewing machines of the highest caliber
- 7/8-thread serger
- It’s simple to sew
CONS:
- When compared to sewing machines from other Brother brands, this one only has 22 built-in stitches.
Best For Beginners: Brother XR9500PRW Project Runway Limited Edition Sewing Machine
Zigzag and ornamental stitches can be widened up to 7mm, which is wider than many other machines. You receive a lot of protection in the hardback case of the big table, which is ideal for quilting tasks that require a lot of fabric. Beginners needn’t be frightened off by the many settings and possibilities, as this is one of the most user-friendly sewing machines on the market. With eight one-step buttonhole designs and a maximum stitching speed of 850 stitches per minute, this machine gives you a wide range of options. This Brother sewing machine is a terrific value and has more built-in stitches than many others in its price range. The LCD display makes it simple to flip between all 100 of them, and the chart on the machine’s side makes it even easier to select the correct one.
PROS:
- Stitch count: 100
- It’s cheap and simple to use.
- Quilters will love this large table.
- 850 stitches per second
CONS:
- A touch too obnoxious
Best Budget: Brother XL2600I Sew Advance Sew Affordable 25-Stitch Free-Arm Sewing Machine
Xem thêm : How To Sew Corners On A Blanket? Best Answers To FAQs!
The dial makes it simple to select the various settings and stitches, and an automatic needle threader makes for a quick and simple set up. Zipper and button sewing can be done with a variety of presser foot. In addition, you get a 25-year limited guarantee and storage space. Despite its size, this is a terrific starter sewing machine that’s simple to operate. While skilled sewers may find the 25 built-in stitches to be a touch rudimentary, beginners will find them easy to use. This Brother sewing machine is an excellent choice for beginners and those working on minor projects. Repairing sleeves and cylinder forms is a cinch with this machine’s free-arm capability and a bright light that illuminates the work area for precise stitching.
PROS:
- There are 25 built-in stithces.
- It’s ideal for newbies
- An unrestricted arm
- Includes a limited warranty of up to 25 years.
CONS:
- A lot of folks don’t have enough sutures.
Brother Sewing Machine Guide
In the sewing machine industry, Brother is one of the most well-known and respected brands. One of the first to emerge is the Japanese brand, which has earned its place as one of the world’s best for a long time. The type of stitching you intend to undertake will play a large role in determining which machine is best for you.
The good news is that Brother sewing machines are among the most adaptable on the market, so you may use one to sew clothing one minute and quilt the next. There’s something for everyone thanks to the wide variety of specialty equipment that are readily available. Listed below are some of the features you may anticipate from Brother sewing machines.
What To Look For In A Brother Sewing Machine
The qualities that are most essential to you should be considered when you purchase a Brother sewing machine. The following are some of the more common warning signs to keep an eye out for:
Easy Set-Up
A top drop-in bobbin that is resistant to jamming is included in this category. Almost every Brother sewing machine comes with this feature as standard, and it’s a great help when it comes to starting new projects.
Safety Cover
A safety cover is a must for protecting your Brother sewing machine from dust and wear and tear that accumulates over time in storage. There are a variety of options, and while basic versions don’t come with hardcovers, a soft cover helps keep the book clean and scratch-resistant.
Presser Feet Options
Make sure that your Brother sewing machine has the correct presser feet for the type of stitching you’ll be undertaking. Most sewing machines come equipped with zipper and buttonhole presser feet, but more proficient sewers will likely require additional presser feet.
Stitches Per Minute
There are many different types of sewing machines out there, and it can be difficult to know which one is best for your needs. A Brother sewing machine’s speed will be determined by this. While 850 stitches per minute is the norm, some machines are capable of more than twice that.
Those are excellent for stitching long rows.
Free Arm
The free arm feature on most Brother sewing machines makes it simple to sew cylinders. With one free arm, you can easily fix sleeves and sew clothing.
Adjustable Speed
Even seasoned sewers will know when to slow things down before pushing the foot pedal again when using a machine with a variable speed, contrary to popular belief.
Make sure the sewing machine you’re considering includes more than just a slow/fast option for adjusting sewing speeds.
LED Light
Even on the hottest of days, it’s impossible to stitch with dark thread in a dark fabric without a reliable LED light. Another area in which Brother sewing machines excel is in this area. You can stitch with precision thanks to some of the longest-lasting lights on the market.
Why Is Brother Such A Good Company?
Brother, which began as the Yasui Sewing Company in 1908, swiftly rose to prominence as an industry leader and a key player in Japan’s industrialization.
They aren’t simply one of the most well-known companies in the industry, but they are also one of the most reliable. Today’s brands have been around for a long time.
Most people know that Brother’s sewing machines will last a long time if they buy one of their machines, even if it is a less expensive model. Because they care so much about what their customers want, they are known for their exceptional after-sale service.
“Superior quality and diligent service” is the company’s ancient motto, and it still rings true today.
What Should You Expect From A Brother Sewing Machine?
A machine that is up to their high standards should be expected. As far as features go, Brother sewing machines are regarded for being simple to operate.
Even their most complicated models and embroidery sewing machines may be mastered by intermediate sewers in no time at all. All of the materials are high-quality thanks to over 100 years of developing their equipment, and many come with essential accessories.
In comparison to many of the smaller brands, you may obtain feeder dogs that are smooth, automatic threading and generously equipped with stitches.
Additionally, Brother sewing machines offer a wide range of options. They have a wide variety of sewing machines that can handle a wide range of jobs, from small to large, and are suitable for both beginners and more skilled sewers.
Even the most basic products in their line come with more than you’d think, and you can count on them to last for a very long time.
Different Types of Brother Sewing Machines
Their reputation as one of the world’s premier sewing machine companies means that they have a wide variety of products to choose from.
In terms of sewing and quilting, these are their most common and economical sewing machines. They can handle modest chores like sewing and repair, but they usually come with a broad table that can be expanded to handle quilting projects.
When it comes to embroidery machines, they are a bit more advanced than sewing and quilting machines. Modern technology has made it possible to buy an embroidery machine that links to a laptop and allows you to download more patterns and techniques.
As a result of their speed and ability to use several bobbins, sergers are ideal for quilting. The Brother serger machines are attractive, yet they operate well and use an overlook stitch to bind the fabric.
Intermediate – Advanced Beginner Brother sewing machines are often available at what most people consider a bargain. There will be fewer built-in stitches, but the product will be simple to use, with automatic threading and additional presser foot, and all of the parts will last for many years.
How Much Does A Brother Sewing Machine Cost?
With a company like Brother, you’ll have access to a large variety of sewing machines. There is a great product available for less than $150.
Beginners or individuals who don’t think they need as many features may choose them, but if you’re looking for a tool for professional usage or one that can do more, $500 is a reasonable starting point.
Anyone looking for a high-quality Brother sewing machine with more features than the entry-level versions may expect to pay $300.
Are Brother Sewing Machines Easy To Use?
When it comes to sewing machines, Brother is one of the most well-known manufacturers. Compared to other brands, their product line is regarded simple to operate, and this includes beginner versions as well as more advanced models.
Most machines have an automated threader and a jam-resistant drop-in top bobbin, making setup a breeze. There are less features, such as fewer built-in stitches, but they do make things easier with instructional DVDs, stitch charts on the side of the machine, and simple to read manuals, if you want something really easy.
The learning curve for a Brother sewing machine isn’t as severe as it is for some other models, but it does exist.
How to Take Care of a Brother Sewing Machine
If you take good care of your Brother sewing machine, it will last for many years to come. Your owner’s handbook should be your first source of information on how to care for and clean your device. What to oil, what to dust, and what to let alone will all be explained here!
Listed below are some general pointers:
- Before doing any cleaning or maintenance, turn off and disconnect your computer. When it’s time to replace the needle, be sure to follow these steps.
- Dust is a threat to anything with a lot of moving parts, and vacuum cleaners are no exception. A cute little cover was probably sent with your machine. After you’ve finished sewing, make sure to put this on.
- You can always rethread your needle if you’re unsure. A simple retrace of one’s thread path can often correct tension issues and resolve concerns with thread knotting up beneath the fabric.
- Look it up on YouTube if you have any doubts about how something works. Use your sewing machine’s model number to look up other people who are using the same machine.
FAQs
Why is my backstitch not working?
Your backstitch may not operate properly if you’ve been sewing with a lower stitch length. Your sewing machine won’t sew forward or backward if the stitch length is zero. Check to see if you’ve accidentally shortened your stitch length.
Do you have to reverse stitch?
Backstitching is an option when using stay stitches, although it isn’t always essential because the stay stitches will be caught in the seam allowance and are unlikely to come undone if done correctly. These stitches are also frequently hooked in another seam, which prevents them from unraveling.
Where is the reverse lever on a sewing machine?
You’ll need to find your reverse stitch button, switch, or knob to do this. It is most common to find reverse stitch mechanisms on the front of your machine, either above the needle or on the left-most front of the machine.
How long should a backstitch be?
You should be able to effortlessly deal with your length. You’ll have to keep rethreading your needle if it’s too short. If it’s overly long, knotting and tangles are more likely to occur. A decent beginning length is between 15 and 20 inches (38 and 50cm).
How many times should you backstitch?
When back stitching, limit yourself to no more than four stitches to avoid affecting the aesthetics of your seams.
Do you backstitch stay stitch?
When Stay Stitching, do you backstitch? Using a backstitch is not required when staying stitched, however it is an option you may want to consider. “What is this?” Stitch length can also be shortened when beginning and completing a line of stay stitches. 1
Conclusion
That’s all there is to it! Simply push the backstitch button on your Brother sewing machine and hold it there while you operate the foot controls to quickly learn how to backstitch. For added strength, use reverse stitches at the start and finish of your stitching session.
We sincerely hope that this was easy to understand. To contact us, simply write a message in the space provided below.
Nguồn: https://spasifikmag.com
Danh mục: Sewing Tips


