It’s easy to see why sewing machines have become so popular. Over the years, they have become a much-desired replacement for the needle and thread, increasing stitching speed and efficiency. Sewing machines, on the other hand, have a complicated mechanism that can be difficult to fix. Sewing machines have a variety of components that must be examined in order to determine what is wrong with it.
Objects That You’ll Use
Bạn đang xem: How To Fix Brother Sewing Machine Yourself?
- a pair of tiny shears
- Needles that need to be replaced
- Swiffer wipes
- Useful tool for tightening screws
Common Brother Sewing Machine Problems
Almost all Brother and other manufacturers of sewing machines have these little issues on a regular basis. They occur frequently as a result of their frequent application. The needle, for example, is the point at which many typical problems begin and end.
Your sewing machine won’t work properly if it isn’t threaded, set in place correctly, crooked, or broken. Replace the needle and you’ll be back in business.
The bobbin region and the machine’s threading are other prominent sources of these difficulties. Both can be re-threaded in a matter of minutes if you double-check your threading.
Many troubles with your sewing machine’s two components can be resolved by simply re-threading or checking the tensions. If your sewing machine malfunctions, follow these steps to fix it.
The sewing machine may not start if the power switch is not on. It’s an easy fix, but you’d be surprised how often people forget to do it.
How To Fix Brother Sewing Machine Yourself
Step 1
Double-check your sewing. Even the slightest deviation from the threading rules can have a significant impact on your stitching outcomes, so be sure to check this as soon as possible if your machine is having issues.
Step 2
Verify the needle. Verify that it is parallel to the table top by laying it down flat on the table. Replace the needle if it is dull or bent in accordance with the instructions that came with your machine (for instance, some models will require you to unscrew a stopper to release the needle).
Step 3
Verify that the needle plate is free of any tangled threads. If there is a thread, pluck it out one at a time with care. Force may result in the knots being re-tied, making removal impossible. To remove the plate, you will need to unscrew the screws.
Step 4
Remove all dust from the interior. This procedure may necessitate the removal of the needle plate so that you may thoroughly clean the bobbin case’s outside. Use a Swiffer wipe or the small sewing machine cleaning brush that came with your machine to get rid of the dust.
Step 5
Make sure the bobbin is correctly wound. To be safe, you may want to unwind the bobbin and rewind the thread.
Step 6
Make sure your tension settings are correct for the fabric you’re working with. For thin textiles, for example, you should use a lower tension.
Step 7
If the problem persists, see your machine’s handbook.
Step 8
Make an appointment with your machine’s manufacturer if none of the previously mentioned fixes worked. You should be entitled to free repairs or replacements if your sewing machine is covered by a decent warranty.
To replace the needle:
- Turn off your computer. Playing it safe is usually a good idea when you have to put your fingers near a needle.
- The presser foot lever can be lowered by pressing down on it. You’ll be able to get to the needle much easier this way.
- Use your fingers to hold the needle in place so it does not fall into the machine.
- Turn the needle clamp screw toward you with a tiny screwdriver to loosen it. A screwdriver that is suited for this purpose is usually included with Brother machines.
- The needle will fall into your left hand as the grip loosens. Keep the old needle in a safe place for disposal.
- The flat side of the shank of the new needle may be seen. Until the needle stopper is reached, insert the needle with the flat side pointing toward the back of the machine.
- The needle clamp screw can be tightened a second time by using a screwdriver, but this time turn the screwdriver away from your body.
Why Does My Brother Sewing Machine Keep Jamming?
- There’s a problem with the upper thread’s threading.
- Tangled up in the top threads
- The fabric does not work with this thread.
- Incompatibility between the thread and the needle
- The thread spool and the spool cap are incompatible.
- No thread or bobbin is correctly inserted.
- The bobbin must be rewound.
- Burrs and scratches can be seen on the case’s outside.
- There is a problem with the bobbin on the sewing machine
- Lint and threads litter the shuttle race.
- The stitch you’re using does not work well with the pressure foot you’re applying.
- The material and project require different sewing machine tension settings.
- The feed dogs aren’t at the correct place.
- You must use the suitable stabilizer.
Brother Sewing Machine Not Feeding Fabric
Look at the Brother sewing machine you have to see whether or not it includes a drop feed. If this is the case, you’ll want to move it to the proper location. When using mechanical feed, make sure the foot is in the proper position before continuing. Lower it if it hasn’t already been set at a lower level.
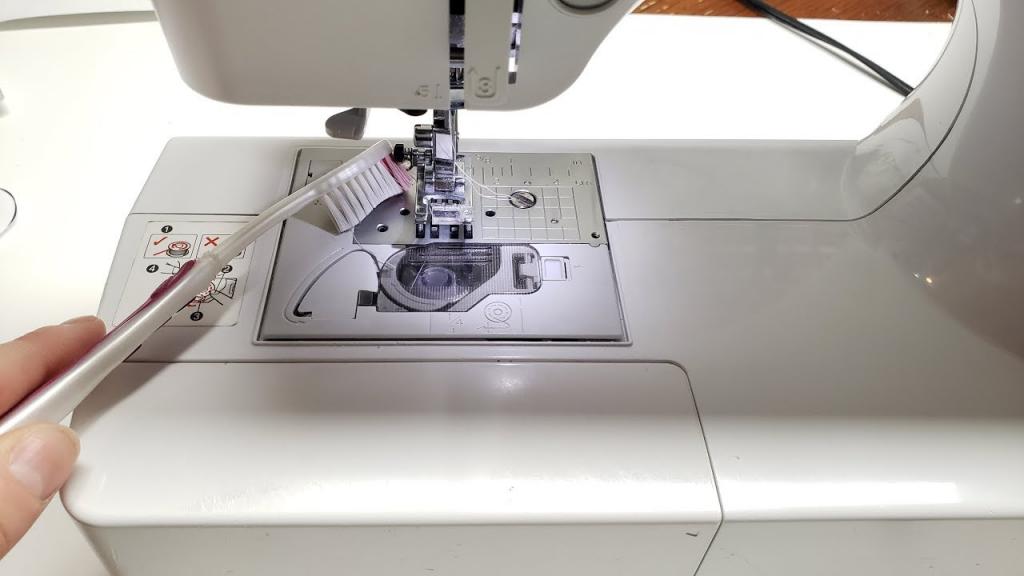
Check your stitch length afterward. If the stitch length is too short, some Brother machines will not feed anything through. Lint, broken threads, and debris may have clogged the feed dogs, which would explain the problem. This problem will be solved in a matter of minutes with a thorough cleaning.
When cleaning, pay special attention to the regions that hold your feed dogs and bobbin case. Your Brother sewing machine will not perform as well if these parts become clogged.
Brother Not Stitching
Problems like these can have a variety of underlying causes. Stop what you’re doing and double-check to see if the top thread is properly threaded before moving on.
If this is the case, you can proceed to the following step, which is to check the needle bar thread guide. There must be a thread guide in front of the needle. The third step is to inspect the thread for knots or tangles. For the fourth reason, the thread can be too big for the needle.
Xem thêm : How To Thread A Montgomery Ward Sewing Machine? A Few Tips to Remember
Remove the knots in the thread or use a thread that is compatible with the needle. After that, look to see if the needle has been bent or has a blunt tip. The needle hole should also be checked for any nicks or scratches. Remove and replace the needle if there are any of those around.
Check your presser foot and bobbin to determine if they are to blame. The bobbin must be replaced if it has any scratches on it.
Not Picking Up The Thread
In order to fix this issue, you may need to loosen your grip on the needle thread. You may have to stop and disentangle the top thread if it gets twisted.
The needle could then be deformed or poorly threaded. Re-thread if the needle is broken in the first case, and replace it if it is broken in the second. If the needle isn’t placed correctly, you’ll need to re-insert it to for the machine to work again.
The bobbin may not be properly threaded or the bobbin region may be dirty. If the problem is with the bobbin, rework it and clean the space around it. Just a few examples of the problem’s many causes.
Not Picking Up The Lower Thread
Make sure the needle is in the right position before moving on to the next step. Remove and re-insert the needle for the first two issues. Make sure you have the right spool cap on your thread spool. You may have to unravel the thread if you use the wrong sized cap. The key suspects in this investigation will come from the same places as in the previous segment. Ensure that the bobbin region is properly threaded through the shuttle race, and that its area is free of any debris.
Make a copy of your owner’s handbook available when trying to figure out the source of the problem. Many of these problems can be resolved with its assistance, and it will also demonstrate how to effectively re-thread the machine.
Brother Sewing Machine Won’t Reverse
Your Brother sewing machine may not sew in reverse for a variety of reasons. An example of this would be a stitch that is overly short. To see if that helps, lengthen it a bit.
Make sure the stitch plate isn’t soiled by looking under it. Clean it up if it is. Additionally, a flaw in the machine’s construction could prohibit it from operating in reverse. In some cases, sutures are not meant to be reversed.
To find out which stitches are restricted in this procedure, simply click here. Analyze the chart to identify any stitches that won’t work in that direction for you.
The Machine Won’t Stay Threaded
To check if it makes a difference, lower your tension to 4. If that’s the case, the thread itself may be to blame. Low-quality thread may not remain in place or break quickly if you don’t purchase it from a reputable source. Similar patches may exist for your Brother 2125 sewing machine to address this issue. To begin, make sure the tensions are correct. This can happen if the tension is excessively high or low, causing the machine to lose thread.
If the needle or thread path has sharp points, the thread may be severed and the machine lose the thread. Finally, you could have messed up the threading and not noticed the thread guides.
It is important to double-check your threading to ensure that it has been done correctly.
Brother Sewing Machine Jammed
It’s possible that the throat plate isn’t as clean as it should be. To examine if the machine is clogged with lint or other debris, you’ll need to remove the cover.
Alternatively, you can use the presser foot lifter to reset the presser foot. After that, you can attempt to cut any tangled thread you come across. After you’ve re-threaded your machine, try resetting the tension.
If you’re still stumped, see your owner’s manual for some further suggestions. You should take your Brother sewing machine to a repairman if you can’t get it unjammed yourself. He should be able to find more locations to look, and the repair may be more difficult than first thought.
Sewing Machine Hook Timing
The instructions and photographs for this small adjustment can be found here if your owner’s manual does not include them. Step-by-step instructions with illustrations may be found on this website to assist you in making the necessary adjustments to the hook and needle. There may be a problem if you don’t establish the distance between the hook and needle correctly. A screwdriver is all that is needed to make the adjustment and reposition the hook.
To make a simple adjustment, all you have to do is tighten or loosen a couple of screws. Also, completing the task correctly necessitates a certain amount of endurance.
How Do I Fix E1 Error On My Brother Sewing Machine?
Fixing an E1 error code is a piece of cake. Please lower the presser foot before you press the reset button. To resume sewing after seeing the code, simply lower the presser foot.
Because they may pinpoint the exact location of a problem, error codes generated by computers are extremely useful. The only issue is that they could go wrong. Not doing so is a mistake.
Don’t mess around with your sewing machine’s repairs yourself. Their equipment and parts are up to the challenge. Also, if your sewing machine is still under warranty, avoid attempting any repairs. Don’t try to fix it yourself.
How To Fix E6 Error on a Brother Sewing Machine
Remove the tangles of thread, then re-thread the machine and re-adjust its tension. Fortunately, this is an easy adjustment that should not take you long to implement. You don’t need to take your equipment to a repairman if the problem is minor, according to the error codes. It’s also possible to resolve the E6 error code on your own. A tangled thread has caused the motor to shut down, as shown by the E6 flashing or lighted light.
Xem thêm : How To Sew A Quilt With A Sewing Machine?
A simple explanation for an E4 error code is that you accidentally hit the reverse switch when the bobbin winder shaft was in the proper position to begin with. To use the reverse function, all you have to do is shift it to the left.
As soon as the foot controller was connected in, you got an E5 telling you to press the start and stop buttons. To use the automated switch, simply unplug the foot controller. Repairs, as you can see, are straightforward.
Repairing a Brother Sewing Machine Foot Pedal
The good news is that the repair may only require the use of a screwdriver. Repairing the foot pedal should be a breeze because there aren’t many parts inside.
If the wires are loose, frayed, or the pedal itself is damaged, then the first step is to inspect the pedal itself. This is when the adjustment screw comes in handy. Once that’s done, you should be good to go.
You won’t be able to modify the foot pedal if it’s controlled by a circuit board, therefore you’ll need to get it repaired.
Brother Handwheel Stuck
It’s possible that you’ll need to clean and restart the sewing machine. Check to see if the machine’s handwheel operates easily once it has been turned on If this is the case, your machine needs to be repaired. Here’s how you do it. See if moving the handwheel back and forth helps. One or more of the following may be to blame if this is the case. Make sure the machine is re-threaded and the tension is correct. Remove the bobbin and try again if it doesn’t liberate the handwheel. The bobbin casing must be reinstalled if the handwheel moves.
Again, verify your warranty before attempting any repairs. It’s always best to check the fine print to see if any repairs are allowed while the warranty is still active.
Why Is My Brother Sewing Machine Not Picking Up Bobbin Thread?
Make sure you have threaded your Brother sewing machine correctly and in accordance with the instructions if the bottom thread would not come out of the needle. If the needle is damaged or not compatible with your model, you will have to get a new one. Learn how to properly change a sewing machine needle to avoid additional problems.
How Do I Fix My Brother Sewing Machine That Won’t Sew?
Depending on the severity of the issue, you may find a quick fix like rethreading your machine, or you may need to take it into the shop if the motor is damaged.
Depending on the severity of the issue, you may find a quick fix like rethreading your machine, or you may need to take it into the shop if the motor is damaged.
Your options may range from a simple fix like rethreading your machine to a more involved repair if the motor is damaged.
In addition, you should double-check that the bobbin is properly placed in the machine by rewinding it and consulting the owner’s manual.
Before you begin sewing, check to see if your presser foot is properly positioned.
If none of these quick remedies work, you may be dealing with an issue with the machine’s motor or some other mechanical component. Repairing a problem this complex usually requires the expertise of a trained professional.
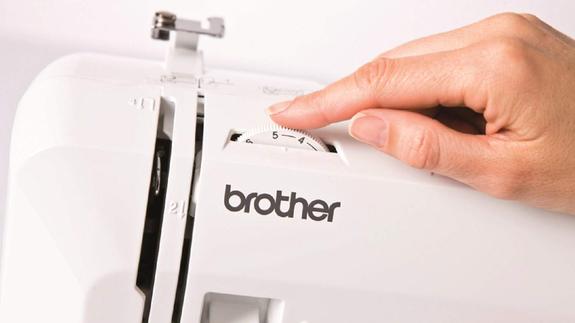
How Do I Fix The Tension On My Brother Sewing Machine?
- When sewing, use the suitable needle and thread for the job at hand.
- According to the Brother sewing machine’s instruction manual, re-thread.
- Use the tension dial to adjust the proper tension for the fabric and thread you’re working with.
- To figure out what alterations to make, sew on a scrap piece of fabric.
- In order to get rid of the lower threads, loosen up the thread tension or shift the dial to a lower number on the thread tension dial.
- If you can see the upper thread beneath the cloth, tighten the thread tension or shift the dial to the right and higher number.
To learn more about Brother sewing machine tension, check out this article.
Brother Sewing Machine Repair Near Me
Because Brother sewing machines are so popular, it’s possible that your local mom-and-and-pop repair business has a Brother-trained specialist. As a result, the best place to look for an authorized dealer is the company’s website.
A Brother-trained technician has the best chance of swiftly and effectively fixing your printer. It’s not enough to just type “sewing machine repair near me” into a search engine. Find a certified repair shop near you on Brother’s website first.
You’ll also be required to obey the guidelines of Brother and visit one of their representatives if you have a warranty.
Conclusion
Sewing machines made by Brother To save time and money, you can learn simple solutions to common jams and tangles. Sewing will go much more smoothly if you know how to rethread the machine, replace the needle, and rewind the bobbin. Using the right needle and thread can also help avoid a lot of headaches.
FAQs
Do Brother Sewing Machines Have a Warranty?
Yes, there is a warranty on some Brother sewing machines. The answer to this question depends on whether or not you purchased your equipment new and at what price. Parts and labor are covered under a warranty from Brother for a period of three years.
Depending on the nature of the work, professional machines may have varying warranties. There may also be some variances between embroidery machines, quilting machines, and sergers.
However, there are restrictions on the warranty’s application. Making unauthorized repairs on your own instead than consulting a professional usually voids the warranty. Visit the company’s website to discover if your equipment qualifies and what you need to do to keep your warranty valid.
Nguồn: https://spasifikmag.com
Danh mục: Sewing Tips


