Isn’t it obvious that keeping your home clean is essential? Your daily duties will go more smoothly since it helps keep things in order. Another thing to remember is to have your car serviced and MOT’d on a regular basis to keep it in top condition. Isn’t it obvious?
- Who Makes Bernette Sewing Machines? 5 Best Bernette Sewing Machines
- How To Finish A Blanket? Complete Step-by-Step Guide
- Why Should You Use Sewing Machine Oils? How To Oil A Sewing Machine?
- How To Sew Nylon Webbing On A Sewing Machine? Complete Guide for Beginners
- How To Sew A Double-Sided Blanket? 7 Best Answers To FAQs!
Sewing machines, what about them?
Bạn đang xem: How To Clean Sewing Machine? How Do You Deep Clean A Singer Sewing Machine?
Among the most pricey items in our creating rooms are our sewing machines for those of us who are crafters. It’s only second to a computer or a cutting machine in terms of importance. Your sewing machine is probably in heavy rotation if you’re like me. Why do we so frequently neglect to properly maintain our machines?
The skill of sewing machine cleaning is essential. That is the most important point! Maintaining a well-functioning machine is a must. Silky-smooth sewing can be achieved with proper maintenance and care. Your machine’s lifespan can be increased in this way as well.
HOW TO CLEAN A SEWING MACHINE
First, you must do four things before you learn how to properly clean your sewing machine:
STEP 1 – UNPLUG YOUR MACHINE
Keep your hands away from anything that’s still plugged in. In order to see what you’re doing, you should move your machine to a brighter area where you can take benefit of the machine lamp. To use the lamp on your computer, do not reconnect it!
STEP 2 – READ YOUR MANUAL
Learn how to use your machine by reading the instructions that comes with it. Keep your machine clean and lubricated at all times, regardless of the task at hand. Find an online sewing machine manual or contact a manufacturer or dealer to find out which oiling and cleaning areas your machine has, and when you need to do it, if you haven’t located your manual.
Keep in mind that certain manufacturers restrict the cleaning of their equipment to authorized dealers or repairers exclusively. Check to make sure you haven’t revoked any warranty.
STEP 3 – CHECK POSITIONS FOR CLEANING
To find out what places need to be cleaned, consult your owner’s manual. To get to the bobbin case, you’ll almost certainly have to remove the needle plates and the bobbin. In the sewing machine’s instruction manual, you’ll find this information.
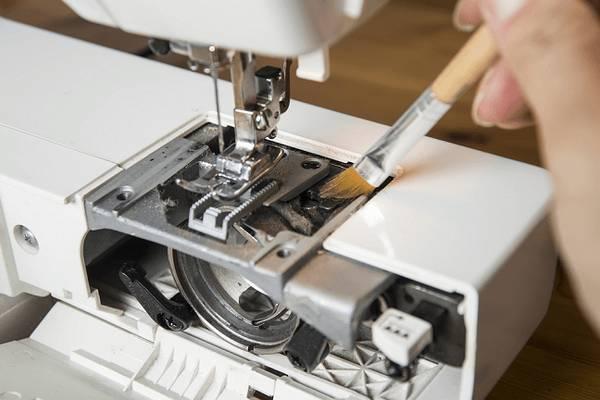
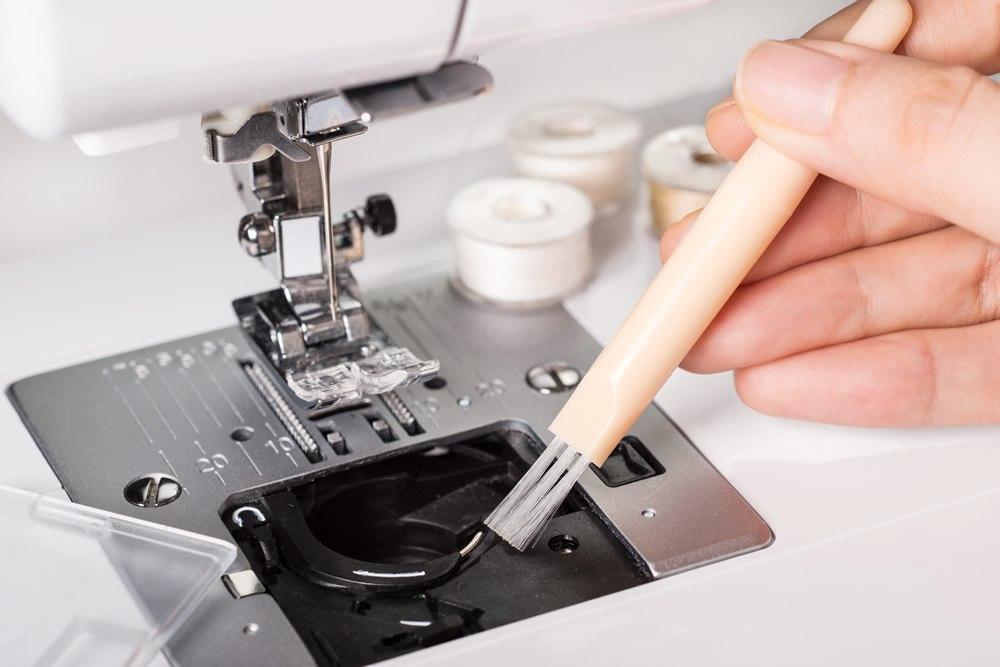
STEP 4 – BRUSH LINT FROMT THE MACHINE
All the lint that has accumulated over time will need to be removed.
Xem thêm : How To Fix A Singer Sewing Machine Bobbin Case?
This could have a big impact on the bobbin storage area below the machine. Take the cover off the bobbin and then get under the machine, according to the directions in your manual.
BRUSHES – Avoid purchasing inexpensive brushes with bristles, as this is the most unpleasant item to have floating around in the machine. A single tiny, stiff brush is standard equipment on the vast majority of machines.
The sewing machine’s commercial brush can be replaced with a disposable mascara brush. Striking a hard-to-reach spot has never been easier with these bristles.
Using your mouth to blow out the lint might also cause the same problems.
STEP 5 – OILING
Make careful to read the instructions on your equipment before you start putting oil all over it.
Make certain that the fluid you choose is appropriate for your equipment. In order for the machine to function properly, each model comes with its own unique oil. If you can’t get the right oil at your local garage, don’t even think about trying to use it. The risk to the machine is simply not worth it. Clear and delicate are the two characteristics of sewing machine oil.
Using scraps of cloth, run the machine to eliminate any traces of oil that could cause damage or a filthy finish.
STEP 6 – CLEAN THE EXTERIOR
After cleaning the inside, it’s time to turn your attention to the outside. For the most part, machines are constructed of durable plastic and can be cleaned with a damp towel. Do not touch any mechanical parts or areas where moisture could enter the material if it is wet.
STEP 7 – TESTING
Reconnect your machine and stitch a test immediately after cleaning and shining it up. This is especially critical if you cleaned with oil. During the first sewing process, you may come across a few stray strands of lint. It is imperative that your stitches are well spaced and have the correct amount of tension.
OTHER GOOD MAINTENANCE PRACTICES
A few extra minutes of testing will ensure that your device performs flawlessly.
- When a machine is left unattended, it quickly fills with dust, lint, and pet hair. In order to protect your sewing machines, cover them up or store them away in an appropriate sewing cabinet. Here are five easy-to-follow sewing machine cover tutorials: No-Fail Coverage Skirted Cover with Pom Poms Ribbons with a Renaissance feel The Pinafore Cover Machine Cover with a Decorative Stitching
- If you have a cat, don’t put its litter box in the same area as your computer.
- Every time the brush is used, lint and dust are cleaned from the machine area.
- The needles need to be changed at least once a week. Both the fabric and your sewing machine suffer from a blunt or bent needle.
- Before working with any sewing equipment, make sure your hands are free of debris. Even a small bit of peanut butter may make a tremendous mess in your washing machine and on your clothes. Please don’t ask me how I know this.
- Basic maintenance on your machine should be performed every two years by an authorized dealer. Among other things, this will include a thorough cleaning and oiling of the machine, as well as an adjustment of the tension. Check the tension by having them sew a straight and even seam.
Xem thêm : How To Use A Brother Sewing Machine? A Step-by-Step Learning Guide
We’d like to express our gratitude to Janome America for their assistance in providing you with the knowledge you need to get the most out of your sewing machine. You may find more information about Janome’s sewing machines and accessories as well as various sewing projects by visiting their website.
WHERE CAN YOU GET A SEWING MACHINE SERVICED – AND HOW MUCH DOES IT COST?
There will be a service for sewing machine repair firms to take advantage of. In your neighborhood, look for a locally owned business (The Sewing and Knitting Centre in Nottingham comes highly recommended).
Sewing machine repair costs will naturally vary. You should expect to pay between PS50 and PS100, depending on your machine’s sophistication level.
WHAT IS A SEWING MACHINE SERVICE?
Repairing a sewing machine is like to taking your car in for a MOT. Your machine will be thoroughly examined, and you won’t be able to perform any extra maintenance on it on your own. It will at the very least consist of the following items:
- The exterior of the cover is removed, and the inside mechanism is thoroughly cleaned and oiled.
- The top and bottom threads need to have equal tension adjusted to keep them balanced.
- Missed stitches can be prevented by checking and, if necessary, correcting the time of the needle and shuttle.
HOW OFTEN SHOULD YOU GET A SEWING MACHINE SERVICED?
Every year, you should get your sewing machine serviced by a professional. But if you use it frequently and frequently, you may need to see it on a consistent basis.
HOW DO YOU GET OLD OIL OUT OF A SEWING MACHINE?
To remove old grease and oil from the sewing machine, soak a soft cloth in oil and use that to wash the machine. Apply the detergent with water, but don’t oversaturate your machine, in order to eliminate more tough oil accumulation. Once the sewing machine oil has been applied, use a dry towel to buff the surface.
Cleaning the surface of your sewing machine can be challenging since you don’t want to clean it aggressively or use a solution that could cause rust. Before using a product in full, always test it on a small area of the machine. The machine should also be kept clean to prevent rusting.
Use a soft, soft cloth with oil for the sewing machine to remove the old grease and oil that has built up over time in the machine’s components. Apply the detergent and water, but don’t oversaturate the machine, to eliminate tougher oil accumulation. Before applying the wax polish, apply the oil to the sewing machine and then buff the area with a dry cloth.
In order to thoroughly clean the parts of your sewing machine without causing rust, you must avoid using any products that could damage them. Use the product on a tiny section of the sewing machine first to make sure it works properly before using it in full. Also, the machine must be cleaned to prevent corrosion.

HOW DO YOU DEEP CLEAN A SINGER SEWING MACHINE?
- In order to thoroughly clean the parts of your sewing machine without causing rust, you must avoid using any products that could damage them. Use the product on a tiny section of the sewing machine first to make sure it works properly before using it in full. Also, the machine must be cleaned to prevent corrosion.
- When it comes to cleaning a sewing machine, you don’t want to rub it too hard or use a product that could create corrosion. Before using the product in full, always test it on a tiny section of your sewing machine. Corrosion may only be avoided by thoroughly cleaning the machine.
- Reach your highest point before removing it.
- The presser foot holder must be removed and the needle plate cover must be removed from the flatbed surface.
- Use a tiny brush to remove the gunk. Remove any lint or debris that has become stuck using tweezers.
- However, do not use pressured air to clean the bobbin, as it could cause lint to be pushed into the machine.
- The needle plate should be removed and then cleaned of any dust bunnies that may have formed.
- Make sure all the pieces fit together properly before you begin.
- To replace the needle on a sewing machine, learn how to do it.
- Make sure that the sewing machine’s surface is clean by wiping it down with a soft cloth until you are satisfied with the results.
- Cover your sewing machine while not in use to keep dust off of it.
CONCLUSION
Routine maintenance on your machine should include cleaning and oiling it. You’ll appreciate working with your machine if it’s in good functioning order and well-oiled.
When you design fantastic clothing with the help of machines and machinists, you can also take pleasure in the process by using an instrument that is actively working. It only takes a few minutes to make sure that everything is working properly and to understand how to clean a machine. An fun and stress-free sewing experience.
Nguồn: https://spasifikmag.com
Danh mục: Sewing Tips


