Even if you carefully follow the directions in the owner’s manual, threading a machine’s threads might be a challenge. When it comes to quilting and sewing, a Brother sewing machine is an essential tool. It can be used for both home and commercial sewing. Using a few simple steps, we’ll learn how to thread a Brother sewing machine.
How to Thread A Brother Sewing Machine
Raise the presser foot and turn off the sewing machine. Remove the spool cap from the machine’s top afterward. Insert the new thread, and then reinstall the cap. A needle threader is used to pass the thread into the eye after the needle is guided by the mechanism for hooking at the top and back toward the back of your head of the machine.
A step-by-step approach may be more efficient. Initially, threading a Brother machine can be a little intimidating, but once you get the hang of it and do it a few times, you’ll find it a breeze.
Step 1. Lift The Presser Foot on Your Brother Sewing Machine
The first step is to turn off the machine and raise the foot of the presser. Lifting the needle from the fabric is done with a hand-operated hook that sits above the needle. During needle threading, it is best to lift the presser foot so the needle can slip between the disks of tension.
Step 2. Attach Your New Spool/Thread
Assuming you want to replace a thread spool that has run out of threads. The next step is to replace the old one with the new one. The spool pin is positioned at the top of each Brother machine and is held in place by the spool cap. It’s as simple as removing the cap and removing any unused yarn from the container. You’ll need to insert the new spool into the spool pin until it reaches the top, then screw in and reinstall the spool cap.
Make a spool of thread long enough to reach all of the sewing machine’s hooks. To thread a typical brother machine, a few meters of thread will be sufficient. Based on the length of the hooking mechanism, you can get a good estimate, but it’s wise to give yourself wiggle room.
Step 3. Thread the Machine – Hooking Mechanism
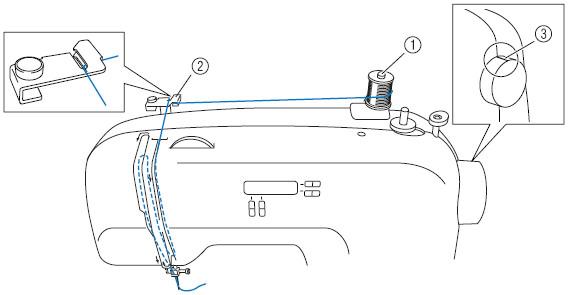
Using a series of hooks on the machine’s head, you guide the thread you’ve already threaded through them. If you’re having trouble threading your Brother sewing machine, there’s an illustrated diagram on top of it. It’s important to start by following the directions on the top and then threading horizontally at the top.
To proceed, you’ll need to place the thread in a very exact location on your head, on both the back and the front. The Thread Guide is a vertical opening on the left side of the head that is used to guide the thread as it is moved from the back of the head to the front. The upper and lower tension settings and the thread take-up lever will be pushed up and down until the needle is at the proper level.
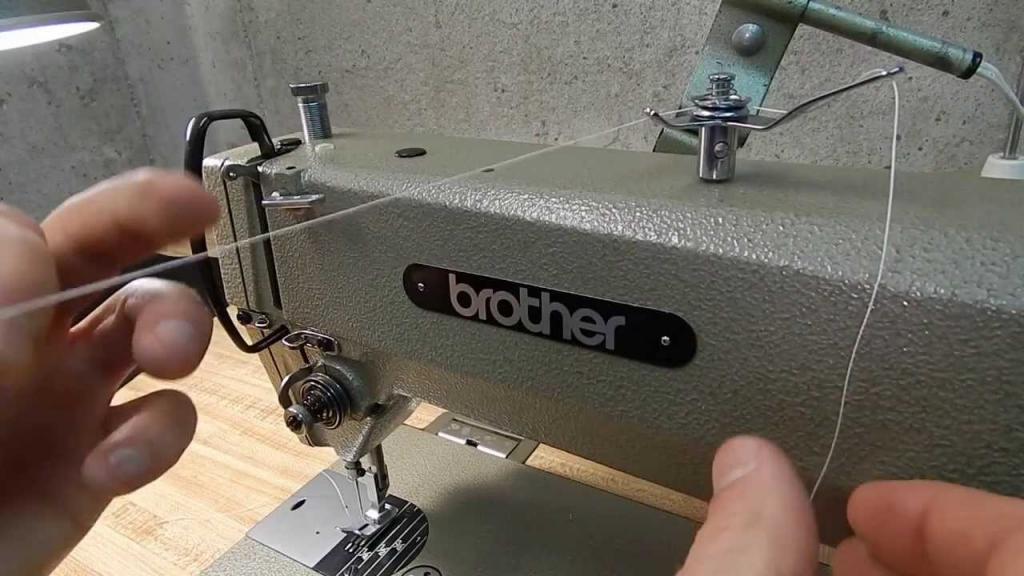
Step 4. Thread the Sewing Machine Needle
It’s the most difficult but also the most important aspect. At this point, your thread has been routed through the lower portion of the machine and attached to an additional spool. Once you’ve done that, you’re stuck in the middle of the process that will lead to the thread being caught in a thread watch.
The Fourth Step (Step 4.1) To begin, thread your needle guide through the thread you’re holding in your hand. The base is the part that looks like an extended finger on the right. As you’d expect, it’s at the top of the needle. It is recommended that the thread be passed behind the object from the left and then pulled forward and toward the front with the left.
Xem thêm : How To Replace Tension Assembly On Sewing Machine? Step-by-Step Tutorial
4.2 is the next step To do this, locate the button on your Brother machine that moves left to right, and then press up. In order to align the needle with the hook of the threader in succeeding phases, you must first lower the needle and then raise it back up.
The fourth and last step Pull the needle threader lever to the left side (mainly plastic) of the needle and secure it with your left hand while you link the thread onto the guide. Actually, it’s a hook-like device supported by a rod that goes over the needle itself.
Make sure that you don’t release this lever yet, since this will keep the thread in place on the guide. As a result, the needle will turn in your direction as well. This allows you to insert a nipper into the needle eye, which will help you thread the needle.
Thread the thread you’re holding in your right hand beneath a lever with your left hand while holding the lever with the thread you’re holding in your other hand. While holding the thread loosely, carefully release the lever so that the hook may drag the thread into the needle’s eyes into the loop.
Check to see if the thread is going in the appropriate direction. Now, drag the thread across your eyeballs until it reaches the other side of your eyes, and then cut it loose. The threading process will be complete at this point, and you’ll be ready to begin stitching. Unscrew the presser foot so that you can start sewing with the thread. The bobbin must, however, be checked to ensure that the thread at the bottom is ready to use it for a full stitch and that it has been correctly prepared.
The Process to Load and Draw up the Bobbin
You may find detailed instructions for drawing and loading the Bobbin below.
Step 1: Place the bobbin inside the socket or hole by the needle
The socket is also located in the direction of the needle. This is where the bobbin will be placed. Around 4 inches of thread must be removed before it can be installed. The container inside the bobbin is where you’ll put the bobbin when using it.
Set the bobbin up so that the thread comes out of it in the same direction as it did with the thread spool, and you’re good to go.
Stitching on a machine will be a disaster if you don’t pay attention to the direction you’re sewing in. In order to complete the process, you’ll have to start from the beginning. In order to avoid this, it’s essential to be aware of the issue and get it right from the start.
Step 2: Hook the thread of the bobbin to the guide at the base and then through the slit
Finally, at the machine’s base, near the bobbin-insertion hole, there is a hook. The thread must be wrapped around the hook or catch. As with all of your other thread guides and clips, of course. This one must be handled in a similar manner, and it should not be difficult to understand.
Pull the thread from the spool and see if there is any resistance as you did with the thread that was removed from the spool. The curved socket at the bottom of the machine can be used to direct the thread if you are confident there is no obstruction. Located close to the socket, it is easily accessible.
Step 3: The needle needs to be cycled once
As soon as the bobbin is in place and the lid is shut, you’ll need to unwind your thread toward the needle and attach it to your spool. Spin the needle to accomplish this.
Xem thêm : How To Sew A Baby Blanket With Satin Binding? A Few Tips to Remember When Sewing With Satin
Remember to turn off your sewing machine so that the needle does not accidently go into your fingers if you accidentally get your foot in the control.
You’ll need to use the identical knob or wheel on the device’s back to complete the cycle. The needle will gradually descend to the bottom of the tube as you turn it toward you. Then it will ascend to its former zenith.
Step 4: Catch the loop you just created
Your goal was to make a loop by cycling your needle, and you achieved it. Now is the time to intervene.
Step 5: Both threads have to be straightened
You now have two threads joined, and you must tug on them until they are each stretched to a length of about six inches. Place the tails at the back of the machine. Check to see that both threads are in the correct location. When using a set of presses, insert the larger thread in front of the smaller one.
Step 6: Go through the manual
Before you start sewing, make one last check of the instruction handbook you received. Make sure that the upper and lower threads are positioned in the correct order before sewing. This is your cue to get back to work on your project if everything looks well.
The sewing machine of your brother is now threaded. Some of the many steps to take-ups are more significant than others. However, each step is important. If you don’t take care of something, you won’t receive the desired result.
How To Thread A Brother XL 5130 Sewing Machine
- Make sure that the XL 5130 is turned off before proceeding. Once you’ve done that, pull up the lever with your toes.
- Turn the handwheel to raise the needle to the top position.
- The spool should be threaded onto the spool pin, and the guidance should be followed until it hits the groove on the machine’s front right.
- Once you’ve found it, thread your needle through the left-to-right slot behind the dial and the tension dial.
- Thread both sides together, then lead it up to the left groove and in front of the take-up lever.
- To finish threading the lever for take-up, thread it left and back before threading it up and to the left.
- Using a 2 inch spool of thread, begin threading the needle from the front.
How do you put a thread spool on a pin spool (horizontal Spool Pin) to the Brother sewing machine?
- Make sure that the spool cap is the right size for the thread you are using.
- Keep the spool in the pin with the slit securely in place.
- Only if there is a space between the cap and the pin’s tip can the thread be easily removed.
How do I utilize the needle threader of the Brother Sewing Machine? (Available on certain models, such as Brother XL 5130). Brother XL 5130)
- Make sure the handwheel is at its highest point by finding the mark on the handwheel.
- Pull the thread while lowering the lever of the presser foot to thread the needle.
- To attach the thread to the guide, begin by threading the thread through the guide and then moving to the left.
- To begin, draw the thread away from the front, then turn the lever for threading toward you.
- To grab the thread, make sure the hook is also going through the needle’s eye.
- While holding the thread, pull the thread through the needle by moving the threader’s lever toward you.
- Pull the thread through the needle’s eye by raising the lever to thread.
- Ensure that the presser foot is threaded with the thread’s end.
- Brother XL 5130 sewing machine has two inches of thread on the back.
How To Thread A Brother LS 2125 Sewing Machine
- Make sure the Brother sewing machine is turned off.
- Turn the handwheel to bring the needle to the highest point by squeezing the foot to the highest position.
- Using the thread spool, which is attached to its pin, the thread is run over the guide
- It’s important to make sure that the thread is positioned correctly ahead of the LS 2125
- It is imperative that the thread be guided through the tension disc.
- Using both ends of your disc thread, pull upwards and to the left, then downwards until you reach the lever to be taken up.
- Thread the needle from the front to the back, leaving about two inches of thread.
How do you thread over the hook of the Brother sewing machine?
The needle bar’s thread guide can be readily manipulated with two hands.
How do you connect the lower thread onto the Brother sewing machine?
- In order to raise the needle, crank the Brother LS 2125’s handwheel counterclockwise.
- To use the presser foot, pull up on the lever.
- Open the shuttle’s lid by looking for it and finding it.
- Get rid of the bobbin that is empty.
- Pull out around four inches of bobbin and then place it in the case.
- Once you’ve selected a slot, pull the thread into it and let it to pass through the eye of the spring.
- Make sure that the bobbin casing is securely fastened to the shuttle race
How Do You Thread the Upper Thread on A Brother Sewing Machine?
A Brother’s upper section may be threaded easily. A new position for the spool and locking it are all you need to do. Then, following recommendations on the head’s top, connect the thread at points three and four. After that, you’ll slide it up and around the lever to grab the thread, and then lower it into the machine to sew the needle in place.
What Thread Is Best for Brother Sewing Machine?
A wide range of threads, including cotton, silk, rayon, and more, can be used on Brother sewing machines. The type of thread you’ll utilize depends on the project you’re working on, not on the system you’re using.. For example, silk or cotton thread may be required for embroidery projects.
Conclusion
To keep a Brother sewing machine in good shape, it’s vital to understand various techniques for threading and maintaining the machine. Lubricating your machine is an essential part of keeping it running smoothly and extending its lifespan. Using the instruction manual that comes with your Brother sewing machine might help you remember the many procedures involved in threading a Brother sewing machine. Keep track of these steps by practising and rehearsing each one. Make sure you know how to thread both the top and bottom threads correctly so that you never forget. A Brother sewing machine can be threaded using the following instructions, if you’ve ever wondered. If you’ve followed the instructions to the letter, you’re ready to begin. Sewing Machine Express has everything you need to get started sewing right away.
Nguồn: https://spasifikmag.com
Danh mục: Sewing Tips


