Carmon Henry of The Featherweight Shop shows you how to remove the Tension Unit or Stud in this video instruction. The video transcript of the instruction, as well as all the necessary materials, are included below. Please feel free to get in touch with us if you have any queries or concerns. Enjoy!
- 13 Steps on How to Sew Curtains With Grommets? Things You Should Know
- What Is The Best Brother Sewing Machine?
- How To Fill A Bobbin On A Singer Sewing Machine Correctly?
- 4 Tips for Buying Fabric for your No-Sew Pillow Covers. How To Make A No-Sew Pillow?
- What Is A Facing In Sewing? Sewing Facing Tips and Techniques
How To Replace Tension Assembly On Sewing Machine?
Despite the fact that tension assemblies come in a variety of shapes and sizes, the way they work is the same on every machine. This tension assembly is critical for providing additional resistance to the upper part. Stitches are held in place by the resistance. As a result, the top and bottom threads won’t be able to correctly interlock without tension assembly. It creates an unattractive and vulnerable seam.
The machine’s tension will change depending on the type of stitch you use and the type of fabric you’re working with. The goal is to maintain the same thread tension during the whole top-stitching process. To achieve a looser bottom tension, the opposite of this is needed.
Bạn đang xem: How To Replace Tension Assembly On Sewing Machine? Step-by-Step Tutorial
Cut the fabric you’ll be using into little pieces before you begin the activity. Sew a tiny test piece using the same thread and stitch you intend to use on the project. The higher the number, the more difficult it is to stitch with the thread on top.
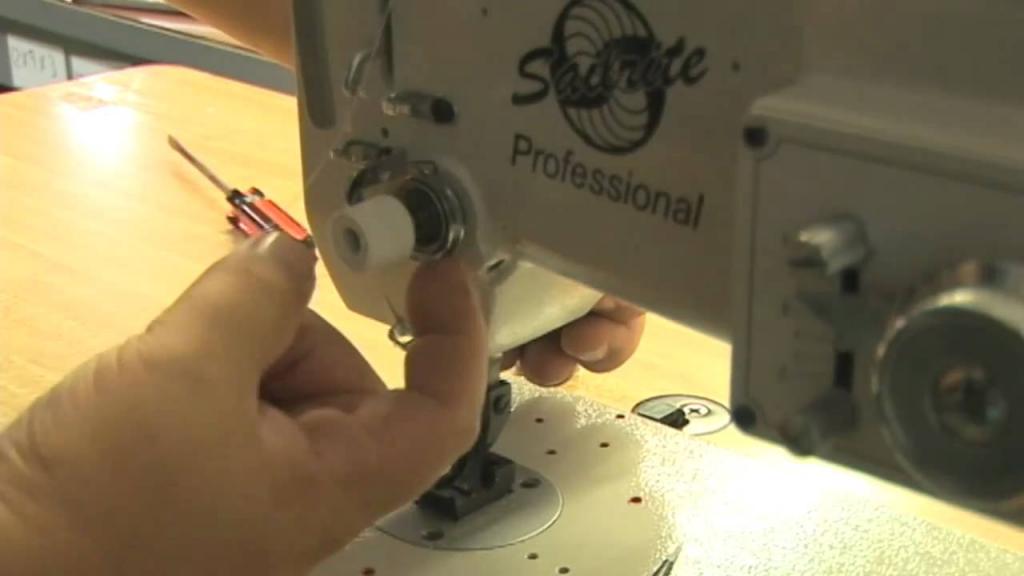
Step 1. Unscrew the front portion of the sewing machine.
- Make a point of reading and understanding the manual that came with your sewing machine.
- The machine’s faceplate is located at the front of the device.
- Remove the masking tape.
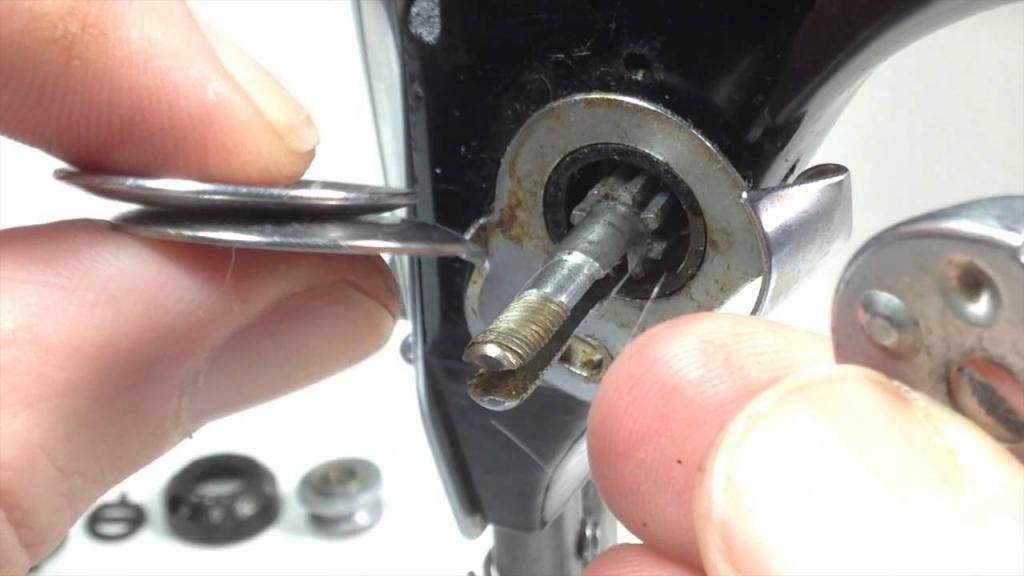
Step 2. Take the tension assembly off the hook.
- Turn the tensioner’s dial. Remove the tensioner assembly if there is a difference in tension but the thread remains the same.
- Turn the screw to the left to loosen it.
- This thread tensioning assembly should be held firmly by your fingers.
- Assemble the thread tensioning unit by moving it away from and toward you.
- Replace the tension assembly in the sewing machine by connecting it to the machine using the replacement cable.
- Using the screw, fix it in place.
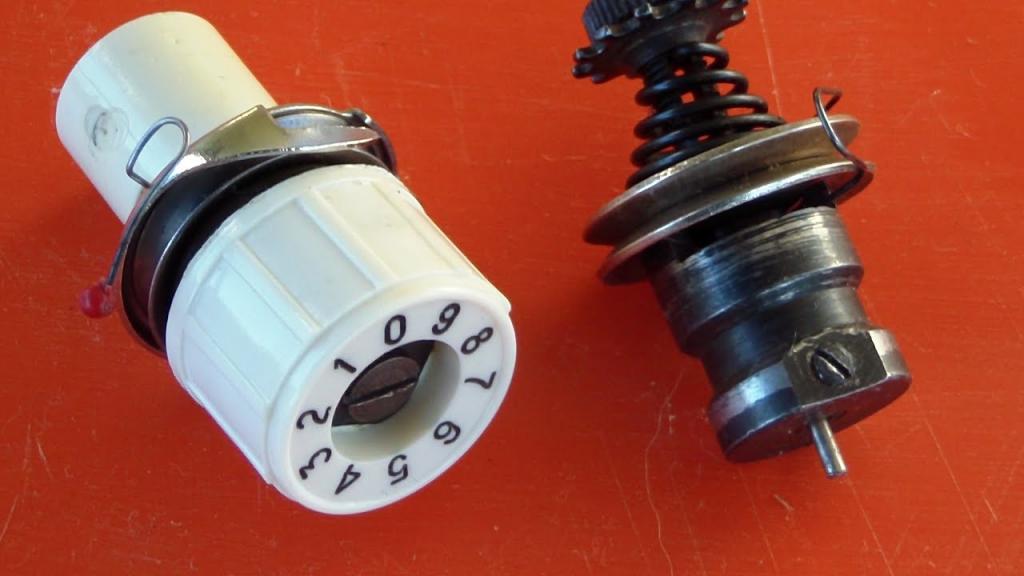
What Do The Tension Numbers Mean On A Sewing Machine?
For a correct stitch, a sewing machine needs both a top and bottom thread. In order to form a central web, the threads must work together cooperatively. One thread will pull the other to the other side if there isn’t enough harmony in the design. This can lead to a shoddy stitch that won’t stay put.
The tension of the thread at the top of sewing machines is controlled by a dial situated in the threading route. When sewing on a sewing machine, be sure that your thread is exactly positioned between the different tension discs. In the absence of this, the machine will produce stitches that are either loose or insecure. In other words, it’s a disgrace to look at.
The tension may be adjusted by rotating the dial, which has numbers printed on it. Most machines have a dial with a number between 0 and 9, which can be used to adjust the tension from loose to tight. As a result, when adjusting the machine’s tension, keep in mind that lower numbers indicate a lower (lessening) level of tension. The greater the number, the tighter the spool.
To get the right kind of stitches, you’ll need to adjust the dial’s settings by a notch or two.
How To Adjust Tension On Sewing Machine Bobbin?
The bobbin tension on most sewing machines is set to a predetermined level. Keep in mind, though, that sticking with the default tension setting doesn’t imply you’ll never have to change it. As a matter of fact, you aren’t likely to be stitching the same fabric for the rest of your life.
bobbin tension adjustment on sewing machines is a three-step method similar to this: bobbin tension
Step 1. Find The Screw For Tension Settings
All standard sewing threads have their bobbin tension (also known as lower tension) pre-adjusted at the factory. As long as you’re on vacation, you don’t need any modifications.
Using a small screw, you may adjust the tension. Located next to open threads, you’ll notice it.
A tiny plate with threads running across the hook may have been found. The little screw on this plate helps to adjust the thread’s tension.
Step 2. Start Adjusting Your Tension
Xem thêm : What Is The Best Thread For Sewing? Everything To Know!
Changing the screw’s position to its utmost extent without marks may prove problematic. In order to get a precise location, you need utilize the black marker.
Begin by using a small screwdriver to make minor adjustments. Screwdrivers of this type can be found in numerous devices. Tension is created by turning this screw clockwise, and then counterclockwise.
Step 3. Test Out The Results On Scraps
With one hand, grasp the thread’s end as you insert the bobbin into the bobbin casing. Then shift the bobbin lightly with your other hand to secure the thread.
There is too much strain if the bobbin can’t reverse direction even a millimeter. When the bobbin is taken out, it indicates that there is an underlying tension. Ultimately, the appropriate tension is when the slide moves barely slightly with each pull.
Bobbin tension can be gauged by watching the needle’s threading. Lower the presser foot and simultaneously pull both threads after that. When they are pulled out equally, the tension is perfect.
How To Fix Sewing Machine Tension Knob?
Professionals have a problem with adjusting the tension knob on their machines. Surely not? However, it isn’t that significant. The only thing you’ve done so far is to follow these instructions:
Step 1. Start With The Presser Bar Lever
To begin, pull up the presser bar lever on the machine. The top thread is not being pulled by the tension discs at this time.
Step 2. Loosen The Set Screws For The Tension
To test the thread’s tension, turn the knob counterclockwise or counterclockwise. When the set screw is removed, the tension assembly is free to move about. To loosen the screw, turn it to the left.
Step 3. Pull The Tension Knob Towards You
Remove the machine’s thread tensioning assembly and push it toward you with your fingers.
Step 4. Mark The Sequence Assembly
Labeling the assembly sequence is one task you’ll have to complete. A wide range of options can be found in some versions of machinery. In the absence of a written plan, you must be familiar with how the components fit together.
Getting the tensioner back in working order begins with a thorough cleaning of the machine component and all of the other parts.
How To Adjust Tension On Old Singer Sewing Machine?
Adjust Bottom Tension
Xem thêm : How To Service A Pfaff Sewing Machine? Troubleshooting and Repair Guide
In order to lessen its tension, each Singer machine has the same mechanism. Small screws on the arched spring allow it to be adjusted in tension.
Take a look at that and figure out how much force is needed to move the threads across it.
Adjust Top Tension
There must be enough adjusters on top to accommodate the wide range of threads and materials that will be used.
Although it may be necessary to keep the top tension at its highest setting in order to compensate, if the lower tension is properly set, the machine will continue to stitch. This could lead to poor or sloppy stitching, or even thread breakage.
Endnote
It’s as simple as that! With this information, you’ll know exactly how much tension to apply to your cloth, no matter what it is. To find out for yourself, put these strategies to use right away.
What Is A Tension Assembly On A Sewing Machine?
The sewing machine’s tension assembly is in charge of giving resistance to the thread at the top of the machine. Because both threads are able to lock together effectively, the stitches will appear identical and look good. Threads can be put between the tension plates of some sewing machines.
It is more difficult to draw the top thread than the bottom while the machine is pulling thread up from the bottom. So, you won’t be able to see the fabric’s top thread. However, because the thread at the bottom is more resistant to pulling than the thread at the top, it is impossible to see the thread that passes through the cloth at a high point.
How To Adjust Tension On Sewing Machine Bobbin
- Find the bobbin case screw and tighten it.
- To adjust the tension, turn the screw to the left or right.
- Make little tweaks and re-evaluate on a regular basis.
- It is possible to stop backlash by tightening the bobbin tension, which can be done if the bobbin thread continues to unwind even after the machine has stopped sewing.
- To fix a bobbin thread that won’t unwind because it’s too thick or heavy, lower the bobbin tension.
You may also check out this article on how to insert a bobbin into a sewing machine for further details.
What Tension Should My Sewing Machine Be On?
The design dictates how much tension you should use on your sewing machine. The quality of stitching on both sides should make it easy to determine the correct tension for your machine. As long as the seam is sturdy and stretchy, it is also obvious how tension functions properly.
Evidence of tension balance
- The knot that links the top thread with the bottom thread is hidden by the top and bottom layers of fabric..
- The stitching is both sturdy and stretchy.
- Both sides of the garment are stitched in an even and consistent manner.
The signs of tension that is unbalanced
- Even if the tension on the lower thread is not tight enough, the knot between the top and bottom threads may be seen from the left-hand side.
- When the upper thread is under stress, the knot between the top and bottom threads may be seen on the right-hand side.
- A blemish or a hole in the fabric seam
Conclusion
Is this article helpful to you? To replace a sewing machine’s tension assembly, you’ll first need to remove the machine’s faceplate. Using the knob, you can also adjust the machine’s tension for the best-possible stitch and seam.
Sewing machine set-up is also something you should be familiar with. This guide will let you sew without any issues.
Nguồn: https://spasifikmag.com
Danh mục: Sewing Tips


