To add a zipper to the back of a cushion or fabric cover, use a lapped zipper. It’s quick and easy. In terms of quality, this is a clean and neat conclusion. When it comes to attaching zippers, many people get nervous.
- How To Pre-wash Fabric For Sewing?
- How To Thread A Janome Sewing Machine? What You Need To Know
- Sewing Basics: How Big Is 46 x 60 Blanket?
- How To Sew A Baby Blanket With Satin Binding? A Few Tips to Remember When Sewing With Satin
- How To Thread A Montgomery Ward Sewing Machine? A Few Tips to Remember
The fear will be justifiable if you give it your best attempt and follow the fantastic step-by-step instructions (given below!).
Bạn đang xem: How To Sew A Lapped Zipper In A Pillow? A Step-by-Step Learning Guide
You’ll be so pleased with the results that you’ll want to finish the entire house. Do you enjoy it when the top of your mattress has a zippered opening? It simply enhances the comfort of the cushion. Because doing so would have altered the pattern placement on the exterior edges of my patchwork pillow tops, I didn’t want to use a 1/2 “seam allowance on the outer parts of my pillow tops when I started making patchwork pillowcases.
Inserting a zipper into a cushion will solve my problem. However, these instructions can be modified to fit any size cushion, not just one that is 20 square inches long. As a result, I didn’t want the colored area of my cushion to be visible.
How To Make Throw Pillow With a Zipper
Casa Brasi is the blog where I first learnt about this kind of painting. There was a problem with the blog, and it was taken down two years ago. Fortunately, I’ve already remembered the steps. However, I decided to re-create the guide, but with the tweaks I use that work best for my own needs.

It’s time to get down to the basics. If you have a sewing machine, I’ll presume that you know how to use it properly. I’m a complete noob when it comes to sewing and can only sew straight lines. This is all you need to do if you can accomplish that and follow the instructions correctly.
Steps To Sew A Lapped Zipper In A Pillow
To create a pillow with a lapped zipper, follow these steps:
Step 1: Cut your fabric
Pillow covers are made from a single piece of fabric with a front and a back that are both cut out.
When making a cushion, I prefer to cut the fabric to match the measurements of the insert. As a result, a 1/2-inch seam allowance fits the pillow shape well. Using a rotary cutter and cutting mat yields the cleanest results, in my experience. There are a number of ways to get started making pillows if you don’t already have one, but if you get hooked on it, a rotary cutter will be a must-have!
Decide which edge will be the bottom edge of your garment once your fabric has been cut and laid out with the lovely sides facing in. STOP! A pattern should follow the same path on both parts if it’s traveling in the right direction. To avoid a costly mistake, double-check this before you cut!
Step 2: Place and Mark your zipper
Place pins in the fabric at the beginning and end of the zipper before pinning it in place. You haven’t yet sewed in your zipper. We’re only going to note where we’re going to insert the zipper in our pillow case.
Step 3: Sew your bottom edge
Sewing the bottom edge is now ready for you. To get a straight zipper, here’s the secret.
Xem thêm : How To Thread A Babylock Sewing Machine?
Sew a regular straight stitch from the edge to the pin with a 1/2-inch seam allowance, backstitching to start and stop your stitch. Repeat on the other side.
Between the pins, you’ll sew the broadest stitch you can with your machine. The zig-zag stitch is a personal favorite of mine. For this section, there is no need to use the back stitch method. It is important that this stitch be easy to remove once the zipper is in place.
Step 4: Get ready to add the zipper
Place your zipper facing down on the seam you just ironed open. The zipper on one of my pillows goes backwards, and it is a headache to open. Isn’t that what life is all about?
You can pin the zipper in place with a few pins and then head over to your sewing machine. Take it easy. You will be alright.
Step 5: Sew your zipper in place!
Ok. Take a deep breath. Surely you can do it!
In order to begin, you must first attach your zipper foot. Your zipper foot will be in your hand. Aren’t you able to notice how it seems like a half foot? You’ll want the “missing side” closest to the zipper when you attach it to your machine and sew down that side, then switch it and sew the other side.
Ok. Ready. Keep as near as possible to the zipper teeth when sewing with a standard straight stitch. Begin sewing from the zipper’s farthest end, furthest away from the zipper handle.
While sewing the zipper, keep your needle in the fabric and stop just a few inches from the zipper pull so that you can’t continue (if possible.) To unzip the zipper all the way to the end, lift your foot up and carefully unzip the zipper past your foot. End your stitch with a backstitch.
The other side of the coin now. Switch your zipper foot to the other side so that the “missing side” is now closest to the zipper, and then repeat the same procedures as before to finish the zipper.
Congratulations! A zipper was just inserted by you! You can do it!
When your husband falls asleep on the couch, he’ll have a beautiful new area to drool! ( Which is unheard of in this town.
Step 6: Undo your temporary stitch
With a seam ripper, remove the lengthy stitch you made along the zipper.
Xem thêm : How To Change Light Bulb In Singer Sewing Machine?
Before moving on to the following step, unzip your zipper at least halfway.
Step 7: Sew the remaining sides of your pillow cover.
Pin the remaining edges of your pillow cover into place after re-laying it with the good sides facing in. (At the very least, unzip the zipper halfway.)
Put your standard foot back on your machine and sew the remaining edges with a 1/2 inch seam allowance, cutting diagonally across the corners. Return to your machine. Take a look at these images:
Rather than continuing to sew, lift your foot, turn the fabric, and then lower your foot. When stitching, this is the best technique to ever turn a corner.
When you’re finished, trim the corners of the stitch by about a half-inch. This will give your pillows a beautiful rounded edge.
Where to Buy Pillow Inserts for Your Throw Pillows
In the meantime, a word on pillows. Polyfills were the most cost-effective option for me at the time. However, they likewise appeared to be dead. You can’t karate chop them either. I’m now a firm believer in feather or down pillows.
Listed below are some of my recent favorites. My favorite place to purchase them is Hancock Fabric, where they frequently have sales where you can get them for 40 or 50 percent off. They’re a 95/5 fill, but I’ve also had good luck with these internet alternatives.. My favorite ones are the 90/10 blend from Robey’s Wholesale Pillow Inserts, which you’ll find in my living room. They appear to have a greater range of sizes than the local fabric shops, too.
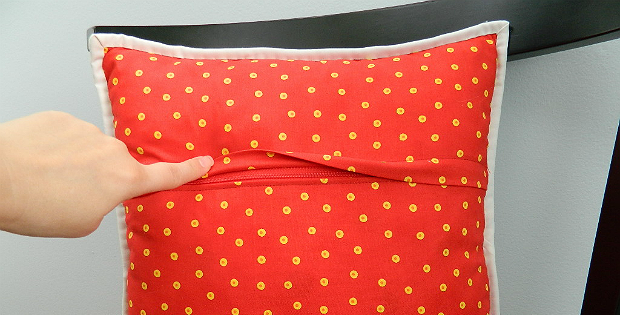
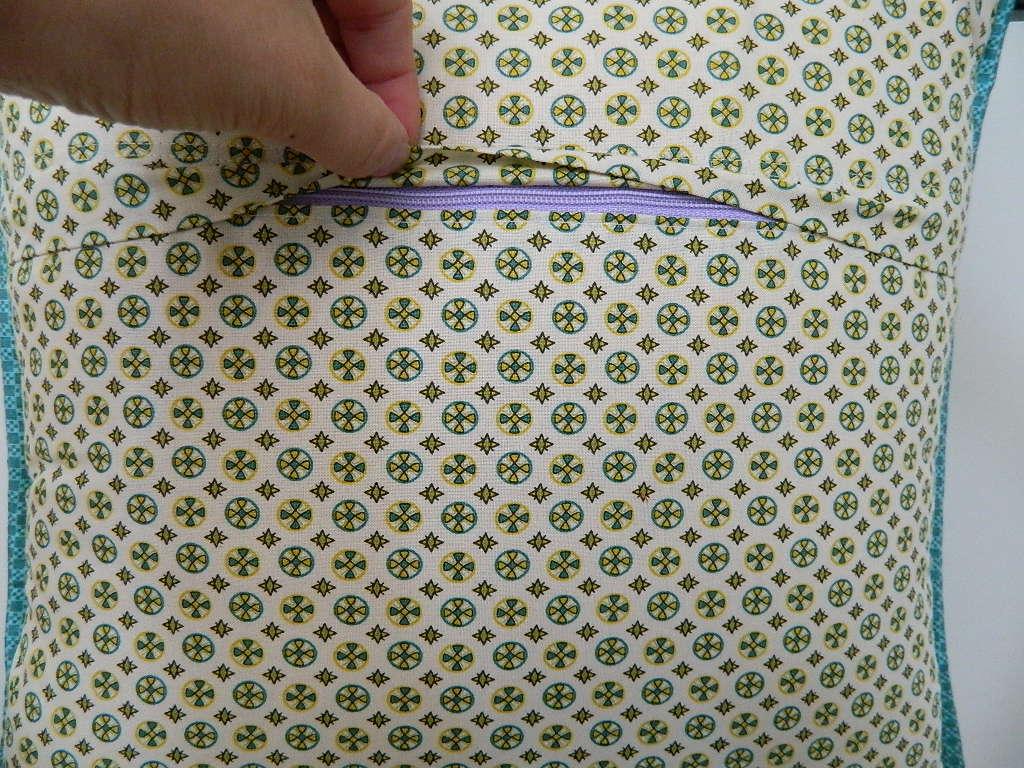
What are lapped zippers used for?
In order to hide the zipper, a lapped zipper must be made. During the insertion of the zipper, the zipper will be kept closed. Topstitching is the only stitching that takes place outside of the garment. When stitching, always maintain the needle in the middle of the zipper teeth and the zipper foot.
How to Sew a Lapped Zipper in a Pillow?
- Using the arrow keys, move the slider under “1” on the other side of the square, and then press.
- Folding row, right-hand side, up to the zipper bars of the fold. Zipper core surrounding the folding row. Use pins to hold the zipper in place, or use Wonder Tape to keep it in place without pins.
- When using a zipper foot connection on your machine and altering the foot connection angle on the right leg, sew the zipper in the place below the fold.
- Right-hand corners of the rectangular should be placed next to the zipper. The raw side of the rectangular prism should be positioned on the zipper’s unsewn side. In my case, the printable portion is on the other side. As a finished back cushion, I want a flat surface.
Pins or Wonder Tape can be used to keep the rectangle form and zipper together during knitting. Knit with a zip-up front. When necessary, adjust the zipper foot position. To open the zipper, use the rectangular shape.
- Once the right leg was sewed on, you folded a piece of cloth over the uncovered zipper, overlapping it by about half an inch. Position yourself parallel to the folding axis and as close as possible to the folding axis for best results.
- Flip the cushion over completely and use the opposite hand to sew the lapped side to the rest of the cushion. Do not worry about the pins; they will not be in the route of the thread.
- Remove the pins. The long side of the back should be measured in 1, “then the loose ends should be tied on each end of the zipper..” The backstitching can be done at the beginning or the end. Entrance Through Zipper
- When you’re done, turn the pillow right-side-up so that it’s facing you. Create a seam allowance across the whole edge of the garment by knitting. When necessary, to snip off the ends of a piece of material. Cushion form is added when the switch is straight out. Make sure the zipper is zipped all the way up.
Wrap It Up!
Finally, you’ve got the answer you were looking for! In a matter of minutes, anyone can create their own lapped zipper cushion after learning the easy procedures shown here.
You’ll be glad you did it when your pillow doesn’t have a zipper to impair its appearance. Conceal the zipper in your cushion.
There are no gaps in the stuffing, either.
That being the case, what are you still sitting there thinking about? Get your supplies and get to work on your cushion, which will feature a lapped zipper.
Have fun with your new hobby!
Nguồn: https://spasifikmag.com
Danh mục: Sewing Tips


