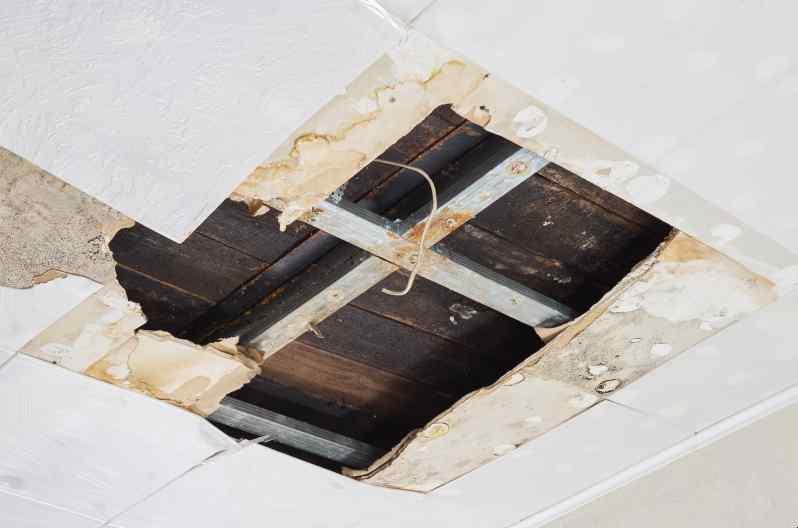
If your roof frequently leaks, you’ll need to know how to remove water-damaged ceiling insulation. If the ceiling insulation has been damaged by water, it must first be dried out before being removed.
- How To Fix Water Damaged Spot On Wooden Table? Step-by-Step Tutorial
- How To Clean A Water Damaged Wall Art? Step-By-Step Guide
- How To Replace Water Damaged Ceiling In Slide Out? Step by Step Instructions
- How To Repair Water Damaged Wallboard? Step-By-Step Guide
- How To Prepare Wall After Water Damage? Easy Step-by-step Guide
To repair any water-damaged structure in your home, you must first allow it to dry. Below, you can find instructions on how to delete them. We’ve included tips on how to replace both wet fiberglass and cellulose insulation.
Bạn đang xem: How To Remove Water Damaged Ceiling Insulation? Comprehensive Guide
Also included are explanations of how water damage affects ceiling insulation and why it should be guarded against. Finally, we’ll have a look at your insurance and the insulation in your ceiling.
The Benefits of Ceiling Insulation
You can significantly lower your heating and cooling costs by installing high-quality insulation in your home. Residential heating and cooling accounts for between 50 and 70 percent of total energy use in the United States, according to the Department of Energy. Air leakage and wasted energy are the result of poor or inadequate insulation. In the summer and winter, air is sealed out of the house, which increases the efficiency of your heating and cooling systems and keeps your home at a constant temperature. The cost of insulating your ceiling will not put a strain on your finances, and the return on your investment will be substantial.
Why Insulate Your Ceiling?
Your heating and cooling bills could be up to 40% higher if you haven’t insulated your ceiling. Heat rises to the roof while cold air falls. In the winter, when you turn on the heat, the heated air will ascend and settle towards the ceiling. ‘ After then, it’ll either warm up the interior or move to the roof and the outside of your house, depending on your preference. Because of the loss of heat, cold air can “drop” into your living space, prompting your heating system to work extra to keep the room warm. In the summer, your cooling system goes through the opposite procedure. Without proper insulation, a large portion of your heating and cooling bills would be wasted.
5 Ceiling Insulation Benefits
1. Comfort
Insulation reduces heat transfer, keeping your rooms warm in the winter and cool in the summer. After you insulate the ceiling, you’ll notice the biggest difference in your home’s summer comfort. During the summer, the ceiling can get extremely hot, making it feel like you’re standing in direct sunlight. Insulation lessens the strain on your air conditioner by reducing the amount of heat that enters your home. In the winter, you’ll also notice that there are fewer drafts between rooms. When you add insulation to your ceiling and walls, your furnace’s life expectancy is increased by 10 to 20 years, making it more efficient and saving you money on utility bills.
2. Moisture
Insulation prevents condensation from accumulating on the walls and ceilings, which can lead to mold and other moisture issues. Vapor barriers built into insulated ceiling assemblies prevent moisture from seeping into your home’s interior. Your home’s structural integrity and your family’s health could be at risk because of mold development caused by poorly insulated attic ceilings. Vapor barriers are only useful in certain scenarios, so it’s best to consult with a professional before putting one in place.
3. Save on Energy Costs
An typical American household’s annual energy costs come to about $2,200. The majority of this energy is used to heat or cool your home. Depending on the size of your house and the climate, you can save 40% or more on your energy bills by insulating your ceiling. You can save $616 a year on heating and cooling by following these recommendations, according to these numbers. Start saving money right away by insulating your ceiling!
4. Better Indoor Quality
Your home’s interior air quality can be improved with proper ceiling insulation, which prevents harmful particles from entering. Poor housing insulation can lead to air leaks that allow external contaminants to enter the home. External pollutants that cause indoor mold and mildew can’t get in because of the insulation in the ceiling. In addition to being a nuisance, mold can pose a health hazard to you and your family. Among the many benefits of ceiling insulation is that it removes pollutants from your insulation system, giving your home a new look and a cleaner air. Insulate your attic for better indoor air quality for you and your family.
5. Sustainability
As a final benefit of installing roof insulation, you are reducing your carbon footprint. Additionally, you’re reducing pollutants and thereby reducing your ecological imprint. You and your family are making a significant contribution to the preservation of our planet by reducing the amount of energy you use at home.
Steps In Removing Water Damaged Ceiling Insulation
The following are the most common types of ceiling insulation and how to remove them:
Method #1. How to remove water-damaged fiberglass insulation
Wet fiberglass insulation has a lower insulating capacity. Overexposure to water can cause insulation to clump, even if it’s dried up and ready to use again after that. The following actions should be followed if your insulation needs to be replaced:
Step #1. Dry it out
When dealing with a water-damaged structure of your home, this is the most important phase. You can use a dehumidifier if your insulation is positioned in a small area.
Protective gear, such as protective clothes, masks, gloves, and eyewear, must also be used in this manner. To keep the fibers out of your lungs, do this.
Check for contaminants including asbestos, mold, and vermin, and remove them if found. Asbestos testing kits are readily available for purchase.
Step #2. Prepare your equipment and working area
An HEPA-filtered, powerful vacuum cleaner with a large capacity is required. You have the option of purchasing or renting this gear.
After that, you’ll want to tidy up your workspace. Plastic sheeting and tape can be used to keep particulates from spreading throughout your site.
Step #3. Vacuum away
Suck up the insulation with your specialist HEPA vacuum. Don’t forget to check the corners and crevices, especially if there has been considerable water damage.
Step #4. Dispose
You’ll need heavy-duty garbage bags to dispose of your vacuum once you remove the fiberglass insulation. Look for a waste management facility that has been accredited by the Environmental Protection Agency.
Method #2. How to remove water-damaged cellulose insulation
Xem thêm : How To Repair Water Damaged Popcorn Ceiling? Step-by-Step Tutorial
Like Fiberglass insulation, cellulose insulation is affected by water damage and becomes less effective. Corrosion of electrical fittings is a possibility as a result.
Step #1. Dry it out
Cellulose insulation is compressed and settled as a result of water damage. It could even droop.
It may be difficult to remove the cellulose insulation if it is moist. It’s also possible to damage your timber building by leaving damp cellulose unattended. This means that the cellulose must be dried quickly.
Step #2. Seal the area
Close the door to the room where you’re working and put on your safety gear. Then, use a vacuum cleaner to remove the cellulose from the roof. While cleaning, be careful not to harm any electrical wires or plumbing pipes.
Step #3. Dispose responsibly
Place the vacuum bag’s contents in an industrial-sized fill bag after removing the wet cellulose from your ceiling. Remove the bag from the vacuum and tie it shut. Make sure to address the leak once you remove the insulation.
Effects of water damage on ceiling insulation
Mold growth
Mold spores thrive in damp, irregularly cleaned environments, such as the ceiling in your home. Because of its properties, fiberglass insulation is ideal for capturing mold spores in dust. The paper backing of the fiberglass batts could be damaged if this results in active mold development.
Cellulose insulation, on the other hand, is resistant to mold. Mold can still grow on it, though, due to its proclivity for absorbing moisture. As a sponge, it may foster the formation of mold on the wooden building next to it.
Loss of insulating value
Your insulators are hindered by water damage, as stated earlier. At least 40% of the R-value is lost when an insulator becomes wet.
Despite the fact that fiberglass appears to be watertight from the outside, its thick batts store moisture, reducing its thermal conductivity. Cellulose, on the other hand, absorbs water and compacts, losing its effectiveness as an insulator in the process.
How Much Does It Cost to Remove Attic Insulation?
For example, the cost of removing old attic insulation varies depending on the type of insulation being removed, your geographic location, and whether you need the service as a stand-alone job or as an integral part to an overall renovation. To that end, the cost of removing insulation from a square foot is $1 to $2.
Identify the type of insulation in your property, whether it has to be replaced or simply supplemented, and whether it contains any risks or toxins that could be distributed during removal before you decide whether or not it’s worth it to have it removed.
In order to save money on heating and cooling bills and improve the comfort of your house, it is imperative that you have your attic insulation in good condition. Even though you may be tempted to remove your own attic insulation, it is strongly recommended that you leave this task to the experts. Once we know if you need it removed and how much it will cost, let’s get started.
How Long Does Attic Insulation Last?
For an attic insulation removal project, the first question is whether or not you actually need to get rid of your insulating material.
Increasing power bills or a lingering draft are two symptoms that your home may be under-insulated, which is why adding attic insulation to your list of must-dos is a good idea. Rather of removing insulation from a property, the most common solution is to put extra insulation on top of it.
If basic home repairs are completed, newer attic insulation does not need to be replaced as frequently. Older homes may need new insulation, especially if the original insulation is damaged or contaminated with dangerous chemicals. Here, we’ll have a look at how long certain insulation kinds last:
- It can endure up to 80 years with spray foam insulation. It’s mold-resistant, airtight, and doesn’t take in water. Pests or construction damage are the most common reasons for its removal. 1
- When properly cared for, fiberglass can survive for up to 100 years. However, it can break down after only 15 to 20 years. Moisture and gravity can also destroy it over time. Its efficacy is directly related to how light and fluffy it remains. It’s normally safe to leave in place while installing insulation on top, unless it’s been damaged by water or pests.
- It can last anywhere from 30 to 80 years, depending on the type and foundation material. Mineral Wool: Moisture and mold are also a problem. If the existing insulation is dry and undamaged, it can be covered with new insulation.
- It can last up to 30 years, although it begins to disintegrate after 15 years. Moisture and mold are two of the biggest threats to cellulose insulation. Existing attic insulation can be covered with new insulation if it is clean, dry, and undamaged.
When Does Attic Insulation Need to Be Removed?
Aside from the fact that some types of insulation need to be removed because they are nearing the end of their life expectancy, some need to be removed because of damage. Some older insulation types can pose health risks to you and your family because they contain asbestos and other toxins.
Insulation in your attic may need to be removed and replaced for one of four reasons.
#1 Removal Due to Hazardous Types of Insulation
Attic insulation in an older house may need to be removed because many older homes were insulated with hazardous forms of insulation. Among them:
- Asbestos abatement contractors should remove any vermiculite insulation from your house if you have it. Asbestos testing is only required if the results show that there is more than 1% asbestos in the air. In order to protect yourself and your family from exposure to asbestos fibers, you must follow safety precautions such as isolating the area where you want to remove the insulation. 2
- It is now recognized that balsamic wool insulation, which is made from cedar tree shavings, contains carcinogens and was once popular in home construction throughout the middle of the twentieth century.
- Older cellulose insulation may offer a fire hazard because it is made from recycled newspaper.
Adding more insulation to a drafty house is a common solution. However, this can result in dangerous insulation being added on top of the already existing material. You can find out if your home has potentially harmful insulation by having an expert inspect it.
#2 Removal Due to Water or Mold
Xem thêm : How To Fix Water Damaged Wood Studs? Step-By-Step Process
Mold can grow in an unmanaged water leak, despite the fact that insulation materials are designed to withstand humidity and moisture. Mold in your insulation poses a threat to your family’s health and necessitates the services of a professional to remove it. Mold spores in your old attic insulation can lead to the following symptoms:
- Headaches
- Coughing
- Problems with the digestive system
#3 Removal Due to Pest-Infested Insulation
A toxic atmosphere created by animal urine and droppings will have a long-term effect on the quality of your home’s air as well as degrade insulation and structural elements. As they build nests and multiply, rodents and insects can enter attics and devour the insulation.
Depending on the extent of the infestation, you may need to remove all of the insulation from your attic.
#4 Removal Due to Other Damage
It is possible to puncture or tear down insulation to allow air to flow between the many layers of protection.
It is possible for wood chips to get into your insulation if your roof was badly built. Because of these gaps, water and dirt are able to get into the insulation and provide an ideal habitat for mold to thrive.
How to Tell if Your Attic Insulation Needs Removal
You can tell if your insulation needs to be removed and replaced by looking for certain symptoms in your attic.
Take a look up in the attic with a flashlight. If you are able to identify the following:
- If your old attic insulation crumbles when you touch it or shows other indications of aging, it may be time to replace it.
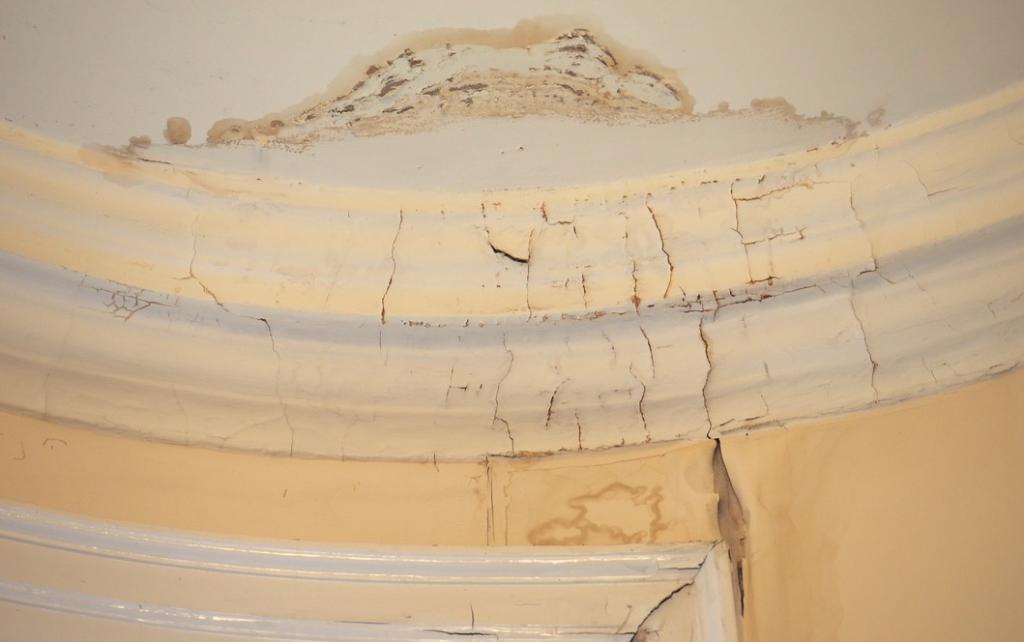
- Visible water damage and/or a smell/feel of moisture in the air are both indicators that you may need to remove insulation and treat for mold.
- Mold – Mold can be seen with the naked eye or not. The insulation may appear to have spots or streaks of dark color. In the case of fiberglass insulation, the black hue may indicate dirt that has accumulated due to the presence of an air leak.’ 3
- It’s possible that you’ll have to remove existing insulation and make repairs to the structure if pests leave signs of their presence, such as droppings, nests, or tunneling. As a matter of fact, you may have already heard these pests’ pitter-patter or chomping when the house is empty.
But a professional inspection and report will be the best test. It’s possible that you won’t be able to smell, see, or hear potential concerns that a professional can help you identify.
How Is Attic Insulation Removed?
The first step in this process is to inspect and prepare the attic for insulation removal. You’ll see a higher eradication rate if you’re dealing with a large infestation or contamination problem.
By hand or machine, depending on the type of insulation or damage, the removal can be done. However, hand-bagging and removing insulation takes longer and costs more money.
Things to keep in mind when making the decision between using a machine and removing it manually:
- It is necessary to package and remove any contaminated insulation by hand if it contains things like wood chips.
- It is necessary to roll up and remove the batt insulation by hand.
- Vacuuming industrial equipment collects and holds blown insulation until it is transported away from the residence.
How to Estimate Your Attic Insulation Removal Cost
Attic insulation removal costs how much? Attic insulation removal costs, on average, $1 to $2 per square foot, as mentioned at the outset of this essay. Costs can rise if the insulation is in a very bad condition. When estimating the cost of your project, consider the following aspects:
- Your pricing per square foot may be affected by the amount of insulation that is already in your home. For example, removing blown-in insulation over fiberglass batting that was previously installed by the previous owners will be more time consuming.
- How much of the present insulation must be removed by hand, and how much of it may be removed by vacuuming? By-hand removal is typically more expensive because it needs more time and effort.
- You’ll need to extend a six-inch diameter hose through your attic to gain access to the vacuum truck if it’s necessary to remove it. Vacuum cleaners are outside your house, and the hose is attached to one of them. Your attic may require removal by hand rather than a machine if space is a constraint.
- The ease or difficulty with which workers will be able to enter and traverse your attic area is an important consideration. Is there going to be anything in the way of their progress? Depending on your employment, this can effect both the methods you utilize and the quantity of time you put in.
- Removal by hand may be necessary if hazardous materials, such as mold or asbestos fibers, or animal waste, are present, necessitating extra safety precautions and actions such quarantining the residence for a set length of time.
How Attic Construction Professionals Can Save You Money
Mold, animal feces, or asbestos-containing insulation must be handled with care to safeguard the removal personnel and prevent contamination from spreading throughout your property.
Attic Construction can manage the removal even if you’re planning to do it yourself throughout the replacement procedure.
You can get a free attic inspection from us if you’re thinking about changing the insulation in your attic. We’ll send one of our inspectors to check out your attic to see how clean, safe, and well-protected it currently is, and then make recommendations on how to maintain it that way.
Do you need to protect your ceiling insulation?
Yes, and the only way to keep your ceiling insulation safe is to keep it from leaking in the first place Maintaining the condition of your roof after a storm is essential to preventing leaks. As soon as damage occurs, have it repaired, and keep an eye on the insulation in your roof, ceiling, and walls.
Insurance policies regarding ceiling insulation
In most cases, leaks cause mold to grow in ceiling insulation, which is not covered by your insurance. If, on the other hand, the damage is the result of a covered event, such as a weather-related disaster, you may be covered. Your lawyer and insurance company can provide more specifics regarding this.
Conclusion
With this knowledge, we hope that you’ve also learned how to keep water damage at bay. Maintaining the quality of your insulation is as simple as following these guidelines step by step.
Using the right amount of ceiling insulation may make a big difference in your home’s energy efficiency, which is why it’s so important to have it installed properly.
Nguồn: https://spasifikmag.com
Danh mục: Damaged


