You can keep both old and new furniture if you know how to restore a water-damaged place on a hardwood table. Just let the wood to dry completely, clear any filth or mold that has formed, and make the required repairs to your table to get it back in working order.
- How To Refinish Water Damaged Wood? Step by Step Instructions
- What To Do With Water Damaged Hardwood Floors? Helpful Tips To Remember
- How To Repair A Water Damaged Concrete Slab? Step by Step Instructions
- How To Repair Water Damaged Popcorn Ceiling? Step-by-Step Tutorial
- How To Repair Water Damaged Pressed Board Cabinets? Comprehensive Guide
Water may do a lot of damage to wood furniture, but there are ways to repair the damage. Learn how to save your water-damaged wooden table by reading this article!
Bạn đang xem: How To Fix Water Damaged Spot On Wooden Table? Step-by-Step Tutorial
How To Repair Water Damaged Spot On Your Wooden Table
Step #1. Remove the table from the source of damage
Water damage from dripping cups, cold drinks, or spills on the table is the most common cause of small, unsightly water spots. There are two types of water stains: those that can be easily removed and those that can’t be.
Water-damaged tables should be moved away from the source of the damage as soon as possible. This usually means not setting anything down on the table until you’re done.
Roofing damage or a broken pipe might cause leaks. Consult with your insurance company in this situation.
Consult with your insurance company to check if water damage is covered by your policy. After then, you should see a lawyer to learn about your possibilities in a lawsuit.
Step #2. Dry the table completely
As long as the water only touches the table’s surface, this step is easy. By wiping away the water droplets, you can dry the table.
Allow it to dry out for a few hours if the water has penetrated deeply. Blow dryers and fans can be used to speed up the drying process.
Step #3. Get rid of light stains
Furniture polish, petroleum jelly, or mayonnaise can be used to remove faint stains from surfaces. Watermarks can be displaced by the oils in these items.
Using toothpaste may help if the stain is particularly adamant. Use a piece of cloth to apply a small amount of toothpaste to the area. Stronger toothpaste can be made by adding 12 teaspoon baking soda to the toothpaste.
Mineral spirits and a soft cloth can be used to remove any leftover stains. Afterwards. Mineral spirits should be tested on the underside of your table before adding it to the stain.
After the stains have been removed, use paste wax and a soft cloth to wax your table. Afterwards, use a buff to remove any excess wax.
Step #4. Fixing darker stains
You’ll need a different set of steps if the stain is darker or more deeply embedded. You’ll need oxalic acid crystals, sandpaper, and wood stain for this procedure.
To begin, warm water is used to dissolve the oxalic acid crystals. Apply the oxalic crystal to the furniture and allow it to dry before moving on to the next step. As soon as the oxalic crystal liquid is powdery, you know it has dried.
Clean water should be used to remove the powdery residue. In order to get rid of all the black stains, repeat the method. If you do get to the bare wood, lightly sand the area and then use tack-cloths to remove the dust from the area.
Once the dark stain has been removed, you should apply a light coat of wood stain that matches your table’s hue. Wait for the wood stain to dry before reapplying.
Step #5. Fixing deep damages
There may be serious damage if the water damage comes from something other than mugs and cups. It’s easy to tell if something is seriously damaged by looking for indicators like swelling, warping, and cracking.
The first step is to look for symptoms of mold. Mold spores can be killed with a solution of one part vinegar to one part water.
If the wood has become powdery due to water damage, it is advisable to remove them. Scrape away any water-damaged wood with a sharp knife until the remaining material is hard and strong.
Xem thêm : How To Repair Water Damaged Glulam Beam? Complete Step-by-Step Guide
The next step is to patch in the holes and cracks that have been created by the damaged wood. Wood filler sticks or wood putty can be used for this phase. Wood putty or a stick that matches the color of your table is the finest option.
Putty or filler should be poured into the hole until it spills out of the crack. The sooner you can flatten the material, the better. Determining how long it will take for the material to dry will depend on the label.
After the filler has dried completely, sand the excess to a uniform color. Sandpaper with a grit range of 120 to 220 is ideal. To get rid of the tiny dust, use a tack cloth.
After that, a coat of wood stain is the finest way to seal the wood. Staining the wood table with wood stain can assist match the color of the filler to the wood, while also protecting it.
Protecting and Caring for Your Wooden Table
Your dining table will eventually show signs of wear and tear. There are a few simple things you can do every day to keep your dining room table in good shape and avoid costly repairs. In addition to being long-lasting, these simple steps will keep your table in pristine shape for many years to come.
- When deciding where to put your dining table, you should take into account the proximity of the nearest heat source. Tables that are placed too close to radiators or fireplaces, for example, may be at risk of collapsing. There is a risk that direct heat will shrink the wood fibers, resulting in the wood breaking or cracking along the grain, or where there are connections across the tabletop
- Keeping your dining table out of direct sunlight is critical. The heat from the sun can cause wood to split or break anew during the summer months. If your dining table is exposed to direct sunshine throughout the year, you might expect its tabletop to become discolored. Discoloration in solid wood is usually irreversible, depending on how far it has penetrated. When the weather is nice and sunny, keep your blinds or drapes closed just a bit to prevent the tabletop from being exposed to direct sunlight for long periods of time. A UV resistant top finish dining table is particularly recommended in these cases, such as an orangery or conservatory, where the table will be exposed to sunlight.
- To prevent warping of the eaves on an extendable dining table, make sure the eaves are stored flat when not in use. Keeping the eaves dry and in the same room as the dining table is preferable, so that the humidity levels are consistent at all times. The increased moisture in the air can cause the wood to expand if it’s kept in a loft or a garden shed.
- Your solid wood dining table is at risk from moisture, so make sure that any spilled food or liquids are cleaned up immediately if they land on the table. The finish on the table will begin to break down and eventually seep into the wood if liquid is left on it. This can harm your tabletop structurally and leave persistent watermarks.
- If you want to extend the life of your dining table’s finish, make sure there are only a few objects on the surface. The usage of placemats at meals is highly recommended due to the sharpness of plates and cutlery, which might damage your surface.
- Tables made of solid wood should not be used for piping hot pots, pans, or serving dishes. Using heat-resistant tablecloths for hot pans or serving dishes will help prevent burn marks and damage to the wood.
- Use coasters wherever possible when sipping on hot or cold beverages at the dinner table. Drinking hot beverages might damage the finish on the tabletop or cause permanent heat damage. Moisture left behind by cold drinks can ruin the table’s finish over time, causing permanent water damage.
- Investing in a whole table cover for special events is a great idea, in our opinion. When hosting a large dinner party with a lot of people, you may want to consider using these as a table-saving device. This is a beautiful piece of furniture, and we’re sure you’d rather show it off to your guests than hide it behind a tablecloth. It’s even worse when you do anything to it and it’s beyond repair.
- In order to maintain a wax or oil finish on a dining table, you will need to treat it on a consistent basis. Depending on how often your table is used, this should be done every three to six months on average. Natural waxes, such as beeswax, carnauba wax, or a combination of the two, should be used. Avoid using silicone-based waxes at all costs since they leave a difficult-to-remove residue on solid wood surfaces.
- When it comes to cleaning your table, precision and care are key considerations. Avoid using abrasive towels or harsh chemical cleaners to clean your wooden dining table.
Cleaning Your Wooden Table
Cleaning your dining table on a regular basis is essential because here is where you and your family will eat on a regular basis. Cleaning a wooden dining table with off-the-shelf cleaning products can be dangerous because many of these products contain harsh chemicals and/or abrasives that can cause irreversible damage to the finish.
As well as disinfecting your wooden table, the cleaning methods we’ve chosen are gentle on the wood, making it safe for you to use while also ensuring its long-term durability.
How to Clean a Wood Table With Vinegar
When cleaning a table that has been finished with oil, wax, varnish, or lacquer, we recommend following these five methods.
- Add a tiny amount of white vinegar to a cup of warm water in a bowl; the recommended ratio is 1-3 teaspoons per cup. White vinegar is a highly acidic liquid, thus diluting it with water is essential. For cleaning up food spills on the table, white vinegar’s acidity makes it an excellent disinfectant. Before washing the entire table, test a small area with a tablespoon of vinegar and a cup of water to ensure you have the proper vinegar-to-water ratio. White vinegar can be used to clean wax and oil finishes, whereas lacquer and varnish can use a stronger solution (1-2 tablespoons white vinegar) (2-3 tablespoons).
- To avoid damaging your table’s finish, use a soft, non-abrasive cloth or the coarser side of a sponge to clean it. To get the greatest results, we recommend using a microfiber cloth. A little soft thistle brush works well for cleaning a rustic dining table with a rough surface before using a vinegar solution.
- For best results, use a cloth that isn’t saturated with vinegar solution before dipping it into a bowl of water. Even if only for a short while, having too much liquid on a tabletop is never a smart idea.
- Wipe the table again with the same towel after rinsing it in clean water and completing the job. This will get rid of the vinegar residue and any other gunk that may have accumulated.
- Clean the table with a separate, dry, and soft cloth. The finish on your tables will degrade over time if moisture is allowed to remain on the surface.
To clean your table if you don’t have vinegar on hand, you can use diluted dishwashing liquid instead. While this may not be as effective in destroying bacteria, it will serve you well until your next trip to the store.
It doesn’t matter how much you clean your dining room table, you’ll still have to deal with the inevitable messes that are bound to happen. A scratch or two on your wonderful wooden dining table is likely as it is such a frequently used piece of furniture in your home will occur over time.
Removing Scuff Marks From a Wooden Table
We’re all too aware that the dining table gets a lot of usage in the home, from daily family dinners to schoolwork done by the kids, so it’s only natural that it would start to show signs of wear and tear with time.
To maintain your wooden table looking its best, we’ve put up a list of simple DIY tips and tricks.
How to Remove Scratches From Wood Furniture With Sandpaper
To remove minor scratches or blemishes from your dining table, use these simple steps:
- Using a sanding sponge or sanding block, lightly sand the scratched area to remove it. Sand in the direction of the grain at all times. Scratches in your dining table can be made deeper and more noticeable with coarser sandpaper than finer grits (80 or 120). Scratches can be disguised by going with the grain of the wood. Scratches that are applied against the grain are less likely to stand out.
- Slight scratches can be erased by sanding with 180-grit and then 240-grit paper to blend in and minimize the scratches left by the 180-grit grit sandpaper. Using a 120-grit sandpaper before this procedure is recommended for deeper scratches.
- 240-grit sandpaper should be used to smooth down any rough edges left by the coarser grit paper, and it should be applied in the direction of grain to ensure a seamless transition. In order to avoid seeing the scratch marks left by the coarse paper, do not go from 120 grit to 240 grit immediately.
- Before refinishing the dining table with oiling or wax, make sure you remove all of the dust from it after you’ve removed the scratch or mark.
It is not always necessary to use sandpaper to erase even the smallest scratches; other common home objects can be used instead.
How to Remove Scratches From Wood Furniture With Vinegar
You’ll need to:
- Vinegar that’s been diluted with water (Cider vinegar will also work).
- Oatmeal.
- a pair of rusty cotton rags
For what reasons do we advocate using white vinegar?
Acetic acid makes up 5 percent of the vinegar’s composition, while water makes up the other 95 percent. In addition to being a great cleaning agent, it also has the ability to cure tiny scratches. In order to fill the scratch, the acetic acid will work its way into the current finish around it.
What are the benefits of using olive oil?
You’ll need a stronger solution of white vinegar than you would use to just wipe your table if you want to repair any light scratches. The tabletop polish can be damaged if the acetic acid concentration in the white vinegar is too high, thus it must be mixed with oil. As it soaks into the bare wood from the scratch, the olive oil enhances the final outcome. The wood is protected from moisture while also achieving a deeper color that matches the rest of the finish. As a last point, olive oil is a natural product that is safe to use on a table where you will be eating.
Xem thêm : How To Replaster A Water Damaged Ceiling? Step-By-Step Guide
To be on the safe side, we suggest applying any remedy to a small test area first.
Scratches can be easily removed with vinegar by following these simple steps:
- Using a bowl or a cup, combine 100ml of white vinegar and 200ml of olive oil.
- Soak a cotton rag in the solution by dipping it into the cup. Soak the rag in water and then squeeze it to remove any extra moisture.
- Apply a moistened rag to the scratched area of your tabletop. Rub the cloth in a circular motion over the scratched area, then finish by rubbing it with the grain.
- The solution should be allowed to sit on the tabletop for two minutes. This helps the oil to penetrate deeper into the surface of the wood.
- Get a new, clean rag and use it to remove any remaining cleaning solution. After that, rub in the direction of the grain. Check the surface for any traces of food or liquid.
The scratches will eventually fade if you keep doing this method over and over. The depth of your scratches may be the source of your inability to remove the marks. Scratches that go deeper than a few millimeters can be removed by using Crayons in the following section:
How to Remove Scratches From Wood Furniture With Crayons
Try using a child’s crayon to remove deeper marks that vinegar can’t. Here are three reasons why using a crayon to remove scratches is a great idea:
- Crayons are strong because they are produced from a variety of waxes. To ensure structural strength and good crayon hold-together, these waxes have been strengthened using a strengthener. You can expect them to solidify into one piece once they’ve filled in the ding or ding on your table.
- Crayons are available in a wide range of colors, making it easier for you to pick the right one. From the Crayola spectrum, we’ve selected the closest wood colors for you to choose from. Crayola’s ‘Bisque’ and ‘Gold’ crayons are ideal for coloring desks made of natural wood. Light Brown and Golden Beige Crayola crayons are recommended for medium brown wood tables. Finally, we recommend ‘Fuzzy Wuzzy’ and ‘Earth Tone’ Crayola crayons for dark wood tables. Choosing the right color crayton for your table is a matter of personal preference, but we recommend that you always go darker than the real wood color of your table.
- Because young toddlers love to eat everything they touch, crayons are made with food-grade ingredients to ensure their safety. Using the crayons on your dining room table will not be a problem because the colors added to the crayons are nontoxic.
Crayons are fantastic for repairing table scratches because they’re so easy to use.
- Keep the area where you want to fix your table clear of dust and dirt, especially in that area. Lack of cleanness on the surface may have an effect on the wax’s ability to adhere to the wood.
- Choose a crayon that matches the color of the wood on your dining room table. In order to make the restoration integrate better with the rest of the wood, we recommend that you go with a darker shade rather than a lighter one.
- The scratched area should be covered with wax by the end of the crayon’s strokes.
- Use a credit card to carefully remove any remaining wax off the surface. Keep an eye on the tabletop to make sure it’s level where the scrape was.
- Blend the wax infill into the tabletop by buffing it with a clean cotton rag.
It is possible to repeat this process numerous times to get a level and smooth surface. If the scratches or voids are too deep or wide to remove using the method above, it may not be possible to remove them. You should continue reading if that’s the case.
Fixing Deep Scratches in Wood Tables
- Fill in the deep scratch on your table using a specialized wood filler that matches the color of the wood. Using your finger, work the scrape until there are no gaps of air.
- Remove any excess wood filler off the table by using a putty knife or an old credit card.
- Filler drying periods can vary, so make sure to read the packaging for correct drying times.
- Dry the area around the scratch and sand it with fine sandpaper (180 grit or 240 grit). Always sand along the direction of the wood’s grain when working on a piece of wood.
- Follow the directions above to apply the proper oil or wax.
Fixing Other Wooden Table Ailments
Multipurpose dining tables are becoming increasingly popular in today’s world. The dining table can be used for a variety of purposes, from eating meals to serving as a home office desk for individuals who work from home, to serving as a classroom for children. There are a variety of ways to keep your hardwood table in good condition despite the fact that it’s more vulnerable to various types of harm.
How to Remove Biro From a Wooden Table
Working and studying at home is made a whole lot easier when done at a dining table. It’s not uncommon, however, for biro ink to accidentally go on your dining table.
In order to remove biro, it is vital to note that the success of the process will be influenced by the finish of your dining table. In order to remove the biro from a waxed or oil-finished hardwood table, the techniques following will most likely take away the wax and oil, requiring a new coat of oil or wax.
Varnish and lacquer treatments protect the wood’s surface with a hard, durable covering. As a result, less ink will have permeated the wood, making it easier to remove the biro.
We recommend using rubbing alcohol or even hand sanitizer to clean up biro or ink stains. Let the solution remain for 10 minutes before rinsing it off. It is advisable to use a cotton ball or towel to massage over the ink in circular motions to help penetrate the trapped ink if it appears to be trapped inside the grain of a hardwood table.
Make certain that the table has been well cleaned and that no alcohol remains on it. You can repeat this technique if there are any remaining traces of ink on the table.
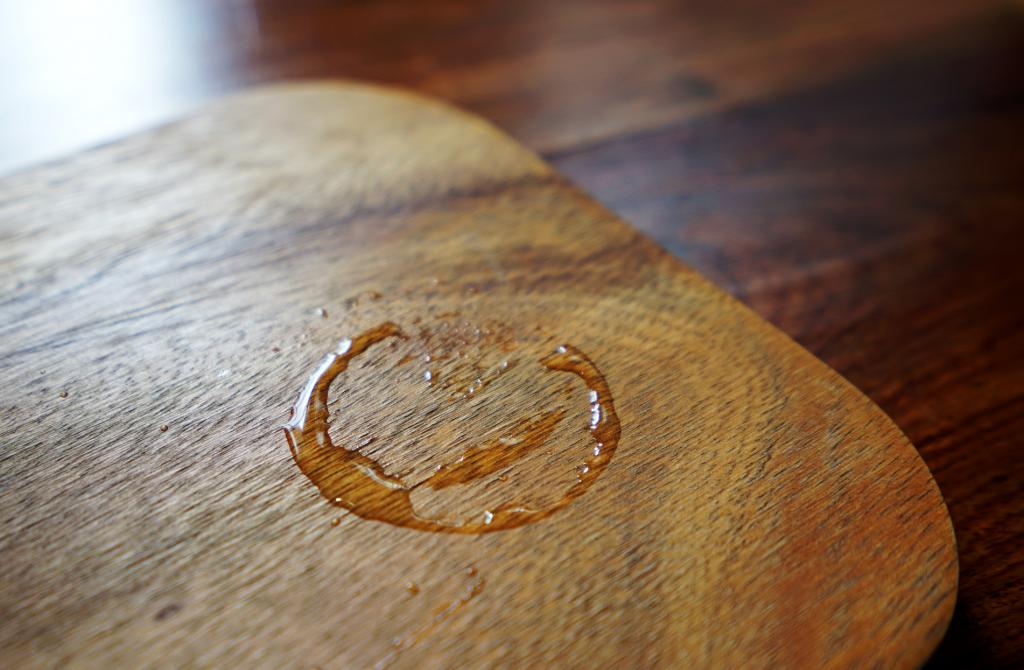
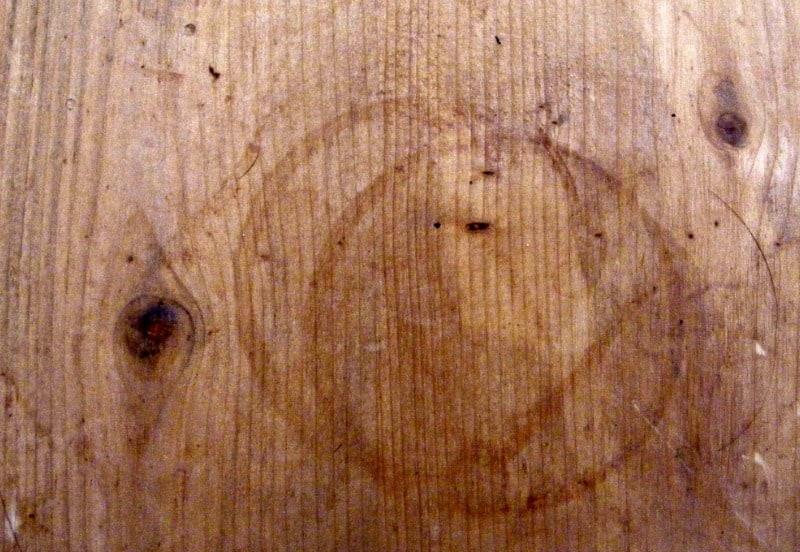
How to Remove Water Stains From a Wooden Table
A white water stain on a dining table is a sight to behold. Since the bottoms of cold or hot glasses or mugs are commonly placed directly on top of a hardwood table, water stains frequently take the form of white rings. Rings aren’t the only type of mark that can be left behind. Cold or hot items, such as heated serving plates or spilled drinks and food, can also leave marks. It’s because water has accumulated on the table’s finish, making the white lines appear hazy. This is the result of either cold-item condensation or hot-item steam.
Note that a dark brown or black watermark indicates that the finish on your table has been damaged by water seeping through it, as opposed to a white watermark. In most cases, the damage to the wood can be repaired by sanding it down and putting another coat of finish.
Watermarks on a table that are white and murky are caused by trapped water in the top finish. Using a hairdryer or heat gun is the quickest way to get the water out of the finish, as the heat will evaporate it. To avoid further damage to your table while yet successfully removing the stains, follow these simple steps:
- Set the temperature of your hairdryer between medium and high.
- Move it side to side over the stained area by holding it about 10cm away from the tabletop. Burning should not be a problem, therefore adjust the heat or move away from the surface if you detect it.
- After about two to three minutes, you should observe some fading of the stain.
- Make sure it’s on for at least 15-20 minutes, or until the stain is completely gone.
After a period of time, some watermarks may not totally remove. Apply a tablespoon of mayonnaise to the affected region and cover it with a kitchen towel overnight, as instructed by our team. Although it may sound strange, mayonnaise is made from an oil-and-vinegar blend. To help the table’s coloration come back while the vinegar’s acetic acid aids in removing the finish from the surrounding area, you can use the oil and vinegar together overnight.
In general, these modest measures should assist you in preventing water stains on your dining room table..
How to Prevent Water Rings on a Wooden Table
Your wooden table is most likely already covered in water stains because of your reading this. To avoid water rings on a hardwood table in the future, here are a few of our best tips:
- Cold and hot liquids should never be placed directly on a hardwood table. Make sure your coasters are close by or on your table, ready to use, to protect your table from moisture and heat.
- Do not use a placemat to protect your table when serving food that is either hot or cold.
- As soon as you discover a spill on your table, immediately wipe it up.
- Keep your table from drying out in the open when you’re done washing it. You should use a dry towel to remove all the water from the table immediately.
Conclusion
If you know how to cure a water damaged place on a hardwood table, you can prolong the life of your prized possession. Your table doesn’t have to be thrown out just because of a little water damage if you follow these five simple measures.
Nguồn: https://spasifikmag.com
Danh mục: Damaged


