Learn and understand how to prepare walls after water damage before you begin to repair your home following a water-related catastrophe. If you fix your walls without priming them, you’re going to have an unintended outcome.
- How To Repair Water Damaged Glulam Beam? Complete Step-by-Step Guide
- How To Fix Water Damaged Wood Table Top? Comprehensive Guide
- How To Repair Water Damaged Beadboard Sheeting? Easy Step-by-step Guide
- How To Repair Water Damaged Shifted Basement Wall? A Few Tips to Remember
- How To Dry Water Damaged Floor Under Cabinet? Easy Step-by-step Guide
Find out what you can do if you’re curious about how to restore the look of your walls below.
Bạn đang xem: How To Prepare Wall After Water Damage? Easy Step-by-step Guide
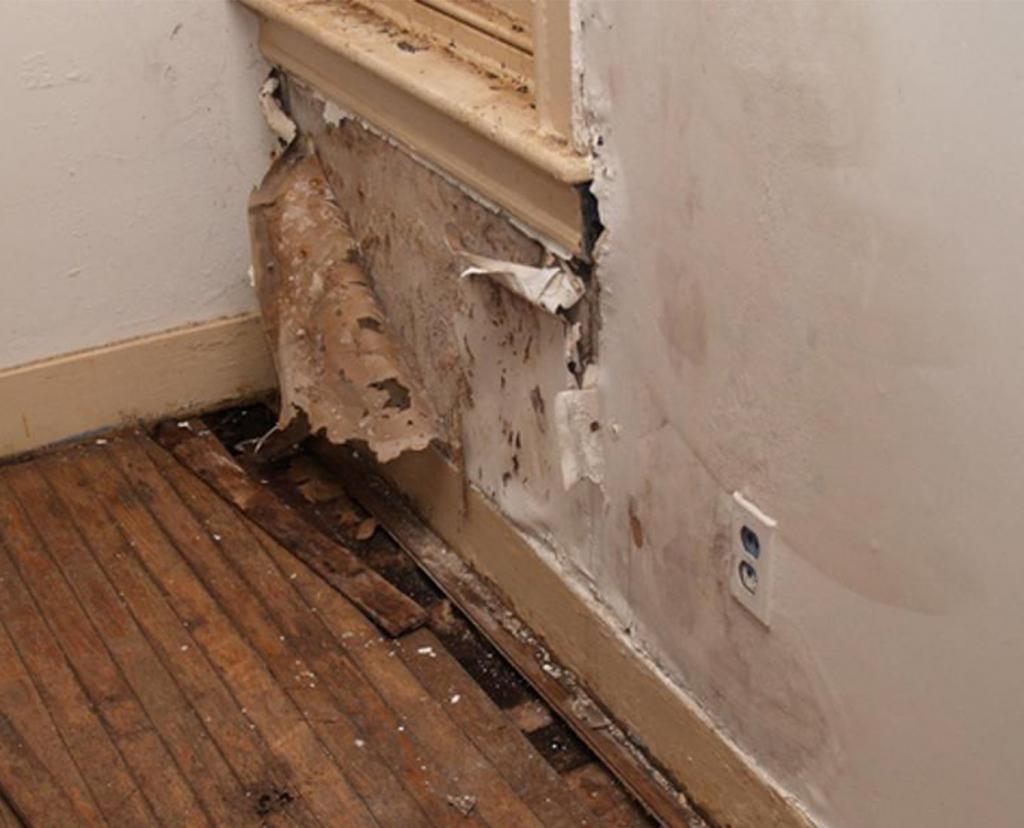
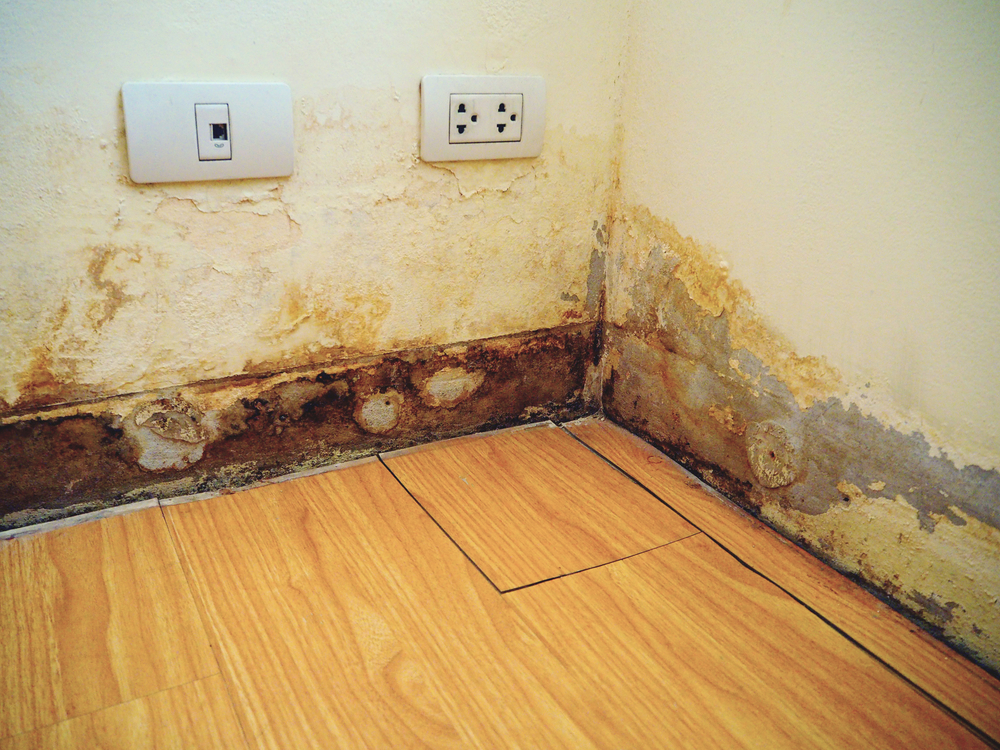
What Does A Water Damaged Wall Looks Like
Fortunately, detecting water damage hidden behind walls is an easy task. You can always keep an eye out for certain signals that act as distinct indicators. To begin, here are the things you may expect to observe if you examine a wall that appears to have been damaged by water.
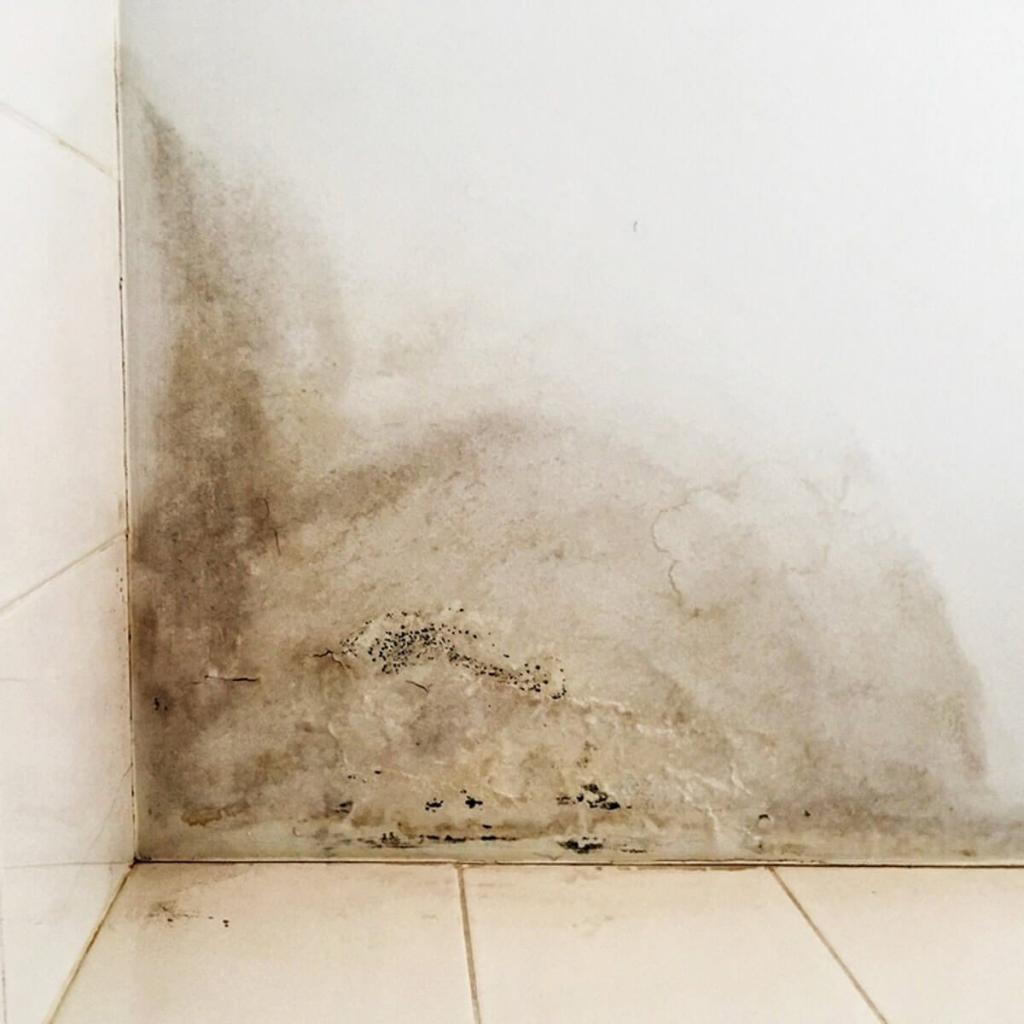
1. Wet spots
Storms and leaks are two common causes of wet spots, therefore they tend to appear in random places. You can tell that the water is fresh if there are dark spots on the walls and if you feel chilly or moist when you touch it. It can take up to 24 hours for the water to settle behind the wall, allowing the mark to appear.
It’s an old stain if the patch is chalky and irregular in hue. Although the preceding incident may have been resolved, there may still be some residual damage.
2. Bubbling and flaking paint
When drywalls are wet, they expand and then return to their previous size, causing the paint to stretch. If left untreated, it can lead to blistering and flaking. While resolving this issue is straightforward and does not necessitate the services of a professional, delaying action can result in more serious consequences.
3. Sounds of running water
In certain cases, the only way to detect an occurrence is to listen for it. Listen out for the sound of water coming from behind walls.. If you suspect that something is lurking behind your drywalls, you should address it immediately.
4. Unpleasant smell
If your house has a musty odor, it’s possible that it’s coming from the walls. When wood and drywall are exposed to too much moisture, mildew, termites, and fungi can grow, causing the wood and drywall to decay.
5. Mold or mildew
You should look out for small black or brown-black specks if they suddenly appear in your home as an indication of mold. Inspectors are available if you’d like to know where they came from and why they’re growing out of control. As soon as possible, it must be removed because it may be poisonous or possibly induce sickness and allergic reactions.
How Long Does It Take For A Water Damage Wall To Dry?
How long the wall has been soaked in water, the atmosphere, as well as the drying equipment employed, all affect the drying time of a wall. The drying process can take up to five days without the use of any devices in locations where the climate is wet and humid.
However, some can take as long as two days or even weeks to dry entirely. Professionals that deal with water damage can speed up the procedure because of their equipment. Natural drying takes the longest time to complete.
Things To Do After Water Damage
Water damage can get worse if left untreated for a lengthy period of time, so it’s crucial to act fast. These are the steps you should do once you’ve figured out what’s wrong:
1. Look for structural and electrical damage
Checking for potential electrical damage is critical since wires are often hidden behind drywall. They have the potential to cause a fire or a short circuit that might bring down the entire house’s electrical system.
Xem thêm : How To Replace Water Damaged Underlayment? Easy Step-by-step Guide
Beams, partitions, framework, joists, and other structural elements can all sustain considerable damage. The problem will return if you leave any water damage in place.
2. Use safety gears
Mold-infested and rotting wood can be extremely hazardous when consumed. You can protect yourself by using a mask, gloves, and other protective clothing.
3. Call your insurance company
Some insurance policies include coverage for water damage accidents. They’ll send out an estimator to assess the damage and determine how much your insurance will cover.
Additionally, you might provide a list of the things in your house that were damaged as a result of the occurrence. They can reduce the amount of money you have to spend on repairs to your walls by including them in your insurance coverage. Another option is to hire an experienced attorney to guide you through the procedure and make sure you receive all you require.
Preparing The Wall After Water Damage
It’s critical to locate the source of the water and moisture before attempting to repair the water-damaged walls. By doing so, the occurrence of a similar incident in the future is no longer a possibility. Step 1: Make sure that you’ve completed these steps before moving on to step 2.
Remove the baseboard as soon as you notice water damage to expose the wall behind it. Removing the decaying sections and badly damaged wood structures is an important part of the cleanup process. You can inspect the site for pollution and defective wiring by cleaning up.
You can now move on to step two, which is drying the wall. Depending on the severity of the damage and your own personal preferences, you can choose from a variety of options.
When drying, you can use dehumidifiers or a fan, or you can simply air dry. If you have a restricted budget, you can only utilize one at a time, although it’s still preferable to use them all.
Remember that even if the surface appears to be dry, the interior is still damp. Before doing any work, wait until the area has totally dried out.
Keep an eye out for any mold growth. If you suspect an infestation in your house, don’t hesitate to contact a pest control specialist right once.
The repair can begin once the wall has been dried, cleansed, and free of harmful elements. If your walls have been damaged by water, you have two options: hire a reputable business or do it yourself.
The Process Of Fixing Water Damaged Wall Paint
Tools & Materials
- The walls and ceilings should be painted in the same color.
- a scraper for removing paint
- Using a paintbrush or roller
- Primer
- Bleach made from chlorine (optional)
Step 1: Fix The Leak
This is the most effective first step because it addresses the root of the problem. By repairing the leak, the harm is less likely to worsen or recur.
Step 2: Clean The Wall
If the wall has mildew or mold, a weak solution of chlorine bleach and water can be used to remove it. After that, let it air dry (you can use a heater or blow dryer to speed up the process).
Step 3: Apply Water-Based Primer/Sealer
Xem thêm : How To Repair Water Damaged White Washed Wood? Troubleshooting Guide
The wall will be protected from further water damage, and the paint will adhere to the wall more effectively as a result. As a whole, the surface will be better suited for painting. Wait for it to cure completely before reapplying the sealant.
Avoid uneven spots by feathering the edges (start heavier in the middle and lighter as you work your way out).
Step 4: Paint It!
Those water damages need to be repaired! Re-coating the entire wall may be necessary to achieve the finest effects. You’ll need more time and resources to complete this task, but the end result will be a flawless wall.
Wall maintenance tips for your home
Repainting your wall:
To give your wall a new look, all you need to do is paint it! Re-painting your walls in a different shade of the same color or a different shade of the same color can bring new life to old and worn-out walls. Painting, pasting wall papers, combining colors, utilizing wall textures, and making various designs on the wall are some of the most common methods for changing the appearance of a room’s walls.
Whitewashing your walls:
You can achieve a fresh look to your walls by focusing on this. You don’t paint the wall when you whitewash; you use plaster of Paris. This is a cost-effective and hygienic way to give your walls a fresh coat of paint. Lime and water are needed to generate the whitewashing mixture, and there is a specific procedure for applying it to the wall. A thick coat of paint can be applied to the walls with a broad paintbrush.
Cleaning your walls:
To clean a wall, there are particular procedures that must be performed. It’s important to note that different types of paint require different cleaning methods, as does the surface texture of the walls. When washing the walls, take care not to scratch the paint or lose the grain of the paint by scrubbing too vigorously. Water and a clean sponge or paper towel should be used to wash the wall. If you have a lot of stains on your walls, you can use a solution of water and dishwashing solutions to remove them.
Stain removing:
Stains made by your children or by mistake are one of the most common problems on your walls. Depending on the type of stain, it can either be oil-based or waterborne. To remove any water-based stains, simply wipe them down with a damp towel. A mild dish soap can be used to remove oil stains, such as those left behind by cooking grease, crayons, and lipstick, among other things.
Wall care for dents and scratches:
If your walls are scraped or dented, there are many different reasons for it. Clear or light-colored rubber bumpers can be used to keep furniture from slamming into walls. Hanging picture frames on two hooks instead of just one can also help keep them in place and less likely to shift around. The plaster of Paris can be used to fill in the scars and dents on your wall if they are already there.
Vacuum your walls regularly:
Make use of a vacuum cleaner with a smooth brush attachment to make your walls look clean and nice. Keep it to a minimum unless your walls are covered in cobwebs or dust. It’s also possible to use a damp towel to clean the walls.
Use glossy paint:
The smooth and shiny surface of the wall can only be achieved by using latex polymer paints. As a result, you won’t have to worry about water dripping down the wall and allowing dirt to build up. The paint in your home should have a semi-gloss or high gloss finish.
Clean your walls thoroughly before painting:
When it comes to painting their walls, most individuals don’t give a hoot. When they forget to dust and mop their walls, they end up painting over the accumulated dirt. To ensure that your walls are free of light switches, cobwebs, and lotion marks, you should thoroughly clean them before painting. These places will be protected from paint failure.
Dampness/leakage in the wall:
Identifying and fixing any water leaks in your wall is a top priority. A weakening of the wall might occur if water or sewage leaks into the wall, causing damage. Most of the walls have collapsed because of this. You can avoid this by making sure that your wall foundation does not have a leaky drain pipe or sewage nearby. Also, keep an eye out for moss growth and use moss cleaners to get rid of it if you see any.
Other tips to have a safe wall:
- Visual checks for cracks, tilt, and wall movement should be performed on a regular basis.
- Drainage holes on the wall should be checked for leaks.
- Drainage around the wall should be checked to ensure a smooth flow of water.
- Avoid blocking the wall’s weep holes.
- Do not raise the wall’s height without first consulting the community.
- Do not disturb the soil beneath the wall with a shovel.
- Trees should not be planted too close to the walls, and branches should be cut back if they are touching the walls.
Conclusion
You now have complete freedom to do whatever you want with a water-damaged wall. It will allow you to bring back the original attractiveness of your home. You don’t have to be concerned about long-term harm because you can remedy everything if you have the right equipment and guidance.
Nguồn: https://spasifikmag.com
Danh mục: Damaged


