If you know how to fix the framework plate under the bathroom’s water closet, you can save your property from collapse and prevent other disasters. To fix this, you need only remove the toilet, stabilize the wall, replace the broken framework plate, and reinstall the unit.
- How To Repair Water Damaged Pressed Wood Drawers? Ultimate Guide
- How To Replace Section Of Water Damaged Wall? Comprehensive Guide
- When To Replace Water Damaged Sheet Rock? Helpful Guide
- How Much To Repair Water Damaged Ceiling? A Helpful Guide
- How Can I Mend A Water Damaged Pergo Plank? Step-By-Step Process
Water damage to a frame plate is difficult to repair, so beginners should wait before replacing it. The good news is that it’s not impossible. Are you going to be replacing the plates of the structure that hold the weight? All the information you require is right here!
Bạn đang xem: How To Replace Water Damaged Framing Plate Behind Toilet? 14 Framing Mistakes to Avoid at All Costs
What Is A Framing Plate?
A framing plate is comprised of the structural frame’s top and bottom beam levels. As such, it can be used as a foundation for either shear or bearing walls. Load-bearing walls hold up the floors and roofs above them, while non-load-bearing walls are just used to separate rooms.
There is no fixed relationship between the top and bottom plates of a frame. The base plate of a wall is usually fastened to the subfloor. A secondary plate, called a “king plate,” is fastened into the top plate to connect the corners and other internal wall frames of a house or building.
How To Replace Framing Plates
Step #1. Preparing for the replacement
Changing out a faulty load-bearing plate in a house’s framework can have a significant impact on its structural integrity. If the house collapses, there is a risk of injury or death within. In cases like these, it’s usually wise to consult an expert for guidance.
But if you know what you’re doing and have the right tools, you can handle the job on your own. To get started, find the relevant authorities and submit a building permission application. You’ll need approval to get started on the fix.
The first step in fixing water damage is tracing where it came from. Is it as a result of a leaky tap, a malfunctioning flush valve, or a cracked tub or toilet? The source of the leak must be addressed before the wall can be repaired.
Talk to your insurance company or legal counsel about what coverage you’re eligible for. Some insurance policies may cover repairs for damage caused by water, such as that caused by burst pipes or other accidents. You might utilize the funds you acquire to pay for the necessary repairs.
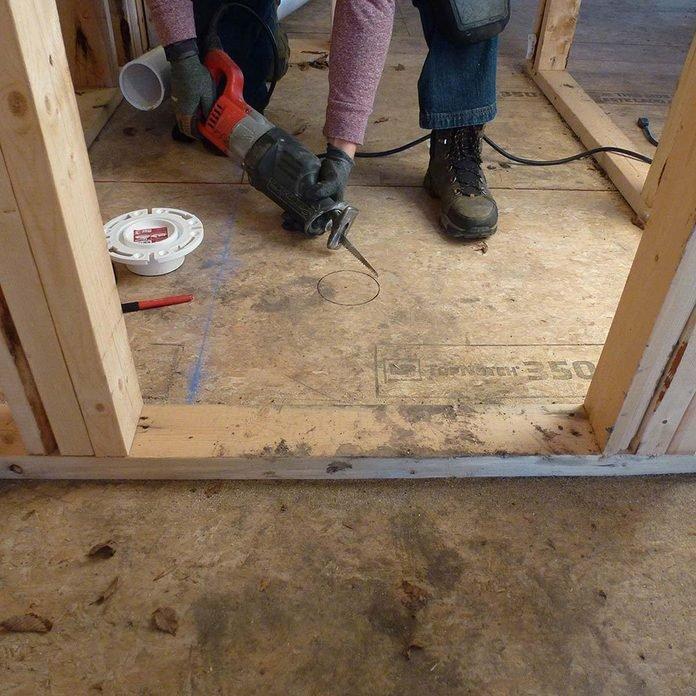
Step #2. Remove the toilet
The toilet needs to be moved so that you can access the frame wall behind it. The first thing you should do before attempting to remove a toilet is turn off the water supply. After that, you need to flush the toilet until no more water drains.
To get rid of any remaining moisture, grab a sponge and a bucket. After the bowl is empty, you can unbolt it from the floor. Remove the toilet by cutting the caulk around it with a utility knife and then lifting it vertically up and out of the way of the bolts.
To avoid having it in the way, relocate the toilet bowl. Once the toilet has been removed, any accumulated filth and trash must be cleaned up.
Step #3. Shore up the wall
It’s important to reinforce the wall before working on the framework plate, which bears the weight of the house. Temporarily fortifying a wall can be done by adding a row of slanted 2x4s next to the existing structure.
The walls and floor can be made to look like a ship’s hold by screwing two 2x4s together. Nail the 2x4s with the wedges between the plates into place. Place the beach directly beneath the wall you’re building in your basement.
Step #4. Cut away the damaged area
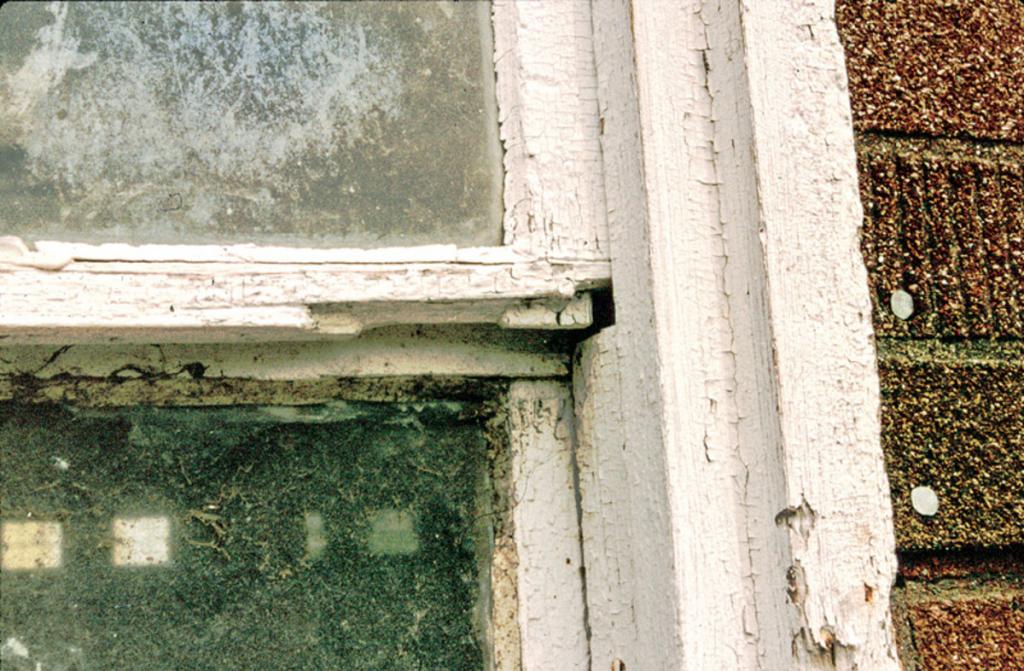
After the wall has been fortified against further water damage, restoration work can commence. The sill plate is the weakest part of a frame since it sits at the ground level.
Turning off the power to the entire home is an absolute must to avoid electrocution. Then, you should make holes in the drywall and expose as many of the frames as you can. Examine the wreckage if you will.
If the damage seems too great for you to handle, it might be time to call in the professionals. If the damage is minimal, the replacement process can begin.
Get rid of the broken parts of the frame. In order to install the new joists, the sill plate and maybe several floor joists will need to be removed. Both the frames and the nails holding them together will need to be snipped.
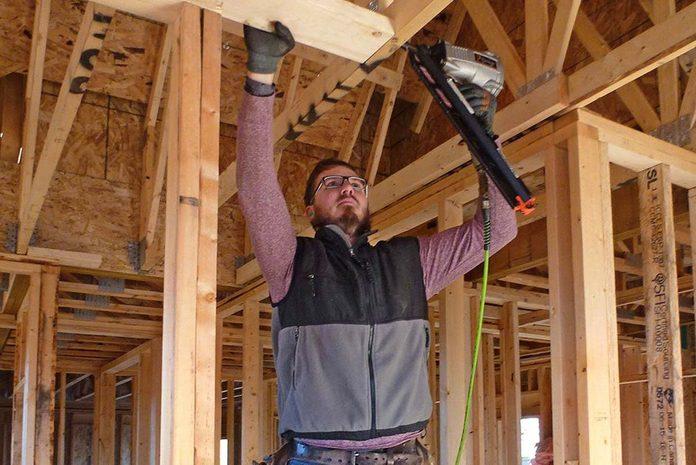
Step #5. Replace the damaged frame
Xem thêm : How To Repair Water Damaged Door Jambs? Troubleshooting and Repair Guide
Once all of the damaged pieces have been taken out, it is time to fix the frame. Whenever you remove something in this stage, you should put it back in.
If the sill plate has been removed, you can replace it with treated wood so that it lasts as long as the original. Nail and glue the new studs into position. The entire floor can be stabilized by installing 212 joists at both ends of the room and fastening joist hangers to them.
Step #6. Put everything back to their place
After the frame is fastened, it’s time to reassemble the whole thing. It’s more cost-effective to build a new wall than to mend an existing one if the hole is too big.
Please refer to the box instructions while reinstalling the toilet. Get the power and water turned back on and clean up the mess.
14 Framing Mistakes to Avoid at All Costs
Avoid Framing Mistakes
Framing flaws of a small nature might cause visible effects such as shaky walls and noisy floors. Severe defects can make a home unsafe in the event of hurricane-force winds, heavy snowfall, or an earthquake. It was our intention to learn about the most common blunders and the means by which they may be avoided. For this reason, it is best to consult a building inspector. There were a few scary tales included for good measure. We learned how to design a house that is both strong and in accordance with local construction rules at this lecture.
Don’t Forget to Stagger the Joints in the Top Plates
It is more efficient to use just one top and tie plate along longer walls. When using multiple plates, make sure there is at least 24 inches between the end joints of the top plates and the end joints of the tie plates. At least 24 inches of space should be provided between adjacent end joints. If the two end joints are not kept apart, the wall is weakened at the hinge point. Many framers recommend at least 48 inches, however some require at least 24.
You Shouldn’t Just Nail Through the Plywood
When constructing a house, the bottom plates of the walls should be nailed into the joists or trusses below them to keep them from sagging. While the wall will remain in place if the plywood is tacked to the floor joists or trusses, the wall may lift if it is not additionally nailed to the plywood in order to account for the expansion and contraction of the roof system. Nails can be removed so that workers can easily drill through the plates to install conduit for wiring and plumbing. For the same reason, top plates should be fastened to the tops of overlapping floor joists or roof trusses as closely to the studs as is practical.
Don’t Forget the Connectors
Structural connectors are used to join the building’s substructure to its framework. They help a structure remain standing in the face of natural disasters like tornadoes, earthquakes, and severe winds. If you have any questions or concerns about the application of structural connectors, be sure to double-check the current regulations in your area by contacting the relevant building authority. The foundation straps you can see here will prevent the little garage walls from being blown over by strong winds.
Remember to Account for the Finished Flooring When Laying Out Stairs
The maximum permissible variation in riser (step) height along the entire staircase is 3/8 in. Those measurements incorporate the completed floor heights. It’s important to visualize the finished floor heights at the top and bottom before you start figuring out the stair stringers’ lengths and spacing.
Adding 3/4-inch hardwood flooring on top of a 1/4-inch subfloor will make the completed floor 1 inch taller. Laminate and vinyl flooring are both less than 3/8 in. thick. You risk failing your inspection if you don’t account for these differences in height, and ripping out stairs is a costly callback.
You Can’t Just Use Any Nails With Treated Lumber
Today, treated lumber used in home construction is preserved with alkaline copper quaternary, a copper-based preservative (ACQ). When working with ACQ lumber, make sure you only use nails that have been approved by ACQ. Standard construction nails will dissolve upon contact with ACQ-treated wood. Nails connecting studs to a treated bottom plate are required for foundation bolts/anchors to work. Sheathing on treated bottom plates can’t be attached without ACQ nails.
You Must Double Up Jack Studs
Framing members called “jack studs” and “trimmers” are used to hold up headers. The length and width of the header determine how many jack studs are needed. If the opening is larger than 6 feet, the standard size for patio doors, two sets of hinges should be installed, one on each side even if the drawings don’t show it.
Don’t Forget to Check for Crowns in the Studs
It may seem like common sense to make sure the crown (bow) of every stud is level before putting up a wall, but this is actually a common mistake. A quarter-inch stud’s crown can be put identically on both ears without being seen. Only if the same studs are used on both sides of the wall will it be visible. Moreover, the studs may continue to warp as they dry, thus amplifying the wave. Construct the walls with the crown side facing upward. Crowns pointing down make it more difficult to build a wall because the studs rock back and forth. Due to its exceptional straightness and solidity, some builders opt to use engineered lumber on walls where cabinets will be mounted.
Always Remember Squash Blocks to Carry Loads
Having more studs is necessary to support the “point load” of a large load-bearing beam from the top of the wall to the floor. Still, that load must be borne to the ground. It is common practice to employ squash blocks to bridge the space between the beam-supporting wall and the adjacent wall.
Don’t Forget Drywall Backing
In most framing arrangements, additional backers are required to properly attach the drywall. Even when paying attention to detail, a piece of drywall backer may fall through the crevices. It will be much more challenging to attach missing backers if the path is obstructed by wires, pipes, or ducts. In some cases, a drywall installer will remove moisture barriers, fiberglass insulation, or spray foam before they will install the drywall. To make sure that all the backing is there before you hang drywall, it’s a simple method to go from room to room and inspect each wall and ceiling intersection. It’s also important to not forget the closets.
Don’t Install Joists Under Toilets
Although it is expected that floor joists and trusses’ sizes and spacing be included on all designs, many plans fail to provide this information. Avoid having floor joists or trusses intrude on mechanical chases or very big drainpipes. It is time and money intensive to hire an engineer to design the repair work needed to move a toilet. To do so, the plumber will have to make a hole in a joist or trestle.
You Must Reinforce Doorway Walls
The frame of a door takes a beating. The maximum weight for a solid-core door is 200 pounds. Something like an angry, door-slamming adolescent and a weak door frame. There should be reinforcements on both the hinge and latch sides of the door frame. Use construction adhesive on the underside of the plate, and secure the opening with toe screws measuring three inches in length on either side.
Talk to the Masons to be Sure Anchors are Where They Belong
Meet with the masons before they start laying the foundation. Anchor bolts must be used to fasten wall plates at regular intervals of six feet on center and at the ends and on both sides of any connections. Anchors, however, are prone to wind up in peculiar locations, such doorways or even under jack studs. Gather everyone together and figure out where the best areas are for the seams and openings to cut down on time spent removing and reinstalling anchors.
Never Forget to Shelter Your Materials
Xem thêm : When To Replace Water Damaged Sheet Rock? Helpful Guide
Cover your building supplies with a tarp if the task is going to be delayed or if you know you’ll be dealing with a long period of wet weather. The effects of mold growth, delamination of engineered timber, and warping and twisting of framing timbers are all made worse by prolonged exposure to wet conditions. The fact that nobody wants to take part in it further cements its unpopularity.
How to maintain the structure of a house
It’s all about the build!
Homes were traditionally constructed out of wood. It has not always been required to treat the wood before it was used in building due to the fact that a solid wood frame is primarily dependent on how it is constructed.
Wood is a living material, therefore it constantly takes in and releases moisture. Because of this, it often shifts position or undergoes minor morphological changes as the seasons change or the temperature severely swings.
Because of its organic makeup, wood is prone to damage by mold, rot, and other fungi. This mold multiplies when the atmosphere is damp.
Dampness is typically the result of construction-related issues. It’s a major issue if the wood can’t dry out since it can’t breathe because of the lack of ventilation. In the presence of moisture, wood is vulnerable to rot. Maintaining minimal amounts of moisture in the home’s structure is crucial to ensuring its continued viability.
Do you want to know if a major frame renovation is necessary for your home?
When you fill out the form, we’ll connect you with pre-screened contractors in our network.

To the ground, to the sky
Likewise crucial is the level at which the bottom of your home’s frame meets the soil. Your house’s wooden framework is protected from the soil and any moisture it may contain by the foundation. Soil and air conditions must be taken into account if you want to keep your wood in good condition.
If your home’s foundation is dug deeply into the ground and encased in cement on all sides, it should last for quite some time. However, the center is vulnerable. One way to maintain your home’s foundation is to keep the grass cut neatly around its outside.
As a result of the moisture retention caused by the grass, the house’s frame rots away. The basement of an older house or building may be displaying symptoms of wear and tear.
The simplest solution to this problem is to double-check the restoration of your foundation. If you haven’t done so previously, you should replace your home’s wooden subfloor with a more modern one. The ground level should be higher than any board levels you use. Don’t let your lawn go unattended; cut it regularly.
Problems with rain gutters also arise frequently. Examine the sky to see whether you’ve neglected your gutters for too long. If you don’t clear your gutters frequently, they can get clogged and cause water to leak into the framework of your home. Maintenance of the gutters is, thus, of paramount importance.
Ways to protect your wood frame!
There are a variety of products on the market that may be used both before and after construction to keep the wood in your home secure. It is important to remember, however, that the primary factor in a home’s durability is its construction, not its upkeep.
You should shield your house’s framework from the sun if you want it to retain its original color and luster over time. For example, this is a common way for wood to age. Look for coatings that block UV rays if you want to shield your furnishings from the sun’s damaging effects.
Linseed oil’s efficacy in protecting and preserving wood finishes has been widely lauded. On the other hand, if you choose this path, make sure it’s verified. This is because some can actually cause rot in the wood. When inspecting wood siding, look for cracks and wet patches, and use an ice pick to probe underneath wet spots for rot.
You can also choose to impregnate the wood used in your home’s construction to keep it preserved. Modern building typically employs a method whereby electrical wires are embedded within the wood to achieve this goal. These cables have a 40-year lifespan and are impervious to the elements.
Termites are a common and undesirable problem in houses that are framed or sided with wood. Depending on the type of termite, they may be difficult to spot. Signs of termites include piles of sawdust around the perimeter of the house’s frame. If this is the case, it’s best to consult an expert in pest management for help.
Conclusion
If the framework plate behind your toilet becomes wet and you don’t know how to replace it, mold and mildew can start growing. Frame plates that have been damaged by water can be easily replaced using a 6-step process. When a task becomes too big, it’s time to consider bringing in outside aid.
Nguồn: https://spasifikmag.com
Danh mục: Damaged