This article will teach you how to fix a water-damaged slide-out ceiling. We’ll go over the stages involved in repairing or replacing a water-damaged ceiling, as well as the sources of water damage and ways to prevent it.
- How To Replace Water Damaged Subfloor? Step-By-Step Guide
- How To Repair Water Damaged Glulam Beam? Complete Step-by-Step Guide
- How To Fix Water-Damaged Baseboard? Step-By-Step Guide
- How Can I Mend A Water Damaged Pergo Plank? Step-By-Step Process
- How To Prevent Fence From Well Water Damage? Complete Step-by-Step Guide
The use of slide-outs in recreational vehicles and RVs is becoming increasingly prevalent. Expandable slide-outs are a common feature of modern recreational vehicles (RVs). Some of your RV’s slide outs can be controlled through the RV’s control panel, while others can be extended manually.
Bạn đang xem: How To Replace Water Damaged Ceiling In Slide Out? Step by Step Instructions
In recreational vehicles, the slide-outs are both strong and vulnerable to water damage. It can cause more damage to your RV if it isn’t treated or replaced very away. Continue reading to find out the answer to your question!
What Causes Water Damage In The Ceiling Of A Slide Out?
Your slide out’s ceiling may be damaged by water for a variety of reasons. Hefty downpours are a major contributor. When the windows of the RV slides are open during a downpour, there is a great probability that water will leak into the RV.
Slide seals and rubber gaskets can potentially allow water to seep into the ceiling. Water should not be dripping out of these slides, but they can fail if there are any fractures. The water can get in through the tiniest of holes.
In addition to this, water can seep through the cracks because of:
- Condensation from your RV’s rooftop air conditioner
- Slides that are soaked in water
- Your RV’s plumbing system is leaking.
You need to be aware of these water damage issues in order to decide when to fix your slide-out ceiling To avoid more issues, you must be aware of many indicators of water leaks.
Replacing A Water Damaged Ceiling In Your Slide Out?
You should replace your ceiling as soon as possible if you observe water damage. You don’t have to panic, though; there are just six simple actions involved!
Step #1. Removing the water damaged ceiling
Please let your water-damaged ceiling to dry out before you proceed with any other repairs. Make sure to allow enough time for it to dry before moving on to the next step.
After that, disconnect any electrical lines that may be present. Remove the lights if they are present before proceeding. To remove the ceiling, first remove the screws holding it to the joists.
Step #2. Repairing the source of water damage
You may now evaluate the water damage after removing the ceiling. You should inspect your RV’s roof and rubber gaskets for any holes or cracks. Repair any damage as soon as you discover the source of the leak.
Your new ceiling will be useless if you don’t fix what caused the water leak in the first place. A repeat of the water damage could necessitate pricey restorations.
Step #3. Cleaning the beams
Rusty or unclean beams might result from water damage to your ceiling. The framing can also be replaced if there is a significant amount of corrosion.
Before moving on to the next step, make sure all dirt and debris has been removed. This can be accomplished with a solution of water and bleach.
Step #4. Organizing the wires
Yes, it’s quite fine for you to reorganize the electrical lines in your ceiling. Additionally, you can check to see if any wires have been harmed. Repair any that you come across.
Step #5. Replacing the plywood
Please take the time to measure the ceiling before cutting plywood. Using wood glues or screws, you can begin reinstalling the plywood. You avoid them dropping, make sure to attach them correctly.
It’s possible to install fresh rubber gaskets before mounting plywood.
Step #6. Applying final touches
Finally, the ceiling can be sanded. Primer is an option if you like to do so. Finally, you can choose the color of paint to use for painting the ceiling of your slide-out unit. ”
How Much Does Ceiling Repair Cost by Square Foot?
Our homes put a lot of strain on the ceilings. They contain possibly leaking pipes, support the floor above, and degrade with time as a result of temperature and humidity fluctuations.
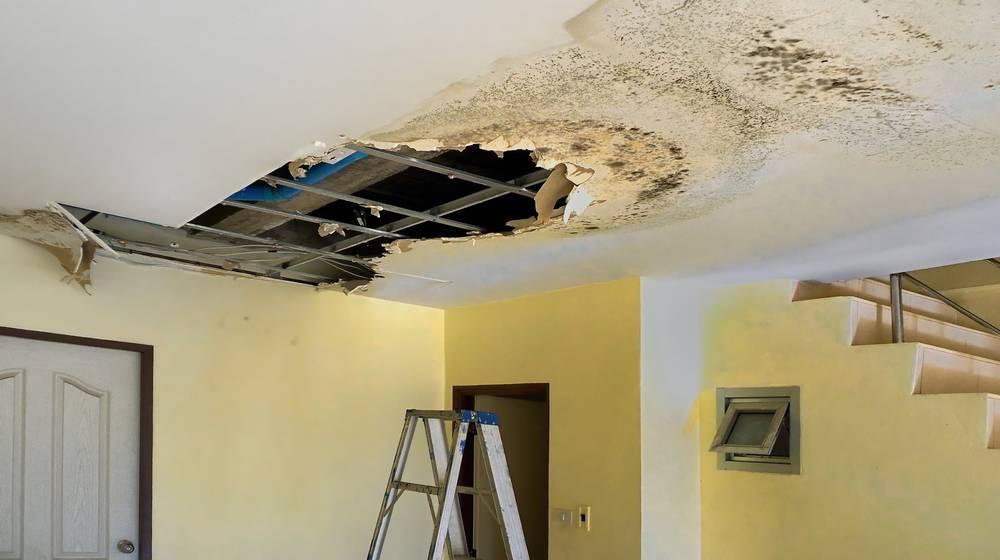
Ceiling damage can range from a minor hairline fracture or a bungled ceiling fan repair to drooping drywall as a result of serious water damage.
As a general rule, professional ceiling repair experts charge either by the square footage of the repair or an hourly rate dependent on the size of the project. An average cost per square foot of damage is somewhere in the range of $45-$90.
The hourly charge of $60 to $90 an hour may make more sense for lesser issues, such as nail holes or damaged joints.
Square Foot Rate by Ceiling Material
Xem thêm : How To Replace Water Damaged Door Frame? Easy Step-by-step Guide
There are some ceiling materials that are more difficult to fix than others. Renovations in older homes with popcorn ceilings or plaster and lath buildings from more than a century ago require greater skill and patience…
Your ceiling’s square-foot rate, for example, varies depending on the material used:
- Cost: $45 to $55 per square foot for traditional drywall
- It costs between $50 and $60 per square foot to build with lightweight sheetrock
- 65-80 cents per square foot for plaster and lath.
- Cost per square foot: $75 to $90 for popcorn ceilings
Compared to other types of ceilings, drop tile ceilings are more user-friendly and can often be repaired by the homeowner. Depending on the square footage, new drop tiles might cost anywhere from $2 to $17 per square foot. You may be charged $60 to $90 an hour by a professional for repairs that are beyond your ability to perform on your own.
How Much Does It Cost to Repair a Ceiling Near You?
The cost of home repairs varies for a variety of factors, but location is a major factor. The cost of local labor, licenses and fees, and materials depends on the cost of living in your location.
If you reside in an area where plaster, spackle, and other building supplies are readily available, this can affect the cost of a ceiling repair estimate.
Let’s take a look at a few real-world instances of how much it really costs to fix a ceiling:
- 570–1,380 dollars in New York
- Between $580 to $1,000 is typical in Massachusetts.
- $470 to $1,230 in Texas
- $400–$1,380 in Florida
- $550 to $1,660 in California
Which Ceiling Repair Services Can I Get on My Budget?
Seeing a fracture or water spot in your ceiling might cause a lot of anxiety. Many ceiling problems can be resolved for less than a few hundred dollars. There is a wide variety of prices for these solutions.
Under $100
Your most common DIY chores come into this category, such as replacing drop tiles and filling in minor holes. You should expect to pay less than $100 if a contractor only needs to mend a tiny area for a few minutes.
$100 to $500
If a tiny to mid-sized section of your ceiling needs repair or replacement due to water damage, you may expect to pay anywhere from $100 to $500. Small structural repairs for drooping ceilings, as well as large painting projects, are all within this price range.
$500 to $1,000
You should expect to see these charges for more extensive repairs including extensive water damage, massive fractures, and collapsing ceilings, Consider bringing in a structural engineer or a plumber as an extra set of eyes.
$1,000 and Up
Replace the ceiling of a mid- to large-sized room, as well as any leaks, HVAC concerns, or foundation repairs that may be related to the ceiling. If you live in an older home with lath and plaster ceilings or other distinctive materials and decor, the cost of ceiling work might run into the thousands.
How Much Does It Cost to Repair a Ceiling Yourself?
When it comes to ceiling repairs, there are a wide range of possibilities. Natural wear and tear, such as flaking paint, is a far cry from a sudden outbreak of mold and water damage.
We recommend only basic repairs that don’t require a lot of time or money:
- Materials in the ceiling framework must be replaced (anything other than drop tiles)
- Engage with plumbing or electrical wiring
- The root causes of these problems.
How do you know what’s really going on here? Don’t wait for things to get worse before taking action. The first indicator of a leak is a musty odor coming from the room in question, therefore don’t hesitate to call the plumber.
As a result of all of this, doing your own ceiling painting or drop tile replacement is both safe and cost-effective. Primer, paint, ladders, drop cloths, and other painting equipment often run between $200 and $600 when painting a ceiling.
We already established that drop tiles cost between $2 and $17 per square foot, and that the old tile may typically be removed by hand to save money.
Ceiling Repair Cost Breakdown
You can expect to receive an estimate of expenses from a professional ceiling repair specialist depending on several factors. It is likely that your quote will include the following:
- Workers are paid a per-hour rate (with an estimated number of hours)
- The price of ceiling tiles
- Unique materials were used to fix the damage.
- More extensive repairs, such as those related to plumbing or structural integrity.
How Much Does It Cost to Fix a Ceiling by the Type of Repair?
How much will it cost to fix a little leak or a rapidly breaking ceiling, depending on its severity? We’ve broken down some estimates based on forms of typical ceiling damage to help you figure out how many hours your contractor will need to address the problem.
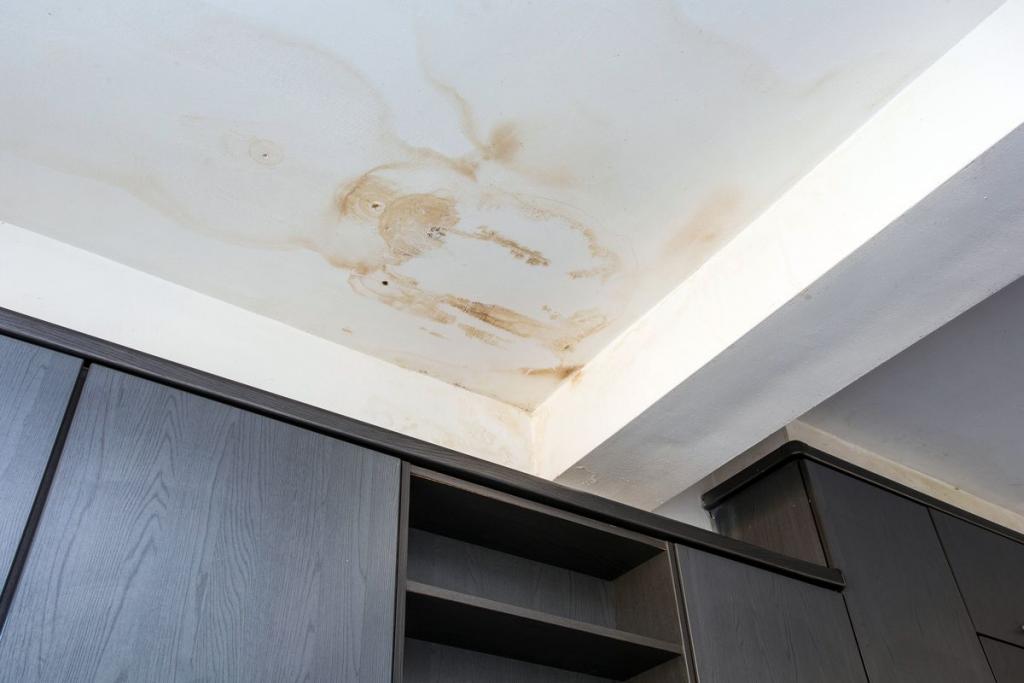
Water Damage
Some sources of water intrusion are storm-related leaks, roof problems, busted pipes, and malfunctioning HVAC vents. Expect to pay between $45 and $55 per square foot for water damage ceiling repairs, which includes everything needed for the task.
Don’t forget to factor in the actual cause of the water damage, such as:
- $175–$3,000 is the range for plumbing repairs.
- The cost of a new roof: $3.50–$5.
- $200–$1,500 for HVAC repairs
- $360 to $1,550 for a new roof.
Sagging Ceiling
Ceilings that are sagging or “pillowing” require labor at a rate of $75 per hour or more, not counting materials. Drywall replacement is inevitable, but outdated insulation or spacers between the ceiling and trusses may need to be addressed as well.
Ceiling Holes
The causes of ceiling holes are numerous and varied. Perhaps you’ve grown bored of that old chandelier and want to fill in the void it leaves behind. You could have slipped your toes between the rafters of an old house’s attic.
Xem thêm : How To Take Down A Water Damaged Ceiling? Step by Step Instructions
According to the type of ceiling and patch size, ceiling hole repairs might cost between $180 and $370.
Ceiling Cracks
Throughout the house, cracks are a prevalent enigma. Small ones, especially those seen around the room’s perimeter, are not uncommon. Hairline fractures are frequent in homes that settle over time.
But cracks greater than a few inches long, that expand over time or that swarm around the beam should be checked out quickly. These may indicate a structural or foundational problem. Depending on the degree of the problem, foundation repair can cost up to $4,500.
What Factors Influence the Cost to Repair Ceilings?
There is no one-size-fits-all repair bill for a home, and this is reflected in the cost. The cost of ceiling restoration will be affected by the following factors:
- Your house’s age
- What’s causing the issue? (plumbing, structural, or natural aging)
- Inquiry into the size of the area
- The material of your ceiling
- Where you live is a matter of personal choice.
- Additional experts may be needed to complete the repair.
How Can You Stop Water Damages In The Ceiling Of Your Slide Out?
Your slide-out ceiling’s quality can be greatly improved by preventing water damage. halt water leaks by following these steps
- Regularly inspect and replace rubber gaskets, especially if there are any cracks.
- A slide-out topper can be added to your recreational vehicle.
- Incorporate Slide-Out Seal Conditioner into your strategy.
- Make sure your RV is level before you set it up.
The cost of repairing various damage to your RV is unquestionably high. In some cases, RV dealerships have insurance policies that cover this type of situation. Only water damage caused by accidents and poor gasket installation is covered by their insurance policy, which only applies to new purchases.
Everything You Need to Know About Ceiling Maintenance
Maintaining the ceiling does not have to take a lot of time, but you should be aware of the need for it. Mould removal, repairs, and painting are just a few of the things that may need to be done. Due to the fact that time isn’t always kind to your ceiling, older homes are more likely to show signs of aging. You should double-check to see whether your guarantee still covers ceiling issues in newer construction.
Basic ceiling repair can be as simple as following these steps:
Cleaning Your Ceiling
The color of most ceilings is white, which means that any blemishes will be clearly visible. It makes sense to clean your ceiling on a regular basis to remove bugs, dust, and debris that might detract from its attractiveness. You should always perform a spot test before using any new product. It’s important to remember that the type of ceiling you have will dictate what you can and cannot do with it.
For the most part, a damp, clean cloth can be used to clean small areas. To avoid water marks, use as little water as possible and be sure to dry thoroughly afterward. You can use a duster or the brush attachment on your vacuum cleaner to get rid of dust and cobwebs. Your ceiling and any ceiling fans can benefit from a simple dusting as you clean the rest of your home.
Painting with Care
Even if the painting is done by an experienced professional, it will eventually need to be repaired. Any interior paintwork should last up to ten years. Painting over little blemishes or damage with a brushstroke may seem like an easy solution, but finding an exact match can be tricky. Before any painting can begin, the surface must be sanded down a bit.
Unique Features
It’s a good idea to preserve any cornices and rosework that have been part of your home for a long time. Sadly, they can weaken and chip over time. A restoration specialist is recommended to keep these characteristics looking and feeling their best. We at WA Ceiling Fixers can match and re-paint any special elements on your ceilings and walls in a seamless manner before they are lost to time and history.
Fighting Mould
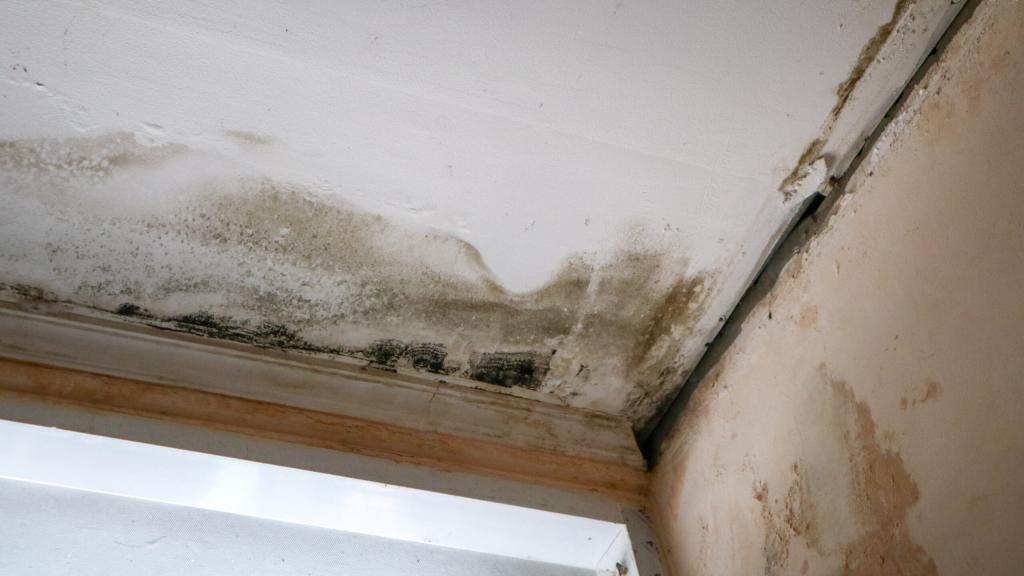
Many homeowners have to deal with mould. As a result of its rapid growth, it may pose a health risk. The presence of even a small amount of mould on the ceiling can be an indication of more serious issues. Water damage can lead to mould growth, which can be a symptom of leaks. A sagging ceiling might be caused by water damage, which should be remedied as soon as possible by a professional. Mold can be removed from ceilings with bleach and water if there are no structural issues, or specialized treatments are available. Keep an eye out for any ugly discoloration by conducting a quick examination.
Warning Signs
There are a few telltale signals that more than just routine ceiling repair is needed. Signs such as these could cause a ceiling to collapse. Consider cracks, cracking sounds, bubbling, and drooping as possible signs of deterioration.
We can help if you’re worried about the condition of your ceilings. Ceilings in the Perth area can be repaired or replaced by our skilled crew. For further information, please don’t hesitate to reach out to us.
FAQs
Your homeowner’s to-do list should always begin and end with healthy ceilings. Having a professional inspect your home can save you money in the long run, as well as provide you peace of mind.
Will ceiling dry out after leak?
The amount of time it takes to dry off the ceiling will depend on how much water was on it. It can take anything from two to four weeks to complete. To avoid being stuck in a vicious cycle, find the source of the leak and fix it.
Does homeowners insurance cover water damage?
In most ordinary house insurance policies, water damage caused by a burst pipe or other water-related incident is typically covered by the policy. Your typical policy will not cover water damage if it originates from anywhere other than your house.
How do I know when it’s time to repair my ceiling?
When a ceiling is in disrepair, it may not be visible at first, but there are other symptoms that it needs to be repaired. Be on the lookout for these things:
- The center of the ceilings have long, continuous fissures.
- Smells of mold or dampness.
- If your wall is suddenly covered in water spots and mildew, don’t panic.
- Touches that feel moist or swollen
- When someone enters the room above, a loud cracking sound is heard.
- Ceilings that sag, bow, or pillar
- Continuously peeling paint, even after applying a new coat.
What should I consider when hiring a general contractor for ceiling repairs?
General contractors are the most common classifications for those who specialize in ceiling repair. A structural engineer or a plumber may be needed on site as well, depending on the scope of the repair. Be cautious while selecting a specialist because you want to make certain that:
- are qualified and covered to carry out the work
- worked in similar positions and achieved high marks
- before doing any work, submit a precise estimate and contract.
- provide a precise timetable for the project
What other projects should I do at the same time?
In the course of ceiling repairs, it’s a good idea to inspect the health of your HVAC system, plumbing, and even the design of the ceiling itself.
A new light fixture, fresh paint, or crown molding can all improve the space’s aesthetic appeal from a decorative aspect.
Conclusion
You’re all set to go now! Fixing your slide-water-damaged out’s ceiling is as simple as following these instructions. If your ceilings are in need of repair, you should get them replaced as soon as possible.
Nguồn: https://spasifikmag.com
Danh mục: Damaged


