Every sewing machine would be incomplete without a bobbin, and it plays an equally important duty. If you don’t have it, you won’t be able to finish any stitching.. However, bobbins can become agitated when threads get tangled or knotted and make a mess on your cloth. The bobbin driver can be disassembled and reassembled to solve major bobbin issues. But how do you get your bobbin’s driver back to where it was before?
- How To Sew On Blanket Binding? Step-by-Step Tutorial
- How To Thread A Babylock Sewing Machine?
- How To Fix Bobbin Winder On Brother Sewing Machine? Step-by-Step Tutorial
- How to Hem Your Curtains Without Sewing? Step by Step Instructions
- What You’ll Need to Unfreeze Your Sewing Machine? 4 Easy To Follow Steps For You!
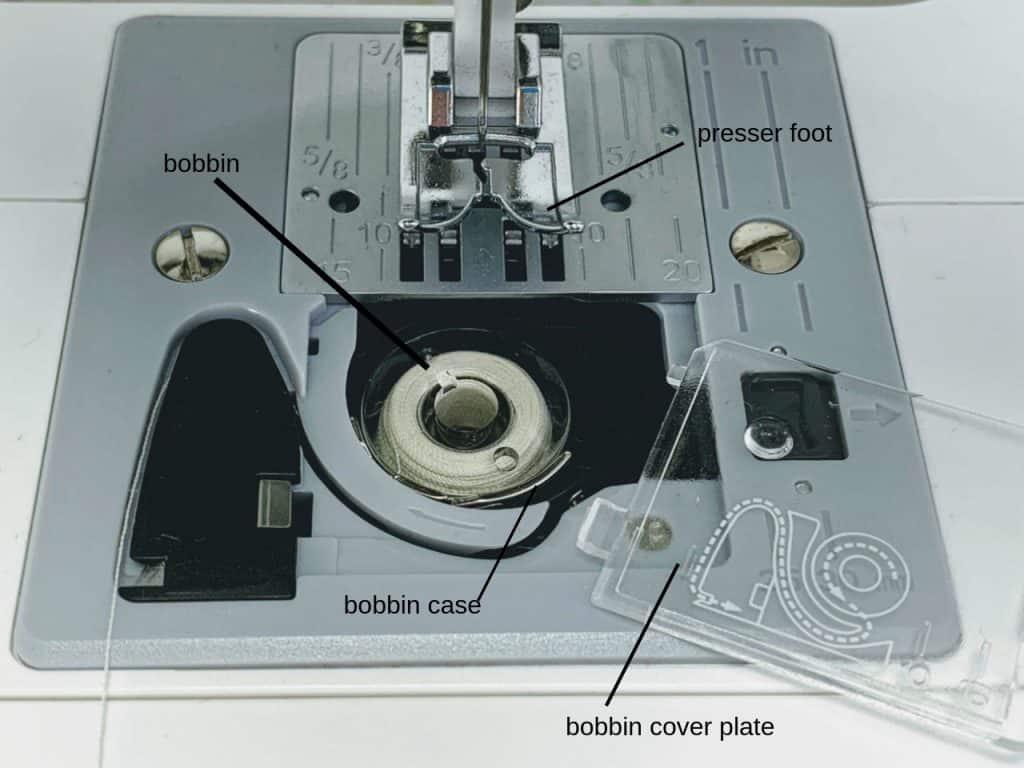
How To Put A Bobbin In A Sewing Machine Correctly
“bobbin case” and “bobbin driver” are commonly used interchangeably. The bobbin driver is, at its most basic, the device that directs the second thread, often known as the “bobbin,” to travel in the desired direction. As the needle moves in any direction, it slams into the bottom of a cylindrical chamber beneath the needle, catching and securing your thread to make a hook.
The bobbin driver can be reconnected in a variety of ways, depending on the type of sewing machine you have. Disconnecting the needle before opening the bobbin’s enclosure wide is the most common method. Take out the bobbin driver, and insert your bobbin with the thread you just wound around it. Make sure the thread in the bobbin driver is spinning in a clockwise direction and leave a few inches of loose thread on the bobbin.
This will make it easier for your sewing machine’s instructions to instruct you on how to stitch, so that you can guide the thread through the bobbin finger as indicated in your manual. Because bobbin drivers on different sewing machines work in different ways, be sure you follow the instructions that come with your machine. Finally, place the bobbin driver into its cage and then secure it. Insert the needle into the bobbin and make sure that it can glide into the bobbin, free from the case that surrounds it, to ensure that the bobbin is properly attached.
Step by Step to Put the Bobbin Driver Back Together
Because bobbin drivers and their placement may vary from model to model, this tutorial will provide an overview of the step-by-step technique for reassembling it so that it is ready to take on the next sewing project. As soon as you remove the old bobbin and replace it, the driver must be connected again so that it can function as a secondary thread.
Since you have already wound your own bobbin or purchased one, we’re going to assume that you know what you’re doing when it comes to this step. If not, examine your sewing machine’s instruction manual for comparable guidance. A specialist should also be called in for more complex bobbin driver concerns, such as mechanical damage or disintegrated bobbin drives.
The bobbin can now be reinserted into the sewing machine by following these instructions:
Step 1- Before You Start
Xem thêm : What Is Best Sewing Machine For Quilting? What You Need to Know
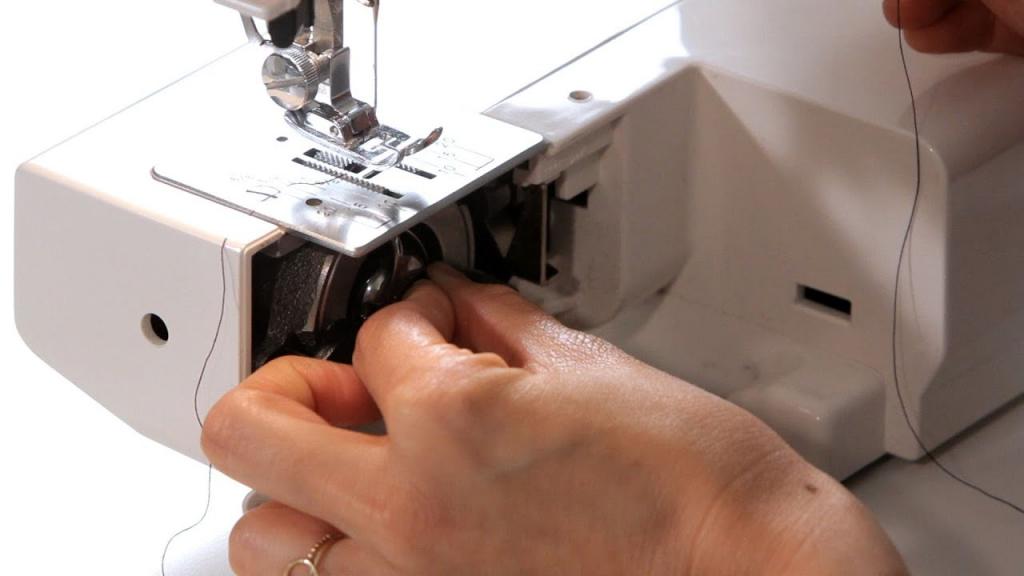
Before attempting to remove the bobbin driver from its container, the needle must be entirely disengaged. An inadvertent movement of the needle, which could result in injury or even damage, will be prevented by this method. To remove the needle, most sewing machines feature a lever or switch near the control panel or wheel.
Step 2- Accessing the Bobbin Driver
Pull the top off the sewing machine’s bobbin chamber to reveal the bobbin. One of the most common features of modern and older sewing machines is that they all have bobbin drivers placed underneath the needle. The bobbin compartment or door may not be visible on your machine; if this is the case, consult your machine’s instruction manual.
Step 3- Remove the Bobbin Driver
Inside the bobbin compartment, you’ll find a cylindrical mechanism that serves as the bobbin driver. Check to see if the hooks are holding it in place. If this is the case, continue and lift it with caution, being careful not to use too much effort. The bobbin casing may need to be rotated slightly in both directions before you can remove it from some machines.
The bobbin driver should be lightly rubbed if it hasn’t been cleaned and is still covered with grease. Remove a bent or damaged driver with care, but be careful not to damage the engine area. The cost of replacing a bobbin’s casing or driver isn’t prohibitive, but the cost of repairing or replacing the complete bobbin chamber is.
Step 4- Replace the Bobbin
Changing the bobbin is the simplest part of the process. If your driver has a bobbin finger, insert your bobbin into the bobbin case and then move it through the case’s opening and the bobbin finger. Make sure that the tension is correct by gently pushing on the loose thread. Consider trimming a few inches from the thread. Otherwise, the level of tension could be too great.
Step 5- Install the Bobbin Case
The bobbin case/driver must be tested before it can be returned to its container. To do this, simply place everything in your sewing machine’s bobbin case, which is specifically built for this purpose. As a proof of good security, it should be able to lock into place. Verify that the lock is in place by putting the needle into the case and turning the wheel to see whether it latches onto thread.
How To Put A Bobbin In A Singer Sewing Machine
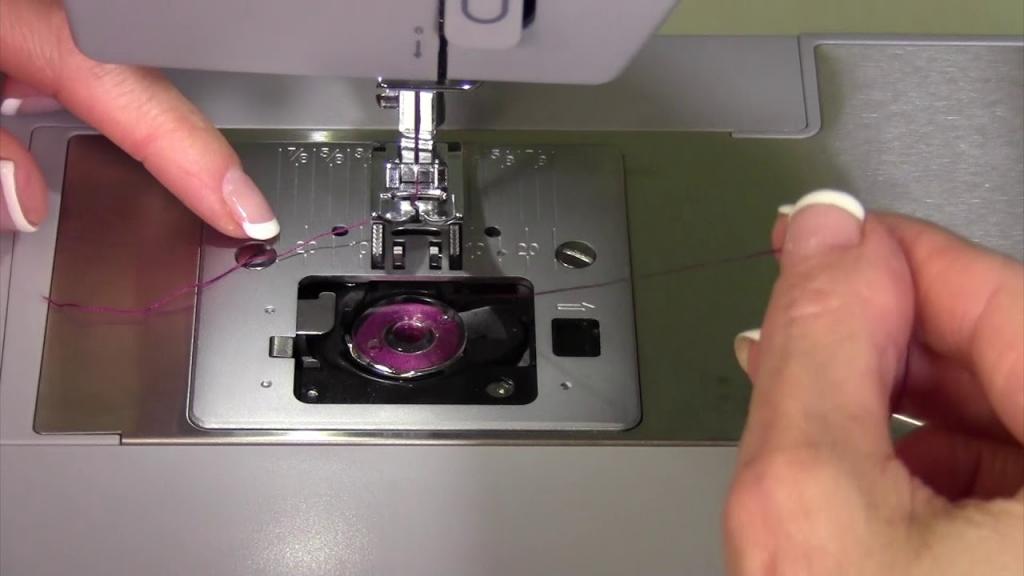
Here’s how to pull up the bobbin thread:
- When inserting the bobbin into the sewing machine, take care not to cut the bobbin thread until the very end. The bobbin cover should not be placed back on.
- Lower and raise the needle by turning the wheel (in your direction) while holding the thread in the upper hand. The top and bobbin threads will be tied together with this.
- It is necessary to raise the higher threads. When this happens, the bobbin’s thread will come out.
- To raise the presser foot, use the lever.
- Finally, drag both threads under the foot of the presser around four inches (10cm) up to (about six inches) (15cm).
- Put the bobbin on and then cover the bobbin.
How Do You Put More Thread on A Bobbin?
A fresh bobbin can be created by winding a bobbin using the mechanism on the machine you are using. Using your main thread to wind a fresh bobbin is the underlying principle of each model’s winding mechanism. A bobbin holder that does not have a thread on which to wind the thread for the bobbin is essential.
How Do I Fix the Bobbin Tension on My Sewing Machine?
Xem thêm : What Is A Grainline In Sewing? Why is a grainline so important in sewing?
It’s possible that the needle will become stuck because of the bobbin tension being too tight. You can get twisted or caught in a knot if the tension is not high enough, making the mess even more difficult to clean up. The bobbin case’s knob, located on the outside, can be used to change the tension. Make sure the thread is not too tight or too loose by suspending the entire case from the free end of the thread.
Which Direction Does The Bobbin Go In?
It’s time to sew when you put your bobbin in the machine. For front-loading Singer machines, the thread should be wound counterclockwise, but for drop-in Singer machines, it should be wound clockwise. In order to avoid troubles with tension, it is vital to keep track of the thread’s orientation when placing the bobbin in its container. To avoid a broken needle, ensure sure the bobbin is oriented correctly and that the thread is unwound according to the manufacturer’s instructions.
Where Does The Bottom Bobbin Thread Go?
Thread from the bobbin’s lower end must be able to pass through the needle’s plate. The thread from the spool, on the other hand, will not pass through the needle’s eye. Find out how a sewing machine works in order to better comprehend its capabilities.
How To Put A Bobbin In A Brother Sewing Machine
- Brother sewing machines should be turned off for safety reasons.
- To raise the needle to its highest point, crank the handwheel.
- Before removing and opening the bobbin cover with the button, lift the presser foot lever.
- In the bobbin, make sure the thread is coming out of the arrow.
- Let go of the thread at the end of your bobbin, then bring it back down.
- Insert the thread into the spring that regulates the tension by threading it through the slot.
- Put the bobbin cover back on the bobbin.
To complete the setup, you’ll need to know how to thread a Brother sewing machine.
How To Put A Bobbin In A Kenmore Sewing Machine
- Removing the bobbin cover.
- Use the wheel to raise the needle to its highest point.
- Make sure the bobbin case is locked and unlocked before you begin.
- While holding the clasp, remove the bobbin case.
- Insert the threaded bobbin back into the casing so that the thread rotates in the proper direction.
- Insert the thread into the case’s slot, then move it under the spring’s strain.
- Make sure the bobbin is securely in place by lifting the clasp and holding it in place inside the case.
- Until the case is sewn shut, don’t release the latch on the case.
How To Put A Bobbin In A Singer Sewing Machine
Front-loading Bobbin Singer sewing machine
- Press the foot all the way to the top of the press.
- By using the handwheel, you can elevate the needle to its highest position.
- Place the bobbin in the machine after unlocking the bobbin cover.
- The thread should be able to run counterclockwise.
- A slit should be made in the thread and then it should be threaded under the finger
- Do not forget to lock up that little bobbin casing!
Top-loading Bobbin Singer sewing machine
- The needle should be raised as high as feasible by rotating the handwheel.
- The button on the bobbin cover allows you to remove it.
- Take care to set the bobbin in such a way that its thread spins freely
- Before pulling it to its final destination, guide it into the second slot.
- Under the presser foot of your sewing machine, take six inches of thread.
- Returning the cover plate is mandatory.
Is there anything more you’d like to know about how to set up your Singer sewing machine? Check out our sewing machine threading lesson.
Conclusion
There’s nothing more to say! For beginners, it is crucial to know whether the sewing machine has an open top or a front loading bobbin method. To avoid problems with thread tension, the thread should always be wound in the opposite direction as the needle.
We sincerely hope that you have learned something new from this manual. In order to learn more about sewing machines, feel free to check out my blog.
Nguồn: https://spasifikmag.com
Danh mục: Sewing Tips


