Using a sewing machine, you may learn how to roll the hem in two simple steps. The ideal rolled hem is just a few simple steps away once you’ve finished sewing the seam. When your hem is rolled, this article has some tips for fixing it.
- How To Polish A Vintage Singer Sewing Machine? A Step-by-Step Learning Guide
- How To Use Decorative Stitches On Sewing Machine?
- How To Sew Blanket Binding On Fleece? and Some Tips to Help You Tackle Mitered Corners
- What Is Casing In Sewing? Everything You Need To Know
- How To Open A Pfaff Sewing Machine? A Few Tips to Remember
If you’re interested in sewing hems, you might want to read up on how to use a hemming foot. Hemming will be a breeze from now on thanks to this handy guide.
Bạn đang xem: How To Do A Rolled Hem On A Sewing Machine?
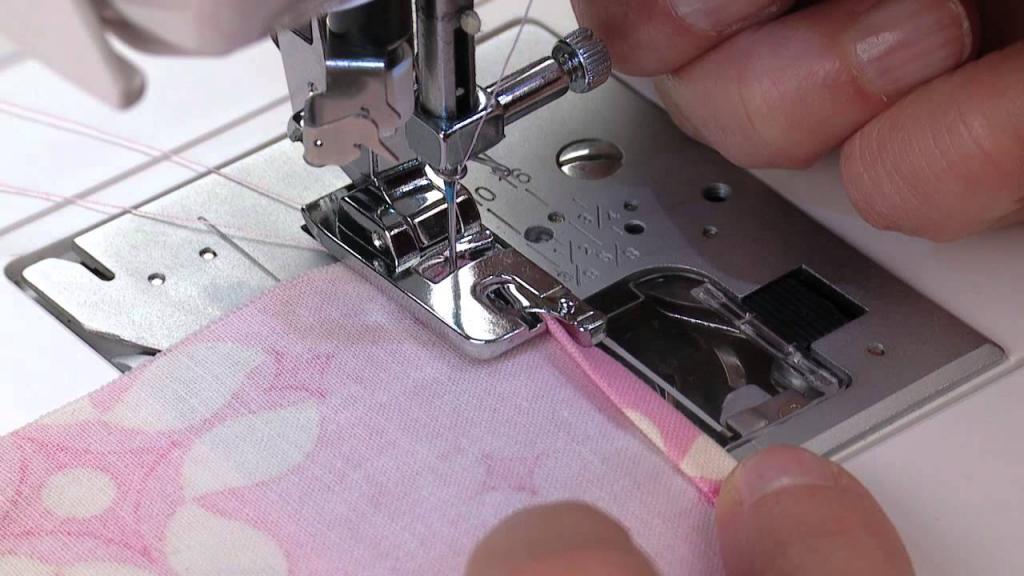
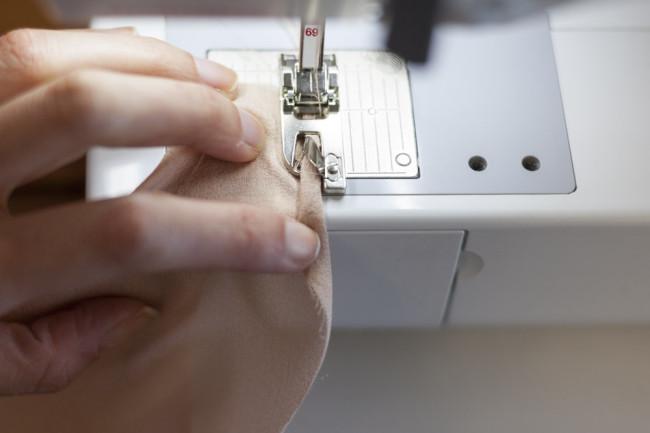
How To Do A Rolled Hem On A Sewing Machine Correctly
The basic rolled hem
We chose a woven cotton cloth because it is simple to press. Depending on the sort of fabric you’re working with, your outcomes may be slightly different. Sewing slowly is a good rule of thumb for most techniques; in this case, it helps keep the fabric rolled into the foot and the stitching precise. A solid fabric with a contrasting thread is used in our presentations to best illustrate the stitching. Only if you’re trying to achieve an artistic effect would it be necessary to use thread that matches your fabric.
- Depending on the breadth of the hemmer foot you’re using, press the fabric’s edge 1/8″ to 1 1/4″ to the wrong side (see more about different width feet below). Rolled hem is usually done without the use of any pins.
- Make a straight stitch on your sewing machine.
- Attach the Hemmer foot to the machine and begin sewing.
- Place the fabric wrong side up under the foot.
- Make sure the presser foot is lowered before folding over the pressed edge to ensure that the needle is at an equal distance from both of these points. There is now a second fold in which you can hide your rough edges.
To keep the fabric in place, lower the foot.
- Insert the needle into the fabric. The needle should be positioned at the fabric’s inner fold.
- Keep the needle in the fabric while raising the pressure foot.
- Insert the fold up and over into the guiding of the foot while holding the fabric’s edge taut.
- Keeping the cloth stiff but not too tight, feed it into the foot as you begin sewing.
- This is what the finished product will look like.
Alternate methods for starting a rolled hem
Some projects need you to begin the rolled hem stitch from a corner, while others don’t. Sewing the fabric uniformly from the edge can be difficult in this situation. There are two ways you can go about it.
Tearaway stabilizer
To prevent the fabric’s edge from being snatched up by the needle plate of the sewing machine, place a tiny rectangle of tearaway stabilizer underneath the fabric. The stabilizer also allows you to draw the fabric past your foot until you’re barely past the corner, allowing you to sew neatly around the edge once more.
- In the same way that you prepared your fabric and sewing machine, do so again.
- Tearaway stabilizer can be cut into a small rectangular piece. We used a 1″ x 2″ piece of material.
- Repeat Steps 1 and 2 for placing fabric under the foot.
- The majority of the rectangle should stretch beyond the corner when the tearaway is placed under the corner of the fabric.
- Begin stitching from the edge by firmly pulling the stabilizer.
- Continue to roll the hem as described above.
Hand thread tail
Using a hand sewing needle and around 10″ of thread, you can begin sewing at the corner of a piece of fabric.
- You’ll need a 10″ spool of thread to do this.
- The folded edge of the fabric should have the needle inserted around 1/8″ from the raw edge of the fabric.
- Pull the thread halfway through the material.
- Let go of the needle’s thread.
- To prepare your fabric, simply follow the steps outlined above and then place it beneath the foot of the machine.
- As you begin to sew the rolled hem, use the thread tail to gently pull the fabric.
Rolled hems on slippery fabric
A slippery or silky fabric will not want to be pressed around the edge if you plan to sew a rolled hem on that cloth. It’s possible, however the regular 1/8″ fold we use in rolled hems will usually unravel. This stops you from inserting an even fold into the foot guide. We’ve got a fantastic answer to this problem! To finish the raw edge, simply sew a line of stitching around 14″ (again depending on the width of your hemmer foot) along it. As a folding guide, this stitching line makes pressing the fold for a rolled hem much easier. This seam, when pressed, aids in the stability of the folded garment.
- Make a basic straight stitch on your sewing machine.
- Using a 14-inch seam allowance, sew along the raw edge of the fabric. This is a one-layer piece of fabric. Use a Quarter Inch Seam foot for this step if you choose.
- Using the stitching line as a guide, fold and press the cloth to the wrong side along the raw edge.
- To sew a rolled hem, fold the fabric in half and sew along the folded edge.
- The rolled hem can be achieved by following the methods outlined above.
Corners
There are a few things you’ll need if you decide to use rolled hems in your next project. A square corner or a mitered corner can be used in this situation.
The square corner is the easier of the two methods, but there will be times when a mitered corner is more appropriate. Whatever method you use, be sure to sew each side separately.
Xem thêm : How To Applique Letters With Sewing Machine?
A few hand-tapping stitches at the corners may be necessary for thicker fabrics, especially if you can’t catch the corners evenly.
Square corners
- Using the instructions above, prepare the fabric for rolling.
- You can begin by sewing a basic rolled hem down one side of your item, using stabilizer or a thread tail if necessary.
- Take the cloth out of the machine and lay it out on a flat surface.
To finish pressing the other side, fold the corner over the sewed rolled edge and press again.
- Sew another rolled hem on the fabric by placing it under the foot of the machine once more. To get over the “hump” in the corner, we suggest using a rectangular piece of tearaway stabilizer.
- Sew the wrapped hem around to the other side of the garment.
- Tear away the corner of the fabric from underneath the foot. However, your thread may be the same color as the fabric in the corner!
- Once you’ve completed one side, repeat the process for the other.
Mitered corners
- A diagonal line will be formed by folding the corner point 14 inch lower.
- Sew as closely as you can to the folded edge of the fabric.
- Remove the point as close as possible to the stitching.
- Follow these steps to complete the other four corners.
- Begin at the clipped edge and press the cloth to the wrong side in the same manner as if you were rolling a hem.
- Sew the rolled hem in the manner outlined above. Using tearaway stabilizer in the corner is a good idea again.
- Take the cloth out of the machine and lay it out on a flat surface.
- Create a miter on the next side of the fabric by angling it at the corner.
- Make the rolled hem by starting at the corner and sewing inward. Make sure you don’t forget about that handy stabilizer piece.
- A finished mitered corner is shown here. With the contrasting thread, ours seems a little disorganized. It would look stunning if the thread was the same color as the fabric.
- Once you’ve completed one side, repeat the process for the other.
Cross seams
- In some cases, you may need to roll a hem over an existing seam. In garment stitching, this is a common occurrence. If the cross seam is too heavy for the hemmer foot, it may not be able to finish the job.
- You can reduce the bulk of your rolled hem by cutting the seam allowance on the cross seam at an angle.
- Alternately, you can skip the seam entirely and sew the rolled hem while keeping the cloth flat, all the while avoiding the need to tuck the folded edge into the foot guide. When you get close to the cross seam, put the needle all the way down and stop sewing.
- The fabric should be gently slid out of the foot’s guide, but not totally removed from the machine. Remember to straighten out the fabric before you start stitching if you turn it slightly.
- The cloth should be flat under your foot as you sew along the folded edge.
- Continue rolling the hem until you reach the cross seam, at which point you should stop and place the needle in the down position.
Before the cross seam, you can back stitch and then remove the fabric from your machine and put it back in position beyond the cross seam. Continue stitching the rolled hem by re-inserting the fold into the foot. Go back to the cross seams after you’ve finished sewing the rolled hem and fill up any gaps. Simply backstitch at the start and finish of your small lines of stitching. Despite what you may think, no one will notice that you rolled the hem and then filled in the stitches later.
Hemming around a circle
- You’ll need to use the same method to finish the rolled hem on a project with a circular form, such a skirt.
- At this point, you will need to remove the folded edge from your foot and finish stitching your hem flat, just like we did in the step before when sewing over cross seams.
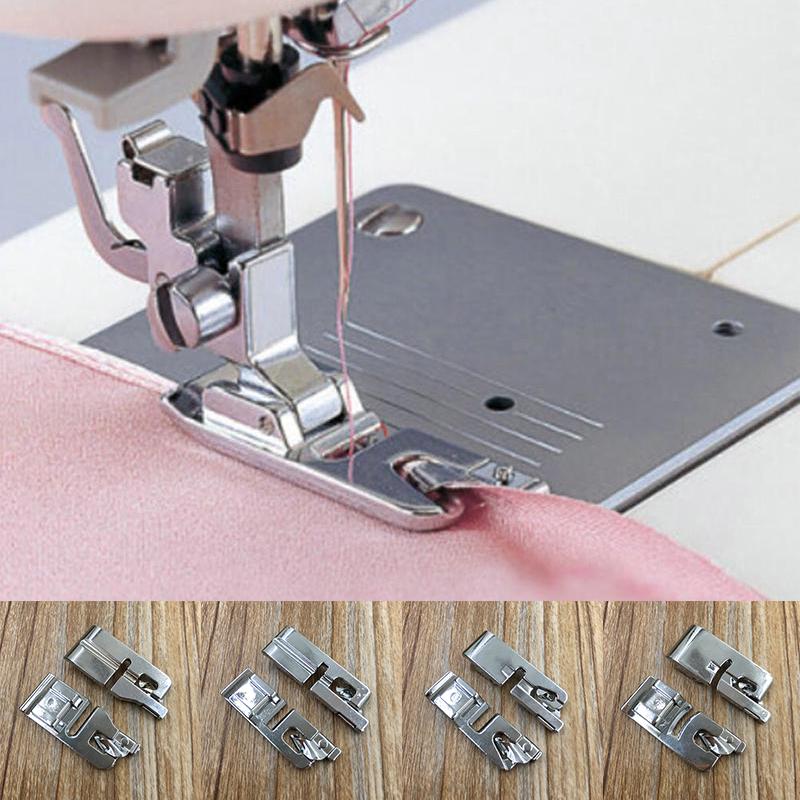
Different width feet
For our S4H studio machines, Janome generously provided us with a variety of Hemmer feet from their collection.
Most Janome sewing machines are equipped with a 2mm-wide Hemmer foot as standard equipment. The Hemmer Foot Set, available as an add-on, includes two additional feet: a 4mm and a 6mm Hemmer foot. Visit your local sewing machine shop to find the correct feet for your machine model and/or brand.
The S4H studio’s Hemmer feet feature distinct variations that are readily apparent.
Look at the underside of the hem to get a sense of how wide it will be when rolled. Under each foot, the rolled hem can be easily rolled up and out.
The choice of foot is straightforward. What matters most is the weight or thickness of the fabric you are using. Your rolled hem can be thinner if the material is thinner. Or, if you’re going for a more ornamental appearance, you might choose based on the depth of the hem itself. Roll a hem on a few scraps with each size foot to see which works best for you.
Zig zag rolled hem
A rolled hem does not necessitate the use of a straight stitch. The zig zag is another option.
Xem thêm : 13 Steps on How to Sew Curtains With Grommets? Things You Should Know
If you look closely at the Hemmer foot, you’ll notice that the needle enters the foot through a large aperture.
It’s designed this way in order to accommodate a zig zag stitch, because sometimes the kind of fabric we like to finish with a rolled hem is also the kind that frays easily, such as a sheer organza or similar. A zig zag stitch is a good defense against this.
Using the same steps as you would to sew the basics of a rolled hem, but instead of picking the straight stitch, choose the zig-zag option. This is how your finished rolled hem will look.
NOTE: It’s always a good idea to test your zig zag stitch on scraps first to make sure the width and length are correct.
Serger rolled hem
If you haven’t already seen it, we thought it might be helpful for you to see how it looks with a serger. In essence, it’s the same story. Fabric’s rough edge is tucked under and stitched to keep it from slipping out of position. Unlike a sewing machine, a serger does all of its work in one pass, thus the fabric’s raw edge is trimmed, folded over, and stitched with a 2- or 3-thread overlock stitch along the folded bottom edge. This may look familiar to you if you’ve ever purchased anything similar in a retail store.
Those are the final words of advise we have for you: practice! A successful rolled hem requires some patience, but the more you do it, the easier it gets.. Keep in mind that if the cloth doesn’t want to roll back into the foot, you may always pause, remove some stitches, and sew again on a portion that has already been rolled.
How Do You Sew A Rolled Hem On A Brother Sewing Machine?
- Sew with the Brother sewing machine in the rolling hem mode
- It’s time to turn off your lights and electricity.
- Remove the sewing machine’s left needle.
- For a three-thread overlock, insert the needle into the correct position
- By elevating the presser foot lever and then pulling the threads out, you remove the stitch finger.
- You can open the front cover after you’re satisfied that nothing is wrapped around the stitch finger
- Pull the stitch finger to the right and lower the upper looper as much as possible to remove it.
- Make sure the stitch width is in the R position and that the stitch length is set to 2.
How Do You Hem Fabric Rolls?
- Switch out the normal sewing machine presser foot with this one:
- Make an 8-inch hem and push the fabric over 1/8 inch to the wrong side before hemming.
- Start stitching after pressing the fabric another 18 inch higher.
- Before lowering the foot, feed the cloth through the scroll from under the foot.
- Finish by sewing around the edge.
How Do You Make A Narrow Hem With A Sewing Machine?
If you want a narrow hem on your sewing project, a rolled hem is excellent for you.
- Stack the material on the presser foot and begin pressing it.
- Make many stitches by aligning the foot’s edge with the fabric’s edge.
- Lift the substance by first raising your foot.
- To shift the threads to the back, simply pull them.
- Hold the excess thread in place as you lower the foot.
- The foot’s curve will turn the edge twice, so place the material around it.
- a seam ripper can be used if necessary to help guide cloth into the curve
- Slowly sew the fabric edge to ensure it hasn’t slipped out of the curve.
- Hold the fabric taut and to the left as you stitch to keep it in place under the foot curve of the machine.
Is the cloth you’re working with stretchy? If you want to ensure that your hems are always perfectly straight, learn how to hem stretch fabric on a sewing machine.
How To Do A Rolled Hem By Hand
- Trim 1/8 inch from the fabric’s edge before sewing 14 inch from it.
- Press the wrong side of the fabric.
- Sew the hem by repeating the folding and pressing process.
- Pick up one thread just above the raw edge with the needle inserted through the folded edge.
- A half-inch long needle should be inserted into the fold where it came out, and the needle should go through the fold.
- Once you have roughly 14-inch-wide vertical stitches, pick up a thread above the hem and repeat that process.
- Gentle thread pulling will cause the fabric to roll and conceal the stitches and raw edge.
- Repeat the sewing and pulling process until the hem is complete.
How Do You Fix A Rolled Hem?
- To keep rolled hems on t-shirts from fluttering, cut perpendicular to the fabric grain.
- Partially machine dry and then air dry your hemmed shirts to prevent them from rolling up at the bottom or sleeves.
- Iron the rolled hem with a hair straightener in a matter of seconds
How Do You Make A Rolled Hem Corner?
- After a corner, begin sewing along the fabric’s edge.
- You can raise the needle once you’re a stitch past the corner.
- Step on the presser foot to start the process.
- Reposition the fabric after it has been moved back to the corner.
- It’s worth seeing if the needle drops on the other end of the corner.
- Before lowering the presser foot, tighten the thread tension.
- Repeat at the next corner.
Conclusion
And with that, I bid you farewell! Using a sewing machine, you must begin by sewing the seam and then pressing the hem to create stitches. Using a particular sewing machine foot for a rolled hem makes the operation much simpler.
Let us know how it went. Let us know in the comments below if you have any further questions about this.
Nguồn: https://spasifikmag.com
Danh mục: Sewing Tips


