Learn how a sewing machine uses two threads and what happens to the fabric while it is stitched. To assist you better understand this invention from 1790, we will also go over the many stitches that machines are capable of producing.
Why not take a peek inside the sewing machine’s guts and see how the motor functions? For your convenience, this article breaks down the machine into its component parts.
Bạn đang xem: How Does A Sewing Machine Make A Stitch? A Stitch Quickly And Perfectly
What Is A Straight Stitch Sewing Machine?
One can start learning how to sew with the simplest type of equipment, a straight-stitch machine. The name of the machine implies that it is limited to straight stitching exclusively.
The treadle machine is a type of straight stitch sewing machine. Current machines are only capable of sewing a straight line. Check out our very own post on treadle machines if you’re interested in learning more!
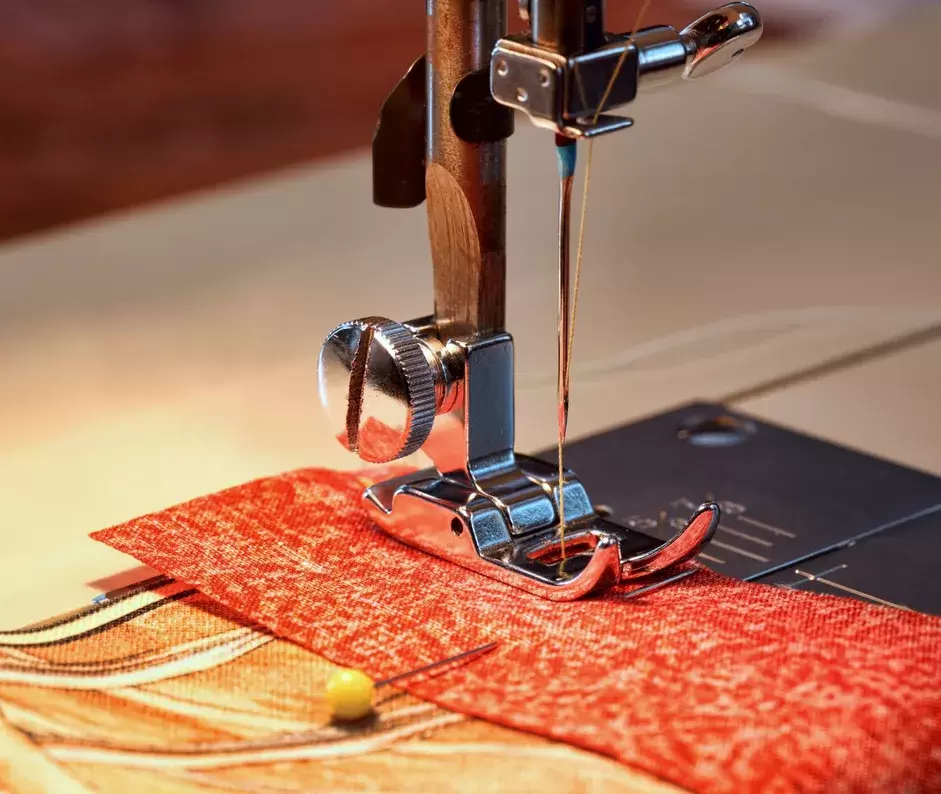
How Does A Sewing Machine Make A Stitch Quickly And Perfectly
How do stitches are stitched?
When sewing by hand, a threaded needle is introduced into and then removed from the fabric, but a sewing machine employs two threads, the needle thread and the bobbin thread. During machine stitching, the needle is the only thread that is utilized.
As the needle thread travels through the cloth, it will tie a long knot with the bobbin thread before the machine draws the thread up. Knots employ a machine to create the stitches, as opposed to hand stitching, which is wholly reliant on the needle.
Need some help picturing how a sewing machine stitches? Investigate the mechanism thoroughly and master the inner workings.
- A long loop of thread from the needle plate is passed between the eye of the needle and the fabric.
- The loop is caught by a rotating hook, which then wind it around the bobbin’s housing.
- Knots arise when the bottom or bobbin threads become entangled in the loop.
- When the thread is pulled twice, the knot becomes firm. The stitch is completed at this point.
The way the fabric and stitching move simultaneously
When the thread is pulled twice, the knot becomes firm. The stitch is completed at this point.
What Are the 3 Types of Sewing Machines?
A second pull on the thread tightens the knot. The stitch is completed at this point.
- A second pull on the thread tightens the knot. The stitch is completed at this point.
- Repeatedly pulling on the thread tightens the knot. This marks the end of the stitching process.
11 Sewing Machine Parts and Their Functions
Your sewing machine’s components are the first step in learning how it works. While every machine is in some ways unique, their fundamental parts are often interchangeable and serve the same purpose.
- Understanding your sewing machine’s parts is the first step in mastering its operation. Although each machine is one of a kind, the core components are universal and perform the same functions.
- Needle. Needles are essential to the proper functioning of a sewing machine. Most sewing machines are compatible with a wide variety of needle types.
- The spool-mounting pin. To feed the needle, the thread is wound around a spindle or pin on the upper portion of the machine, which is used as a spool holder.
- Spool attachment pin. The thread is wound onto a spindle or pin in the machine’s spool holder at the top in order to feed the needle.
- The needle’s position can be adjusted with this knob. The needle’s height can be adjusted by hand on most sewing machines using a hand wheel or button (for example, when you wish to remove your cloth).
- You may do a reverse stitch on a button. When you press down on the foot pedal, your sewing machine will resume stitching. Some sewing machines have a reverse stitch button that allows you to undo your previous stitching (for example, at the end of a line to prevent it from unraveling).
- The knob has a decorative stitching pattern. Straight stitch, zigzag stitch, and ornamental stitching are just some of the options available on modern sewing machines. A machine’s knob is used for this purpose while operated manually, whereas a touch screen is used when the operation is automated.
- Knob with a stitch-length. This knob determines how far your needle may travel before piercing the fabric again—long stitches indicate fewer holes, while short ones result in more close-packed holes. With computers, you may select stitches from a computer screen.
- Knob with a stitch-length. This knob determines how far your needle may travel before piercing the fabric again—long stitches indicate fewer holes, while short ones result in more close-packed holes. With computers, you may select stitches from a computer screen.
How to Set up a Sewing Machine
The knob has a length of stitching. This knob governs how far your needle may travel before piercing the fabric again—long stitches imply fewer holes, while short ones result in more close-packed holes. With computers, you may select stitches from a computer screen.
- One who has a stitch-length knob. A long stitch means fewer holes, whereas a short stitch results in holes that are closer together, and this knob controls how far the needle can travel before re-piercing the fabric. Today, you may use a computer to pick your stitches right off a screen.
- Get ready to use the bobbin holder by winding a bobbin. A bobbin is a second spool of thread used in sewing machines. You can tell whether or not the bobbin is facing the right direction by following the arrow on your machine.
- Take up the slack. Connecting the top and bobbin threads is the first step in getting started with sewing. Make a loop in the bobbin thread by lowering your needle all the way down and then raising it again with your needle position button or knob. In order to keep the two thread strands from tangling, pass a ruler or other flat item under the needle.
How to Use a Sewing Machine
Xem thêm : 4 Ways How To Use A Cone Thread On Sewing Machine
Take up the slack. Connecting the top and bobbin threads is the first step in getting started with sewing. Make a loop in the bobbin thread by lowering your needle all the way down and then raising it again with your needle position button or knob. In order to keep the two thread strands from tangling, pass a ruler or other flat item under the needle.
- Take up the slack. Connecting the top and bobbin threads is the first step in getting started with sewing. Make a loop in the bobbin thread by lowering your needle all the way down and then raising it again with your needle position button or knob. In order to protect the two thread strands from tangling, pass a ruler or other flat item under the needle.
- Fill in the gaps. Once the top thread and bobbin thread have been prepared, they must be joined. Using the needle position button or knob, lower the needle all the way, then raise it again to create a loop in the bobbin thread. In order to protect the two thread strands from tangling, pass a ruler or other flat item under the needle.
- Fill in the gaps. Once the top thread and bobbin thread have been prepared, they must be joined. Using the needle position button or knob, lower the needle all the way, then raise it again to create a loop in the bobbin thread. In order to protect the two thread strands from tangling, pass a ruler or other flat item under the needle.
- Step in and help out. When you’re ready to start stitching, connect the top and bobbin threads. Use the needle position button or knob to lower the needle all the way, then raise it back up to the top of the machine to create a loop in the bobbin thread. Slide a ruler or other flat object under the needle to prevent the two threads from tangling.
- Your fabric should be steered by you. In order to sew a straight line, match the edge of your fabric with the seam allowance guideline on your sewing machine (recommended for beginners). With the help of feed dogs, your sewing machine will do all of the work of stitching the cloth for you.
- You should direct your fabric. It is easier to sew a straight line if you align the edge of your fabric with the seam allowance guideline on your sewing machine (recommended for beginners). You may rest easy knowing that your sewing machine will perform all the hard work of stitching the fabric for you thanks to the feed dogs.
How to Clean Your Sewing Machine
The importance of treating your sewing machine with respect cannot be overstated. What is the one thing you must do to guarantee that your sewing machine will continue to function properly? Remove all of the lint from the machine! As a result of sewing, it’s impossible to avoid it. It’s an unfortunate reality of sewing that lint accumulates in the machine as you work. Your machine will run better if it is cleaned on a regular basis. Furthermore, a silent machine is a clean machine. Taking care of your computer on a regular basis will save you money in the long run, as well. To Janome America’s credit, they walked us through the essentials of self-servicing upkeep between visits to your dealer for a more complete clean and service.
There are no exaggerations allowed when it comes to the value of treating your sewing machine with the utmost care. What is the one thing you must do to ensure the continued health of your sewing machine? Remove all of the lint from the machine! Sewing makes it impossible to avoid. The more you sew, the more lint will get into your sewing machine’s moving parts. Maintaining a clean machine is essential to its optimal functioning. Additionally, a tidy machine is a quiet one. Spending time and money maintaining your computer on a regular basis will save you both time and money in the long term. Janome America deserves praise for guiding us through the basics of self-service maintenance between professional cleanings and servicing.
10 Basic Stitches You Should Know
1. The Running Stitch
No amount of reiteration will suffice to stress the significance of taking care of your sewing machine with the utmost reverence. What is the one thing you must do regularly to ensure the sewing machine continues to function properly? Get the lint out of the dryer! To avoid it would be futile, as sewing makes this physically impossible. As a matter of fact, the more you sew, the more lint will become caught in your machine. When you clean your machine on a regular basis, it will function better. A machine that runs smoothly but makes little noise also has a better chance of staying dust-free. Maintaining your computer on a regular basis will help you save cash in the long term. Janome America did a good job of instructing us on how to perform basic maintenance on our machines between professional cleanings and tune-ups.
- Simply insert the threaded needle from the wrong side of the fabric and begin stitching (the wrong side)
- Simply re-insert the needle and drag it through the fabric in the opposite direction from where the knot was at the end of the thread.
- Bring the thread back up through the fabric and repeat.
2. The Basting Stitch
Similar to the running stitch, but with more length. The recommended stitch distance is between 14 and 12 inches, rather than 1 centimeter.
The basting stitch will quickly become faster than the running stitch as you get into a rhythm.
3. The Cross Stitch (Catch Stitch)
It’s safe to assume that you’re already familiar with cross-stitch. Two of cross-many stitching’s functions are to finish off hems and make designs that can be seen from the front. Although not as difficult as the running or basting stitches, this one requires a bit more practice to master.
For those unfamiliar, cross-stitch is done by making Xs in the fabric.
- To tie a knot, bring the thread from the underside of the fabric to the front.
- Perform a diagonal stitch to the left, about a centimeter distant.
- Insert the needle into the back of the fabric about a centimeter to the left of where the thread was first inserted and a centimeter back from where the thread was last inserted.
- A centimeter and a half to the left of where the last stitch began, and a centimeter backward from where the thread went in last.
4. The Backstitch
- Half a centimeter to the left of the place where the thread was last inserted, and the same distance back.
- Put the needle back into the end of the stitch from which you removed the thread.
It is crucial that these stitches give the impression of overlapping.
5. The Slip Stitch
When sewing hems, this stitch is handy since it hides the stitches. Patchworkers will appreciate it.
- When sewing hems, this stitch is handy since it hides the stitches. Patchworkers will appreciate it.
- When stitching hems, this stitch is handy since it hides the stitches. Quilters will find it useful.
- This stitch is helpful for stitching hems since it conceals the seams. Patchworkers will find this useful.
- Pulling the needle through just a few threads at a time prevents the strands from becoming tangled.
- When re-inserting the needle into the fold, you should do it while keeping the needle perpendicular to the fold.
- All of the preceding steps should be repeated.
A half inch gap between stitches and some give in the thread is ideal.
6. The Blanket Stitch (Buttonhole Stitch)
Xem thêm : What Is Best Sewing Machine For Quilting? What You Need to Know
As the name suggests, this stitch is ideal for completing the edges of blankets or creating buttonholes.
- In order to sew, the needle must be inserted from the wrong side of the fabric and pulled through to the right.
- Instead of re-entering the needle from the front of the fabric, as you would for conventional stitches, you should do so from the back.
- Draw the needle through the fabric twice from the reverse side to create a loop. The loop is where the needle will go in.
- When constructing a blanket, stitches should be around a centimeter apart throughout the process.
7. The Standard Forward/Backward Stitch
When making the transition from hand stitching to machine sewing, this stitch should be learned.
- It’s recommended to begin straight stitching 1/8 to 3/8 inches from the edge of the fabric.
- Stitch backwards over the pinned seam, and then forward again.
- The second step needs to be done in reverse.
- Repeat the first three steps.
8. The Zigzag Stitch
Repeat the first three steps.
- Repeat the first three steps.
- It’s important to start over and do steps one through three again.
- Put less pressure on the pedal to slow down the machine’s operation. This will aid in directing the cloth while it does its function.
- Sew the fabric together till the very end, but avoid stitching over the same area twice.
9. Blind Hem Stitch
This stitch is made up of both straight and zigzag threads. To top it all off, it is nearly unnoticeable, making it perfect for alterations. You can use this stitch to unite the folds of a single piece of fabric or to sew two pieces together.
- Straight stitching should be done twice or thrice.
- To make one wide row of zigzag stitches (cross-stitch)
- Repeat
10. The Buttonhole Stitch
Most sewing machines also come with a buttonhole foot attachment or a buttonhole preset that may be used in place of the zigzag stitch when making buttonholes.
- Insert the foot with the buttonhole into the device (if you have one)
- Your buttonhole’s placement should be marked on the fabric with the appropriate measurements.
- When sewing, the presser foot should be positioned over the finished buttonhole.
- A zigzag stitch from one end of the buttonhole to the other is used to create the buttonhole.
- To complete the buttonhole, sew a zigzag line parallel to (or upward from) the starting point of the buttonhole.
- Use a seam ripper to remove the stitches, and problem solved! That was easy; you should have a buttonhole now.
FAQs
Why are the stitches looping in the sewing machine?
The most common cause of looped threads is incorrect tension. Correcting an upper-side loop is as simple as adjusting the upper- or lower-tension screw to make it tighter. If the loop is on the underside, the best way to fix it is to alter the upper tension of the garment.
Why do sewing machines have two threads?
Lack of attention to proper tension is the most frequent cause of looping threads. An upper-side loop can be fixed by tightening either the upper or lower tension screw. A change in the garment’s upper tension is the most effective method of mending a loop that has formed on the underside of the fabric.
Why is the bottom stitch on my sewing machine loose?
An erroneous winding of the bobbin thread could cause the machine to malfunction. – Check to see that the bobbin is seated correctly. – The bobbin in your machine must be able to fit into this machine. – Make that the shuttle race bobbin is securely threaded.
Why is my sewing machine knotting underneath?
An erroneous winding of the bobbin thread could cause the machine to malfunction. – Check to see that the bobbin is seated correctly. – The bobbin in your machine must be able to fit into this machine. – Make that the shuttle race bobbin is securely threaded.
Conclusion
The machine could stop working if the bobbin thread is wound incorrectly. – Check to check that the bobbin is seated correctly. – The bobbin of the machine you’re using must be compatible with the bobbin of this one. – Make that the shuttle race bobbin is securely threaded.
Nguồn: https://spasifikmag.com
Danh mục: Sewing Tips


