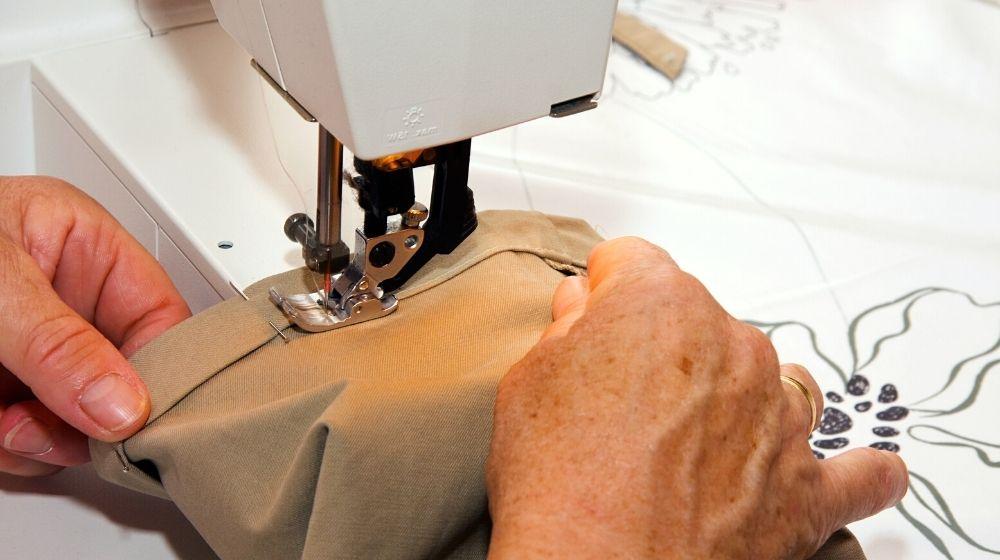
If you want to learn how to hem your shorts using a sewing machine, then follow this two-step process. Remove the hem first, and then we’ll discuss how to adjust the short’s length in accordance with the short’s length.
Sewing machine instructions for hem pants are available here. Although it’s comparable, it’s advantageous to know how to construct lengthier items.
Bạn đang xem: How To Hem Shorts With A Sewing Machine?
Even if you’re a novice sewer, you have nothing to fear when it comes to sewing hems. Let’s begin to make you feel at home.
How To Hem Shorts With A Sewing Machine Step By Step
Step 1. Undo the hem
- Learn how to remove stitches correctly so that the ones on the hemline are eliminated.
- Shorts can now be folded in half and turned inside out when the sutures are removed.
- Make sure there are no wrinkles in the clothing by laying it out on a flat surface.
- Add an extra inch to the desired length to account for seam allowance when measuring from the crotch.
- The shorts should be cut to fit your body.
- The shorts’ legs should be folded in half using a sewing gauge.
- One-half inch extra folding once the ideal position has been achieved.
- After the fold is about a half-inch wide, secure the hem.
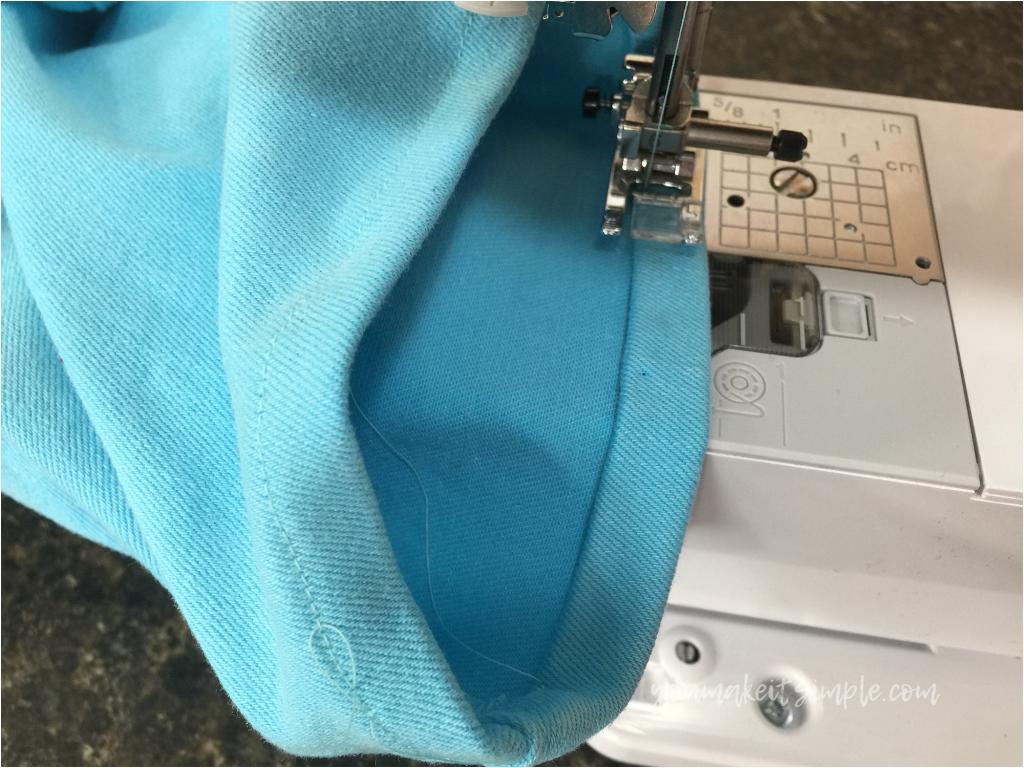
Step 2. Sew the new hem
- Setting the sewing machine correctly is essential.
- Use the same color thread as the spool and the bobbin to thread the machine.
- For pants and shorts, use medium-length straight stitches to determine the suitable length for your stitch.
- Use a sample of the same fabric as your shorts to test your stitching settings.
- Use 1/4 inch seam allowance to sew around your hem, sewing only one leg at a time.
- Sewing machine needles should never be used to pierce the pins.
- When you get to the beginning of the stitching, go back and check to see if the stitches are secure.
- Get rid of any extra threads.
- Make sure the shorts are facing the correct direction.
- The hem can be pressed.
Can You Hem With A Sewing Machine?
You can use an embroidery machine for the most time-saving and efficient method of finishing garments, such as clothing. Depending on your skill level or desired style, you can use a variety of methods to sew the hem, so pick one that works best for you.
As an alternative to the traditional double-fold hem, you can also employ the following two machine-assisted hemming techniques:
Blind stitch Hem
- The raw edge of the fabric should be pressed and folded for 1/4 inch.
- Using the seam allowance as a guide, fold and press the fold once more.
- Fold the hem in the back, making sure that only 1/8 inch of the borders are visible.
- Setting the length and width of the sewing machine to 2 inches for blind stitching is recommended.
- Use the correct blind Hemming foot during hemming.
- Using the foot guide or placing the fabric in the machine, make sure that the stitch goes through the folded edge.
- Fold the top hem over and sew it in place.
- As soon as the blind is completed, the hem should be ironed.
Take a look at what is a blind sewing machine if you use this technique frequently.
Overlocked hem
Using an overlocker, follow these instructions to make a rolled hem.
- Use a scrap of fabric to test stitch length and tension on the serger or overlocker before making any final adjustments.
- On a flat surface, spread the material out evenly
- Sew directly over the edge of the fabric using the stitch plate as a guide. At the mid-seam, begin. When hemming materials that need to go all the way around, this step is extremely critical.
- As you near an edge, be sure to stitch all the way to the end of your current stitching line before you cut the thread.
- Once you’ve returned to the beginning of the seam, stitch it.
- In order to leave an unfinished thread, you should draw the fabric toward the back and sides as you stitch.
- Just before the seam, snip off the excess thread using a pair of scissors
For those who don’t own a serging machine, learning how to use one is also an option.
What Machine Stitch Is Suitable For Turning Up A Hem?
A hem turn is the best method for finishing medium to lightweight fabrics with accuracy. 1/8 inch is all that is needed to turn the rough edge toward the underside. Topstitch 1/8 inches from the fold after pressing.
Hemming stitch, slip stitch, zigzag, and backstitch are some of the stitches you can use to make a hem seem better. It’s vital to keep in mind that this technique works best with fabrics that aren’t too heavy to ruffle.
How Do You Do A Simple Hem Stitch?
- Underneath the hem allowance, fold the excess fabric.
- Select a few threads from the fabric. Fold over the needle when it pierces into the fabric.
- Sew about a third of an inch into the folded edge of the fabric. After that, remove the needle and rip several threads from the material.
- Stitch at a distance of about 1/8 of an inch apart.
- Grab the threads as you sew the seam to prevent the thread from being seen.
How to Hem Pants by Hand With a Needle and Thread
Hand sewing is an option if you don’t have access to a sewing machine.
- Get your supplies together. An iron and ironing board; straight pins; measuring tape or ruler; scissors; a needle; and thread in the same color as your pants are all you need to complete this task.
- Discard the old hem. The original hem of the pants may need to be removed, depending on their length and thickness. After removing all of the stitches with a seam ripper, unfold the pants and press them flat for a neat appearance.
- Pin and fold. The pants should be turned inside out before being worn. Shorten the length of each pant leg by folding it up. Straight pins can be inserted along the top of the fold, parallel to the new hem, to keep the fold in place. This is a good time to put on the pants and see if they’re the proper length for you. Adjust as necessary.
- Trim and iron as necessary. Each pant leg should be ironed to create a crease in the fold at the bottom. The pant legs can be unfolded after you have a crease. Leave one inch of fabric above the crease when trimming your pants with scissors and a measuring tape. The “seam allowance” or “hem allowance” refers to this.
- Fold and pin once more. As before, fold a half-inch up from the raw edge of the pant leg opening and iron. Fold the raw edge of the pants up another half inch to prevent fraying. Pin and re-iron as necessary.
- Sew. This style of stitch, known as “blind stitching,” can be used to sew the new hem. Tie a knot at the end of the thread with a needle. In order for the knot to be placed on top of the crease, you must first sew the seam allowance. Afterwards, re-punch your seam allowance with your sewing needle. Pick up some threads from the pants’ fabric and pull them through with a needle and thread. All the way around the hem, sew in tiny stitches like this. Another knot is all that is left to do.
- Re-iron. To maintain the crease, iron your jeans again. Flip them over and do the same.
How to Hem Pants Without Sewing
For those who lack sewing equipment or needles and thread, hem tape is an option. You may find it at drugstores. Use hem tape by turning your pants inside out, folding them in half to get the appropriate length, and then ironing the crease. The folded edge should be ironed over to seal the seam. A short-term fix, hem tape is only meant to last a few washes. Lacking a steamer? The use of heat transfer isn’t necessary for hemming stickers.
The Jeans hemming process in 1-2-3 steps
Using a tape measure, measure and pin the finished leg length.
- Double turn the hem once it has been trimmed to 1 1/8 inch.
- Sew the hem all the way around.
It’s important to know that the hem on this pair of jeans is double-turned, which is what you’ll find on ready-to-wear pairs.
The most important part of a successful and easy hem is the right equipment.
What you will need for hemming Jeans
Sewing machine that works well. Any of my BERNINAs come to mind. BERNINA’s 3 Series is our entry-level machine, and these photos were taken while we were hemming a pair of denim. It didn’t miss a beat as it sailed through the project.
System of One-Hand Operation (FHS). Make the most of it if your machine has it! While placing the bottom of the leg around the BERNINA Freearm you will be free to handle the jeans leg, especially with a double twisted hem.
This is a straight stitch foot designed to make it easier to go through thick clothing.
To avoid needle bending, which can lead to needle breakage, use Foot #8 in conjunction with Foot #8
Jeans needles are essential for mending denim since they are extremely sharp.
Additionally, they have a thicker, more durable shank than conventional needles of the same size.
Topstitch needle size 100 may be required if using the thick yellow or gold “jeans” thread.
Three thin plates pivot on a rivet to form this tool, which can be used to level a presser foot against uneven fabric layers by inserting a thin, medium, or thick layer under the presser foot’s bottom.
When the presser foot reaches or leaves behind a thick cross seam, this tool is ideal for leveling the presser foot.
In this tutorial, 2 plates were plenty for ordinary jeans.
The hem allowance will be marked at the 1 1/8-inch mark on the gauge.
The hem allowance can be marked with a chalk tool.
The best shears or scissors
For simpler pressing, this is recommended. In order to press the hem, you don’t have to enter the iron’s tip into the leg of the jeans.
Using a sleeve board is also useful for tabletop pressing of small objects. If you don’t need it anymore, it folds up for easy storage.
Thread of choice for sewing
Use an embroidery thread like Isacord in both the needle and bobbin, and use a triple stitch to stitch the hem if you need to match a ‘gold’ or yellow strong jeans thread. When compared to hefty jeans thread, embroidery thread is much more manageable.
Isacord is available in over 400 different colors, so you’re sure to find something that matches exactly (even if the original thread on the jeans has faded).
The Mettler Polysheen brand sells the same embroidery thread in smaller spools, so you don’t have to buy 1000 yards of thread only to hem a pair of jeans.
Regular sewing thread, such as Mettler Silk Finish or Metrosene, can also be used to make a triple stitch on the hem of your garments. You can find enough colors of sewing thread to match the original thread color of your jeans.
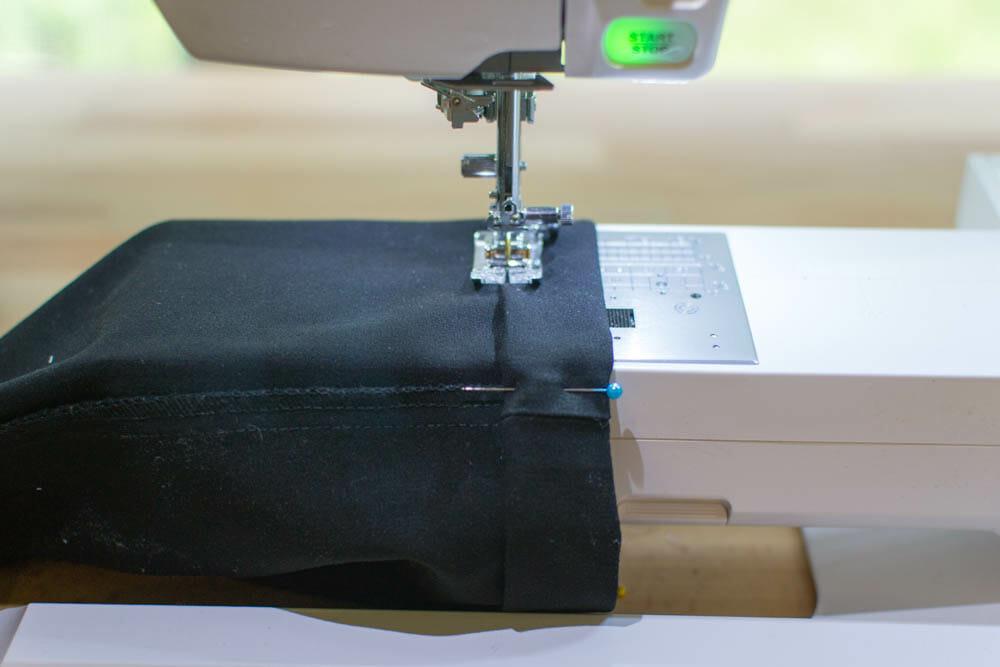
Step 1: Pin or Press the hem in
In order to accurately measure the length of your jeans leg without leaning over and distorting the measurement, ask a close friend to meet you for coffee and ask them to turn in the extra length for you.
Pins can be used to keep the folded hem in place. Once pressed in, the pins can be removed.
Using pins, you can keep the folded hem in place. The pins can be removed once they’ve been inserted.
While ironing the hem fold, use a steam press to loosen the fibers and allow the fold to “collapse” under the weight of the iron.
Allow the crease to set under the dry iron for a few seconds before moving on.
It is possible to twist the hemline and make the hem allowance more difficult or even uneven if you drag your iron across the hem fold.
In order to shorten your jeans without adding too much more length, you’ll need to first release the original hem:
- Remove the original hem by using a seam ripper to cut through the stitching.
- Press the original hem flat after releasing it entirely.
- Keep doing what you’ve done thus far.
Step 2: Mark the hem allowance
- Reverse the jeans’ legs the other way around.
- 1 1/8-inch hem gauge is the standard.
- Make sure the gauge’s red slider is positioned against the fold.
- Use the gauge end as a guide to mark the hem allowance with the chalk.
It’s easier to trim the hem allowance if you mark every inch or two, rather than drawing a continuous line down the entire length.
- After the marking is complete, I normally remove the pins.
Step 3: Trim the excess length
You’ll need a pair of scissors:
- Cut in at a diagonal to reach the chalk markings.
- Make an angle cut to get at the chalk marks.
It’s easier to rotate into the specified line if you cut in diagonally. Perpendicular pivots are not only more complex but might also be less precise.
This is what the hem will look like when it has been trimmed:
Step 4: Double-Turn the hem allowance to form the hem
Before pressing the hem allowance, you can spray it with starch or use sizing. It will aid in the formation of the hem and improve its ability to hold a press mark.
Assuming that the bottom of the leg has previously been folded and trimmed, we can say:
In case you were curious, the hem allowance was cut to a width of 1-1/8 inches rather than 1 inch. You can find out here.
- It is necessary to pull the raw edge and turn the hem allowance once, leaving about a 1/8-inch space (little less than one centimeter).
- Simply hold down the button here to begin (this will make the second turn easier).
NOTE: The seam allowances from the vertical leg seams within the hem allowance can be trimmed if the cross seams are excessively thick. To avoid cutting open the side seams, care must be taken. When using a jeans foot with a Straight Stitch Plate and a size 90 jeans needle, I’ve found that this step is unnecessary.
- On the original hem fold, refold the hem allowance that was folded in half.
Using an extra 1/8-inch hem allowance in the initial folding, we may make the second turn lie more flat. Using a double turn with the raw edge against the main fold causes a hem to flare up after stitching because of the added stress. It’s possible to achieve a completely flat and relaxed-looking hem using this “gap” turning technique.
A neatly pressed hem makes sewing a hem a breeze.
A sleeve board is an excellent tool for this situation. Ironing on a flat ironing board is a lot easier than working the iron into the hem of the jeans.
Because of this, the jeans leg can freely go around the board (easier)
- A method of pressing that allows the hem to lie flat (better).
With your iron on cotton/dry, press the final hem in the same manner as the first pressing:
- Place a Dry Iron on top
- Blowing Steam
- To set, press and hold for a few seconds.
- Continue with your current position.
That is the question now: whether or not to pin.
Since pins damage the hem’s shape, I never use them on my pressed hems. To make matters more difficult, they tend to flex as they pass through three layers of denim, particularly near the cross seams.
Use Clover Wonder Clips to keep your hem in place while you’re about to right-side-out your pants. Better yet, they’re easier to remove when you stitch the hem and don’t cause any disruptions.
It’s time to get to work on the computer… this will be completed in the next stage
- Right-side-up, turn the jeans over.
When you’re ready to sew the hem, it should resemble the image below:
The hemming of the jeans is now complete!
Take advantage of the BERNINA Dual Feed option if you have one on your machine. An improved version of Jeans Foot #8D is available. This foot combines the straight stitch functionality of Jeans Foot #8 with the increased traction on the fabric.
With the steps above completed, stitching the hem will be straightforward.
- After following the instructions above, sewing the hem should be a breeze.
- Stitching the hem will be a breeze after the following procedures are accomplished.
- Take a 3/8-inch seam line and line up your leg’s bottom edge with it.
It’s easier to move the jeans leg over the free arm of a sewing machine if you use the Free Hand System to lift the presser foot (added bonus: it will also lower the feed dog!).
Step 5: Secure the hem seam at the beginning
- Straight Stitch, 0.5 mm in length, is the best choice (for short locking stitches).
- To avoid ‘jogged’ stitches, select the Needle Down feature. This will ensure that your hem is perfectly lined.
You can use the Height Compensation Tool by putting it beneath a toe.
To level the foot, use no more than two plates.
- Sew 5-6 stitches along the cross-seam to begin the hem seam.
- Place the height compensation tool on only one side of your foot so that it doesn’t come into contact with any part of the needle.
- Keeping the Height Compensation Tool under the toe of the foot, needle down, you can convert the stitch to a Triple Straight Stitch without disrupting the hem placement on the machine.
Step 6: Stitch the hem with a Triple Straight Stitch
- Using the 3 mm stitch length, choose the Triple Straight Stitch/Stitch length.
- When the foot is clear of the cross seam, begin sewing the hem.
The (thick) cross seam will no longer be visible on the back of the foot after a few stitches.
- Sew pause (the needle should stop down in the fabric).
- Remove the Height Compensation Tool from the bottom of the shoe. Remove the Height Compensation Tool from the shoe.
To make removal easier, lift the foot with the Free Hand System. When you release the FHS, the foot will automatically return to its original position.
- Make your way back to the beginning of the hem by sewing around it a second time using a 3/8-inch seam allowance (cross seam).
It’s time to go home:
Before the front of the foot lifts to fit the cross seam, when the toes reach the edge of the initial cross seam:
Sew pause (with the needle down in the fabric).
- A triple stitch goes in reverse every third needle penetration, so we don’t want to risk stitching through the tool. Lift the foot up with the FHS and position the Height Compensation Tool beneath the back of the foot, leaving about a 1/4-inch gap behind the needle and the tool.
- Complete the seam with a triple stitch back to the beginning point of the cross-seam.
Step 7: Lock the stitches at the end of the hem
The Height Compensation Tool is no longer necessary because the presser foot is now on top of the thicker cross seam.
Once you’ve reached the beginning of your triple stitch:
Switch back to the Straight Stitch while the needle is in the fabric.
- To hide the fastening stitches, you might sew them in the opposite direction of the hem.
BERNINA sewing machines with computerized controls dating back to 1986 remember the settings for at least the previous two stitches you’ve used (current generation models remember settings to ALL stitches you use while the machine is turned on). Temporary Altered Stitch Memory is the name given to this unique (and incredibly valuable!) form of memory.
Once you’ve finished the second leg, you’re ready to wear your newly hemmed jeans.
Ways To Machine Stitch Hems
We’ve already discussed hand-sewing hems and overlocking hems, so now it’s time to talk about machine-sewing hems. While some may argue that a hand stitched hem is always preferable, there is no denying that machine stitching has its time and place. When it comes to some fabric and hem kinds, it’s easier to get professional results with this method than it is with other methods. As an example, it’s far easier to get an even flat hem on a sewing machine than it is to do it by hand. If you don’t have an overlocker or cover stitch machine, a machine stitched hem with a twin needle is an excellent alternative for a professional finish if you’re working with stretch fabrics by hand. Sewing machine feet (see our entire selection here) now make it easier than ever to sew crisp, accurate hems with a machine.
The Blind Hem
For optimum results, hand stitch any hem deeper than a narrow hem; however, you can use a blind hemming foot on your machine, which makes a less apparent stitching line than a normal foot and stitch. Coarse woven textiles, such as linen, wool, and tweed, perform particularly well with this choice since the scarcely visible stitching is concealed amid the fibers of the cloth. In addition to woven materials, it can also be used on non-patterned woven fabrics, with the added benefit of hardly revealing the threads in the process.
In order to produce a blind hem, finish the raw edge of the fabric and press the appropriate hem allowance up. A portion of the raw edge and some of the hem allowance will be visible when the hem allowance is folded back onto the right side of the garment. The folded edge of the fabric should lie on the inside edge of the right side of the foot when using a machine with a blind hem foot. Make use of your sewing machine’s blind hem stitch and begin sewing with the fold aligned with the inside edge of the foot. Instead of stitching straight across the folded edge of cloth, this method will catch just enough to finish several stitches in the hem allowance before switching to stitch straight across so the stitching line is barely discernible from the right side. The width of the stitches on many machines can be adjusted using an adjustable blind hem foot*, allowing you to catch more or less of the main garment fabric.
Sewing machine feet should be checked against our compatibility charts before being purchased, and if you are still unsure, feel free to contact us.
The Turned Hem
Most hem allowances and fabrics can be used with this method, however it should be avoided if the cloth is heavy or transparent.
It’s easy to construct turned hems with a simple push-up of the fabric’s raw edge by about 1/8′′ (or more, if necessary, according to the fabric). Then, press the raw edge of the fabric up again to the desired length of the finished hem.
You can begin by sewing close to the raw edge of the hem allowance, starting at one of the side seams and back-tacking. An edge foot or seam guide foot like the one seen in the image below can be used to ensure that your stitches are perfectly straight.
A Curved Turned Hem
Stitch a line of basting 1/4″ from the raw edge of the hem to make a tidy hem on a flared hemline. In addition to serving as a guide for pressing the hem up, this serves as an aid in the process.
The raw edge of the fabric should be pressed up along the stitching.
Press the cloth once more to ensure that the raw edge of the fabric meets the pressed fold, and then release the pressure. Before pressing, carefully grasp one of the fabric’s threads to ease the fabric into the press and prevent creases.
Following a thorough pressing, begin stitching along one of the folded edges, beginning at one of the side seams, and then backtacking to secure it. An edge foot or seam guide foot can be helpful in ensuring precise stitching. Give it one last push, and you’re done!
An Overlocked And Turned Hem
Flared hems and heavy materials benefit from this choice because the cloth is only turned up once, resulting in reduced bulk. Sheer textiles should not be overlocked since the right side of the fabric will show the overlocked edge.
Use an overlocker or the overcasting stitch on your sewing machine to overlock the raw edge of the hem.
Stitch the hem allowance in place from the wrong side, near to the edge of the hem allowance and within the overlocking stitches, as seen in the image below. Stitching with a seam guide foot or edge foot might be helpful. To begin, backtack along a side seam.
Afterward, you’ll be left with a clean line of stitching on the right side of the garment.
It’s important to note that the hem allowance should be as narrow as possible when working with a curved hem. Try changing the differential feed on your overlocker if the hem is highly flaring and you are using an overlocker to gather the cloth gently.
A Narrow Hem/Rolled Hem Foot
A hemmer foot or rolled hem foot can also be used to make thin hems, in addition to the methods listed above. If you can get the hang of this method, you’ll be able to swiftly and effortlessly produce tight hems that are very beneficial when working with delicate and sheer materials. You can start stitching more easily when working with slippery fabrics like silk, satin, or chiffon by placing a strip of water-soluble stabiliser between the fabric and needle plate.
Prior to beginning, press an inch of the cloth up against the gap of your hemming foot (2mm to roughly 6mm – I am using a 2MM foot to create an extremely narrow hem). Repeat the procedure with the same force.
Make a few of stitches with your needle by placing the ironed fabric under the narrow hem foot.
While keeping the needle down, raise the fabric up and out from under the scrolling edge of the foot and stop sewing there.
Continue sewing while holding the cloth vertically and ensuring that the fabric feeds consistently through the scroll and the foot.
There is a slimming effect that can be achieved with this method.
For delicate textiles like this chiffon, it is ideal. To get a rolled hem, use this foot on chiffon or silk fabrics and don’t press them afterward. However, we think a hand rolled hem is better.
A Twin Needle
Two needles are used to create two parallel lines of stitching, as seen on many commercially available clothes. If you don’t have access to a coverstitch machine, a twin needle finish is ideal for garments made of stretch fabrics like jersey, knit, and scuba. Using a zig zag stitch on the wrong side means that your garment may stretch and move with you without breaking, making it ideal for stretch materials.
From 1.6 mm to 6 mm, twin needles are available. A 4mm twin needle creates two rows of stitches 4mm apart because the measurement is based on the distance between the needles. To get the greatest results, use the proper needle for your fabric type (such as stretch or denim) when sewing with twin needles.
Insert the twin needle into your machine as usual, then place a spool of thread on the additional thread stand on the top of your machine, as shown in the image (usually used for winding the bobbin). Thread the right hand needle by following the regular route. Use the machine’s main thread stand to thread your left-hand needle as normal.
It’s a good idea to note down the needle plate marks you’ll be using. Make sure the folded edge is on the right side of the fabric when you place it on the needle plate. Take note of which stitching line/needle is aligned with the folded edge on your stitch plate by positioning the raw edge of your fabric where you want the stitching lines/needles to fall. Line the folded edge up with the required marking and stitch when you turn the fabric over to the right side.
Reduce the tension on your sewing machine and experiment until you are satisfied with the results if you suffer ‘tunneling,’ when the fabric between the stitching lines is lifted and protrudes the fabric on either side. Try a stabilizer between the cloth and the needle plate if you have to lessen the tension so much that the stitches loosen.
Twin-needle sewing can be frustrating, so another alternative is to stand the left-needle spool away from the machine while stitching. The first step is to test the findings with a homemade thread stand, such as this Hemline double cone holder.
Conclusion
Is this article helpful to you? A sewing machine is used to sew shorts, as we discussed earlier. It’s a double-fold hem, so it’s really not that difficult.
With slip stitches or blind stitching, clothing can still be sewn. It’s a good idea to buy a serger if you frequently need to hem.
If you have any questions or comments, please feel free to contact us.
Nguồn: https://spasifikmag.com
Danh mục: Sewing Tips


