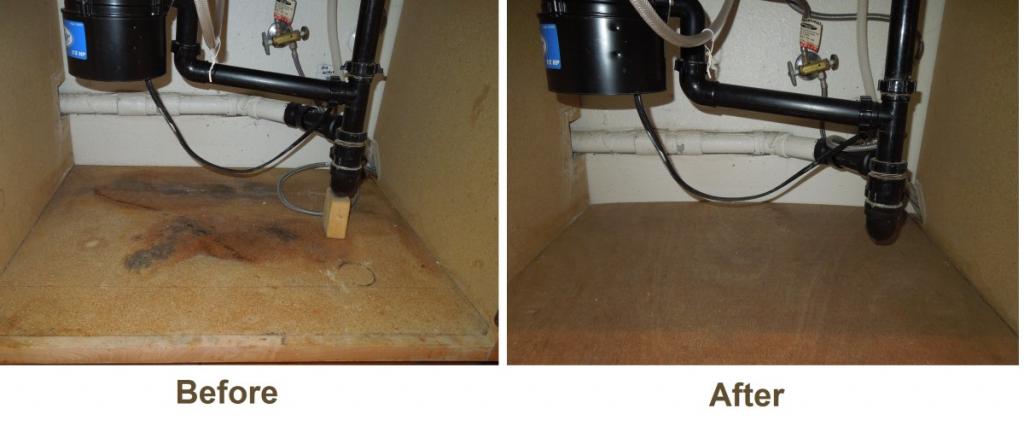
To begin the process of repairing a water-damaged under-sink kitchen cabinet, remove all contents and allow the cabinet to air dry completely. We’ll go over the processes involved in repairing and drying out wet under-sink cabinets.
- How To Clean Water Damaged Concrete Masonry Unit Walls? Step by Step Instructions
- How To Fix Water-Damaged Baseboard? Step-By-Step Guide
- How To Repair Water Damaged Pressed Wood Drawers? Ultimate Guide
- How To Tell If Wood Is Badly Damaged By Water? Step-By-Step Guide
- How To Fix Water Damaged Table? Step-by-Step Tutorial
Additionally, we’ll talk about how to prevent future water damage to your kitchen cabinets, as well as how to dry and repair the area. Finally, we’ll discuss repair costs, so stick around till the finish!
Bạn đang xem: How To Fix Water Damage Undersink? Complete Step-by-Step Guide
Steps In Repairing Water Damaged Undersink Kitchen Cabinets
Step #1. Remove contents
If your sink cabinet has been flooded, you’ll need to empty it first. After that, check for any places that are still damp and allow them to air out. If there is any pooling, it should be removed.
Give yourself more room by removing the doors. To be sure, check to see if the cabinet doors are also harmed.
Step #2. Remove affected area
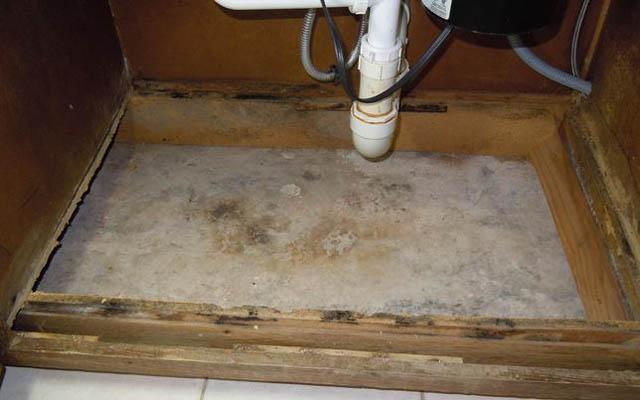
Remove the cabinet’s water-damaged portions using a hammer after checking for wet regions. Check the cabinet’s base for damage and remove it if necessary, as this is the area that is most commonly impacted by water.
Step #3. Repair as necessary
It’s a simple matter of replacing the base if all that’s broken. The first step is to make a frame for it and place it on the cabinet’s floor.
After that, take measurements of the old base and transfer those values to the new one using a measuring tape. After that, attach the new floor to the cabinet’s frame. To make the floor waterproof, it is necessary to sand it down and coat it with sealant.
Sand the cabinet doors if they’re damaged. After that, use a primer based on shellac to prime the cabinet doors. Paint it when it has been sanded down again.
Why are your under sink kitchen cabinets vulnerable to moisture?
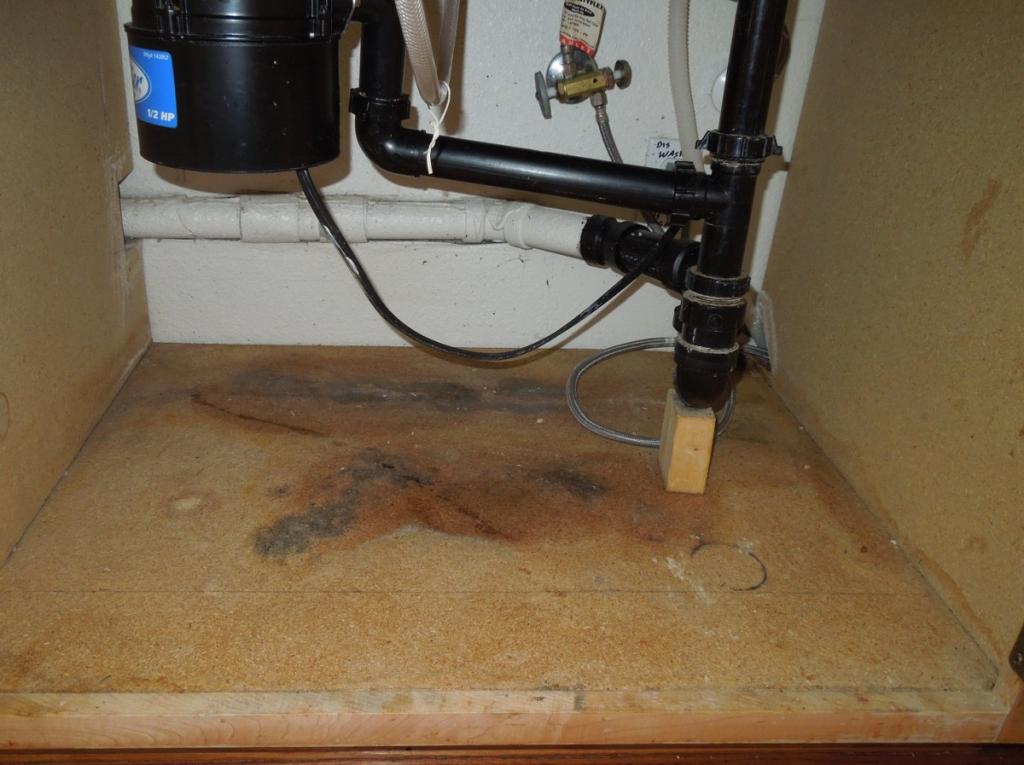
Under-sink cabinets are vulnerable to water damage due to their position. Overflowing sinks can damage your kitchen cabinetry as well as leak from your sink pipes.
Under-sink cabinetry in your kitchen might be ruined if your dishwasher floods. Damage to your sink and surrounding area may occur if your faucet is leaking or malfunctioning. In the end, the water may even get into the cabinets under the sink.
Ways to protect your under-sink cabinets from water damage
We compiled a list of preventative measures for kitchen under-sink cabinets because of their susceptibility to water damage.
Waterproof shelf liner
Cabinet bases can be protected from water and dust using waterproof shelf liners, which are thin, flexible liners. Adhesive and non-adhesive versions are available. Because waterproof shelf liners are sold in rolls, it’s important to note the dimensions of your cabinet before applying the liner.
Peel-and-stick vinyl tiles
It’s a well-known solution that many homeowners have tried out. This waterproof layer is provided by the peel-and-stick vinyl tiles.
You’ll need to cut them to fit, much like with the adhesive waterproof shelf liners. The placement of these vinyl tiles would be ineffective if they were exposed in any way.
Waterproof stain sealant
Water can cause wood to rot. However, the attractive appearance does not deter homeowners from including them in their kitchens. You can safeguard your hardwood cabinets by lacquering or varnishing them to keep them watertight.
Sand and prime your cabinets’ surfaces first, then seal them. To aid in the adhesion of the varnish to the surface, this should be done.
If you plan to use varnish in a kitchen, make sure that it is food-safe. Finally, let the polyurethane to cure for a few days before using the cabinet.
Regularly check for leaks
Maintaining your kitchen cabinets is the most important factor in preventing water damage. This is why it is important to inspect your pipes on a regular basis.
If your under-sink cabinets come into contact with your under-sink pipes, you should inspect their condition. Investing in PEX or copper pipes might also help your pipes last longer.
Seal everything
As long as there is a crack or crevice for water to enter, it will find a way in. In order to prevent water from damaging regions, it is important to seal everything properly.
You can prevent water from getting into your cabinets by caulking the little gaps. Caulks and sealants are two options.
Sealants are more pliable than caulks, but they are also more dense. Depending on the type of surface you’re trying to seal, you can choose between the two.
Common problems with sinks and faucets
Xem thêm : How To Repair Water Damaged Textured Ceiling? Step-by-Step Tutorial
In addition to being a nuisance, faulty plumbing and fixtures can lead to higher water bills and structural damage to your property. 10 percent of all houses in the United States have plumbing leaks that waste more than 90 gallons of water each day, according to the EPA. Each year, repairing those leaks can save you 10% on your water expenses.
A clogged or damaged pipe can cause a leak in your home’s interior or exterior plumbing, resulting in a dripping faucet spout. If you wait too long to fix a plumbing leak, you risk damaging the drywall and floors beneath and behind the vanity, cabinet, or pedestal. If you see an increase in your water bill, you may have a problem with your water supply. You can also check your water meter to determine if there is a leak in your home by not using any household water for two hours and then checking again. If the meter fluctuates in any way, there is most likely a leak someplace.
Your water leak can be solved by a professional plumber. Between $110 to $170 is the national average cost to hire a plumber.
What affects the cost of sink and faucet repairs?
How much it will cost to fix your bathroom or kitchen sink will be largely determined by the nature of the issue, the parts required to correct it, and how much damage your fixture and plumbing have already sustained.
Clearing a clogged drain: $150 – $200
A clogged drain might cost anywhere from $150 to $200 to be assessed and cleared by a plumber in the United States.
Both kitchen and bathroom sinks are plagued with clogged drains. With a plunger or some boiling water, you may be able to fix it yourself. Since Draino and other strong chemical drain cleaners like it can erode pipes and discharge harmful chemicals into the sewage system, most plumbing professionals advise against their use.
Sometimes the clog in the drain is so stubborn that it’s impossible to remove it. In the event that you’ve attempted to clear a blocked sink on your own and failed, you may need to hire a professional plumber. A professional plumber can pinpoint the exact position of the blockage and devise a plan to clear it without causing any damage to your pipes.
Drain traps, also known as P-traps, are standard on all sinks and toilets. They prevent sewer gas from entering your property. P-traps that are clogged or leaking can be repaired or replaced by a plumber.
Clearing and repairing pipes: $120 – $170
There is an average cost of $120 to $170 for a pipe repair project in the United States. If you need a simple pipe repair, you may expect to pay between $60 and $65. The hourly rate for sewer line replacements is approximately $95 per hour.
The source of clogged drains may not always be within your own home. There may be an issue with the pipes between the fixture and the main sewer line or branch line if there is a problem with more than one fixture (sink, tub, or shower). Yard debris or overgrown tree roots can clog an exterior drain. It’s also possible that the outer pipe has been corroded or damaged owing to age. Because you may have to replace the pipes, this means an increase in your repair costs.
Repairing pipes between the sink and the wall is less expensive than having a plumber break into a wall to replace damaged pipes, which can cost up to $400, depending on the scope of the job.
Professional tools for clogged drains and pipes
Costs for repairs might be affected by the equipment your contractor employs to complete them.
Video camera inspection
A video camera check may be recommended by a plumber to identify the source of a leak or a clogged drain. Using a video camera, a plumber may inspect your home’s plumbing from the inside. This may be included in the price of the repair or cleaning of the drain by some plumbers.
Cabling
The cost for a plumber to cable a drain through the P-trap is between $230 and $250. For the same job, national plumbing chains may charge between $300 and $400.
Clogged drains are commonly caused by organic debris, such as oil, food, or hair, that becomes stuck in the P-trap of a sink’s drainpipe. A plumber’s snake, cable, or drain auger is the most frequent instrument used to unclog P-traps. Your drain will be cleared of clogs with the help of this instrument. A novice DIYer might be better off hiring someone to help them with this. If you don’t know how to use the tool appropriately, you run the risk of damaging your pipes and causing other leaks.
Hydrojetting
Plumbers may need to use a hydrojetter depending on the type of the clog and the substance of the pipes. Hydrojetting is a method of removing obstructions by using high-pressure water. You may expect to pay between 30 and 50 percent more for hydrojetting than for cabling.
Stopping a dripping faucet: $65 – $150
Repairing a dripping faucet can cost anywhere from $65 to $150, depending on the type and severity of the leak.
As it turns out, this is a simple problem to solve. The corroded valve seat or worn out washer may need to be replaced or a stem screw tightened to fix faucets that leak from the spout.
Water temperature and pressure
There may be more than just annoying drips and dripping faucets to deal with. When you turn on the faucet for the first time, it may sputter because of an imbalance in the pressure in your plumbing. Your morning shower may not be as stimulating if you have low water pressure.
When your faucet doesn’t work, it’s usually a sign of a bigger problem, such as a leak in your plumbing or a problem with your water heater.
The temperature of the water heater can be adjusted to resolve problems with the temperature of the water. Sink faucets with low water pressure often have an aerator screen blockage. Minerals and other deposits can easily be removed from the faucet by unscrewing the aerator screen. Having a low water pressure can be caused by a lack of shutoff valves under the sink.
A plumber can tell you if your faucet’s problem is a simple fix or a sign of a more serious problem in your home’s plumbing system. The cost of replacing a water heater can range from $350 to $3,500, depending on the capacity and kind of the heater.
Fixing surface problems: $100 – $200
Xem thêm : How Much To Fix Water Damaged Wood On Sidelight? Learn From The Best Guide!
Sinks can develop dings, cracks, and scratches over time, detracting from their aesthetic appeal. Porcelain sink gauges can rust over time. Resurfacing these discolorations will set you back anything from $100 to $200.
Replacing your sink or faucet: $150 – $400
A malfunctioning sink or faucet can be expensive to repair, so it’s better to buy a new one instead. A new sink or faucet may cost less than repairing the old one; inquire about additional expenses before signing off on a repair order.
Replace your old faucet with a new one that costs about $150 (or more, depending on the style of faucet). Keep in mind that the pricing does not include the cost of the new fixture. Flat or hourly fees are common for plumbing installation.
The cost of a new sink and sink installation might go from $150 to $400. The starting price for a simple model is $300.
Sinks come in a variety of pricing points, so you may find one that fits your style and price range. The price you spend depends on a variety of factors, including the brand, material, size, and style. Drop-in, undermount, farmhouse style, standing bowls, and pedestal sinks are all types of sinks. Typical materials include stainless steel, porcelain, and cast iron. Soapstone and hammered copper, two more expensive materials, are also available for sinks.
If you don’t want a complete kitchen or bathroom redesign, the type of new sink you can choose may be constrained by the existing kitchen or bathroom base cabinet, the existing type of sink, and the existing countertop. It is possible to replace a single vanity cabinet’s sink and countertop with an all-in-one sink and countertop combination. The plumber can advise you on the best sort of sink for your needs.
Some faucets need to be replaced because the internal mechanisms have worn out or corroded to the point where a replacement is necessary. Every taste and budget can be accommodated with the many different options for new faucets. The amount of pre-drilled holes in your bathroom or kitchen countertop may limit the sort of new faucet you can purchase.
How to save money on sink repair
Check the warranty on your current sink or faucet to be sure it’s still valid. High-end brands often provide warranty coverage for the fixture’s mechanical components and finish. If your sink or faucet needs to be replaced, check with the manufacturer to determine if a free replacement is covered by your warranty.
Many merchants and kitchen and bath showrooms provide professional discounts to plumbers. If you’re in the market for a new sink or faucet, shop around online or at local home improvement stores to compare prices. They may be able to negotiate a better price for you.
If you’re having problems with your plumbing, you should get free quotes before hiring a professional. If your kitchen faucet isn’t working, you’ll be glad to know that there is a way to get it back up and running. With a family to feed!), you don’t want to overspend or incur an unforeseen expense.
FAQs
How do you waterproof under a kitchen sink?
Under-Sink Cabinet Waterproofing: 5 Tips & Tricks Secure the area around the sink with tape. Caulk the gaps between the cabinets. Utilize polyurethane. The water pipes should be completely encased in plastic. Install mats beneath the sink.
How do I absorb moisture under my sink?
Your home’s humidity should be kept between 30 and 50 percent by using a dehumidifier. After repairing the leak, disinfect the area using a solution of 1/2 cup bleach to 1 gallon water to clean nonporous surfaces. After removing any traces of mold or mildew, allow the area to completely dry before moving on.
Does homeowners policy cover water damage?
Any unexpected or accidental water leakage in your home should be covered by your home insurance policy. Coverage extends to incidents such as water line breakage and appliance malfunctions. Damage caused by water entering through a hole caused by hail or wind is also covered.
How much does it cost to replace board under sink?
But you may have to replace the wood floor under your sink if mold has already spread over half of it. You may either hire a handyman, which will cost you around $150, or fix it yourself for less than $50.
How do you get rid of mold under the sink?
Make your own mold cleaning solution by combining one part bleach to four parts water. If you’re concerned about bleach discoloring the area beneath your sink, you may want to use a different cleaning solution.
What happens if particle board gets wet?
Wet particleboard might swell or possibly break down. Particleboard is a cheaper alternative to plywood for manufacturers. Paint or waterproofing material should be applied to particleboard that will be exposed to water to avoid additional damage.
How do you fix water damaged particle board cabinets?
Step-by-step instructions for repairing water damage to particle board The damp region must be dried. Sandpaper can be used to remove the elevated region. A knife can be used to remove the broken sections of the board. The holes should be filled with wood filler. Make sure that the repair is complete by sanding the area. Conclusion.
Can you fix swollen particle board?
The first step in repairing water-damaged particleboard furniture is to dry the affected area completely. After that, rub the swollen regions with sandpaper. A sharp knife can be used to remove swelling portions that have been extensively affected by water. The particleboard will need to be replaced if it is severely damaged.
How do you fix peeling melamine cabinets?
Use an instant glue like Super Glue or Krazy Glue to repair any portions of melamine that have come free. Instant glue can be used to repair a cabinet’s peeling melamine covering. The melamine cabinets will need to be painted if substantial parts are loose.
How do you paint under cabinet sinks?
Here’s how to go about it. Preparing the Under-Sink Storage. Remove all of the cabinet’s hardware before beginning the project. Preparing the Cabinet for Action. Before priming, allow the cabinet to dry and remove the paint stripper. The First Coat is being Applied. Make a wise choice when it comes to the paint you’ll be using. When the last coat of paint is put on.
Why is there water under my kitchen sink?
Probably the most prevalent cause of water under your sink is a dripping drain. Fractures in the plumbing lines under your sink can be caused by shifting plumbing lines, worn-out connectors, or even pipe corrosion. This causes water flowing down your drain to slowly spill out.
Why is it humid under my sink?
A leak in the drain or supply piping (or the outer wall allowing rainwater to enter through cement and plaster) may be causing the problem, which can be alleviated with greater ventilation, but it’s preferable to locate and fix the cause rather than wait for it to get worse.
Conclusion
We’ve outlined the procedure for repairing a water-damaged kitchen under-sink cabinet. We sincerely hope that you found the information we’ve provided on under-sink cabinets to be useful.
Nguồn: https://spasifikmag.com
Danh mục: Damaged


