Preparation of materials is the first stage in repairing a water damaged textured ceiling. There is no need to hurry about your house looking for the supplies you need.
- How To Stabilize Water Damaged Plaster Walls? A Few Tips to Remember
- How To Fix Water Damaged Granite? A Few Tips to Remember
- How To Fix Water Damaged Textured Ceiling? Complete Step-by-Step Guide
- How To Repair Water Damaged Popcorn Ceiling? Step-by-Step Tutorial
- How To Tell If Wood Is Badly Damaged By Water? Step-By-Step Guide
There are a variety of ways to get the texture you want on textured ceilings that have been damaged by water. Hopefully this article on water damage will help you figure out how to cure it. As a final tip, we’ll show you how to properly clean a textured ceiling.
Bạn đang xem: How To Repair Water Damaged Textured Ceiling? Step-by-Step Tutorial
Steps In Repairing Water Damaged Textured Ceiling
White textured ceilings do a great job at concealing faults. It’s difficult to paint and restore them after they’ve been damaged. To make up for it, we’ve outlined the processes involved in drying off a textured ceiling that’s been wet.
For your insurance claim, we recommend documenting the water damage on your water-damaged textured ceiling. We also recommend consulting with a lawyer before filing an insurance claim to ensure that you understand your coverage and policies.
Step #1. Prepare the materials
The tools you’ll need are texture brush, putty knife, stain blocker spray, joint compound, and paint; gather them all up now. You’ll need a piece of cardboard and a dust mask for this project.
When preparing your materials, soak the texture brushes in warm water overnight. So that the bristles are supple and the proper texture for your ceiling, this is how they’re made.
Step #2. Remove the damaged surface
Allow your textured ceiling to dry after prepping the materials. After that, determine which areas of the textured ceiling are damaged and proceed to remove them.
Dust masks and safety goggles are two examples of acceptable personal protective equipment to wear. The purpose of this is to keep particles out of your eyes and lips.
Your textured ceiling is likely to have damaged areas that are easily removed with a putty knife because they are loose and flaky. Prepare a cardboard scrap to collect the flakes that fall from the ceiling as you scrape them off.
Step #3. Spray stain blocker
So that you don’t have to worry with water damage again, you should prime your textured ceiling with a stain-blocking primer. Stain-blocking primers like Kilz Upshot, which spray up, are ideal.
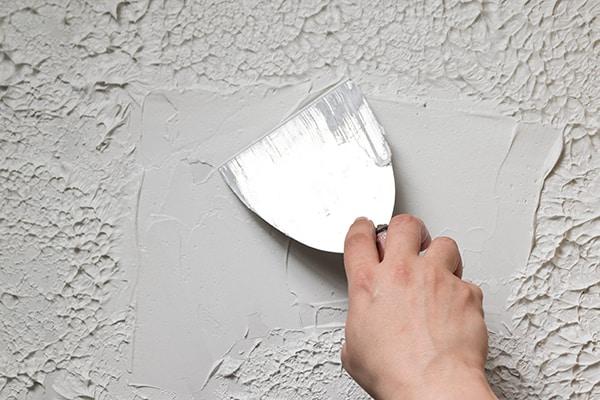
Step #4. Apply the joint compound on the ceiling
To begin, use a large spoon or paint stick to loosen and mix your joint compound. Next, try the pattern on a scrap of drywall to see if the results match what you’ve already created.
Putty a knife into the afflicted region after the joint compound has been applied to the right texture. The newly applied compound mixture should be blended in with the existing texture at the edges, so take care.
Work on smoothing and leveling the surface before trying to match the existing texture. Make sure to use your texture tool to replicate the pattern from your practice exam after adding joint compound.
Step #5. Paint
Before painting, let the joint compound dry for at least 24 hours. Spray paint is a better option than using a roller because it’s more convenient for you.
Different types of textured ceilings
There are a variety of sorts of water-damaged textured ceilings, and this section explains how to build them.
Crow’s foot
A foam rubber roller with a pre-printed texture pattern is used to create this type of textured ceiling. Because of its sunburst effect, this sort of textured ceiling is a popular choice. Slap brush texture is another name for it.
Knockdown texture
This is a typical textured drywall ceiling. It’s less dramatic than popcorn or orange peel ceilings, but it still packs a powerful visual punch. A knockdown texture patch sponge can be used to achieve this effect.
Popcorn ceiling
Some may find the textured ceiling to be an eyesore, but others may find it to be a sound-deadening asset. Spray painting popcorn can be used to achieve this look on your ceiling.
Cleaning your textured ceiling
It’s safe to say that the most striking type of textured ceiling is one with popcorn texture. It’s also the most difficult to keep clean because of the way the design collects dirt.
You must therefore do this at least once a year while cleaning your popcorn walls and ceilings. Setting a plastic sheet on the floor and gathering your supplies is the first step.
Put on safety gear and use a broom or a vacuum to eliminate any visible dust and cobwebs. Using a lint roller can help remove the dust from your popcorn ceiling’s nooks and crannies.
Deep-clean any places that have water or mildew stains after that. Do not soak the ceiling in bleach-water solution; instead, dab it on the surface. Allow it to cure completely the night before painting over it.
How Much Does Ceiling Repair Cost by Square Foot?
Xem thêm : How To Repair Water Damaged Cabinet Doors? Complete Step-by-Step Guide
In our homes, ceilings are subjected to a lot of stress. They protect the above-floor structure from shifting temperatures and humidity, while also housing possibly leaky pipes.
Damage to the ceiling can range from a little hairline fracture to drooping drywall as a result of major water damage, from a poorly performed ceiling fan repair to this.
It is common for ceiling repair experts to charge either per square foot of the repair or per hour, based on how large the project is. Expect to spend anywhere from $45 to $90 per square foot in damages.
The hourly charge of $60 to $90 an hour may make more sense for lesser issues, such as nail holes or damaged joints.
Square Foot Rate by Ceiling Material
When it comes to ceiling repair, some materials are more difficult to work with than others. Older houses, such as those with 1960s-era popcorn ceilings or structures constructed of plaster and lath more than a century ago, necessitate additional effort and resources.
As an illustration, the price per square foot varies depending on the type of ceiling tile you choose:
- Cost: $45 to $55 per square foot for traditional drywall
- Per square foot: $50 to $60 for light-weight sheetrock
- 65-80 cents per square foot for plaster and lath.
- Cost per square foot: $75 to $90 for popcorn ceilings
Compared to other types of ceilings, drop tile ceilings are more user-friendly and can often be repaired by the homeowner. A square foot of fresh drop tiles might cost anything from $2 to $17. If you need repairs done that you cannot handle on your own, you should expect to pay between $60 and $90 an hour for a professional.
How Much Does It Cost to Repair a Ceiling Near You?
The cost of home repairs varies for a variety of factors, but location is a major factor. As the cost of living rises in a particular area, so do costs for local labor, licenses and fees, and materials.
It’s also possible that the initial cost of a ceiling repair will be affected by where you reside because it typically calls for a variety of materials and tools including plaster, spackle, and construction materials.
When it comes to the expense of ceiling repair, here are a few examples:
- From $570 to $1,380
- Massachusetts: $580 to $1,000
- Between $470 to $1,230 in Texas
- $400–$1,380 in Florida
- $550 to $1,660 in California
Which Ceiling Repair Services Can I Get on My Budget?
When you see a fracture or a water stain in your ceiling, you may be alarmed. It’s possible to fix a variety of ceiling problems for less than a few hundred dollars.
Under $100
In this category are most of your DIY projects, such as replacing drop tiles and repairing small fractures. You might expect to pay less than $100 if a contractor has to mend a tiny area in less than an hour.
$100 to $500
You should expect to pay between $100 and $500 to have a small to mid-sized piece of your ceiling repaired and replaced by an expert. Large painting tasks and basic structural repairs for drooping ceilings also cost around this amount.
$500 to $1,000
You should expect to pay these fees for more extensive repairs such extensive water damage, big cracks, and drooping ceilings An additional set of eyes is needed, so bring in a plumbing or structural engineer as well.
$1,000 and Up
Replace the ceiling of a mid- to large-sized room, as well as any leaks, HVAC difficulties, or foundation repairs that may be related to the ceiling replacement. If you live in an older home with lath and plaster ceilings or other distinctive materials and decor, the cost of ceiling work might run into the thousands.
How Much Does It Cost to Repair a Ceiling Yourself?
If your ceiling is in need of repair, it could imply a variety of reasons. Natural wear and tear, such as flaking paint, is a far cry from a sudden outbreak of mold and water damage.
Only small repairs that don’t: are worth tackling on your own.
- Replacement of structure and ceiling materials is required (anything other than drop tiles)
- Get into contact with the pipes or the power lines
- The root causes of the problem
Is there something else going on here? Don’t wait for things to get worse before acting. Even if you only notice a musty smell in the room, call a plumber as soon as you notice any evidence of a leak.
Despite this, painting your ceiling or replacing drop tiles on your own is safe and cost-effective. Depending on what you need, it can cost anywhere from $200 to $600 to paint a single ceiling.
Drop tiles cost between $2 and $17 per square foot of tile and may be replaced by simply removing the old tile and replacing it with a new one.
Ceiling Repair Cost Breakdown
Based on a few parameters, a professional ceiling repair specialist will provide you with an estimate of the expenses. Among the things you’ll say is probably something like this:
- Rate per hour for labor (with an estimated number of hours)
- The price of ceiling tiles
- The repair will require specialized materials.
- Plumbing, structural, or aesthetic issues may require additional work.
How Much Does It Cost to Fix a Ceiling by the Type of Repair?
How much will it cost to fix a little leak or a rapidly breaking ceiling, depending on its severity? We’ve broken down some estimates based on the most frequent types of ceiling damage to help you figure out how long it will take your professional to address the problem.
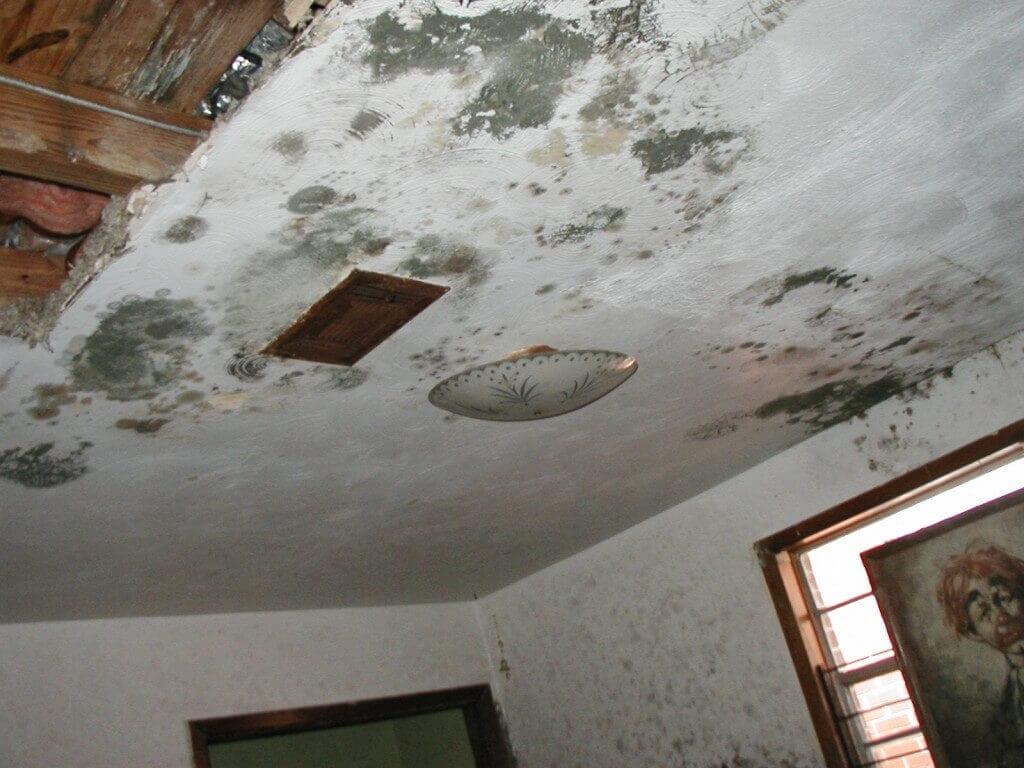
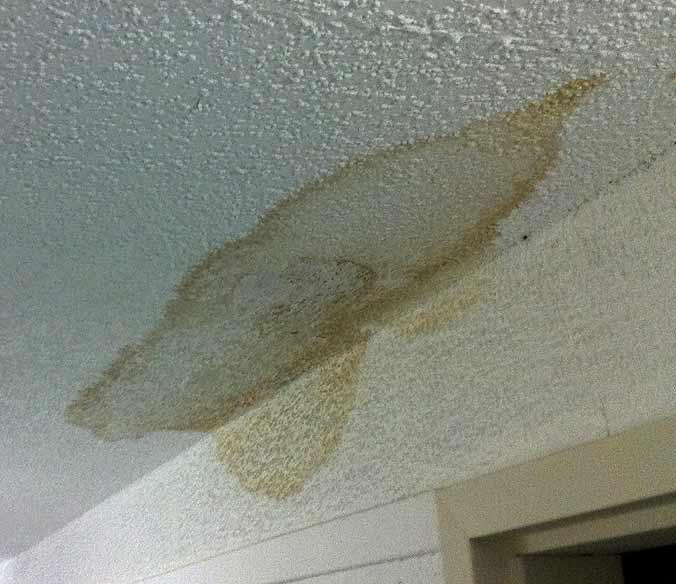
Water Damage
Some sources of water intrusion are storm-related leaks, roof problems, busted pipes, and malfunctioning HVAC vents. Expect to pay between $45 and $55 per square foot for water damage ceiling repairs, which includes all the materials needed for the job.
Xem thêm : How Much To Fix Water Damaged Wood On Sidelight? Learn From The Best Guide!
Remember to add in the cause of the water damage, such as:
- Between $175 and $3,000 is the range for plumbing repairs.
- A new roof can cost anything between $3.50 and $5 per square foot.
- Repairs to your HVAC system can cost anywhere between $200 and $1,500.
- Repairing a roof might cost between $360 and $1,550.
Sagging Ceiling
It costs $75 an hour or more to work on sagging or pillowing ceilings, not counting materials. Drywall replacement is likely, but outdated insulation or spacers between the ceiling and trusses may be addressed as well.
Ceiling Holes
There are a plethora of reasons why ceilings develop holes. Alternatively, perhaps you’ve grown tired of the chandelier and wish to fill in the void it left. Alternatively, you may have slipped your toes between the rafters of an old house’s attic.
It costs between $180 and $370 to patch a hole in your ceiling, depending on the material and size of the patch.
Ceiling Cracks
Most homes have cracks, and they’re a mystery to everyone. Small ones, especially those seen around the room’s perimeter, are not uncommon. Hairline fractures are frequent in homes that settle over time.
But cracks greater than a few inches wide, that expand over time or that crowd around beams should be checked out immediately. These may indicate a structural or foundational problem. According to the magnitude of the problem, foundation repair costs on average $4,500.
What Factors Influence the Cost to Repair Ceilings?
There is no one-size-fits-all repair bill for a home, and the pricing will reflect this. The cost of repairing a ceiling will be affected by the following factors:
- Your house’s age
- What’s causing the issue? (plumbing, structural, or natural aging)
- The area in question’s size
- When it comes to the material of your ceiling, you have two
- You’re residing in?
- Whether or not more experts are needed to complete the repair
Everything You Need to Know About Ceiling Maintenance
Ceiling maintenance doesn’t have to be time-consuming, but it’s something you should keep an eye out for. Mould removal, repairs, and painting are just a few of the things that may need to be done. In homes that have been around for a long time, the ceilings tend to deteriorate more quickly. Although it’s possible that older homes with ceiling concerns may still be covered under warranty, it’s worth checking.
You need to know this information in order to maintain your ceiling properly:.
Cleaning Your Ceiling
Because white is the most common color for ceilings, any blemishes will stand out. It makes sense to clean your ceiling on a regular basis to remove bugs, dust, and debris that might detract from its attractiveness. Do a spot test on an inconspicuous area of skin before applying any products. It’s important to remember that the sort of ceiling you have can influence the materials you can safely employ.
Small spots can be cleaned with a moist, clean cloth. To avoid water stains, use only a small amount of water, and be sure to dry the area thoroughly afterward. You can use a duster or the brush attachment on your vacuum cleaner to get rid of dust and cobwebs. Your ceiling and any fan blades should be lightly dusted as you clean the rest of your home.
Painting with Care
Even a professional painter’s work, no matter how great the quality, will eventually need to be maintained. Any interior paintwork should last up to ten years. Painting over little blemishes or damage with a brushstroke may seem like an easy solution, but finding an exact match can be tricky. Before painting, a light sanding step may be required.
Unique Features
It is well worth keeping any cornices and rose work that has graced your property over the years. They can, unfortunately, weaken and chip with time. A restoration specialist is recommended to keep these characteristics looking and feeling their best. Your ceilings and walls can be restored to their original splendor by WA Ceiling Fixers before they’re gone for good.
Fighting Mould
Many homeowners have to deal with mould. It spreads swiftly and has the potential to create serious health problems. It’s possible that a small amount of mould on the ceiling could indicate an underlying issue. Detecting mold can be a symptom of a water leak. A sagging ceiling can be caused by water damage and should be addressed by a professional as soon as possible. Mold can be removed from ceilings with bleach and water if there are no structural issues, or specialized treatments are available. Prevent ugly discoloration by performing a spot check on a regular basis.
Warning Signs
There are a few telltale indications that require more attention than the bare minimum in terms of ceiling upkeep. As a result, ceiling collapse may be imminent. Cracks, cracking sounds, bubbling, and drooping are all things to look out for.
When it comes to your ceilings, we’re here to help. Our staff serves the Perth area and can fix or replace your ceiling. Please get in touch with us right away so we can go over your requirements.
FAQs
Your home’s ceilings should always be at the top of your to-do list. Having a professional inspect your home can save you money in the long run, as well as provide you peace of mind.
How do I know when it’s time to repair my ceiling?
Even while apparent problems like holes, leaks, and massive cracks indicate the need for a ceiling repair professional, other indicators of neglect may appear sooner. In the meantime, keep an eye out for:
- Long cracks running the length of the ceilings
- A musty or moldy odor permeates the space.
- Small water stains or abrupt mold growth on the walls of your home
- areas that feel wet when you touch them
- When visitors enter the room above, there are loud cracking noises.
- Chandeliers that are lopsided, drooping, or bending
- Even after a fresh coat of paint, paint that continues to scrape off surfaces
What should I consider when hiring a general contractor for ceiling repairs?
General contractors frequently employ ceiling repair specialists. Your repair team may include structural engineers and plumbers, depending on the scope of the work. If you hire a specialist, make certain that they:
- can repair the problem because they are properly licensed and insured.
- worked in similar positions and received excellent feedback
- Before beginning any work, submit a precise estimate and contract.
- provide a precise timetable for the project
What other projects should I do at the same time?
Repairing your ceiling is a great time to check up on the health of your HVAC system, plumbing, and even the design of it.
The area can also be brightened up with a new light fixture, paint, or even crown molding, all of which can be done for aesthetic purposes.
Conclusion
For this reason, it is necessary to take extra precautions when working with textured ceilings, especially popcorn ceilings. Textured ceilings, as previously stated, aren’t for everyone, but they do have certain advantages.
When they’re at their best, they can hide ceiling flaws while also being regarded as works of art. It also helps to reduce the noise in busy areas. To repair a water-damaged textured ceiling instead of replacing it, it is important that you understand how to cure water damage.
Nguồn: https://spasifikmag.com
Danh mục: Damaged


