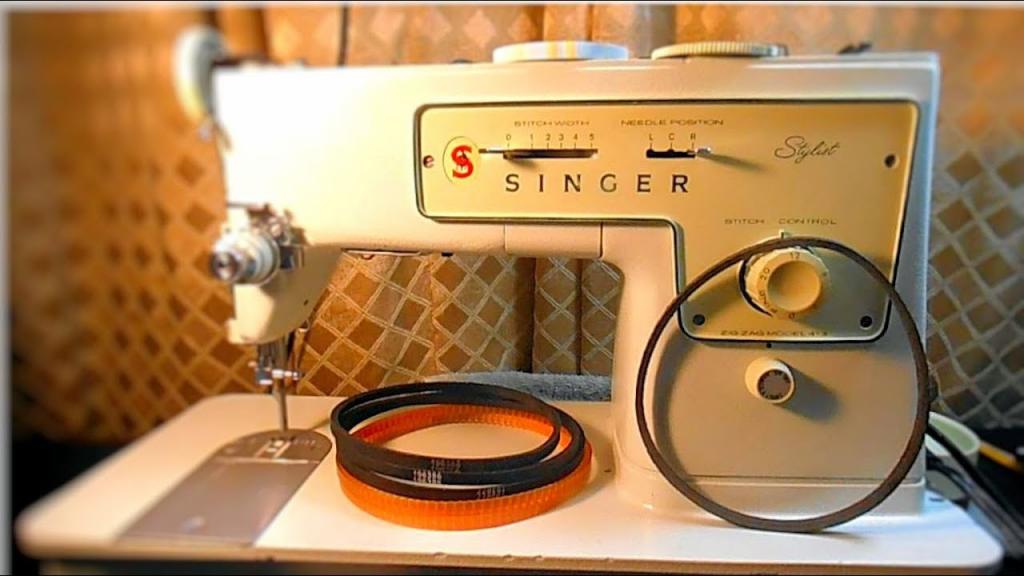
In order to learn how to replace the Singer sewing machine’s motor belt, there are two measures to take into consideration. We’ll cover treadle sewing machine belt replacement in addition to motorized sewing machine belt replacement in this guide. Everything you ever wanted to know about sewing machine conveyor belts is right here.
- 5 Step by Step to Put the Bobbin Driver Back Together
- What Size Needle For Sewing Fleece? A Perfect Guide For You!
- How Many Joules Do I Need In A Surge Protector To Protect My Sewing Machine
- How To Make A Sofa Slipcover Without Sewing? Things You’ll Need
- How To Make Curtains Longer Without Sewing? Step-by-Step Tutorial
Step 1
Remove the sewing machine’s power cord from its socket.
Step 2
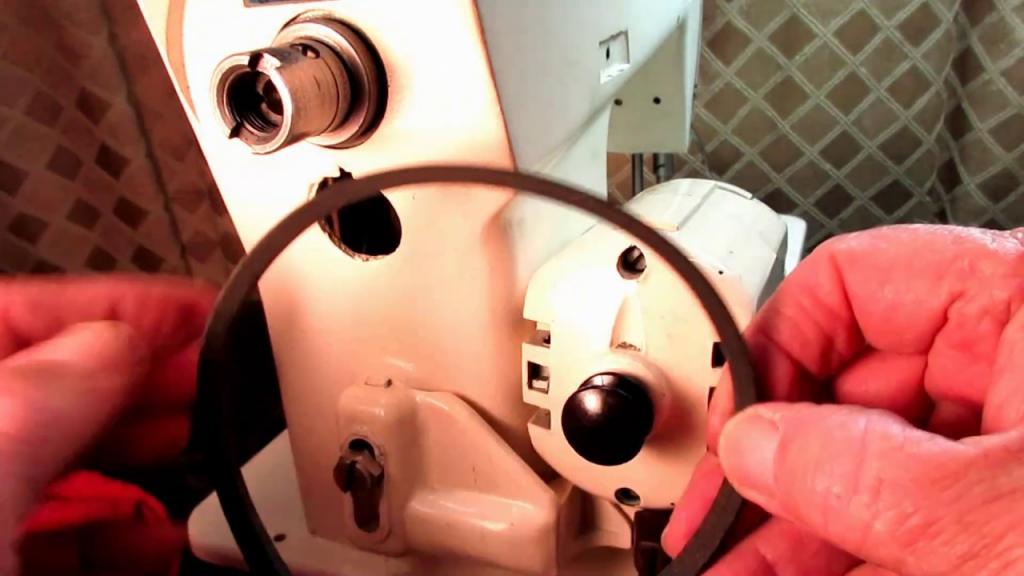
Using a screwdriver, remove the covers from your sewing machine. On both sides of your handwheel, you’ll normally find coverings. So that they don’t go lost while you’re working, put all the screws in a little bowl.
Bạn đang xem: How To Change Singer Sewing Machine Motor Belt? The Easy Way
Step 3
The belt should be gently removed from the wheel before it is replaced. Even if the belt is damaged, this should be a straightforward task. To begin, remove the belt from the handwheel and then from the wheels at the bottom of the machine, starting with the handwheel.
Step 4
Find out what type of belt you are using by going through your sewing machine’s instruction booklet. Note down the complete alphabet and the corresponding digits when purchasing a new belt.
Step 5
Shift the motor so that the gears on the belt are exposed by removing the screws from it.
Step 6
One end of the belt should be attached to the handwheel. The belt must be pulled all the way to the gears before it can be used. Slide it over the wheel with care.
Step 7
The screws on the motor should be tightened, and then the belt’s tension should be checked. No more than a half-inch of belt flex is acceptable. Because of this, the screws will be under more stress as they’re being turned.
Step 8
In order to properly install the machine’s screws, you must first replace its outer covers with new ones.
Tip
It is possible to find the model numbers on the sewing machine belts if you are unable to locate your machine’s handbook or the instructions in the belt.
Warning
Xem thêm : How To Open A Pfaff Sewing Machine? A Few Tips to Remember
It’s possible to find a universal belt in the market. Even though cheap belts usually function, the best alternative is to get a belt made expressly for your sewing machine.
If you can’t see the belt when you pull the front of your machine, you probably have an internal belt. Get a new sewing machine if this happens to you.
Stretching new sewing machine belts over the hand wheel and gears is a challenging task. To avoid damaging your fingers, you may want to use the screwdriver’s point to help you move it.
How To Change Sewing Machine Belt – The Easy Way
Understanding Sewing Machine Belts
It may appear to be a simple component, but sewing machine belts come in all shapes and sizes, and each one has its own set of advantages. There are both gear belts and non-geared belts to accommodate your equipment. ‘ For motor pulleys that have toothed wheels, you’ll want to use the geared version instead.
Types Of Non-Geared Belts
There are V-belts and circular belts for non-geared belts. The V-belts work well because they can slide into the pulley’s groove. Unlike geared belts, which cannot be used on wheels with teeth, lug belts have a toothed inner surface.
Precautions For Changing A Geared Belt
The geared belt, as you are aware, is built to fit your machine. There’s no room for tinkering here. To avoid having your needle go out of phase, make sure it’s fitted correctly before using it.
Finding The Right Non-Geared Belt For Your Machine
You can find the right non-geared belt for any model from the many sewing-related websites out there. As an alternative, if your machine does not have an appropriate belt, there is an option to determine the exact measurements.
It’s simple to remove the belt if it’s not within the machine. The first step is to center your machine in the slots if the motor can be modified.
Xem thêm : How To Restore Antique Singer Sewing Machine?
Wrap the twine around the handle wheel in the same way as the belt is wrapped around the handle wheel. To wrap the rope around the pulley, connect the motor to it. Connect the two ends with a pen and mark the spot.
As a general rule, new belts tend to relax slightly, so you should make the belt as tight as you can. Your belt will fit perfectly if you cut your string at the area you’ve marked.
Removing Your Worn-Out Belt
Removing the belt should be done with caution. The first step is to remove the electrical plug from the socket. Make sure that your handwheel is always adjusted down as well. When you remove the belt, the needle will not turn.
To remove the screws holding the motor in place, you first need to remove them from the machine’s backside. It’s therefore a cinch to remove the belt from the pulley.
Installing The New Belt In Your Machine
Fixing the handwheel’s handwheel is the first step. Spin the handwheel in order to correct it. While feeding the belt, progressively reverse the wheel rotation. Keep in mind the outside edge of your belt as you are feeding the belt.
It’s easy to tell because of the marks on most belts. Make a slow, deliberate motion with the handwheel, allowing the belt to be fed into place. After that, lower it to the motor’s pulleys.

Completing The Installation Process
The motor can be returned to its original position, with the belt tightest, after installation of the new belt. If the motor’s location can be altered, this is conceivable. This prevents the belt from slipping out of place later on, which is a common problem with pre-tensioned belts.
Using the screws that hold the motor’s housing in place is an absolute necessity. After you’ve finished tightening the screws, take a look at the belt’s slack. The belt should not have more than a half-inch of slack in it.
Conclusion
A sewing machine’s belt can be replaced without the assistance of a professional mechanic, however reading the instruction manual thoroughly is recommended before commencing. You need to know exactly what kind of belt you’ll need before you buy it.
If you already have a geared belt, make sure you get the same size. In most belts, the numbering is listed on the inside. If your sewing machine’s belt begins to show signs of wear, consult the handbook for instructions on how to replace it.
Nguồn: https://spasifikmag.com
Danh mục: Sewing Tips


