When to repair drywall that has been exposed to water. Walls that have been damaged by water might not always need to be replaced. Several minor problems exist, however they are readily fixed.
- How To Protect Cabinet Doors In Water Damaged Kitchen? Ultimate Guide
- How To Repair Water Damaged Wood Siding? Troubleshooting and Repair Guide
- How To Fix Water Damaged Paneling? Step-By-Step Process
- How To Stabilize Water Damaged Plaster Walls? A Few Tips to Remember
- How To Repair Water Damaged Popcorn Ceiling? Step-by-Step Tutorial
However, if there is considerable water damage, it may be necessary to replace the affected area rather than merely repair it. Knowing the signs that a wall needs to be replaced can save you a lot of money as a homeowner.
Bạn đang xem: When To Replace Water Damaged Wall? 20 Tips to Prevent Water Damage
How do I know my wall has been damaged by water?
You might miss water trickling down from the ceiling. Internal or indirect sources of water entry are common causes of water damage. For instance, if there’s a leak in the middle of the wall or somewhere behind it, water will eventually make its way through the patch. Water will go where it wants to go because of gravity.
Common signs of water damage include discoloration, bubbling, and sagging. If you notice any of these things, it’s likely due to a leak.
What are the most common reasons for water damage to a wall?
Damage to the internal walls of a structure can be caused by a leaking pipe. The leak could be the result of a damaged roof, a broken or punctured water line, or a leaky tank. The plumbing in the kitchen and bathroom is especially important to check for.
The first step in repairing water damage to a wall is finding and fixing the leak. To put it another way: if you don’t do this, you’ll be doomed to an endless round of breakdown and patchwork.
How bad could it get if water damage is left too long?
Neglecting to repair a wall that has been damaged by water might have serious repercussions (and the cause of it). These are some examples:
- Neglecting to repair a wall that has been damaged by water might have serious repercussions (and the cause of it). These are some examples:
- Neglecting to repair a water-damaged wall might lead to serious problems (and the cause of it). These are some examples:
- wooden surface deterioration that can be both ugly and hazardous.
- Damage to the tune of tens of thousands of dollars caused by structural defects.
Where am I most likely to find water damaged walls?
Water damage is especially likely to occur in areas where water pipes are present. Damage to the upper floors of a home, such as the kitchen and bathroom, is possible due to leaky attic space.
Will I have to replace water damaged drywall?
Spackling materials can be used to repair small areas of water damage. Apply the filler with a putty knife and let it dry before painting.
If the damage is extensive, you’ll probably need to rip out and replace sections of the wall with new drywall. To make the patch match in with the surrounding area, it must be taped off around the edges, sanded, spackled, and painted.
What if the damage is only water stains?
If the damage is extensive, you’ll probably need to rip out and replace sections of the wall with new drywall. To make the patch match in with the surrounding area, it must be taped off around the edges, sanded, spackled, and painted.
If the damage is severe, pieces of the wall will need to be torn out and replaced with new drywall. To make the patch look like it belongs, you’ll need to tape off the edges, sand, spackle, then paint it.
Signs Of Water Damaged Wall In Need Of Replacement
Some of the signs and hints of water damage in your home might be easily spotted, while others will require a more thorough study. Someone with limited knowledge or experience in inspection may miss some red flags.
The following signs can help you assess whether or not your water-damaged walls need to be replaced.
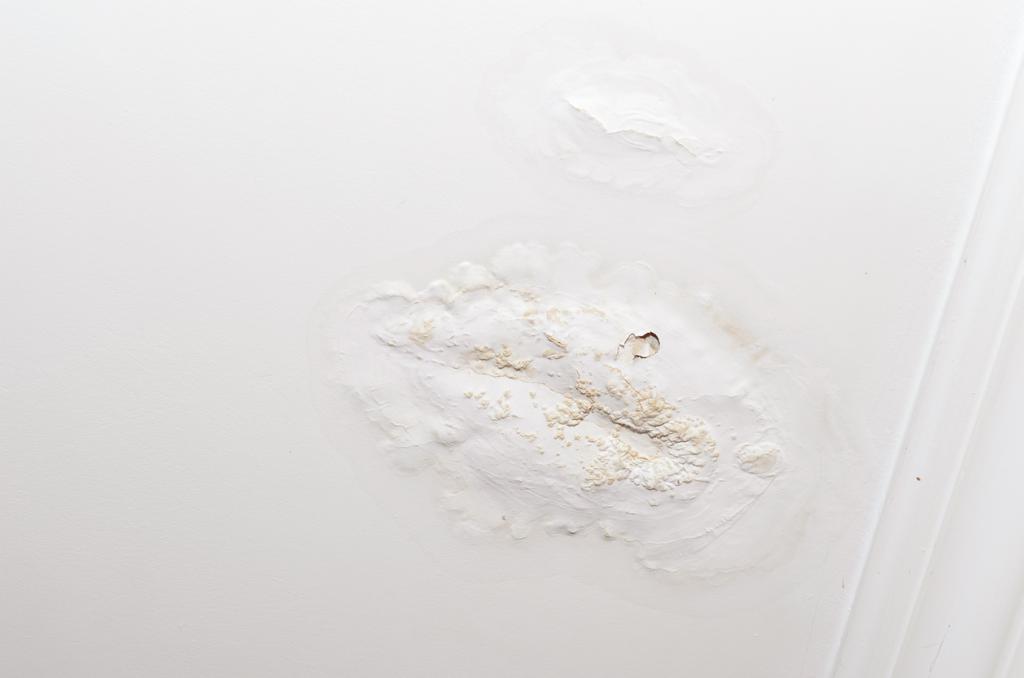
1. Discoloration
Let’s start with the biggest red flag you should look out for. Discoloration and staining can occur on walls that have been affected by water.
Water has been penetrating the walls for some time if they have turned a darker hue. This seems like a really apparent symptom, thus it might be one that people notice more than others. Significant deterioration or staining on a wall disrupts the wall’s harmony and the atmosphere of the room.
2. Peeling and bubbling
Having paint that is peeling and bubbling on your walls is not aesthetically pleasing. When wall pigments are exposed to water for extended periods of time, they begin to flake and peel off the wall. If you see paint peeling away from the wall, it could be a sign of a leak that needs to be addressed.
Re-painting a damaged wall is a waste of time and money if the cause of the damage is still present. Fixing a wall that has been damaged by water is easier if the wall in question is removed and the source of the problem is addressed.
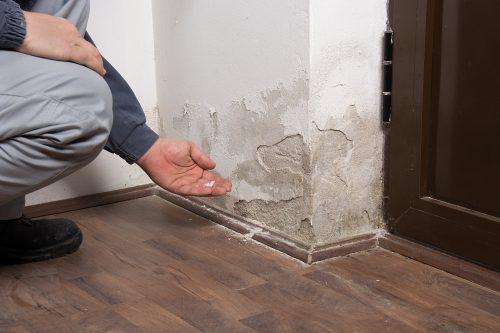
3. Bulges and bumps
Walls that have been submerged in water for a lengthy period of time will develop bulges and bumps as a result of structural damage. These protrusions and imperfections render the walls unsafe for further usage. Damaged by water, bumps and lumps are mushy and crumble easily.
As soon as possible, it’s best to get rid of these walls rather than try to fix them. Poor construction can also cause lumps and bumps, thus the best solution is to have a new structure built. When you patch them up, it might destroy the look and feel of the room.
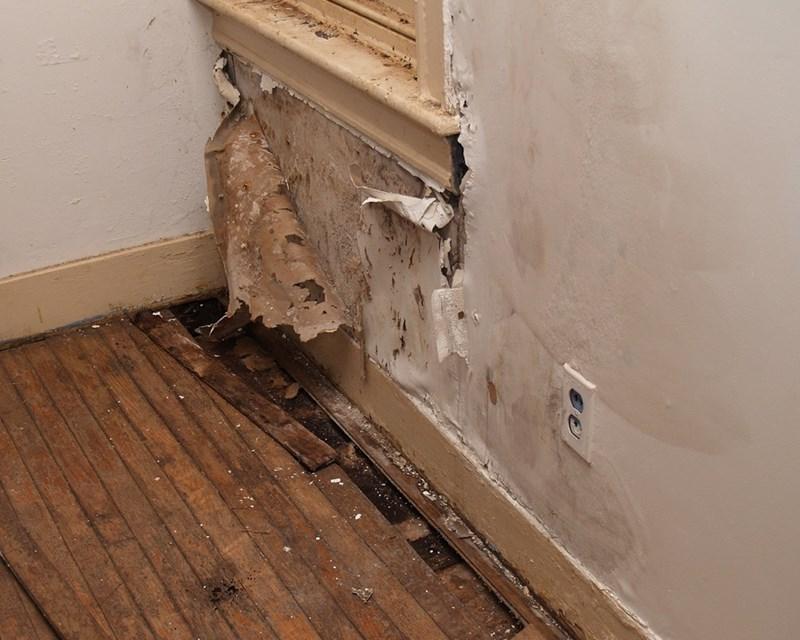
5. Warped and disfigured walls
Repairing these flaws is a top priority. Wall warps and disfigurements are additional indicators that the walls are structurally unsound and may cause further problems.
Walls that are constantly being penetrated by water will eventually sag and deteriorate. There’s a need for a new wall because water has weakened the current one.
Does water damaged drywall need to be replaced?
Obviously! For a long time, dry walls aren’t meant to be submerged in water.
Obviously! Dry walls have a long history of not being suitable for use in wet environments.
5 Effective Wall maintenance tips for your home
1. Remove dust or dirt from walls
Routine dusting is the first step in maintaining the beauty of your wall. In addition to making your home cleaner and extending the life of your paint, this will also make your walls look better. This also helps reduce internal air pollution and surface deterioration. It is recommended to use a dry cloth or feather duster to remove dust and dried filth from the surface.
Once a month, use a long-handled broom and a cloth to sweep your walls to remove dust, dirt, and cobwebs, which can damage your paint and cause it to fade prematurely. Don’t forget about the ceilings; they can quickly become dirty due to the dust that settles there because of gravity.
2. Clean and remove stains from walls of the home
It can be challenging, if not impossible, to clean walls that have been painted or have a rough surface. Make sure you don’t scratch the wall’s paint or leave streaks by scrubbing too harshly when cleaning the walls. The wall may be cleaned with just water and a gentle sponge.
Your walls may be stained from your children’s food or accidents. There are more oil-based stains than water-based ones. Water-based stains and spills can be cleaned up with a damp cloth. Oil stains, such as those generated by cooking grease, can be removed using a solution of dishwashing liquid/soup and water, or with a mild cleanser.
Tiles in the kitchen and bathroom should be cleaned on a regular basis. Regular washing can help remove residues from the kitchen and the bathroom, and wiping down the painted walls can do the same. To dry the wall, use old towels.
Xem thêm : How To Replace Water Damaged Subfloor? Step-By-Step Guide
A good rule of thumb is to always do a test patch on freshly painted walls. Walls with a glossy or semi-gloss surface can be safely washed in the kitchen or bathroom, but it is recommended that you perform a spot test beforehand. Don’t try to get the chalked-off paint off of your sponge.
3. Repaint your old painted wall
If the walls in your house are starting to appear drab, a new coat of paint can do wonders. A fresh coat of paint over the old one is all that’s needed to update the look of a wall. Whether you’re painting the inside or the outside of your home, it’s important to use the appropriate paint.
4. Take care of damage on the wall
Repairing or touching up damaged areas of paint as soon as feasible is essential for maintaining the paint’s integrity. Use sandpaper to smooth out rough spots and fix any holes you find in a surface that has been scraped or chipped. The next step is to repaint the area so that it appears continuous. A can of touch-up paint is all that’s needed to fix these tiny scratches.
5. Protect from Dampness or Seepage in the wall – A Silent Killer
There is a common problem with moist walls and water seepage in homes. Side effects may include effluence, paint flaking and cracking, and severe deterioration. Furthermore, it is very dangerous to one’s health.
Any wall leaks that could cause structural damage should be immediately addressed. The wall could collapse if the issue isn’t solved soon. Accordingly, tracing back its roots is a vital first step. With the help of modern thermal imaging equipment, we can now find the source of a building’s seepage or dampness, be it a hidden leak, a broken pipe, or something else entirely.
Alternate methods for maintaining the integrity of your home’s walls:
When it comes to the outside of the house, we have yet to have a serious conversation. Keeping up with exterior maintenance helps keep your building in good shape. However, water leakage from outside can cause peeling paint and other issues if the outside is not well maintained. So, why should you hire a pro to take care of your building’s exterior maintenance? Because only trained professionals can give a structure a comprehensive checkup for issues that could lead to costly structural damage.
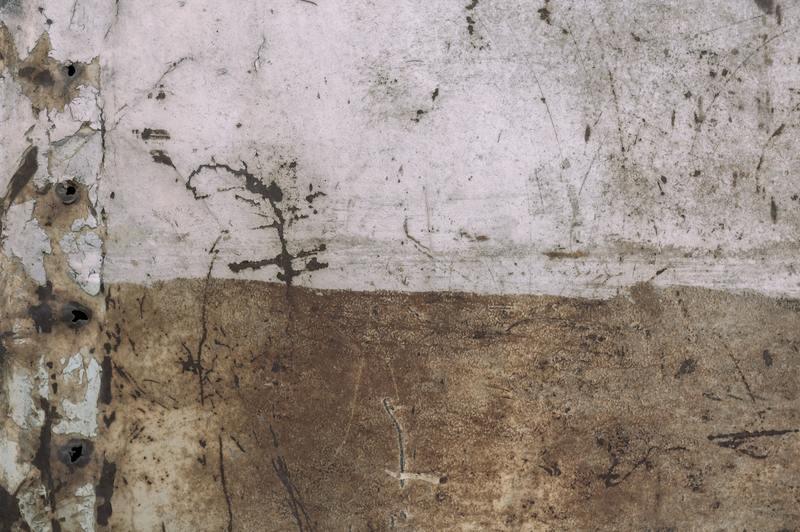
How to tell if water damage is new or old
A tree’s age can be determined in much the same way that water damage can. When water seeps into a wall’s surface, it forms rings.
This new water damage has some dark, moist spots. Water damage over time generates a pattern of dried, ring-like scars that look much like tree rings. More and larger rings form on damage that is older than ten years.
Mold can also grow, which is something to keep in mind. Mold doesn’t immediately start growing if a wall is damaged.
Seeds often take many days to germinate. If mold is growing widely and far from the water’s origin, it’s conceivable that the wall was exposed to water for an extended length of time.
20 Tips to Prevent Water Damage in Your Home
1. Inspect Sinks and Drains
Cooking fat should not be poured down the drain to avoid clogging your sinks and drains. No matter how hot or cold the water in the toilet is, grease will solidify and stick to the pipes. This could potentially lead to catastrophic damage or even prevent water from flowing.
Cooking fat should not be poured down the drain to avoid clogging your sinks and drains. No matter how hot or cold the water in the toilet is, grease will solidify and stick to the pipes. This could potentially lead to catastrophic damage or even prevent water from flowing.
- Avoid clogging sinks and drains by keeping all cooking oil out of the garbage disposal and the drain. Even if you flush it down with boiling water, grease will harden and stick to the inside of your pipes. The worst-case scenario is that it blocks water flow or causes extensive damage.
- After cleaning the strainer, do not put anything down the toilet or the drain.
- Before getting into the shower, check that the overflow drain is working and not leaking.
- Examining the drain taps that can be found in sink vanity cabinets routinely is essential.
2. Check Your Appliances Regularly
If you want to avoid water damage, it’s important to regularly inspect your appliances for leaks and follow the manufacturer’s recommendations. Lack of maintenance is typically not covered by homeowner’s insurance. Upgrading and regularly replacing hoses can help you avoid water loss and damage that result from leaks.
Be sure to inspect the freezer, the oven, the furnace, and the loft.
- Do you have an ice maker and/or water dispenser in your fridge? Check that the hose connecting your refrigerator’s water supply to the wall is securely fastened. Make sure there are no holes in the roof.
- Is there a water dispenser and/or an ice maker in the fridge? The water supply to your fridge relies on a hose that must be securely fastened to the wall. Verify that the roof is in good condition and free of any obvious holes.
- For this reason, it is crucial to maintain a clean and dry attic, where mold and humidity can grow unchecked. Mold is a health risk and a nuisance in the house because it thrives in damp, water-logged wood.
3. Shut Off Your Water Main While Away
Water main shutoff is recommended for long-term absences. While their owners are away, homes may sit empty for several days or weeks at a time. An insignificant leak can do significant damage before anyone notices or returns. If you are going to be away from home for an extended period of time, you should cut off your water main.
4. Know Where Your Water Shut-off Valves Are
In the event of a flood, you should be familiar with the location of the water main shutoffs.
Among the items in this list are:
- The entire residence has lost water pressure.
- You can stop the flow of hot water from your water heater at any moment.
- In-sink and -toilet shutoff valves for emergency use
- Valves for turning off water supply to washing machine and dishwasher
In the event of flooding, the water supply should be cut off at the valves. Each of these valves needs to be inspected once a year to make sure they are working properly.
5. Install Leak Detectors
There are electronic gadgets that detect water or flooding and sound an alert when they are activated. Numerous models exist, each with its own unique set of features. In some cases,
- There are electronic gadgets that detect water or flooding and sound an alert when they are activated. Numerous models exist, each with its own unique set of features. In some cases,
- Electronic devices are available that can detect water or flooding and sound an alarm if activated. There is a vast selection of models available, each with their own unique set of features. To a certain extent,
- A phone that sends you alerts
- Thermometers that use infrared light to measure temperature
Both point-and-area detectors are on the market. An alarm will sound if water or moisture comes into touch with a spot detector. The area detectors use sensor wires to detect flooding across a wider area.
An active and a passive flood warning system is in place. If an alarm is activated, the water supply might be turned off. Set up a passive alarm system in high-risk flood areas. Sensors are activated by moisture and sound an alarm. One disadvantage of passive alarms is that water supply must be turned off manually. Keep an eye on your battery life!
The cost of a leak detector is typically between $10 and $30. The 9V battery is all you need.
A Leak Detector, for instance, could be installed anywhere:
- Basement and rooftop
- Near the air conditioner, but still a safe distance
- Place where dirty clothes are washed and dried.
- Water heater closet.
- laundromats, or clothes washers,
- Bathroom with both a toilet and a tub
- Kitchen sink and refrigerator region
- Near any water piping
Within walking distance of a water main
- Look out for any telltale signs of moisture.
- Watch the forecast closely.
- Test the air for the presence of moisture that could support mold growth.
- In case of an emergency, it is imperative that you shut off your water supply.
Damage to a home can be mitigated with the help of water sensors if they are installed quickly after a leak is discovered.
Some Things to Keep in Mind When Purchasing a Leak Detector
- A constant check on the surrounding temperature
- Includes a smartphone app and push notifications.
- Consistency in scale and coverage
- There is a built-in alarm system
- There are internal sensors that can detect motion, temperature, and other conditions.
- What source of power do we have to rely on?
- There is a mechanism that turns off the water supply when it detects a leak.
6. Install a Water Flow Monitoring System
These gadgets are hardwired into your home’s main water supply and constantly track how much water is being used. The water supply can be cut off automatically if the monitoring system detects usage patterns that don’t match those of the connected appliances. It may be set up next to your existing main water line, so no new holes need to be drilled. Ultrasonic technology is used to find leaks before they cause costly harm. Incorporating a reliable water flow monitoring system is a great way to cut costs without sacrificing efficiency.
As a general rule, most systems can provide real-time water data to a computer or mobile device. It has the potential to be of great utility in facilitating best-practice water notification, benchmarking, and consumption.
7. Check Water Pressure with a Pressure Gauge
A water pressure gauge, a mechanical instrument used for measuring water pressure, has been in use for over a century. The pressure gauge is a useful tool that consists of a dial indication, a length of tubing or hose, and a nut that can be tightened or loosened to change the reading.
Xem thêm : How To Soften Water Damaged Leather? Complete Step-by-Step Guide
Over-pressurized pipes are a regular plumbing issue, so investing in a water pressure gauge is prudent. Water pressure is the force applied to water from the water supply system. Having pressure sensors in a fluid power system is essential. Pressure and leakage in the system can be reliably checked with gauges.
What is the function of a digital pressure gauge?
- Pressure
- Torque
- Load
- Force
- Hardness
All three types of pressure can be measured: absolute, gauge, and vacuum.
Absolute pressure can be used to determine a compression ratio. Steel pressure gauges are used for high pressure, while bronze gauges are used for low pressure.
Overly pressurized water can cause pipes and hoses to burst. Water pressure can be determined by attaching a pressure gauge to the exterior of a faucet. Standard water system pressure ranges from 40 to 70 psi. If the water pressure in your home is more than 100 pounds per square inch (psi), you need to have a regulator installed. Contact a plumber if the pressure fluctuates outside of a safe range (between 30 and 80 psi).
It is possible to detect plumbing or irrigation system leaks by measuring the static water pressure. Excessive water pressure is harmful to pipes, fixtures, and even flexible hoses and hose connectors. If your water pressure is low, you should call your water provider or utility company to arrange for an inspection. Therefore, the pressure can be restored by adjusting the relief valve (PRV).
8. Buy or Replace a Pressure Release Valve
A valve like this can be used to relieve pressure in frozen pipes and prevent them from bursting. It can regulate the water pressure up or down. Before entering the home’s plumbing system, the water pressure is reduced to a more bearable level.
A professional repair of a valve could cost as much as $200. It ensures that the diagnosis and setup are carried out properly. A water pressure reducing valve reduces the force exerted on the plumbing’s internal components including valves, faucets, and appliances. It is possible to acquire a pressure release valve from any hardware store. Check the water pressure after the regulator has been placed, and make any necessary adjustments. It is imperative that malfunctioning valves be replaced without delay.
A water heater’s internal pressure can be reduced by draining the tank’s contents. If the water inside the water heater gets too hot or the pressure gets too high, the water heater opens the valve automatically. Keeping up with routine maintenance on the hot water heater’s valve can help prevent pipe bursts. The valves are opened and closed to release pressure when necessary.
Valves have the capabilities of…
- Utilize metals such as iron and brass in your construction.
- 10 – 70 psi, or 0 – 50 psi (around 23 kg)
- tolerate heat of up to 150 degrees Celsius (149 degrees Celsius).
- They come in a variety of sizes to meet your specific requirements.
9. Fix the Caulking Around Your Home
To reduce or eliminate leaks around your windows and doors, buy a tube or many and do the work yourself. As soon as a crack is spotted, caulk it. Mold growth, paint peeling or bubbling, crumbling drywall or plaster, and termite infestations are all signs of water damage.
Storm-related flooding is an all-too-common problem in American houses. Damage to the drywall around windows and in the frames themselves is a common problem caused by water infiltration. Fix the window by applying caulk and weather stripping to the parts that aren’t sealing properly. As a secondary safeguard, storm windows can be installed in your home. If your windows and doors are correctly sealed, water will be kept out and your home’s electrical efficiency will increase.
10. Monitor Your Water Bill
You can estimate your monthly water use from your water bill, so it’s a good idea to check it frequently. The possibility of a leak increases if your water bill fluctuates widely from one month to the next. If your water bill seems unusually high, check for these potential causes:
- Leaking commode
- Water-spouting fixtures
- Installing a brand new pool
- Applying water to a garden
- Travelers going back to their childhood homes
- ACs that use water to cool the air
- A water heater that springs a leak or a burst pipe
- Constant water recycling is in effect.
- Keeping water running through them can prevent them from freezing.
11. Clean Gutters and Downspouts
Gutter maintenance, such as cleaning, should be performed at least once every few months to avoid obstructions. Standing water can lead to puddles that might erode your foundation. In the event that your gutters become blocked, water may begin to seep through the exterior walls of your home. The average cost to clean gutters is between $50 and $250. When ice dams form, it’s important to get rid of them right away.
12. Install Gutter Guards
Gutter guards or attachments that divert water away from the foundation of the house prevent the gutters from becoming clogged. Gutter blockage can be caused by a number of things, including decaying leaves, bird nests, and branches. If leaves and other debris are regularly blocking your gutters, you should consider installing gutter guards. You won’t have to clean your gutters as frequently since they will prevent debris from building up. If your gutters are excessively high, you should have a professional check them and clean them for you.
13. Clean Downspouts and Decline Your Soil
Clearing out the downspouts will allow water to flow again. Direct downspouts should be placed five to ten feet from the foundation of the home. Your yard should slope away from the house’s base. Leaks around the foundation, cracked walls, and tilted walls are all signs of unchecked slope. Water should drain away from your home and into the street or your backyard.
14. Maintain Trees and Shrubs
Trim back overgrown vegetation near pipelines to improve visibility. If you live in an area that experiences drought, be wary of the effects dry soil can have on your home. Soaker hoses should be set up 3 inches (ca. 8 cm) into the ground and half a foot away from the foundation to prevent soil contraction and expansion. Trees with aggressive root systems may eventually invade your irrigation system, preventing water from getting where it needs to go. Trees should be planted at least 20 feet from the home (around 6 meters).
15. Decline Your Soil
Raking and shoveling the dirt around your house might help you get rid of excess. Gradually sloping the soil away from the wall of the foundation is what you’re going for. For water to run off the soil rather than pooling on it, the soil must be compressed. By sloping the land away from the house, you can prevent water from pooling against the foundation.
16. Monitor Your Sump Pump
To prevent flooding, the basement of the typical house will be equipped with a sump pump. This is the last line of defense for your home against rising groundwater or internal floods. If the water level in this pit becomes too high, a float-operated electric pump will go on. When water would otherwise flow in the wrong direction, it is diverted instead.
- More regular testing is recommended when storms are in the forecast.
- Once a year is the bare minimum, and more often should be spent inspecting for damage during stormy seasons.
Learn what to look for when inspecting a sump pump.
- Make sure the pump is wired into an electrical outlet (GFCI)
- The water pump must be turned on.
- Before proceeding, make sure the circuit breaker is turned on.
- The pump must be level at all times.
- Please verify that water is being supplied to the sump pit via the sump pump.
- As you progressively fill the sump pump with water, be sure to monitor the levels.
- The primary pump must be turned off before the backup can be tested.
Prices for pumps typically fall between $150 and $350. There is no charge for the examinations. There’s a possibility of basement flooding if you wait.
17. Fix Water Leaks
Repair any leaking pipes that you can see. Keep an eye out for any shadows or discolorations in or near any pipes or the ceiling. Replace any cracked caulking. Look for loose or broken shingles, as well as those that are missing or loose. Look for moss that has worked its way beneath the shingles, and fix any damage caused by falling trees.
18. Repair Your Chimney!
Fix any obvious plumbing leaks. If you see any shadows or discolorations in the ceiling or around the pipes, you should investigate immediately. Caulking that has been damaged should be fixed. Check for missing or damaged shingles, as well as those that are loose. Check the roof for moss that has crept under the shingles and fix any broken tiles or holes left by falling branches.
If you want to stay safe:
- Installing a cover for your chimney is a smart safety measure.
- Check the metal flashing around the chimney for damage.
- Have your chimney’s masonry resealed, please.
- Repairing mortar and brick fissures.
19. Replace Copper Pipes
If you get your pipes replaced, you won’t have to worry about damage from pinhole leaks. Replace regular copper pipes with ones that can withstand corrosion. If your copper pipes have rusted or become solid, consider switching to PEX. Joints between copper pipes are prone to leaks. Hole formation and a steady drip of water can result from corrosion. Leaks like these can cause serious structural damage to the roof and walls.
20. Install Floor and Drain Pans
You could want to provide floor layouts beneath your appliances. They can prevent damage to your home from slow, hidden water leaks. It is possible that a drain or a sloped surface will be required to channel the water to the correct drainage area.
Protecting Your Home From Water Damage.
Thus, these guidelines can be used to prevent flooding and water damage to property regardless of where the leak is coming from. You and your homeowner’s insurance company can both win by taking preventative measures against this type of harm.
Conclusion
If you pay attention to the warning signs and suggestions, you’ll know when to replace a wall that has been damaged by water. A home’s walls are crucial, so if you see any signs of water damage, don’t wait to get them fixed.
Nguồn: https://spasifikmag.com
Danh mục: Damaged


