It may seem like a simple task to learn how to spackle a water damaged ceiling. All that needs to be done to repair the damage is a little scraping and then some application of the paste. It’s not as simple as it seems, so jotting down some notes is a good idea.
- How To Replace Water Damaged Underlayment? Easy Step-by-step Guide
- How To Repair Water Damaged Epoxy Concrete Floors? Comprehensive Guide
- How To Stabilize Water Damaged Plaster Walls? A Few Tips to Remember
- What Does Water Damaged Insulation Smell Like? A Detailed Guide
- How To Repair A Water Damaged Top Cabinet? 7 Easy To Follow Steps For You!
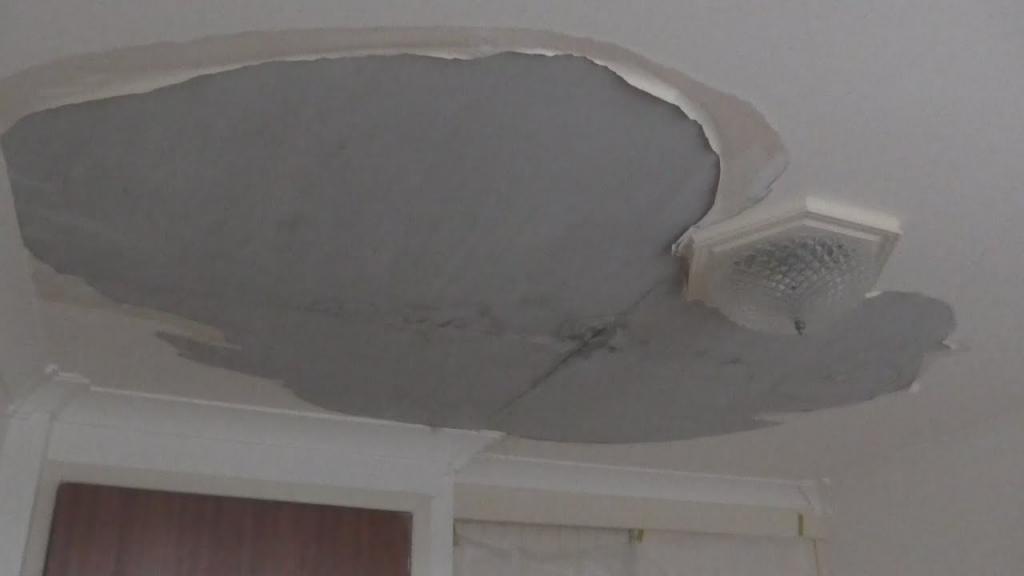
If your ceiling has been damaged by water, it must be repaired as soon as any cracks appear. Water damage to walls and subsequent damage to your furniture is unsightly and can cause further problems with your home’s furnishings. Furthermore, it poses a threat to the security of your dwelling.
Bạn đang xem: How To Spackle Water Damaged Ceiling? Easy Step-by-step Guide
Here, we’ll show you how to spackle your ceiling the right way and give you some pointers on how to apply putty if you’ve never done it before.
Ceiling Damage Symptoms
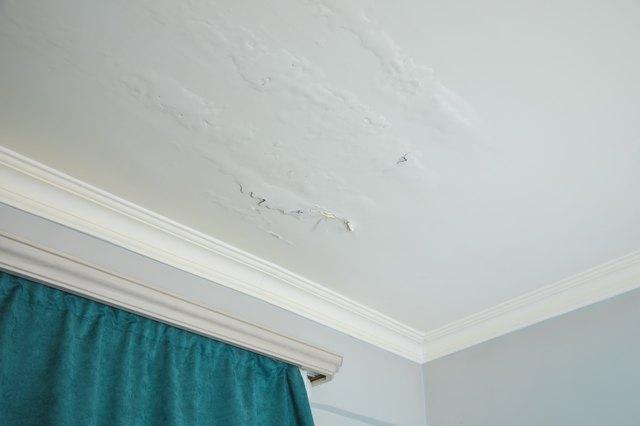
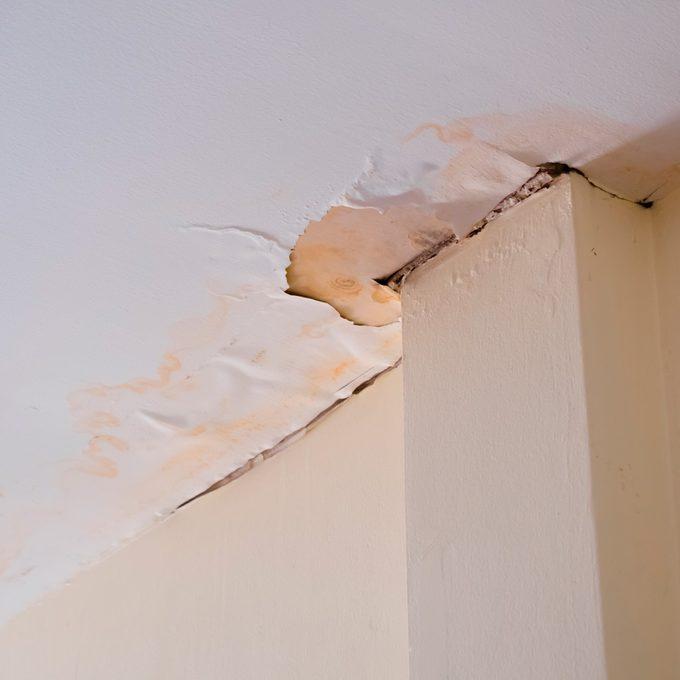
Discoloration in specific spots on a ceiling is the first sign of damage. These areas, which range in hue from yellow to brown, look damp. You can touch the region gently, but you should still wear gloves in case of infection.
Black spots expanding in size are another warning indicator. An infestation of mold could be rapidly growing across your ceiling, making the situation extremely hazardous. As was previously mentioned, it’s not a good idea to touch these spots with your bare hands because it can lead to all sorts of health problems.
How To Patch Up Your Water Damaged Ceiling
Step #1. Inspect the area
Check the ceilings for damage before you do anything else. Now is the moment to evaluate the nature and extent of the issue. It’s best to touch the injured region while wearing gloves.
If you notice moisture, you should start by locating the leak. However, even if the area appears to be dry, you should check for water leaks before moving on.
Step #2. Measure the perimeter
You will now take measurements of the damaged region. It will serve as a guide for determining how much spackling putty you will need. Take careful measurements of how big the damaged area is.
Carefully make a shallow cut on the affected area with a knife. Wear protective eyewear, since debris falling from the ceiling may cause scratching or irritation to the eyes.
Step #3. Spread the spackling compound
Taping off the area and scraping it clean are prerequisites before applying spackling compound. Avoiding cracks in your putty is much easier by doing this. Next, using the putty knife, spread the spackling paste you’ve prepared over the taped area.
Before applying a second layer, let the first one dry for a few minutes. Patience is required here, as things will need to settle down gradually before they can be considered completely smooth.
Step #4. Sand down the blemishes
In spite of your best efforts, sanding is necessary to ensure a smooth finish after applying compound. Remove any surplus spackling paste with a sanding sponge. Always use safety equipment, such as a face mask and goggles, when working with chemicals.
Take caution not to go overboard. It’s best not to scratch too much or you’ll have to start again with the spackling compound.
Step #5. Prime and paint the affected spot
You’re almost there, so keep going! Next, you should repaint the region to match the rest of your ceiling as closely as possible. Make sure to clean the area first of any sanding dust or other particles.
You should also check to see if you missed any regions and smooth off any rough patches. If none exist, a water-based primer should be used before painting. Priming prior to painting improves adhesion and prolongs paint life.
Types Of Spackling Compound
Lightweight
To repair minor holes, lightweight spackling putty is recommended. It takes very little time to dry and produces only a minimal amount of shrinking. The beautiful thing about this compound is that you can skip the sanding step and go straight to painting.
Standard
In place of lightweight filler, gypsum is typically used in the conventional spackling compound recipe. The substance can be prepared into a paste with a similar consistency to that of toothpaste. Despite its slower drying time compared to the preceding spackle, the standard spackle is designed with longevity in mind.
Acrylic
For more extensive water-damaged areas, it would be best to use an acrylic compound. It can handle damages as big as three-quarters of an inch. You can use it on a variety of materials like wood, brick, and even stone.
How Much Does Ceiling Repair Cost by Square Foot?
Acrylic compound is the best option for larger water damaged areas. It has a 3/4 inch damage tolerance. Wood, brick, and even stone can all benefit from its application.
In cases when there is considerable water damage, an acrylic compound is recommended. Damages of up to three-quarters of an inch will not be a problem for it. Wood, brick, and even stone are all suitable substrates for its application.
Experts in ceiling repair may charge by the hour or by the square foot. Overall, you may expect to pay between $45 and $90 per square foot of damage.
Xem thêm : How To Fix Water Damaged Wood Studs? Step-By-Step Process
Be aware that a fee of $60 to $90 per hour may be more reasonable for minor repairs like nail holes or damaged joints.
It usually costs between $900 and $2,840 to remove a popcorn ceiling.
Square Foot Rate by Ceiling Material
However, not all ceiling materials are equally simple to fix. Popcorn ceilings from the 1960s and plaster and lath construction from more than a century ago require a bit more time and skill to repair.
You might expect a different price per square foot depending on the material of your ceiling, as shown in the table below.
- Traditional drywall: $45 to $55 per square foot
- Common drywall costs between $45 and $55 per square foot.
- From $65 to $80 per square foot for plaster and lath
- Prices for popcorn ceilings typically range between $90 and $125 per square foot.
Different from conventional ceilings, drop tile ceilings can be easily repaired by the homeowner. The price per square foot for brand new drop tiles can be anywhere from $2 to $17. If the damage is too great for you to handle alone, a professional may charge you $60 to $90 per hour.
How Much Does It Cost to Repair a Ceiling Near You?
There are a number of factors that contribute to the final price tag for home repairs, but one of the biggest is your geographic location. The total amount you’ll have to spend on things like labor, government fees, and supplies will vary depending on where you live.
The first estimate might also be affected by your location because ceiling repairs require a broad variety of materials and techniques (plaster, spackle, building materials, etc.).
Let’s take a look at some real-world instances of how much it costs to fix a ceiling:
- $570–$1,380 in New York
- The range in Massachusetts is $580–$1,000.
- Texas: $470–$1,230
- From $600 to $2,080
- In the Golden State, prices range from $550 to $1,660.
Which Ceiling Repair Services Can I Get on My Budget?
You could get worried if you see a break in your ceiling or a water stain there. However, there is a price range for various ceiling problems, and many of them cost less than a few hundred dollars to fix.
Under $100
DIY tasks like this, such as fixing a leaky faucet or repairing cracked tiles, make up the bulk of your time and energy. If the repair job takes less than an hour, you should expect to pay less than $100.
$100 to $500
Costs will range from $100 to $500 to have a professional repair and replace a small to medium sized section of your ceiling due to water damage. Small structural repairs for drooping ceilings can cost as little as this, while large painting jobs can cost as much.
$500 to $1,000
These costs are typical for fixing big issues including leaking ceilings, structural fissures, and missing drywall. Involve a structural engineer or plumber as a second opinion.
$1,000 and Up
Depending on the size of the space, you may need to replace the ceiling as well as address any leaks, HVAC problems, or foundation concerns that may have developed. Ceiling repair on an older home with lath and plaster or other unusual materials and design may easily exceed $1,000.
How Much Does It Cost to Repair a Ceiling Yourself?
Repairs to the ceiling can refer to a wide variety of tasks. Peeling paint from normal wear and tear is in a different league than unexpected mold and water damage patches.
Minor repairs should only be attempted if they do not:
- Ceiling materials in the building must be replaced (anything other than drop tiles)
- Communicate with the water system or the electrical wiring
- In other words, they have their roots in more fundamental problems.
We can’t tell if this is just a small glitch or if it’s the start of something greater. One should never take a chance and wait for things to get worse. If you smell something musty in a room, even if it’s just been there a little while, you should call a plumber immediately.
Having said that, painting your own ceiling or replacing drop tiles without the help of a professional is safe and quite cost-effective. The total cost of painting a ceiling might range from $200 to $600 if you need to buy primer, paint, ladders, drop cloths, and other supplies.
As we’ve already established, replacing drop tiles can cost anywhere between $2 and $17 per square foot, depending on the quality of the tile.
Ceiling Repair Cost Breakdown
An experienced ceiling repair professional will be able to provide a rough price quote after considering a number of criteria. The following items are likely to be included in your quote:
- The Hourly Rate of Pay (with an estimated number of hours)
- Materials for a ceiling’s price
- Specialized components for the maintenance
- Any further maintenance, whether it be structural, cosmetic, or plumbing-related
How Much Does It Cost to Fix a Ceiling by the Type of Repair?
How much money would you anticipate to spend fixing anything from a tiny leak to a rapidly cracking ceiling? It can be difficult to anticipate how many hours your professional will need to repair your ceiling, so we’ve divided it down per damage kind.
Water Damage
Recent storms, roofing problems, burst pipes, and damaged air conditioning vents are just some of the many potential sources of water damage. Including labor and materials, the cost to restore a ceiling that has been damaged by water is roughly $45 to $55 per square foot.
Remember to add the cause of the water damage on top of this cost, such as:
- Remember to add the cause of the water damage on top of this cost, such as:
- Price range: $200-$1,500
- Price range: $360 – $1,550
Sagging Ceiling
Xem thêm : How To Fix Small Water Damaged Hole Drywall Ceiling? A Step-by Step Learning Guide
A project to repair a sagging or pillowing ceiling, not considering the price of materials, can cost up to $75 per hour. Professional repair work will most likely involve replacing drywall, but may also involve removing and replacing insulation or spacers between the ceiling and trusses.
Ceiling Holes
There is a seemingly unlimited variety of causes for ceiling holes. Maybe you’re sick of looking at that antiquated chandelier and want to find a replacement. Or perhaps you were living in an ancient house and managed to jam your foot in the attic.
Prices range from $180 to $370 to fix a hole in your ceiling, depending on the type of ceiling and the size of the hole.
Ceiling Cracks
The cause of cracks in the house is often a mystery. Small ones, especially along the room’s perimeter, are common. Hairline cracks are typical as a result of a home’s natural settling process.
However, cracks wider than a few inches, those that widen over time, and those that appear to be converging on a beam warrant rapid attention. These could indicate underlying structural problems. Depending on the severity of the damage, repairing a foundation might cost upwards of $4,500 on average.
What Factors Influence the Cost to Repair Ceilings?
Repair costs will reflect the fact that every house is different because every house has its own character. The price of ceiling repair will depend on a number of factors, including those listed below.
- How long you’ve lived there
- Cause of the trouble (plumbing, structural, or natural aging)
- Measurements of the Area at Issue
- As for the stuff you put up there,
- One’s abode
- Consider whether or not bringing in more experts to tackle the problem
Everything You Need to Know About Ceiling Maintenance
It’s important to keep in mind that ceiling maintenance doesn’t have to take a lot of time. Mold remediation, repairs, and repainting could also be required in addition to routine cleaning. The ceiling of an older home, especially if it hasn’t been maintained properly, is more likely to show signs of wear and tear over time. It’s important to double-check because some ceiling problems in newer constructions may still be covered by the original guarantee.
To help you keep your ceiling in good shape, here is some basic upkeep information:
Cleaning Your Ceiling
Most ceilings are white, so any scuffs or scratches will really stand out. It’s only natural to want to clean your ceiling on periodically to keep it looking its best and remove the dust, filth, and bugs that settle there. A spot test should be performed before to utilizing any new product. What can and cannot be used depends on the material of your ceiling, so keep that in mind.
To wipe down small surfaces, a clean, moist towel is usually sufficient. If you don’t want water marks, take careful not to use too much water and to wipe away any leftover moisture. Use a duster or the brush attachment on your vacuum cleaner to get rid of dust and cobwebs. Dusting the ceiling and the fans on it as part of your regular cleaning routine will help keep buildup to a minimum.
Painting with Care
Even high quality painting from an experienced tradesperson will need maintenance over time. You should expect up to 10 years from any interior paintwork. It may be tempting to paint over small marks or damage with a stroke of the brush, but getting an exact colour match can be difficult. Light sanding may be needed before any paint work can occur.
Unique Features
Even if you hire a skilled professional to do the painting for you, you will still need to touch it up eventually. Any interior paint job can last as long as ten years with proper care. Fixing minor damage or blemishes with a fresh coat of paint is appealing, but finding a perfect color match may be challenging. A light sanding may be required prior to painting.
Fighting Mould
The struggle against mold is one that many households must wage. It spreads rapidly and can be harmful to human health. A small amount of mold on a ceiling could indicate a larger issue that has to be addressed. Mildew is often the result of water damage and a hint of hidden leaks. A sagging ceiling is a sign of water damage that has to be addressed quickly. Ceiling mold can be cleaned up with bleach and water or specially designed chemicals if there are no underlying structural issues. In order to prevent any unseemly discoloration, it is important to regularly perform spot checks.
Warning Signs
There are few symptoms that may suggest some more ceiling repair may be needed. These symptoms may indicate impending ceiling collapse. Inspect for signs of cracking, including visual evidence and audible cracking as well as bubbling and sagging.
We are here to assist you if you are worried about the condition of your ceilings. If you are in the Perth area, our skilled crew can help you with ceiling repairs or replacement. If you’re interested in discussing your requirements with us, please get in touch right away.
FAQs
Keeping your ceiling in good condition should be at the top of your list of priorities as a homeowner. Over time, problems might develop, so it’s always a good idea to have a professional take a look every once in a while.
How do I know when it’s time to repair my ceiling?
Ceiling damage may not always be as evident as things like holes, leaks, or massive fractures. You should be on the lookout for:
- Ceilings with long, continuous cracks down the middle
- Rough, musty, or moldy odors
- The sudden appearance of mold or water stains on your wall
- Spaces that seem wet or damp to the touch
- When visitors enter the room above, there are loud cracking noises.
- Low or drooping ceilings
- Failing to fix the peeling paint problem after repainting
What should I consider when hiring a general contractor for ceiling repairs?
General contractors are the go-to people when you need your ceiling fixed. An additional structural engineer or plumber may be required, depending on the nature of the damage. Make sure the expert you hire:
- can fix it because they have the proper credentials and insurance
- gotten rave reviews in previous positions of equal responsibility
- Before beginning any work, please submit a thorough estimate and contract.
- Clearly outline the expected duration of the project.
What other projects should I do at the same time?
Maintaining the health of your HVAC system, plumbing, and ceiling design can all be checked off your list while you’re up there fixing your ceiling.
Painting the walls, adding new light fixtures, and installing crown molding are all good ways to give a room a more polished look.
Conclusion
Having learned how to spackle a water-damaged ceiling, it is important to remember to take precautions. In all likelihood, you’ll need to use a ladder, so make sure you have a helper nearby. In the unfortunate event that something goes wrong, assistance can be requested swiftly.
While making repairs to your ceiling, it’s a good idea to provide yourself with safety gear. High levels of mold development are likely up there, as was previously predicted. Dry skin, coughing, and allergic reactions are some of the side effects of coming into direct contact with mold.
Nguồn: https://spasifikmag.com
Danh mục: Damaged


