Replace water damaged underlayment by understanding the various layers of flooring. Due to the fact that water-damaged underlayment repairs begin with the removal of the damaged flooring, this is a necessary initial step.
- How To Hide Water Damaged Particle Board? 5 Easy To Follow Steps For You!
- How To Fix Water Damaged Dark Wood? Easy Step-by-step Guide
- Who Covers Removal Of Water Damaged Sheet Rock? Complete Guide
- How To Repair A Water Damaged Concrete Slab? Step by Step Instructions
- How To Tell If Wood Is Badly Damaged By Water? Step-By-Step Guide
The page contains detailed instructions on how to remedy the situation. In addition, we discussed what underlayment is and how it’s used. Last but not least, we discussed the issue of insurance and whether or not water damage is included in the policy coverage.
Bạn đang xem: How To Replace Water Damaged Underlayment? Easy Step-by-step Guide
What Is Underlayment?
In between the subfloor and the finished floor lies a 14-inch to 12-inch thick piece of material called underlayment. A variety of materials can be used for its construction. Plywood, on the other hand, is more typically utilized as an underlayment than a subfloor, which leads to some confusion.
Structural support is provided by a subfloor. To secure it, it’s nailed to the subfloor. To help with sound absorption and insulation, the flooring underlayment is used.
Flooring Structure Explained
The numerous pieces of furniture in your house are all supported to some extent by your flooring. Everything is held in place not only by the magnificent floor but also by subfloor, joists, and underlayment.
Flooring Joist
You can’t have a floor without a floor joist. In framing, a horizontal structural element is typically employed to span an open gap between beams, which then transfers loads to vertical members. The subfloor sheathing can act as a horizontal diaphragm when joists are used as part of the floor construction system.
Subfloor
Underneath your finished flooring, there is a subfloor. Structural continuity over the joists. OSB (Oriented Strandboard) is one of the most common subfloor materials, however wood plank, plywood, and concrete are other options. Because there are no floor joists in most basements, there is concrete. As moisture wicks through concrete, basement flooring are also vulnerable to water damage.
Flooring Underlayment
It is a thin layer of material such as fiber, felt, rubber or foam that serves as an underlayment for the floor. Cushioning, sound absorption, and insulation are all provided by the thin layer of material. There is a “vapor barrier” in laminate or engineered wood flooring to keep water out of your floor. Sound rating tests, used by HOAs and condo organizations, can also assist reduce noise.
Floor Coverings
This is the visible part of the ground that a person can walk on. It is possible to choose from a variety of floor coverings including laminate, floating engineered hardwood, ceramic tile and carpet.
Floor Underlayment Main Purpose
Sound Reduction or Dampens Noise
Sound can’t travel from one room to the next because to underlayment. Sound is absorbed and prevented from reverberating throughout the house by an underlayment made from recycled fibers. Tones down the squeak of click-together floating floors.
Moisture Protection – Blocking Harmful Damage To Your Floor
A vapor barrier is integrated into some underlayment to prevent moisture from penetrating your floor. As a result, it is common knowledge that flooring installed on concrete subfloors will be subjected to the moisture and chemical contamination that comes from the concrete.
Compression Resistance
Dented portions of your flooring can be caused by heavy foot usage. The click-together mechanism is supported by dense recycled fiber underlayment, which maintains its supportive arrangement under the constant traffic of the floor above.
Smooths Subfloor Imperfections
The levelness of all subfloors is not the same. Underlayment, on the other hand, can take on some of the roughness of the subfloor, which saves time in the preparation process.
Insulating Value
Adding to the overall comfort of the house as the seasons change.
Approved for In-Floor Heating Systems
Ensures that the floor covering material is not damaged by thermal shock while also allowing heat to circulate evenly.
Certified Clean and Safe Indoor Air Quality
There should be no unpleasant odors emanating from the flooring underlayment. Indoor air quality testing should always be accompanied by some sort of certification. As a result, no one in your household will be subjected to any unwelcome illnesses or headaches.
Competitively Priced
The cost of an underlayment shouldn’t be prohibitive, but it should keep you dry and quiet.
Underlayment Considerations
It’s usually a good idea to double-check the underlayment recommendations in your flooring installation instructions before moving on. Depending on the flooring manufacturer, you may or may not be required to use this type of material while installing your floor. Consider an underlayment that combines sound absorption with moisture control if you want to reduce noise.
Why is it essential to use underlayment?
1. Sound reduction
Underlayment should be made from sound-absorbing recycled fibers (not plywood). This is to prevent sound from reverberating or bouncing around the room.
2. Moisture protection
Underlayment that has a built-in vapor barrier can also provide moisture protection. Concrete subfloors are especially vulnerable to moisture damage, so this is a good idea if you have one installed.
3. Resistance to compression
There are sections of your home that receive a lot of wear and tear, resulting in damaged surfaces. Underlayment, on the other hand, can function as a buffer to protect your flooring from heavy traffic.
4. Smooths imperfections
Underlayment helps even out the roughness of a subfloor that isn’t always smooth and level. As a result, the time required to prepare the subfloor surface is reduced.
5. Insulation
Xem thêm : How To Fix Water Damaged Dark Wood? Easy Step-by-step Guide
Finally, underlayment contributes to the comfort of your house when the weather changes.
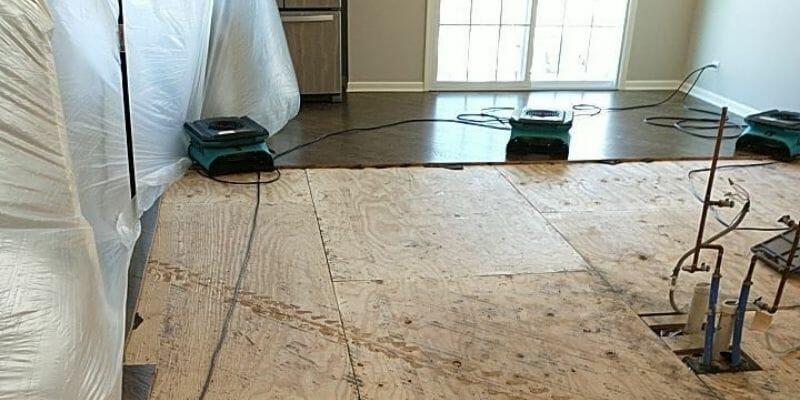
Steps In Repairing Water-Damaged Underlayment
Step #1. Prepare materials
Sheets of underlayment, galvanized 3D ring-shank nails, a dust mask, pliers, safety glasses, knee pad, utility knife, heavy work gloves, and a pry bar are all you’ll need for this project.. Other tools required are a vacuum, broom, chalk line and large garbage can; hammer and circular saw are also recommended but are not required.
Step #2. Remove damaged flooring
When dealing with a water-damaged structure, you must begin by drying out the floor first. You must also fix the leak or the root cause of the water damage so that this does not happen again.
Using a corner as a starting point, begin ripping up the damaged flooring. Afterwards, use a pry bar to remove the nails and separate the layers of wood flooring.
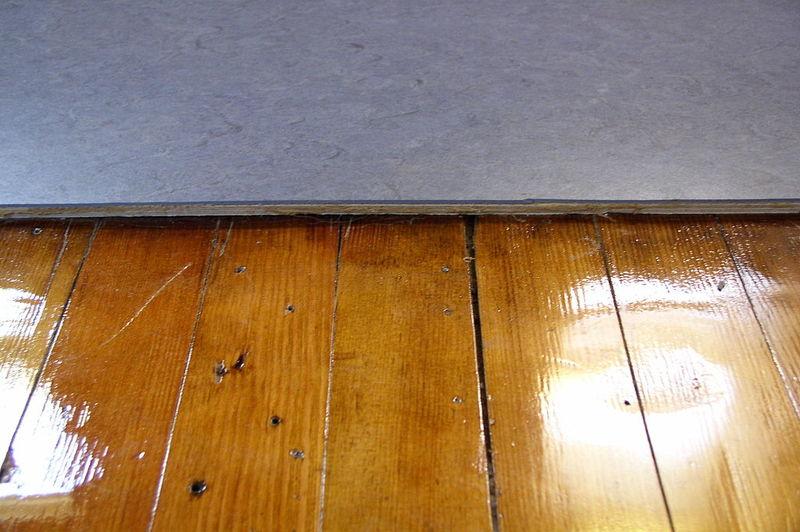
Step #3. Assess the damage
Because the damage can’t be seen at ground level, it’s better to start by removing some of the flooring. Then, examine the condition of the underlayment, particularly in areas where water is inevitable. Determine which parts should be changed after that.
Step #4. Cut into panels
Determine which pieces are damaged, then cut the underlayment into them. Chalk a line across the area you wish to remove the underlayment from. After that, cut the panel using the circular saw.
When cutting the underlayment, avoid going through the subfloor. Goggles and gloves should also be worn while cutting the panels, so as not to injure yourself.
Step #5. Remove the underlayment
To get rid of the sliced parts, follow these steps:
- Use a hammer or pry bar.
- Disconnect the subfloor from the underlayment by removing any nails or staples that may be present. Dispose of any small pieces of debris in the garbage can.
- Stack the larger pieces to the side.
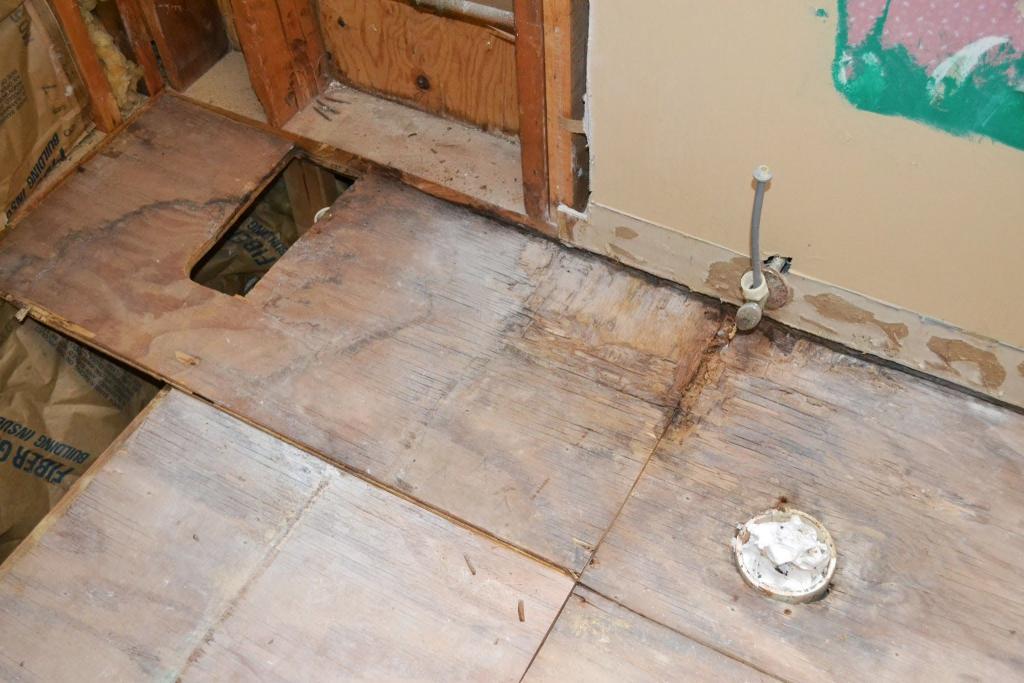
Step #6. Scan the subfloor
Look at the subfloor to see whether it has been damaged by water or if it has been disfigured by accident. It is necessary to rebuild the subfloor if the water damage has reached it. If not, check certain that all of the fasteners are properly secured.
After that, clear the subfloor of all debris. To prepare the floor for underlayment installation, vacuum it as well.
Step #7. Underlayment installment
The underlayment can now be installed after the subfloor has been cleaned. You can either use a seam filler or not while installing the underlayment. The latter, on the other hand, is more simpler.
The smooth side of the underlayment should face up when it is installed. The long edges of the underlayment panel should be at least two inches apart from the long edges of the subfloor..
Place the underlayment at least two inches away from the floor joists. Then, maintain the panel at least 14-inch apart from the walls for expansion.
After that, use a 3D ring to secure the panel, then repeat the process with the other boards. Install the new flooring material on top of the panels after inspecting them.
Is water damage included in your insurance coverage?
Your insurance provider should be able to answer any questions you may have about your policy. In most cases, they take into account water damage and leaks. It is nonetheless recommended that you get the advice of a lawyer when it comes to filling out your insurance statement.
Flooring Types and the Right Underlayment for Each
Here, we’ll go through the many kinds of underlay that are most commonly utilized in today’s flooring. For your convenience, we’ve broken down the list into categories based on the sort of flooring you’re looking for.
Tile Flooring Underlayment
As a result, tile flooring are still a popular choice for bathrooms, entryways and other areas where water resistance is needed. A wide range of tile types, shapes, and colors let you create a unique look.
In order to prevent tile and grout from cracking as people walk on them, the tile underlayment must be strong enough to sustain them. It must, however, be flexible enough to accommodate movement and any expansion or contraction caused by variations in humidity and temperature. There are only two materials that meet these criteria to a high degree.
CBU or Cement Board Underlayment
CBU is composed up of cement and wood or cellulose fibers. The fibers add strength to the cement while also providing a degree of pliability that prevents the cement from cracking. The most common size of cement board is 3’x5′, however it is also available in 4’x8′. 1/4″ and 1/2″ are common thicknesses. It is also known as cement board.
- Brands like James Hardie and PermaBase are among the best.
- Between $0.75 and $1.10 per square foot, the CBU price is
- In most cases, CBUs are installed by nailing or screwing them to the subfloor. However, they can also be glued. Using a utility knife or a saw, it is easy to dissect. Tile should be laid on a flat surface with thin-set mortar filling in the gaps between the tiles.
DITRA Uncoupling Membrane
Polyethylene is used to make this quality underlay, which has a unique design. Every cavity in DITRA’s grid has a greater base than its corresponding top. When the tile mortar hardens, it is able to anchor itself in the cavity. Take a look at our comprehensive overview of Schulter Ditra.
In order to prevent the mortar from adhering to the flooring, the DITRA membrane, which is 1/8″ thick, is used. This is done by laminating a fleece-backed DITRA to the DITRA’s underside, which is then bonded to the subfloor using thin-set mortar.
Allows for mobility and expansion/contraction while limiting the stress transfer that causes grout and tile to break. Moreover, this polyethylene membrane can be put over wood or concrete floors as well as those with radiant heat. Rolls of DITRA and DITRA-XL are 3 feet wide.
- Schluter DITRA and DITRA-XL are the brands.
- DITRA pricing per square foot: $1.55 to $1.90
- Schluter DITRA installation: Rolling out the material with the fleece side down and cutting for obstructions such as drains and posts is an easy way to install Schluter DITRA. Afterwards, the material is rolled back up, and a notched trowel is used to apply thin-set mortar to the floor. In order to ensure that the fleece is in contact with the mortar on its whole surface, the DITRA is rolled out over it. To remove air pockets and press the material’s fleece into the mortar, a screed trowel or concrete float is employed.
Self-leveling Underlayment
Xem thêm : How To Repair Water Damaged Pressed Board Cabinets? Comprehensive Guide
The concrete subfloors of an older home are likely to be cracked, uneven, or have low sections due to settlement. If you want your flooring to appear beautiful and last, don’t put it down right on top of them.
Self-leveling underlayment, a concrete product that is easy to mix and pour, is the answer to placing flooring over concrete that is in bad condition.. Its surface will eventually level off, just like the surface of any liquid. Additional underlayment, such as carpet padding, DITRA, or plywood, can be easily installed on top of this.
Radiant floor heating systems benefit from the self-leveling underlay’s compatibility. The self-leveling underlay is then poured on top of the tubing, which is laid on top of the previous concrete.
- Bostik, Quickrete, Henry, LevelLite, DAP Ardex, and Henry are among the most popular brands.
- a 40-50 lb bag of self-leveling underlayment costs $30-$36 and can cover 40-50 square feet per inch.
- One inch of self-leveling underlayment is usually sufficient to cover radiant floor tubing during installation. This material or ordinary concrete must be used to fill in any low spots that are deeper than 1″ before a self-leveling substance can be poured on top of it. Complete mixing and pouring instructions are included in the underlayment package. A 5-gallon bucket, an electric drill, and a mixing paddle are all you’ll need. Typically, the pail is filled with water, and the mixture is poured gradually while the paddle is used to agitate the mixture.. After mixing, most components must be poured within 10 minutes.
Laminate Flooring Underlayment
If you’re looking for a low-cost alternative to hardwood flooring, consider laminate. Underlayment may be included in the production of high-quality laminate flooring. Installing this way eliminates a step that can take a long time.
In order to hide minor defects in the subfloor and give the laminate better durability, you’ll need to select one of these items.
Foam Laminate Underlayment
Laminate flooring underlay made of foam is the most basic type. Foam is available in rolls ranging from 3mm (1/8″) to 6mm (1/4″) thick and in a variety of widths and lengths.
When it comes to foam underlayment, there are two options: one with a moisture/vapor barrier and another without. Laminate flooring can be installed in the basement or any other space where high humidity is common, such as a bathroom, by using a combination product.
Laminate underlayment that incorporates rubber or fibers is known as upgraded foam underlayment. It also aids in dampening noise transmission from one floor to the next.
- Best-selling brands include QEP Roberts, MP Global, Courey Eco-Friendly, KronoSwiss, and LVT;
- Depending on the quality of the foam underlayment, it might cost anywhere from $0.22 to $0.30 per square foot. It costs between $0.30 and $0.45 per square foot more for a higher-quality foam underlay.
- For a DIY homeowner with basic skills, foam underlayment can be easily installed with the help of a roll of foam underlay. Use scissors or a utility knife to trim the material’s edges and around obstructions as you roll out the material. Instead of overlapping, the edges of all laminate flooring underlayment should be butted.
Acoustical Laminate Underlayment
Acoustic laminate flooring underlay is the best option if you want to reduce the hollow sound created by foot traffic. A moisture barrier is present in most cork and felt variants. They range in thickness from 3mm (1/8″) to 6mm (1/4′′) and can be installed with only minimal abilities.
- Top brands include QEP Roberts, Eco-Cork, AcoustiCORK, WidgetCo, Bildermann’s, and Blue Hawk (all cork and felt) (felt)
- There is a significant difference in price between cork and felt as an acoustic underlayment.
- Rolls of acoustical underlayment are used to install acoustical underlayment. Using a knife or scissors, it may be rolled out and cut into the desired shape. Cork is available in a variety of forms, including rolls and sheets that may be cut with either scissors or a knife. Rather from overlapping, the margins should be butted together.
Hardwood Flooring Underlayment
Hardwood is a broad term that encompasses several different types of flooring when discussing underlayment. Exotic hardwoods like Brazilian cherrywood and koa are available as well as domestic hardwoods like oak, maple, hickory, and ash. Solid hardwood on top of layers of composite material is incorporated in engineered flooring. Since the underlay options for cork and bamboo are the same as for hardwood, we’ll include them here as well.
Felt Underlayment
It’s felt that’s most commonly used as an underlayment for hardwood floors, and it’s usually sold in rolls. Dense, with most goods ranging in thickness from 3mm (1/8″) to 6mm (1/4′′). A moisture barrier should be put in humid areas in addition to the felt because of the felt’s low moisture absorption rate.
- QEP Roberts, Bellawood, and Bildermann’s are among the most popular brands.
- Based on density and thickness, felt underlayment costs $0.75 to $1.25.
- Installation of felt underlayment is straightforward if you have the necessary abilities. Use a knife or scissors to trim the edges and around obstructions as you roll it out. Consult with your supplier to determine if the felt will be glued down. Subfloor type and finish floor selection will have an impact.
Cork Underlayment
Cork is also utilized as a moisture barrier beneath hardwood floors, and you can purchase it in both dry and wet forms. As a general rule, wood should be able to breathe, therefore no moisture barrier is necessary.
However, in areas with excessive humidity, a barrier is a better option. It’s important to remember that solid hardwood should not be laid in basements or moist areas.
- Manton, WidgetCo and QEP are some of the most popular brands.
- An underlayment made of cork and rubber is a luxury product, costing between $1.15 and $1.50 per square foot (depending on the size of the area covered by the hybrid underlayment).
- A flexible material, cork underlayment can be easily cut to fit around drains, doors, and other obstructions.
Rubber Underlayment
For hardwood flooring, rubber underlayment is an option. Rubber has great moisture resistance and noise reduction properties. Because it doesn’t require any glue, it saves time and effort when it comes to installation and removal.
In comparison to foam or cork, rubber underlayment offers higher sound absorption and moisture resistance and is available in thicknesses ranging from 2mm (5/64″) to 9mm (3/8″). Rubber is an excellent insulator as well. It’s simple to use, although it’s more expensive than other solutions.
- Leading manufacturers: Rubber Flooring, Sound Terminator, RB Silent Tread, Absorba Sound.
- The price of rubber underlayment varies from $1.15 to $1.50 a square foot..
- Rolls of rubber underlayment may be simply cut to fit for installation because they are produced in rolls and are easy to trim. Gluing is not necessary. Instead of overlapping, sew lines should be butted together.
Foam Underlay for Engineered Hardwood
As a sound-absorbing, mold-resistant, and recyclable underlay, foam is a great choice for a variety of applications. The density, moisture resistance, and durability of upgraded foam are all improved by the addition of rubber or other material fibers. You can choose between foam that includes a moisture barrier, known as combination foam, or foam that does not have a barrier. When hardwood floors are laid in a room with high humidity, the combination foam is the best solution for moisture control. Laminate’s foam underlay is very comparable to this underlay.
- QEP Roberts, LVT, MP Global, Courey Eco-Friendly, KronoSwiss are some of the most popular brands.
- It costs between $0.22 and $0.30 per square foot for foam underlayment, which is rather standard. It costs between $0.30 and $0.45 per square foot more for a higher-quality foam underlay.
- Installing foam underlayment is simple if you have some experience with hand tools. Foam underlay is available in rolls and may be easily installed. Trim the material’s edges and obstructions with scissors or a utility knife once it has been rolled out. Rather from overlapping, the margins should be butted together.
Carpet Underlayment
For a well-maintained wood or concrete subfloor, the most common carpet underlay is foam or rubber carpet cushioning. In today’s market, there are more padding options than ever. Among the most common are:
- High-density foam pieces bonded together to form a cushion.
- Standard urethane foam is inexpensive, however it is not recommended for use in high-traffic areas.
- Denser urethane foam frothed for usage in high-traffic areas
- Comfortable and robust memory foam
- Slab rubber is extremely dense and long-lasting, yet it costs more than most foam pads.
- Waffle rubber padding is less expensive than slab rubber padding, but it does not provide the same level of durability or comfort as slab rubber padding offers.
Your carpet store will be able to recommend the correct carpet padding based on the type of subfloor you have and the type of carpet you intend to install. Carpet Cushion Council recommends padding at least 1/2′′ thick for cut pile carpet and less for Berber style carpeting. Moisture barriers are commonly seen in carpet padding.
- Scotchgard, Step Ahead, Memory Foam, and Traffic Master are among the best-known brands.
- According to thickness and quality, carpet padding costs anywhere from $0.55 to $1.00 per square foot.
- Using scissors or a carpet knife, you may easily cut and trim the padding to fit around obstacles. A staple gun and one staple every two to three square feet are used to install the material.
Carpet buying and installation advice can be found in our buyers guide.
Vinyl Underlayment
1/4-inch plywood is the ideal underlayment for sheet vinyl flooring. If the OSB or plywood subfloor is in excellent shape, some installers will lay vinyl on top of it. 4’x8′ and 4’x4′ sheets of plywood are common sizes.
- No particular brand is linked with this product, which can be found at any home improvement store that carries open stock.
- Standard plywood underlay costs between $0.40 and $0.55 per square foot, whereas premium plywood underlay costs between $1 and $1.50 per square foot.
- Use 4’x8′ sheets of plywood for large areas, and 4’x4′ sheets for smaller ones, such as bathrooms, when putting down a plywood underlay. Dispose of old fixtures such as toilets and pedestal sinks before putting in a new one. To trim around drains and other obstructions, use a handsaw to cut the pieces to size. Staggered seams should be used in big regions. To secure plywood to a wood subfloor, use 1 1/8″ underlayment nails, and plywood adhesive to secure it to concrete. Apply self-leveling compound to the seams with a 6-inch shovel.
The Quality of the Installation is Crucial
Learn as much as you can about the installation process before you get started on a DIY project. Installing your flooring correctly will ensure that it looks its best and performs its best. Getting numerous quotes from local flooring contractors is a smart move when hiring a professional to install your new flooring. Find out what they’ve done in the past and get a list of references. In order to find a reputable flooring contractor at a reasonable price, use this method.
Conclusion
It’s one thing to know how to fix water-damaged underlayment; it’s another to know how to preserve it. We hope you never have to deal with water damage on your floors again, but if you do, we’ve provided you with the information you need.
Nguồn: https://spasifikmag.com
Danh mục: Damaged


