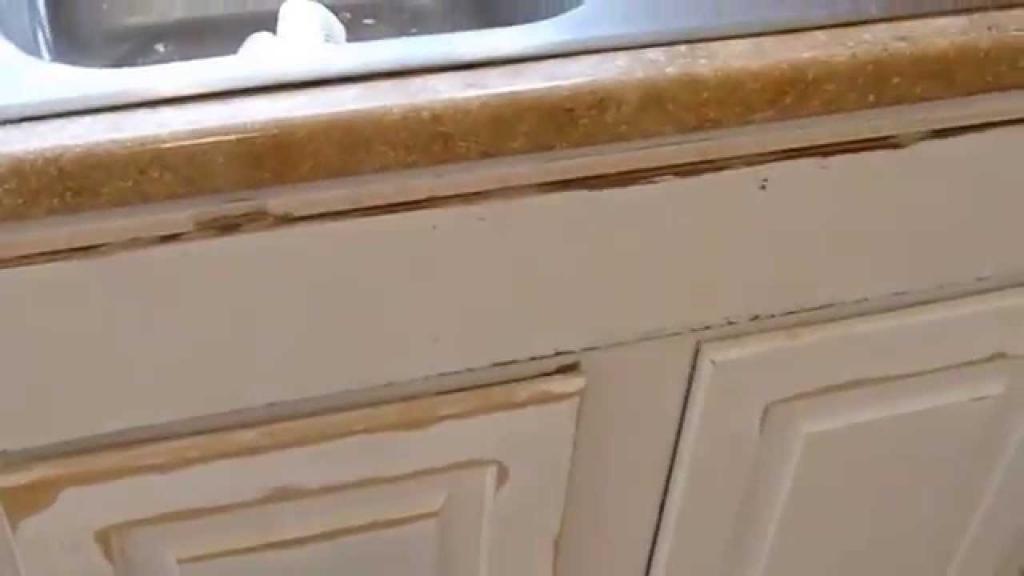
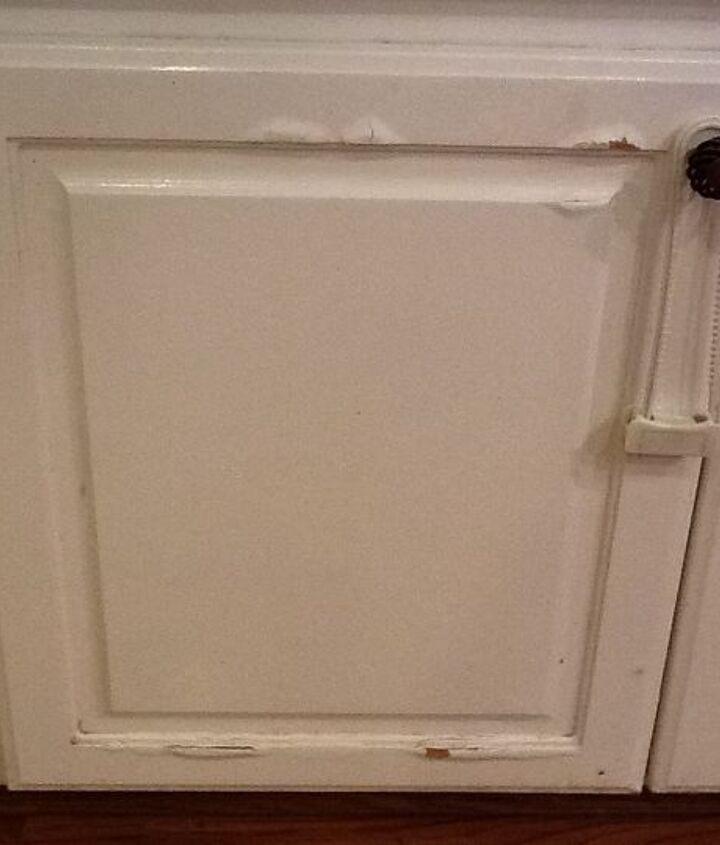
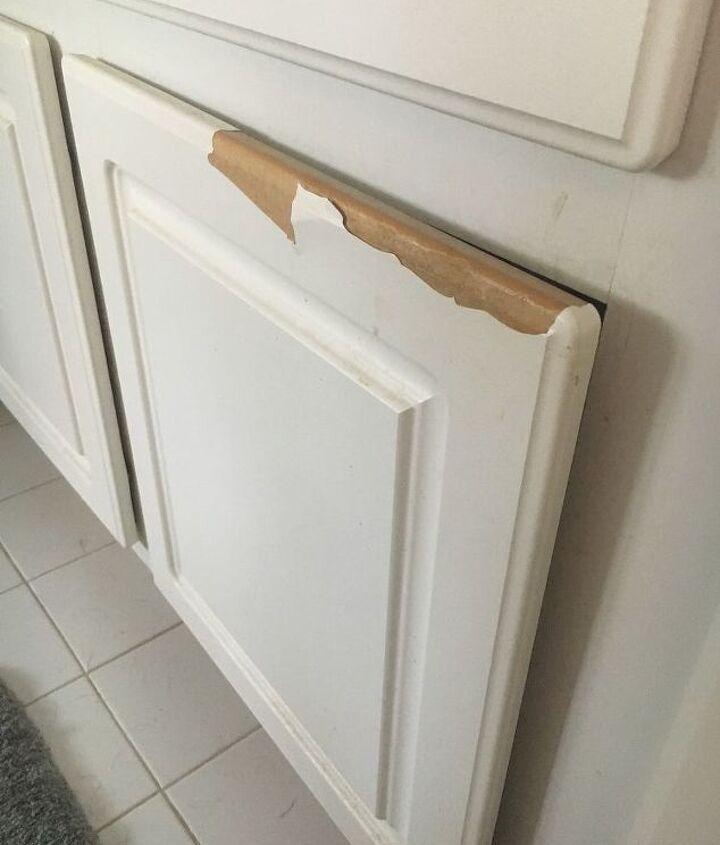
Cabinets in the kitchen take a lot of abuse, especially if they’re located behind the sink or the refrigerator and are constructed of flimsy materials like MDF or particle board. Cabinets that have been damaged by water from your sink and moisture from the air can be more noticeable.
- How To Replace Water Damaged Brick Sheathing? Step-By-Step Guide
- How To Diagnose A Damaged Water Heater? Comprehensive Guide
- How To Patch A Water Damaged Ceiling? Complete Step-by-Step Guide
- How To Fix Water Damaged Paneling? Step-By-Step Process
- How To Save Water Damaged Wood Furniture? Simple Tips
It’s common for water-damaged cabinetry to expand, resulting in paint chipping off or laminate bubbles forming and ruining the surface. Because of water damage in your cabinets, you may discover that a laminate surface is peeling off completely.
Bạn đang xem: How To Repair Water Damaged Cabinet Doors? Complete Step-by-Step Guide
Repairing water damaged kitchen cabinets as soon as possible is critical to preventing further damage. However, the team at Kitchen Infinity knows from experience that water damage to cabinets can reach a point where they are no longer salvageable.
The best approach to repair water-damaged kitchen cabinetry and explore measures to prevent future water problems is the focus of this article.
Come on, then!
9 Steps For Repairing Kitchen Cabinets After Water Damage
In general, these are the steps you should follow when installing any type of cabinet door, regardless of the material or style. It’s important to use common sense when determining the extent of water damage and whether or not it’s possible to rescue your cabinets.
Using these nine techniques, you can easily repair water damage on cabinets made of MDF, particle board, plywood, and many other materials.
So, how do you fix water-damaged wood cabinetry?
1. Prepare the cabinets for repair
To begin, you’ll want to have the cabinets ready for the work ahead of time.
You need to remove the cabinet door from its hinges and place it on a work surface which is safe and protected for tools/paint. Move it to a garage or shed and cover it with dropcloths to prevent paint splashes.
Removing hinges, handles, and other hardware from the cabinet door may be necessary, depending on the extent of the water damage. Regardless of the extent of the water damage, you may find this method to be helpful.
There can’t be any recent water damage to the doors before you start working on them. If necessary, remove them a few days before you intend to fix them.
2. Use a shellac-based primer on the wood
Shellac-based primers, which can be found in most hardware stores, can be used to fix minor defects and damage to wooden furniture, such as our cabinets.
Typically, shellac-based primer is applied with a spray bottle, making it simple to cover up imperfections. To smooth out the surface of your cabinet door, apply 1 or 2 coats of this product over damaged areas.
Shellac-based primers allow you to paint over them with any type of paint. This primer will smooth out the wood’s surface and allow the paint to adhere to it very well.
3. Apply plastic wood filler if necessary
Plastic wood filler can be used to repair significant areas of water damage on your kitchen cabinets if you like. If your cabinets are made of particle board, make sure to properly clean them.
A little putty knife and a tube of plastic wood filler are my preferred methods of applying and smoothing out the filler in spots where it is needed. What you use, how much you use, and how you apply it will obviously vary based on the circumstances.
Before moving on to the following stage, make sure your cabinets’ surfaces are smooth and flat (or as flat as possible!).
4. Get sanding that cabinet door!
Once the glue has dried, it is time to begin sanding the surface.
Sanding is a common part of kitchen cabinet repair, and this is no exception! A sanding process is needed to restore the wood to its original appearance, free of any bubbling or swelling areas.
The 120-grit sandpaper that I prefer is fine, but any equally coarse grit should work fine. This stage can be performed by hand, but I like to use an electric sander.
An electric sander from a well-known home design firm is great.
Keep in mind that you’ll likely have to redo the process, so the cabinets won’t appear brand new right immediately. After sanding, ensure sure the surface is smoother and less damaged.
5. Repeat the previous steps if necessary
If your cabinet is severely damaged by water, you may want to repeat the preceding steps a few times to ensure that the repair job is appropriate.
Shellac primer, plastic wood filler, and sanding may all be necessary, depending on the extent of the damage.
If you’re unsure, ask a friend who’s good at home DIY or use your best judgment! Steps 2 to 4 should be repeated until the wood appears flat and smooth.
Focus on the wood repair rather than the color at this time.
6. Start painting your kitchen cabinet!
It’s time to start painting the cabinet door once the water damage is barely noticeable and the surface is flat and smooth.
Repaint the cabinet using the same color and type of paint you used on the original design. The shellac primer will make it easier for the paint to stick to the wood.
A paint roller and a small paintbrush can be used to complete the process of painting a larger cabinet door. Painting using paintbrushes is also an option, depending on personal preference and skill level.
Xem thêm : How To Replace Water Damaged Brick Sheathing? Step-By-Step Guide
Water-damaged regions of a cupboard should be painted over completely, rather than only the damaged sections.
Wait for the painted cabinet door to cure completely depending on the sort of paint you used once you’ve completed painting it. Because oil-based wood paint takes several hours to dry between layers, make sure to allot plenty of time for this process….
7. Sand the painted cabinet doors down
Performing this repair will demonstrate just how adept you are at sanding!
Yes, after the paint has dried, use a finer sandpaper to refinish the surface. Rather than reshaping the wood, the purpose here is to make the paint finish appear more uniform. Additionally, the sanding helps to produce microscopic holes and grooves in the cabinet door surface, which assists subsequent paint layers to adhere.
To finish this repair, I sand using a 220-grit sandpaper.
Sand the painted wood again, either by hand or with an electric sander. Hand sanding is preferable since you can be more precise and protect the paint finish.
Please, don’t be harsh!
8. Apply a final coat of paint and sand it down again
A second sanding with fine 220-grit sandpaper or comparable is all that is needed now. A few more times may be necessary, depending on the condition of your cabinet door.
At this time, there should be no evident water damage or paint chipping. The cabinet door should look like it just came off the line. Finally, the restoration is nearing its end!
9. Apply a water-proofing varnish or seal
Applying a clear coat or final topcoat to kitchen cabinets that have been damaged by water is a good way to ensure that the problem doesn’t return.
Wooden kitchen cabinets can be coated with a variety of waterproof sealants, transparent coatings, and varnishes. Choose one that is appropriate for the type of wood and paint you’ve been working with.
The clear coat’s finish should also be considered. If you want a flat matte paint finish, for example, you want a clear coat that does not dry shiny.
Your cabinets won’t be impenetrable to water, but they’ll be much more difficult for future moisture to permeate the wood thanks to the use of waterproof paint and varnish.
How Do I Protect My Kitchen Cabinets From Water?
If your kitchen cabinets have been restored, you want to make sure they don’t suffer any more harm in the future. Keep in mind that protecting your cabinets is preferable to continually repairing them. There are five primary methods:
1. Get them laminated
Laminate kitchen cabinetry is a popular option. Laminate protects your wood cabinets and frames from water damage by covering them with a layer of “laminate.”
Plastic or a comparable water-resistant material may be used to make this laminate layer. Despite the fact that laminated kitchen cabinets are not waterproof, the smooth exterior layer can prevent water droplets from accessing the wooden core of the cabinet doors.
It is feasible to paint laminate kitchen cabinets to complement the style of your kitchen if you like a more matte finish.
2. Use a water-proofing varnish, seal, or clear coat
Your kitchen cabinets can be protected from water damage by applying a clear finish. Even if your kitchen cabinets are made of inexpensive wood, you can prevent them from absorbing water with this method.
Kitchen cabinet doors can be coated in a variety of waterproof sealants, varnishes, or clear coatings depending on the type of wood and paint used.
Keep in mind, however, that the finish (i.e. glossy, matte, or satin) of the clear coat you choose must match the finish of your new kitchen cabinet design.
3. Get a deeper style of sink
It could be time to remodel your kitchen if you continually spilling water on your cabinet doors.
For example, do you need a sink that’s a little deeper so that water doesn’t spill out so easily? Possibly a better sink edge seal is required to prevent water from escaping.
Water spills can be avoided entirely by installing a different type of sink. Preventive maintenance is preferable to corrective maintenance.
4. Try new countertop edges
Changing the design of your countertop edges may also be an option. If you don’t think about it, the design of your countertop edges might have a big impact on the risk of water dripping into your cabinets and destroying them.
If you have a countertop with a bullnose edge (i.e., an edge that bends all the way around), you’re more likely to see water spills dripping into the cabinets below.
On the other hand, if you have beveled edges on your kitchen countertops, spills tend to fall straight down onto the floor, omitting the cabinets completely.
Square edge or beveled edge countertops are an excellent alternative if you have no small children to worry about (the edges might be sharp!) if your home is prone to cabinet damage.
5. Get better ventilation or dehumidification
Consider installing a kitchen exhaust fan to help with any issues you may be having with your kitchen. If you frequently cook or boil a lot of water, you’ll want to be sure that the steam you produce is properly vented from your house.
This isn’t some complicated science.
Open your windows to let the moisture and steam out, but you might also want to look into kitchen extractor fans and dehumidifiers to assist soak up the excess moisture in the air that’s damaging your beloved cabinets!!
Xem thêm : How To Clean Water Damaged Bare Wood? Step by Step Instructions
An open window has a limited impact.
MDF vs. Plywood: Know the Difference
Engineered woods such as MDF and plywood are frequently utilized in the construction of kitchen cabinets. Higher-end kitchens use them because they are more resilient and long-lasting than particleboard. However, each has its advantages and disadvantages. Let’s compare the two.
Strength
Breakdown of hardwood and softwood composites yields medium-density fiberboard (MDF). A sort of wax is used as a bonding agent to hold the fibers together. For painting, the surface is extremely smooth. Melamine-coated MDF cabinets are also available. MDF is a good substitute for plywood, but it isn’t quite as robust.
Using three or more wood veneer sheets, plywood is created by gluing them together. The material’s strength is comparable to that of solid wood.
Water resistance
MDF is more easily damaged than plywood, which is more water resistant. In contrast, MDF cabinets with a melamine finish are virtually impermeable to water as long as the finish is in good condition. When water gets in, the material expands and becomes more difficult to repair than water-damaged plywood.
As long as it is properly sealed and protected from the elements, plywood is a solid choice for outside applications. If you seal the material with liquid polyurethane or a similar sealant, you can keep it in good condition for a longer period of time.
Appearance
This is because plywood has a more refined appearance compared to MDF. Veneer sheets preserve the natural beauty of wood while allowing you to save money if you want the look of solid wood cabinets but lack the funds to purchase them. To keep the original look, you can paint or stain the plywood cabinets.
Despite its unassuming appearance, MDF has many advantages. In addition to painting it in a variety of hues, you may also apply laminate for a more contemporary look.
Installation ease
Plywood is more difficult to fasten, but because it is made up of multiple layers, the screws are more tightly held and the plywood remains structurally sound for a longer period of time.
It is easier to fasten MDF than it is to screw wood because of the small fibers in MDF. If care isn’t taken, the material can potentially be damaged.
Cost
Because MDF is less expensive than plywood, individuals looking for kitchen cabinets on a budget choose it over plywood. Plywood, on the other hand, looks nicer and lasts longer, making it a superior long-term investment.
How Much Does it Cost To Replace Cabinet Doors?
While replacing cabinet doors can be expensive, there are a number of aspects to keep in mind. There is a per-square-foot expense for changing cabinet doors. Depending on the style and wood species, certain doors are more difficult to construct and more expensive. You’ll also need to take into account how the doors will be finished and whether or not drilling and hinges will be required for the installation. The cost of your cabinet doors will be affected by each of these criteria, and your final budget will be determined by them all.
To find out what kind of finish you want for your cabinet doors, do some research and talk to a painter or a paint supply store about the options available. They can help you decide whether or not to go the DIY route. With Cabinetdoors.com, you may choose from a variety of Sherwin Williams colors or a Clear Satin Conversion Varnish to finish your doors if you don’t want to paint them yourself. A local painter or finisher could be hired as a third alternative. Professionally finished painted doors will cost more than unfinished, paint-grade doors. Make sure that if you plan to paint or stain your replacement cabinet doors yourself, you also take into account the material expenses connected with each step of the procedure.
Cabinetdoors.com can only offer you a general sense of what this might cost because prices and ballparks vary by region. Whatever your location, it is important to keep these points in mind when putting out a financial strategy.
- Design of a cabinet door
- diameters of cabinets’ doors
- species of wood utilised
- The finish of the cabinet doors
- The cabinet door’s quality is an important consideration.
- Replacement cabinet doors can be purchased from the following retailers:
Cabinet Door Replacement Costs at Cabinetdoors.com
Affordability is a key consideration when it comes to upgrading cabinet doors. You could pay much more or less for your doors, depending on where you get them. Retail outlets often charge a markup of 30-50% over the manufacturer’s pricing, resulting in a large increase in your prices. If you don’t want to pay the markup, you can. You can place an order directly from the manufacturer’s website.
Ordering replacement kitchen cabinet doors from Cabinetdoors.com allows you to avoid paying a retail markup because you’re ordering manufacturer direct. Not only that, but you can choose from any of our available wood species and finishes when you place an order with us. To put it another way, your new cabinet doors will be custom-made to your specifications and brought directly to your door from our manufacturer in the US. So, how can you figure out how much it will cost you to have new cabinet doors?
If you want a certain sort of wood for a particular door style, you can get a different price per square foot when purchasing cabinet doors. When you make an order for a replacement cabinet door, you’ll provide the exact dimensions you need to establish the price. Then, select your wood type and finish, and the Cabinetdoors.com order page will compute the cost per door for you.
Cabinetdoors.com makes it simple to figure out how much you can spend on your project. Even if you don’t buy the hinges from us, you can spend a little more to have hinge pockets bored in each of the doors for a simpler installation. At Cabinetdoors.com, we believe that the cost of replacing cabinet doors should be simple to determine. From ordering to receiving, everything is made simple on our website.
Cabinet Door Replacement Costs at Retail Stores
You should expect to pay more if you shop at some of the most popular large box hardware and home improvement stores. As a rule of thumb, you may expect to pay between 30 and 50 percent extra for each cabinet door. Because you have to pay for the shop location, these prices are greater. That is to say, you’re paying for the services of a slew of intermediaries.
There are fewer personalization possibilities available at big-box businesses because of the same middlemen. Cabinetdoors.com has a far wider selection than what you’ll discover elsewhere. To buy simply the doors is not an option in most retail establishments. As a result, you’ll have to have your old cabinets removed and arrange for installation with the retailer. While doing it yourself can save you money on demolition, in order to maintain the warranty, most retail businesses insist that their items be installed by specialists.
Nowadays, shopping in a brick-and-mortar store and hoping to find someone who can help you is much less convenient than ordering online and having everything delivered straight to your door. Replacing cabinet doors at a large box retailer can be expensive, and it’s not always worth it.
Cabinet Door Replacement Labor Cost
Replacing cabinet doors might cost anything from $200 to $400. You must also take into account both the cost of labor and the amount of time it will take to install the product. When it comes to replacing cabinet doors, you have two options: you can either do it yourself or pay a professional to do it for you.
It’s possible that a professional cabinet refacing company will come in, take measurements, find doors and hinges, and then replace the old doors with the new ones for you. However, these personnel expenditures can quickly pile up if you hire the wrong person. Instead of hiring a contractor, you can install your own cabinet doors. Besides the price of your doors, this won’t cost you anything additional. However, it may require a little more effort on your part. Especially if you’re a first-timer or a full-time employee who can only work on home improvement projects on the weekends. A good drill and screwdriver are also necessary if you don’t already own them. In contrast, the process is made as simple as possible by Cabinetdoors.com from then on out.
Detailed instructions on how to measure, order, and install replacement cabinet doors may be found at Cabinetdoors.com. You may order your doors from us online and save a lot of money, and you can install them yourself with confidence, which saves you even more money! You don’t need to be an experienced contractor to hang your new kitchen cabinet doors precisely in a single afternoon, we guarantee. Everything on this site has been created with the end-user in mind. If you’re a DIY aficionado, you could even enjoy this project.
You can also work at your own pace and make all the decisions instead of being dictated to by a contractor’s schedule. In this way, you can save time by not having to wait till someone has time available, and money by not paying someone to do something you can simply accomplish on your own. Keep in mind, however, that even if you pay someone to finish or hang the doors, you can still save money on cabinet door replacement expenses by ordering online at Cabinetdoors.com.
Other Potential Cabinet Door Replacement Costs
Cabinet door replacement can come with a variety of expenses. Repairing concealed damage is typical while you’re upgrading your home, kitchen or bathroom. When upgrading any section of your home, it’s a good idea to include a few extra dollars in your renovation budget to cover unexpected expenses. Consider these expenditures while budgeting for new cabinet doors.
Replacing Cabinet Doors: Other Possible Costs
- Repairing or replacing any cabinetry that has been damaged or is in poor condition. Sink, range, oven, and over-the-range microwave relocation are all more expensive.
- Identifying and repairing any concealed damage, such as water damage, mildew, or mold, identified while replacing cabinet components.
- Supplies and materials are subject to sales tax.
- Hinge boring and new hinges are in order.
- finishing materials like sandpaper and paint or stain or laminate are used to complete projects.
- Products for cleaning, refinishing, and repairing cabinet boxes.
As anybody who has worked with contractors on a major home improvement job can attest, renovations are inherently unpredictable, and costs can soar at any time. You can save money by purchasing replacement cabinet doors from Cabinetdoors.com and putting them in yourself, knowing that. Changing cabinet doors doesn’t have to be prohibitively expensive. Let Cabinetdoors.com help you keep within your price range.
The Bottom Line
Repairing your kitchen cabinets is not a simple task, but it is doable if you are prepared to invest the time, effort, and supplies required. Repairing your wet cabinets might take anything from a few hours to a few days, depending on the type of paint you’re using and the scope of the endeavor.
In my opinion, the best way to protect your cabinets from future spills is to invest in deep sinks, good sealing, and counter edges that allow spills to roll off the end and into the floor. I wish you luck with your repairs, whether you’re addressing current problems or preventing future moisture damage.
Nguồn: https://spasifikmag.com
Danh mục: Damaged


