Is there a baby shower coming up and you’re stumped as to what to bring? A new mother will never be able to have too many diapers. Whatever the theme of the baby shower, there’s an easy method to give lots of diapers if you like to get creative. A stroller diaper cake would be the ideal gift for a pregnant woman who isn’t sure whether she’s having a boy or a girl.
Simple instructions for making a stroller diaper cake are below.
Bạn đang xem: How to Make a Stroller Diaper Cake? Step-By-Step Guide
What is a diaper cake?
This cake-shaped construction is made of diapers and decorated with a variety of items, such as toy animals and flowers. There are normally two or three layers of diaper frosting that are wrapped in ribbons.
Depending on the theme of your baby shower, you can alter the design of your diaper cake. The most common shape for a cake at a baby shower is a round one, but diaper cakes in the form of automobiles, motorbikes, and even animals are becoming increasingly popular (unicorns and elephants are popular choices).
Why make a diaper cake?
Making a diaper cake is a considerate and enjoyable idea whether you’re hosting or attending a baby shower. You may use diaper cakes as both an attractive centerpiece and an unforgettable present, but they’re also useful.
A baby shower isn’t complete without a few diaper cakes for the mom-to-be to take home with her when it’s all said and done. To make the gift even more useful, some guests at baby showers include extra diapering materials (such as wipes and diaper cream) in the cake.
How many diapers do you need for a diaper cake?
The number of diapers you’ll need for a three-tier cake may vary depending on its size and form, but expect to need anywhere from 38 to 64 diapers.
A good technique to figure out how many diapers you’ll need for the bottom of the cake is to figure out how wide you want the bottom to be. Think about how many tiers you’d like to have.
On order to figure out how many diapers you will need for each tier, divide the number of diapers in the tier below it by two. You’d need 16 diapers in the center layer and 8 on top of a three-tier cake built with 32 diapers as an example.
What are the Best Diapers to Use for a Baby Diaper Cake
Diapers come in so many varieties these days that choosing one might be overwhelming (especially if you’ve never had a baby in diapers before!).
For starters, I would recommend that you choose diaper cakes that are between the ages of 2 and 4. As a result of their newborns’ delicate skin, new mothers are frequently choosy about the diapers they use on them or require a variety of brands to be tested.
As soon as a baby outgrows its newborn diapers, they’ll be able to wear a wider choice of brands and types without having any concerns.
Xem thêm : How To Assemble Chicco Bravo Stroller? Easy Step-by-step Guide
Color should be your next point of focus. Plain white is best if you want your embellishments to truly stand out.
Many diaper brands now provide bright, eye-catching designs that may even compliment the overall theme of your diaper cake. If you’re looking for inspiration, you may want to peruse these first.
Don’t worry if you find a terrific diaper deal but the print or color isn’t to your liking. It doesn’t matter if you buy them because you can utilize them in your internal rounds/layers that aren’t visible from the outside.
What You’ll Need to Make a Diaper Cake
When it comes to making and decorating a diaper cake, the options are endless. However, here’s a quick rundown of the essentials:
- Diapers. To make a small to medium-sized diaper cake, you may only need one or two packs of diapers (depending on the size of the pack), but you can go much larger and use more diapers if you like! It’s a good rule of thumb that the first tier may need between 20 and 60 diapers, followed by the second tier between 10 and 40 diapers, and the third tier 5 to 20. It’s up to you to decide how many tiers and how big each tier is, and these values are only approximations.
- Rubber bands with a squishy surface. If you’re utilizing the rolling method, you’ll need one extra-large rubber band each tier and as many small ones as you have diapers.
- Ribbon for aesthetic purposes. The diapers will be held in place and decorated with this.
- A foundation. Consider using a cake stand or a tray instead of cardboard. If you can find a piece of wood in a craft store or online, you can display some cakes on it.
- Glue. If you don’t want to use glue, you can, although it can help keep the ribbon in place.
- Dowels. Dowels are required to keep the tiers firmly in place if you intend to use them.
- Scissors
- The diaper cake can be decked out with miniature baby gifts, as well as whatever craft supplies you like for the sign and/or decorations. For further ideas on what you might need, take a look at the pictures of our decorated rooms below.
- Tulle or cellophane in long, flowing strands. If you plan to wrap the finished product, you’ll need this.
What Diapers to Use
To bake a diaper cake, you’ll obviously need diapers. There are a number of products that we recommend.
Choosing a diaper size is completely up to you! When it comes to making the cake, though, it may be more convenient to get a larger cake pan.
Even though you won’t have to worry about handling a variety of different-sized diapers, you may want to consider choosing a different size for each of the cake’s tiers if you’re only using one size. Parents-to-be won’t run out of options after their child is born.
Step-by-Step: How to Make a Diaper Cake
A diaper cake requires patience, but it can also be a lot of fun. It’s also a terrific way to stimulate your imagination. Just follow these five easy steps, and your finished product will be ready to go.
Step 1: Choose a base
For diaper cakes that will be transported, a robust base is essential. You don’t want it to fall apart due to a weak foundation. It’s possible to use something sturdy like a cake stand or a large tray. There are a number of ways to hide the cardboard, like covering it in foil and wrapping paper, or cutting it into a circle that is exactly the same size as your bottom tier cake.
Step 2: Prepare the diapers
Diaper cakes can be made using either the roll-up or the wrap method. Roll each diaper and fasten it with a rubber band so that it can’t unfurl for a roll-up cake. It’s also possible to wrap a ribbon around each one, although this takes longer. Roll each one separately until you’ve finished.
To make a wrap diaper cake, you only have to perform a few simple things. Step three is as simple as removing the diapers from their container.
Step 3: Position the diapers
If you’re making a roll-up diaper cake, stack the rolls together until the bottom tier is the desired size. Wrap a large rubber band or ribbon around the rolls to keep them in position. It’s possible to cover a rubber band with ribbon if you choose. Make a little knot that you may cover with a decoration later on, or use a small amount of hot glue to secure the ribbon. Another alternative is to use the long ends of ribbon to tie a huge bow.
Diaper rolls need to be secured in place by around three wooden dowels if you plan on adding another tier in the future.
Xem thêm : How to Open a Graco Modes Nest Stroller? Step-By-Step Guide
More diaper rolls can be placed around the dowels to make the second tier. There should be a second tier that is smaller than the first one. Just as you did with the first tier, use an extra-large rubber band or ribbon to secure the second. If the top points of the dowels protrude, you’ll need to clip them off or use shorter dowels.
Stack as many tiers as you desire, and then proceed to the next stage in the process. Place an upright paper towel roll on your base and wrap the diapers around it for a wraparound diaper cake. Continue wrapping until your diaper cake’s first tier is the desired width. When you’re finished, use an extra-large rubber band or a ribbon to keep the diapers in place. The ribbon can be tied with a knot or a bow, or it can be fastened with hot glue (taking care not to get any on the diapers). When you’re ready to decorate your diaper cake, you’ll be able to hide any exposed rubber band ends.
Make sure to keep in mind that some people choose to give the parents-to-be a gift of a bottle of bubbly instead of the paper towel roll. You might also use a baby bottle as an alternative. Your present to the parents might then include this item. Regardless of how it’s done, it’s always a pleasant surprise. Keep wrapping diapers around the top half of the paper towel roll to create a second tier. Use a rubber band or ribbon to secure the second tier, which should be smaller than the first. Alternatively, proceed to step four and add a tiny third tier in the same manner.
Step 4: Add decorations
Diaper cakes can be decorated in a variety of ways. In order to keep your diaper rolls in place, try covering the rubber band with ribbon or fabric.
You can decorate the cake with little toys by arranging them around the base or on each tier.
Adding a large teddy bear to the top of the cake is also a good option.
Flowers, paper cutouts, calligraphy-written signs are just some of the options available to you as a decorator. You don’t have to stick to the theme of the baby shower if you don’t want to.
Theme ideas for a baby shower for a girl or a baby shower for a boy are available if you haven’t decided on a theme yet.
Step 5: Wrap the diaper cake
A smart tip is to wrap up the cake before shipping it, so you don’t risk damaging it in the process. Place the diaper cake’s foundation on a large sheet of cellophane or soft tulle and secure it in place. Wrap the cake in cellophane, cinch the corners together, and secure it with a piece of ribbon.
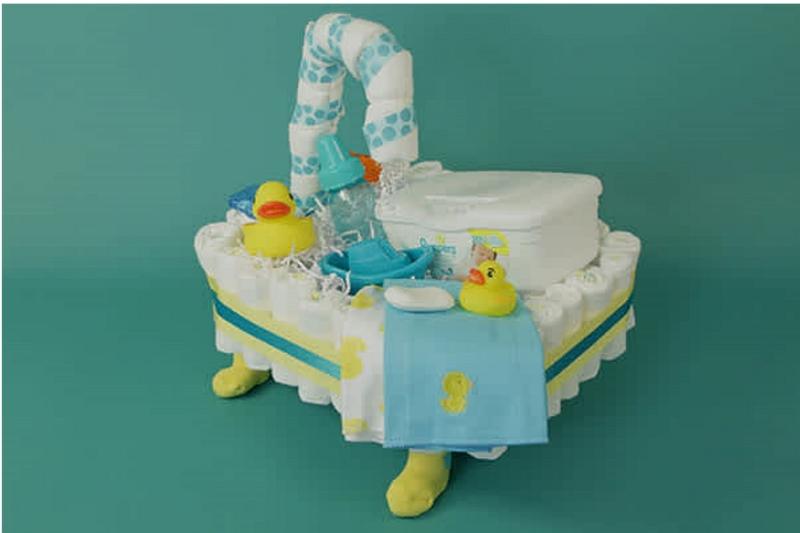
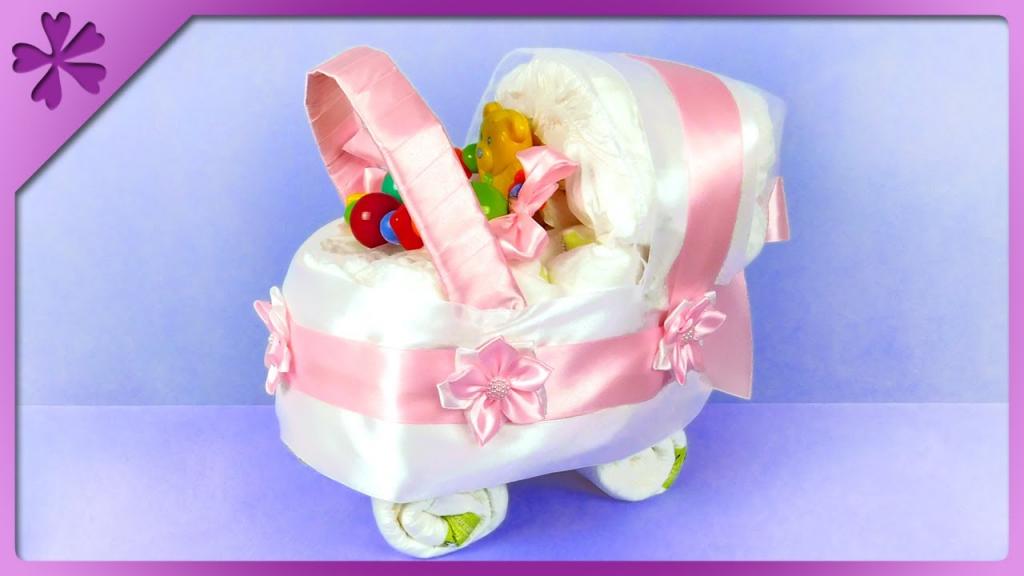
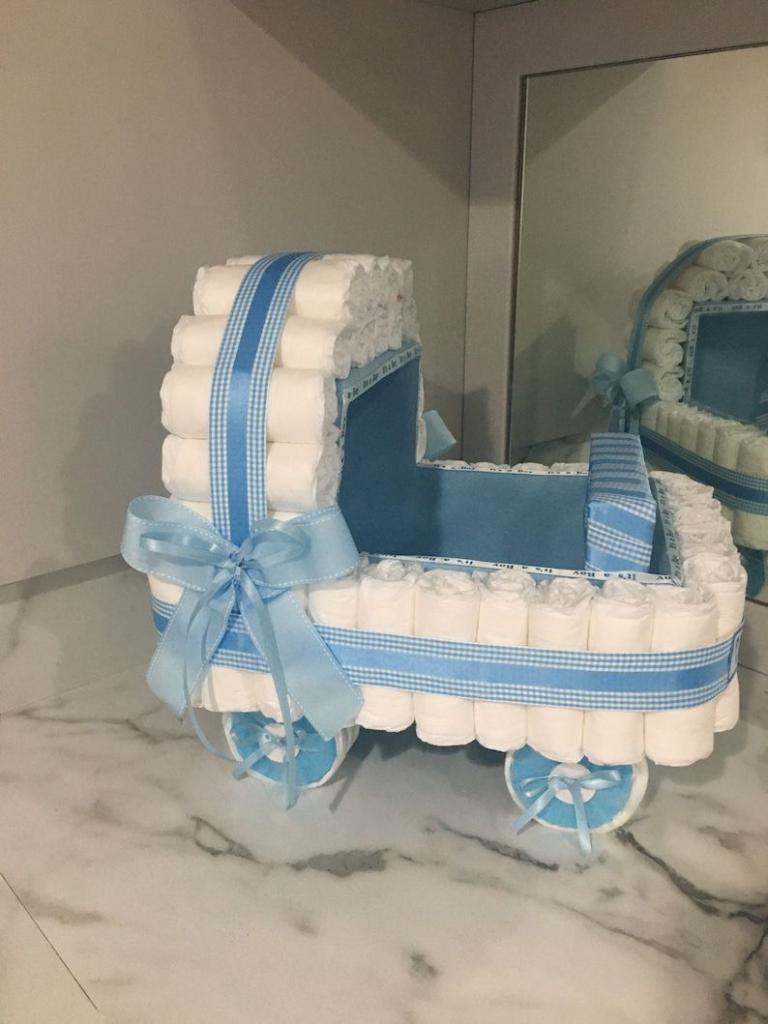
Different Diaper Cake Shapes
Diaper cakes don’t have to be spherical! Diaper cakes can be made in a variety of shapes, including the basic diaper cake shape we’ve mentioned above, to reflect a certain theme.
25 Diaper Cake Decoration Ideas
The diaper cake can be decorated in a variety of ways to make it stand out from the rest. To make your diaper cake stand out, try one of these 25 creative ideas:
- A baby shower staple is baby blue and white.
- Another traditional combination for a baby shower is pink and white.
- Gender-neutral colors of yellow and baby blue are a beautiful choice.
- Modern style calls for deep hues like navy or black with silver accents.
- If you’re going for a star-themed look, gold is a great color choice.
- To go with the fairy or forest concept, go with purple.
- Diaper cakes inspired by nature look wonderful in green and brown.
- For a baby shower with a superheroes theme, basic children’s colors such as red, blue, and yellow work great.
- Incorporate patterned or multicolored ribbons throughout the design. Consider polka-dot or other patterned ribbons, or a ribbon with a unique accent. If you like, you can start with a thicker ribbon and then finish with a finer ribbon of a different hue or texture on top of that. It’s possible to experiment with various materials, such as lace or burlap, as well.
- Consider using twine as a substitute. Using twine instead of ribbon as a method of securing diapers in a diaper cake is a popular new trend. With some flowers or greenery, it may be stunning.
- Each tier should be adorned with a piece of fabric. Buffalo check or muslin can be used to cover each tier of a baby shower gift for the mom-to-be with a farm or country theme.
- Try a variety of approaches to the base. A clean piece of wood can be used as the base for a woodland or nature-themed baby shower. Placing the diaper cake on a mirrored plate will reflect the shower’s pink and gold hues brilliantly, enhancing the overall look. If you’re going to use cardboard as a base, make sure you wrap it in matching wrapping paper.
- Cut out some paper shapes, either by hand or with a printer. As an example, you might decorate the side of your diaper cake with cutouts of fairies, owls and foxes if you were going for a forest theme. To get some ideas, have a look at these cutouts. Cutouts of bodysuits, baby bottles, and booties are all examples of “baby related” cutouts. Use small, decorative pegs, or glue the cutouts to the ribbon with care so that the diapers don’t come into direct contact with the adhesives.
- Put on a bow tie and a matching bow. Make sure to include both bows and bow ties in your diaper cake if the baby shower theme is “bows or bow ties.”
- Tulle can be used as a trim. Add tulle trim to the bottom of the diaper cake if it’s a ballerina or princess theme. This has the extra benefit of concealing the base.
- Flowers say it all. Flowers are the perfect gift for a soon-to-be mother. Your diaper cake could benefit with adding fresh (or faux) flowers or flower bud shapes cut from paper or other craft materials, such as felt. Check out this tutorial for how to make beautiful felt flowers at home.
- Display a pennant banner on the wall. To decorate one tier of the cake, you can use a little pennant banner from your local party supply store. Cut triangles from colorful card stock and attach them with string or twine to design your own. Each triangle can be personalized by adding letters, such as the word “baby.”
- Publish a notice. Signs like “Oh, baby!” (or “Oh boy!” if the gender has been disclosed) or something else that matches the baby shower theme can be made to match the occasion. If you have a buddy with calligraphy talents, now is the time to ask them for help. In addition to card material in a wide range of colors, you can use glitter, pens in various colors, and more. The use of finger paint is another option. Stick a toothpick on the bottom border of your sign and set it between two diaper rolls to keep it upright.
- Small gifts can be placed at the bottom or on each tier. Adding a few small baby accessories to your diaper cake will make it seem even better and give the parents-to-be a little something extra. These items include: a teething ring, bath toy, burp cloth, diaper, mittens, small travel pack of wipes (and, for the littlest ones, pacifiers). Even a couple of small add-ons will make your diaper cake appear even more opulent, but don’t go overboard.
- On top, place a plush toy. You can top your diaper cake with a plush animal, like an elephant, rabbit, or teddy bear. If your diaper cake has a certain color scheme (pink, for example), the cuddly toy should match or contrast with that scheme. Put a dark brown teddy bear on top of a baby blue diaper cake, for example.
- Add crinkled paper to each tier. This is a popular way to cover the diaper rolls of each tier. Buy shredded paper that matches the color scheme or theme of your diaper cake and place handfuls on each tier.
- Every layer should have crinkled paper. When it comes to covering the diaper rolls in each tier, this is a typical method. Put a few handfuls of shredded paper that matches your diaper cake’s color scheme or motif on each tier.
- Succulents and other vegetation add a contemporary twist to the decor. Diaper cakes don’t have to be “baby” themed to be a good idea. You may, for example, use succulents, green branches, or local flowers to embellish your diaper cake. When coupled with twine or burlap, this can look really beautiful.
- On top of it, place baby booties. A pair of baby booties or shoes is irresistible, and utilizing them as the centerpiece of a cake is a clever idea.
- Add a helium balloon to the mix. Small helium balloons in a variety of colors or sayings like “Oh, baby!” are probably available at your local party supply store. To keep it in place, tuck the straw that came with the helium balloon between a pair of diaper rolls.
- Take care of it like a real unicorn. The horn, ears, and eyelashes of unicorns are all the rage right now, so include them in your diaper cake. Unicorns are easy to produce, thanks to common craft supplies such as card paper and glitter. To keep the shapes in place, insert a toothpick through the diaper rolls and into the shapes themselves.
- Sweets are a must. After all, it’s a diaper cake. Why not sandwich some cake pops or cookies on sticks between the diapers? It’s possible to add a sign reading “Sweet baby” if you chose to go this route.
- Decorate according to the time of year. Adding sunflowers or bees on your diaper cake is a cute idea for the summer. Fall is a great time to contemplate pumpkins and changing leaves. Make a snowman out of your diaper cake or decorate it with silver glitter and snowflake cutouts if it’s for a winter celebration. A “Baby it’s chilly outside” sign is a great addition to a diaper cake for the winter months. In the spring, you can decorate with butterflies or bunnies. Year-round, but especially in the spring, flowers are a great choice!
- Include a book for young readers. Diaper cakes are a great way to incorporate your favorite children’s book into your baby shower celebration.
- Wrap each tier with string lights. Battery-operated lights can be purchased at your local big-box store or online. If the theme is “twinkle, twinkle, tiny star” or “a star is born,” beautiful lighting can perform wonders. A tremendous show-stopper, this!
- It’s doubly exciting if the expectant mother is carrying twins.s. You may make two smaller diaper cakes or add two toys so that each baby has a soft toy.
- Don’t go overboard. Numerous tiers and elaborate embellishments aren’t required for diaper cakes. As an example, you might simply make a diaper cake from a single package, put a sign or soft toy to the top, and decorate it with ribbon. It’s all finished!
The bottom line
When it comes to diaper cakes, there is no right or wrong way to do it. Your efforts will be appreciated, regardless of whether you choose to make a grand gesture or a little one. Have fun with it, and see how the guest of honor’s face lights up when you reveal your work to him or her. Enjoy it.
Nguồn: https://spasifikmag.com
Danh mục: Kids