If you know how to identify if your subfloor has been damaged by water, you won’t have to pay for unneeded and costly repairs. You’ll need to inspect your subfloor for evidence that it’s in need of replacement if the damage is serious.
- How To Repair Water Damaged Popcorn Ceiling? Step-by-Step Tutorial
- How Electrical Fixtures Get Water Damaged? Everything You Need To Know
- How Long To Dry OSB Board In Water Damaged Wall? Things You Need To Know
- How To Diagnose A Damaged Water Heater? Comprehensive Guide
- How To Fix Small Water Damaged Hole Drywall Ceiling? A Step-by Step Learning Guide
Subfloors, whether made of concrete or wood, are vulnerable to water damage. Early detection of wear and tear is critical to preventing further deterioration and the spread of damage. The following information will help you determine whether or not your subfloors are damaged and what else you need to know about assessing the damage on your own.
Bạn đang xem: How To Tell If Water Damaged Subfloor Is Okay? Complete Step-by-Step Guide
Underneath the visible floor area, a subfloor is a surface. In addition to fir, OSB and plywood, it can also be made of various materials. It serves as a base for the outer flooring material, such as tile, hardwood, or laminate, that can be seen from above.
OSB is a composite material that is formed by gluing together small pieces of wood with adhesive. Due to its low cost and ease of installation, this is a frequent subflooring material. Compared to plywood or other conventional subfloor materials, it is also cheaper. As a result, OSB subfloors are common in modern homes.
Depending on where you live, different people have different ideas on what constitutes a subfloor. Concrete flooring can be considered the subfloor surface in various areas of the house, such as the basement. The concrete surface is often left uncoated. In any case, it’s still a subfloor.
A concrete floor may be encased in another layer of material in some cases. Even so, you’ll have to put down sleepers before you can put down your chosen top floor material.
The optimal lifespan of a subfloor is the same as that of the home. As a result, it’s uncommon to have to make repeated repairs to the subfloor. If the subfloor begins to show symptoms of wear and tear, it may be time for a new one.
Twenty to thirty years after the surface is installed, the vast majority of subflooring issues will arise. If the installation is of poor quality, the problems may come up sooner.. As a result, you need to know when to change the surface.
The entire top floor must be removed before the subfloor can be replaced. As a result, you must be certain that there is a problem with the subfloor. If you don’t do it right the first time, you’ll waste time and money.
In addition, if you don’t know how to replace the part, you could do it incorrectly. As a result, the subfloor will need to be replaced again after a while due to wear and tear.
Before you replace the subfloor, here are some things you should know. First, let’s take a look at the symptoms that your subfloor needs to be replaced.
Signs That Your Home’s Subfloor is Damaged
When the subflooring material is damaged to the point of being dangerous to walk on, it needs to be replaced. In other cases, unevenness in the subfloor can point to more serious structural issues with the foundation or the floor joists. It’s possible to experience multiple of these circumstances at the same time.
1. Loud Squeaks
In most homes, the creaking of the floorboards is typical and unnoticeable. If you hear a squeaking sound coming from your floor, it’s most likely caused by wood rubbing against a nail. Using skims or wood screws, you might try to find the source of the squeak.
The subfloor’s loose materials are to blame for the annoying squeaks. There could be a problem with the OSB or any other subflooring material. As a result, sound is produced when the subfloor material rubs against a nail holding it to the joists. Subfloors that have begun to warp are likely to produce creaking noises.
OSB flexes because it is not as robust as plywood. Because of this, when you step on the floor, you’ll hear squeaking from the nails holding them to the joists.
It is possible to repair a squeaky floor without needing to replace the subfloor in many cases.
2. Weak Subfloor
There should be no dips or weak spots in the subfloor. If you walk on your subfloor and feel it give way under your feet, there is probably a problem with the installation of the subfloor or the floor structure. Here are a few reasons why your subfloor may be sagging or uneven:
- A water leak or moist crawl space has caused water damage to the subfloor.
- The distance between the floor joists or trusses is greater than 16 inches.
- The subfloor’s border does not rest on a joist.
- The subfloor will be uneven if the joists or trusses are unequal, which could signal a structural issue.
As moisture seeps into the flooring, it weakens the surface, which might be caused by plumbing leaks or a damp crawlspace. Your subfloor (and the floor joists) can dry rot without your knowledge if you have a moisture problem in your crawl area.
The crawl space may need to be encapsulated or a water drainage system like a French drain installed if you have a long-term moisture problem.
Floor joist lengths wider than 16 inches on center (o.c.) were tested by builders in the 1980s and 1990s to discover how far they could go without sacrificing structural integrity. Many homes still have floor joists that are 24 inches or wider in length across the center.
The subfloor will bend underneath if the floor joists span more than 16 inches o.c. unless diagonal 1-inch thick planks are used. Floor joists of 16 inches o.c. are notably needed for plywood and OSB to reduce deflection.
In addition, a bad subfloor job could be at blame. During installation, the ends of the subflooring must meet in the middle of the floor joists as a general rule. The plywood or OSB will not catch a section of the floor joist if the dimensional lumber is bent or not correctly framed, causing the edge to float and feel like a weak area.
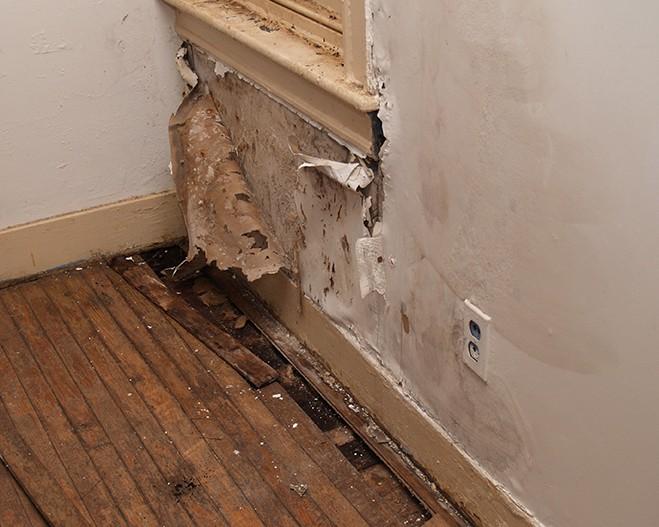
3. Cupping Floorboards Due to Moisture
Because a floorboard is supposed to be flat, cupping is a sign of an underlying issue. As a result, the house’s value is reduced because of the warping. Inconsistent floor surfaces are unappealing to the eyes.
In some places, you may have observed that your floorboards are curled. The finished flooring may split from the subfloor due to the presence of dampness. You can’t rule out the possibility that a problem with the subfloor is responsible for the curling. Moisture may have been able to get through the floors because they weren’t properly installed.
However, it’s possible that the subfloor’s weakness is due to an underlying problem.
In this instance, you should inspect the subfloor for signs of moisture damage. Finished flooring warping is most frequently caused by uneven or wet subflooring.
4. Cracked and Popping Tiles
Whenever your tiles begin to fracture and pop up on their own, there is an issue that has to be addressed. When installed correctly, a tile should not be able to be readily yanked out. Some tiles will peel off after a long period of use, but the problem lies in the subfloor.
Make sure there aren’t any trowel marks on the popped tile. A thin, dry set with no marks is a significant red flag that something is wrong beneath the surface. Moisture is most likely building up in the subfloor.
This may also be caused to the incompatibility between the tile and the subfloor. Ideally, the subfloor should be covered with cement board before the tiles are laid. With it, it’s easier to build a solid foundation on which the tiles can rest securely. It also lessens the bounce, which is a contributing factor in tile breaking.
It makes no difference what’s producing the popping or cracking. If you see this, your subfloor has an issue that needs to be addressed. If you don’t, the tiles will continue to fracture.
5. Musty Smell
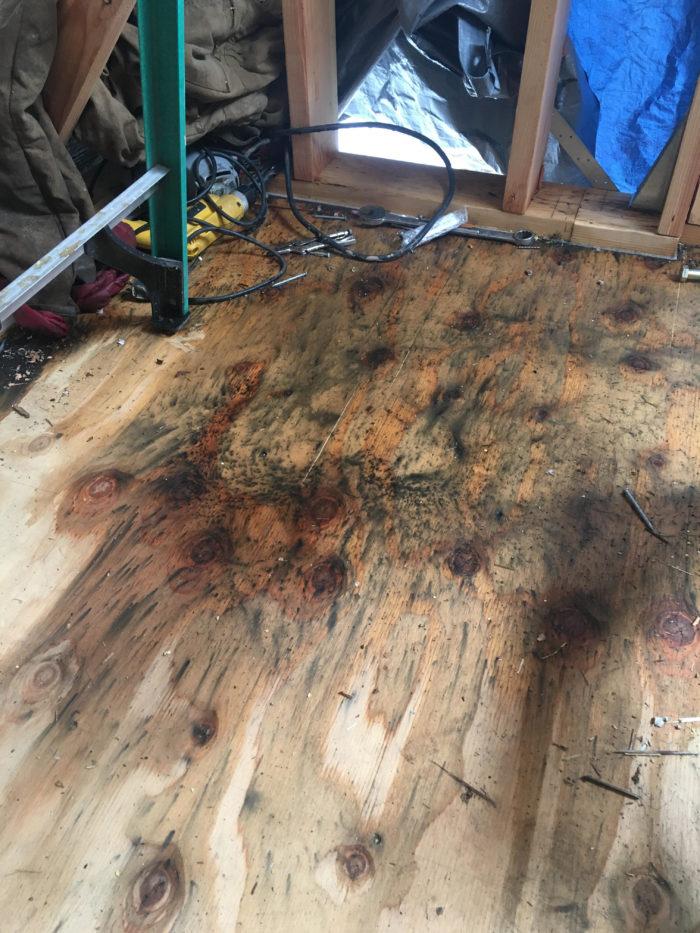
The smell of wet wood and mold coming from the floor indicates that the subfloor is most likely the source of the problem. It’s a sign that water has built up in a particular area. Mold thrives in a moist, dark crawl area.
A musty odor is the first indicator of mildew growth. The damage has already occurred by the time you notice the smell. This is a common problem in bathrooms and other settings where wetness is frequently present.
Crawl space musty odors are frequently the result of a plumbing leak or a groundwater problem. Both of these conditions, if left uncontrolled, can lead to significant structural and subfloor damage.
You may also need to build a vapor barrier, a dehumidifier, or a crawl space encapsulation if you have recurring groundwater difficulties.
You may be able to get away with merely patching the leaks and rebuilding the damaged subfloor if you have plumbing leaks.
Additional bracing between floor joists may be used instead of subfloor replacement in modest occurrences of subfloor damage.
The subfloor cannot be replaced from below. You can only add structural support by bracing it. To stabilize the subfloor, some contractors would cut a thin piece of plywood or OSB to press against the damaged subfloor and then brace it for further support.
6. Bouncy Floor
If you walk on your floor and it feels bouncy, you should be concerned about the condition of the subfloor. When you walk, you may also notice that the floorboards move. It’s not natural, either, and points to an issue with the subfloor.
Xem thêm : How To Clean Water Damaged Walls? Easy Step-by-step Guide
If you have a spongy floor, there is a separation between the subfloor and the floorboards. Because of this problem, the subfloor is likely to give way under the weight of traffic below. Therefore, the best way to remedy bouncy floors is to inspect the subfloor and fix it if necessary.
There are two possible causes of a bouncy floor:
- The floor of the crawl area has been ravaged by dry rot due to a lack of moisture.
- There is a faulty support for the foundation.
7. A Loose Toilet
A toilet needs to be firmly secured to the floor. If the subfloor region is weak, the anchors that hold the toilet in place are not strong enough to keep it in place. Moisture from leaking pipes is the most common cause of subfloor damage in most toilets.
When you see movement in your toilet, fix the problem immediately. In the long run, it will help prevent more damage. As a preventative measure, you’ll want to have the subfloor and any leaky pipes repaired.
Other parts of your floor can be affected by water damage, especially those near the entrance of your home. A poorly-fitting door will allow rain or snow to seep into the flooring if it is not properly sealed.
In regions where flooding is a regular occurrence, subfloor damage is common. Thus, rather than replacing your subfloor every few years, waterproof your home first. Water accumulation, which can be disastrous, will be greatly reduced as a result.
8. A Leaky Ceiling
Subfloor damage might result from a leaking ceiling. Water that falls from the roof onto the floorboards is absorbed by the subfloor. It’s possible that your subfloor will need to be replaced after a long period of exposure.
Because of this, it is necessary to rebuild the subfloor that has been damaged by a roof leak. It’s possible to save money on a subfloor replacement if you’re quick to respond. Over time, moisture in the subfloor can cause wood rot.
What Causes Subfloor Damage
According to the information provided, the most common cause of subfloor damage is an excessive amount of moisture exposure. Possibly a leaking pipe or flooding is at blame. In addition, moisture will undoubtedly enter through a door or window that isn’t properly sealed.
It’s also possible that the toilet isn’t properly installed. As a result, the water from the toilet will seep into the floorboards and cause it to buckle.
The majority of subfloor damage can be linked to water, but there are a number of other possibilities. According to the US Department of Housing and Urban Development (HUD), pests are to blame. The subfloor will also get weaker if it is subjected to numerous earthquakes. It’s also possible that there are problems with the foundation of your floor.
Underlayment damage is something to be aware of. As a result, it’s rare to discover a subfloor that has all of its pieces intact. As a result, if the damage and its source can be identified, then repair should not be a problem.
We’ve provided a list of the most prevalent indicators here. You should be able to use this information to determine when you need the services of a flooring professional.
How To Know If Your Water Damaged Subfloor Is Okay
Step #1. Listen for a loud squeaking on your floorboards
It’s not unusual for a floor to squeak slightly. Often, people would ignore the bothersome noise and avoid walking over the creaky area of the floorboards, thereby avoiding the problem. However, if you hear a distinct squeaking sound, you may have a warped or twisted subfloor.
Subfloor nails that attach to the wooden joists generate a squeaking noise when they move in and out frequently. The subfloor should be nailed down to the joists as firmly as possible. The famed squeaks can be heard in the event of water damage, which loosens the nails.
If you hear a loud creaking, look underneath the floorboards to see if there’s any damage there. You can begin arranging the repair process from this point onward.
Step #2. Check for signs of mold
A moldy, polluted subfloor is most likely the source of a peculiar, musty stench coming from your floor. It is possible that water damage from mold will result in a squeaky, uneven, and even soft floor.
In the case of a molding subfloor, it may be difficult to locate the cause of an unpleasant odor. Inhaling mold spores can be hazardous to your health, so be sure to use a mask or other respiratory protection when doing so.
You can try a variety of DIY methods to eliminate mold from your subfloor. That said, it could potentially put you and your loved ones in danger by contaminating the air around you. Instead, hire a team of experts to take care of the job.
Step #3. Look for cracks on tiles
Seeing cracks in tiles can indicate that the flooring beneath it is weak and pliable. To prevent tiles from fracturing and cracking, they must be placed on a sturdy and stable base. You may tell if your subfloor isn’t stable enough by looking at the condition of your tiled floor for evidence of damage.
Look at the back of loose tiles if you’re still not sure if the subfloor is to blame. For sure, there’s a subfloor issue if the other side of the tile is entirely coated in dried thinset.
Step #4. Look for uneven or sunken sections
If you walk through your house and feel the floor shifting and sinking, you can be sure it’s a subfloor problem. It’s a sure sign of damage when the floor begins to sink between the joists and surrounding them.
This problem arises as a result of both deteriorating timber and heavy foot activity. Sinking flooring can be the result of a faulty subfloor installation as well as water damage, which is still a possibility. Because moisture is the primary cause of subfloor deterioration, controlling moisture is the best approach to prevent this from happening.
Step #5. Inspect the finish floor for damage
Examining the finished flooring for visible damage is the quickest approach to determine if your subfloor needs replacement. Your subfloor might need to be replaced, even if a simple floor breakdown appears to be the problem.
There may be a deeper issue that has to be addressed if cracking tiles, warped wood, or peeling Linoleum floor finishes are found. It’s possible that a closer look will show a problem with the subflooring.
It’s possible that water has warped the wood beneath the surface, resulting in a cupping hardwood floor. Perhaps the subfloor isn’t supporting the tiles properly. Moisture under the Linoleum could be the source of a bubbling Linoleum Floor.
If you suspect serious damage to your subfloors, it’s important to contact your insurance company or attorney right away. In this way, you can determine whether or not your insurance company will cover the cost of repairs.
Can You Replace the Subfloor Yourself?
Replacing the subfloor should be straightforward if you’re skilled in carpentry. However, it’s advisable to hire an expert because this isn’t a one-time problem.
The extent of the harm and the cause will be determined by an expert. A minor issue with the subfloor may turn out to be a major one. You may have some knowledge of subflooring, but it’s best to leave it to the experts, especially if the problem becomes more complex.
Having the necessary equipment is as important as having the knowledge and experience to correctly assess the source and extent of damage. To accomplish a great job, you’ll need the necessary equipment and knowledge. As a result, enlist the help of a professional and feel confident that every issue will be addressed.
You are still responsible for preventing damage to the subfloor. The source of the water damage to the floor may be found and repaired, for example. For example, if you notice a problem with the door’s fit, you may be able to fix it yourself without the help of a professional.
As a homeowner, you have a responsibility to check for suspected leaks, according to the EPA. Detecting and repairing leaks as soon as possible will reduce the expense of future repairs.
Subfloor repair should be delegated to a professional, but you should also be involved in its ongoing upkeep.
How Much Does It Cost to Replace a Subfloor?
For a 300-square-foot area, Angi estimates that it will cost $500 to replace the subfloor. If you need to repair the subfloor in a large room, the cost might soar to $700. The material of choice and the cost of labor are two more factors that can raise the price of a project.
The higher the quality of the material, the more expensive it will be to produce. When labor expenditures are taken into account, the price might jump to $900. An hour’s work usually costs roughly $30. Consequently, you must be prepared to pay for the labor.
For how much per square foot?
A square foot of most materials costs between $1.50 and $7.50, on the average. The pricing is a direct reflection of the quality of the product. Plywood, at about $1.50 per square foot, is the least expensive option. As a result, a 300-square-foot room will cost $450.
Building prices and material shortages have made much of the information available obsolete. From 2019 to 2021, the cost of materials has more than doubled. As of this writing, plywood costs between $45 and $75 per sheet, whereas OSB costs between $28 and $60 per sheet.
Xem thêm : How To Repair Water Damaged Camper Ceiling? Step by Step Instructions
For example, at current rates, we estimate that replacing a plywood subfloor will cost between $2.50 and $5 per square foot.
What is the Cost of a DIY Subfloor Repair?
An avid do-it-yourselfer You can take on this project if you enjoy fixing things around your house. In addition to this, you must be familiar with subfloor fixing, as was previously instructed.
Repairing the subfloor has the primary benefit of saving you money on labor. As a result, you’ll simply have to spend money on the materials. Select a material based on how much money you have available to spend.
You’ll also need to purchase the appropriate tools, even if you already own them. At least $40 is required for a circular saw. You’ll also need a crowbar and nails, both of which are around $10. Finally, you’ll need a nail gun, which will set you back about $150.
The 5/8-inch OSB subfloor should be replaced with 1-1/2-inch screws rather than nails. Replace 3/4-inch plywood with 2-inch screws.
You’ll save money on labor expenditures, but you’ll have to put in a lot of effort. The amount of time it takes to repair the subfloor depends on the severity of the damage. Replacing the subfloor in one room can take up to a day on average.
Even if you can save a significant amount of money by doing it yourself, you’d rather employ a professional. Your subfloor will be constructed from a material of their choosing. A expert can also fix it faster than you can.
You should expect to pay $30 an hour for a professional. Between $720 and $3,200 is the average total cost of labor. Moving items out of the house and tearing off the old subfloor are two things that will drive up your labor prices.
Also, if you have a huge room, you’ll have to spend more time and money on it.
How Long Does it Take to Replace Subfloor?
If the space is tiny, a professional can repair the subfloor in a matter of minutes. For those who choose to handle the work themselves instead of hiring a contractor, the process can take up to a week to complete.
A expert should be able to mend a modest room in no more than eight hours. If the region is extensive, the job can be completed in no more than 24 hours. Because of this, we strongly recommend that you hire a professional for the job.
Is it Hard to Install Subfloor?
If you have the proper tools, installing a subfloor isn’t that difficult. As a result, anyone with even the most basic knowledge of carpentry will be able to swiftly and easily resolve the problem. There is a lot of work involved, but if you follow the proper procedures, the process should be a breeze.
We’ll go through some of the most important stages for mending the subfloor:
You’ll Need to Assess the Damage
A clear view of the subfloor region is the best approach to determine the severity of the problem. As a result, you’ll have to tear out a section of your finished floor. Use a flashlight to inspect the degree of the damage after it’s been removed. If the subfloor in the region is defective, you may also need to investigate the crawl space.
You’ll be prepared for the work ahead of you after the inspection. It is best to use the least invasive method possible. It will be inexpensive and simple to implement. The degree of the problem, though, may necessitate the removal of a considerable portion of the subfloor to find out what’s causing it.
Make sure the subfloor is in good condition before dealing with a cracked tile problem.
You’ll Need to Determine the Cause
The most important stage in subfloor replacement is determining what is causing the problem. It’s pointless to put in another subfloor if the problem isn’t fixed; it will meet the same destiny as the original.
The subfloor of a toilet should be checked for leaks. It’s possible that your subfloor is warping due to shoddy installation. As a result, when laying the new subfloor, be sure to correct this issue.
Also, the joists can fail, resulting in damage to the subfloor. Fixing the issue will be a piece of cake once you find out what’s causing it.
Repair any Plumbing Leaks
You should address the leak first if you suspect that the subfloor damage is caused by water. In the preceding section, we emphasized the importance of this procedure.
It’s impossible to fix all the water issues in the world. When dealing with a leak, the most critical step is determining the leak’s duration. Because of its continual interaction with water, the subfloor cannot be saved. Having mold growing on the subfloor is one of the most obvious signs that the floor is beyond repair
As a result, look for evidence of significant damage to the subfloor. It’s also crucial to know where the water leak is coming from. A water spill, for example, could be the cause of the leak. It’s also possible that the subfloor was soaked because of floods in the house.
There’s no need to rebuild the entire subfloor if the water problem was a one-off. The following suggestions can be of assistance in such a situation.
- Remove all furniture and floor coverings from the afflicted areas to allow fresh air to circulate. The drying process will be sped up if all of the water is removed from the surface.
- The drywall must be removed as well if it is moist. It’ll help the subfloor dry down faster.
- It is also critical to aerate the damaged area in order to hasten the drying process of the subfloor. The room must have box fans for this. To speed up the drying process, utilize the box fans both below and above the floor. The Hurricane Box Fan is an excellent choice for this application. It works well and doesn’t take up a lot of room. Additionally, it has a top speed of 2400 CFM, which is simply astounding.
- Excess moisture can be removed from the crawl area with the help of a humidifier.
Repairing Dry Subfloor Damage
Some of the subfloor material may feel flimsy even after it has dried, even though the water damage has cured. Rather than removing the subfloor, which is time-consuming and expensive, you can fortify it. Make certain, however, that the old layer is not infested with mold.
As a first step, check for any symptoms of mold or mildew. The next step is to attach a joist material to the underside of the subfloor. It is possible to lay another subfloor on top of the previous one without weakening the structure’s integrity.
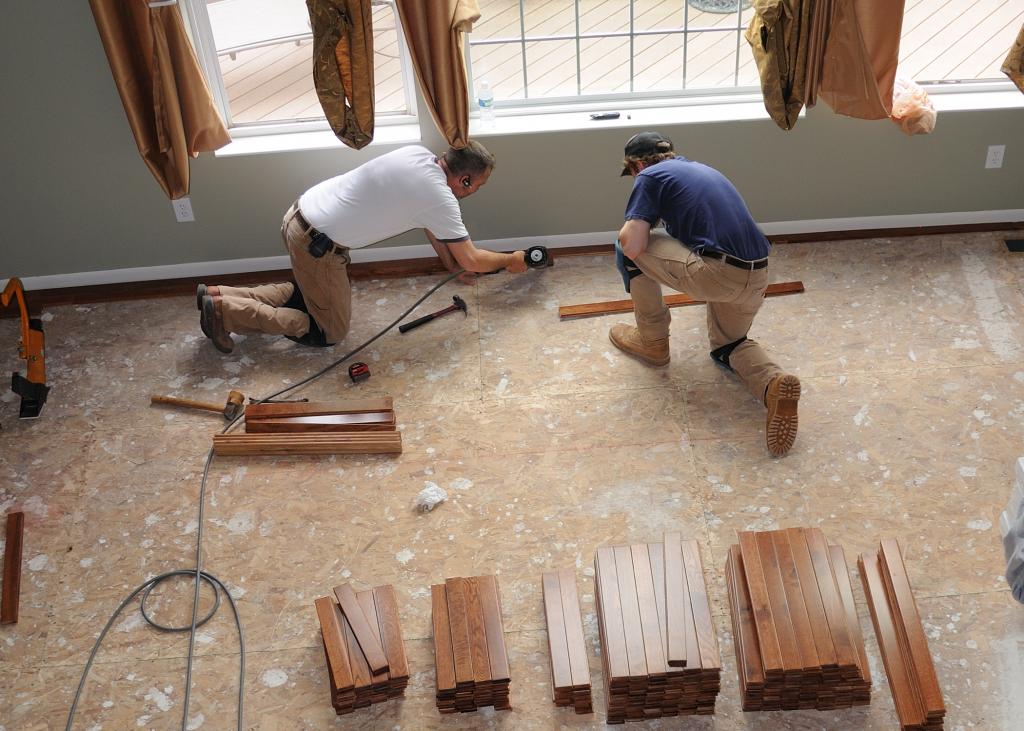
Steps to Installing a New Subfloor
In other circumstances, the leak may have been going on for a long time and the subfloor is beyond repair. If that’s the case, you’ll need to get another one. However, you should not rush into a total refinishing of the floor. Everything will be fine as long as you fix the broken part.
To replace your subfloor, take these steps:
- The first step is to remove the upper flooring. Depending on the extent of the damage, it may or may not be reused. If you decide it can be reused, remove it with care to avoid harm.
- Install a new floor by removing the old one and replacing it. All the subfloors that have been ruined must be removed during this step. If you leave a portion of the mold-infested piece, it will spread to the new piece.
- Remove the original subfloor’s square and symmetrical sections. It will guarantee that the new subfloor will fit correctly without any difficulty.
- Consider the thickness of the new subfloor material while making a decision. As a result, the joists will be perfectly accommodated. Afterwards, glue the floor’s sides to the joists where they are attached with an adhesive. For this task, we propose Loctite PL Premium glue because to its compatibility with a wide variety of subfloors and other flooring types. Use a caulking gun to apply it thinly and evenly.
- Lay the subfloor and screw it firmly. If your floor was creaking before, it is now time to make the connection as tight as possible. Nails can also be used, however they are more susceptible to squeaking than screws. As a result, use screws.
Lay the subfloor and screw it firmly. If your floor was creaking before, it is now time to make the connection as tight as possible. Nails can also be used, however they are more susceptible to squeaking than screws. As a result, use screws.
Do You Need a Permit to Replace Subfloor
Screw the subfloor in place. If your floor was previously squeaking, now is the moment to tighten the connection. However, nails are prone to cracking, so you may want to use a different tool for the job. Because of this, you should use screws.
Over a joist or engineered floor system, a subfloor is installed. Permits are required if the subfloor is damaged or deteriorated to the point of replacement.
In some cases, a permit is required if you want to replace some of the joists as part of your restoration. After installing new joists or engineered trusses, the building department may conduct an inspection of your subfloor.
Do Plumbers Replace Subfloor
Plumbing is a specialized trade that focuses solely on water and waste pipe installation and repair. Plumbers rarely replace subfloors. It’s not, however, to say that all of them do so.
In most cases, you’ll employ a licensed contractor to conduct structural repairs, and that contractor will then hire a licensed plumber to handle the plumbing repairs.
Plumbing repairs are typically carried out in collaboration with a professional contractor hired by the homeowner if the plumber is hired directly.
How to Keep Your Sub Floor in Good Condition
Know Your Subfloor:
The first thing you need to know is that subfloors come in a variety of varieties, not just one. As a result, you must know which type you have in order to properly care for it. To find out what materials were utilized in the construction of yours, you may need to engage a specialist.
Removing Rubble and Debris:
The best approach to start degradation under the home and against the flooring is to accumulate rubble and other debris. As a result, you must make every effort to keep potential dangers off your floor. It’s possible that even in the early stages of deterioration, rats and other pests could get access to your house, mold could form, and other problems could arise that jeopardize the structural integrity of your house itself.
Ventilation:
If you want to keep your flooring in good condition, you must also make sure that it is adequately vented at all times. An underfloor moisture barrier prevents the rot and spongey areas that can form in your floors from spreading to the rest of the house.
Conclusion
A subfloor that has been damaged by water does not necessarily need to be replaced. You can easily dry and fix a wet spot with the necessary tools and know-how if you catch it early enough. It’s possible to permanently damage a wet subfloor by ignoring it for an extended period of time.
To assist you determine whether or not to replace your subfloor, you need to know how to tell if it’s water damaged. You can save yourself a lot of time and money by spotting the early indicators of deterioration to your subfloor.
Nguồn: https://spasifikmag.com
Danh mục: Damaged


