You may extend the life of your camper by learning how to repair a water-damaged pop-up tent trailer. Assess the damage, clear off any filth, and then patch or replace damaged pieces to get your trailer back in working order.
- What Is The Issue With K-Love? How To Cancel K Love Donation?
- What If I Buy Water Damaged House Without Knowing? A Must Read Guide
- What Is A Good Donation Amount? Our Effective Giving Recommendations
- The Quick And Easy Way To Remove The Swivel Off Your Recliner
- Who Invented The Hair Dryer? Brief History Of The Hair Dryer
However, it is possible to undertake all of the work yourself if the repairs are extensive enough. Repairing water damage to a pop-up trailer is easy if you follow the methods outlined in this article.
Bạn đang xem: How To Repair Water Damaged Pop Up Tent Trailer? 4 Easy To Follow Steps For You!
How To Fix Your Water-Damaged Pop-Up Tent Camper
Step #1. Find the source of the water damage
Identifying and correcting the root cause of a problem is the most important component of any repair. Reduce the amount of time and effort required to fix it, as well as prevent the harm from happening again.
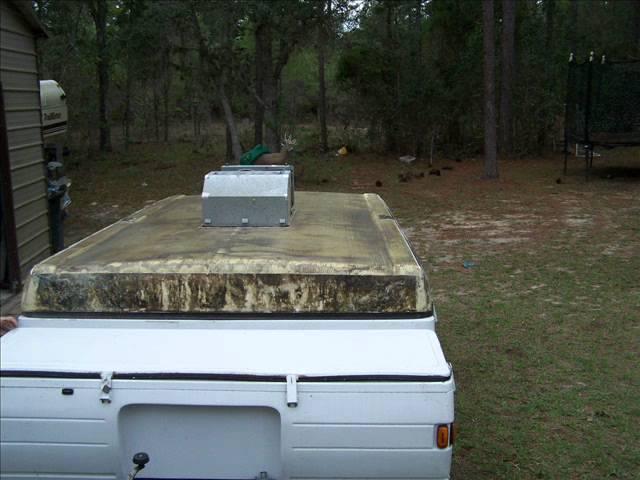
A broken roof is the most common cause of water damage, therefore it’s important to check for leaks and holes. Determine how much work is required by locating these sources of damage.
Other indications of water damage could lead you to the source of the problem, so be on the lookout for those, as well. Soft areas near the vents, discolouration, wrinkles, and mold development are some of the warning indicators to look out for.
Walls, floors, and windowsills may all have these warnings. Your camper’s pipes and seams may need to be repaired if this is the case.
Take a closer look at your insurance policy if your pop-up camper is insured. As a homeowner, you should contact your insurance carrier or a lawyer if water damage is covered by your policy.
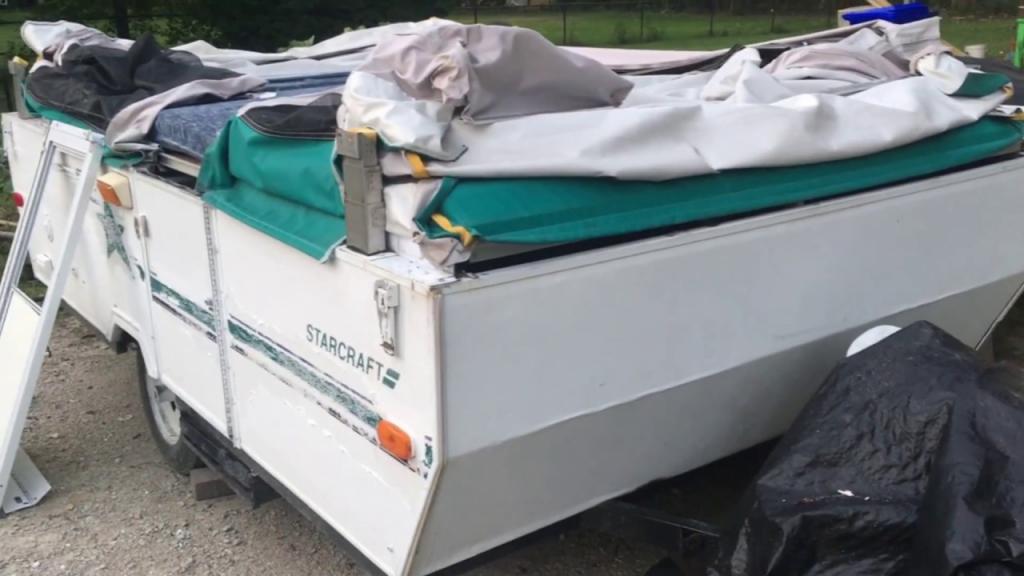
Step #2. Disassemble your camper
After determining the exact location of the damage, you can begin dismantling the trailer. The best place to begin fixing a leaky ceiling in your camper is with the roof. In this case, you can simply repair the affected region.
Take pictures of each phase of the dismantling process. Then you’ll have a reference point for putting everything back where it belongs.
Canvas or aluminum are the most common materials for trailer roofs, which are joined together by screws, nuts, bolts, and adhesive. The first step is to dismantle all of the components that hold the roof in place.
You’ll be able to view the wood panels underneath once the roof has been removed. At this point, it’s best to gauge the extent of the harm.
The panels may be structurally sound, so if the damage is limited, you may be able to perform simple repairs on them. You may need to replace the damaged panels if you believe the damage is substantial.
For safety reasons, you will need to remove the internal roof before replacing the roof panels. The lights, interior trim, foam insulation, and vents must all be removed.
Step #3. Clean up the area
It’s time to clean out the filth and grime that have gathered over the years. In order to attach your camper’s new parts with ease, it’s critical that any dirt and debris from the vehicle be removed.
Mold and mildew should be on your radar. Mold may be removed with common household items. If there is a lot of mold and mildew growth, you may want to hire mold remediation specialists.
Step #4. Repair and replace the significantly damaged parts
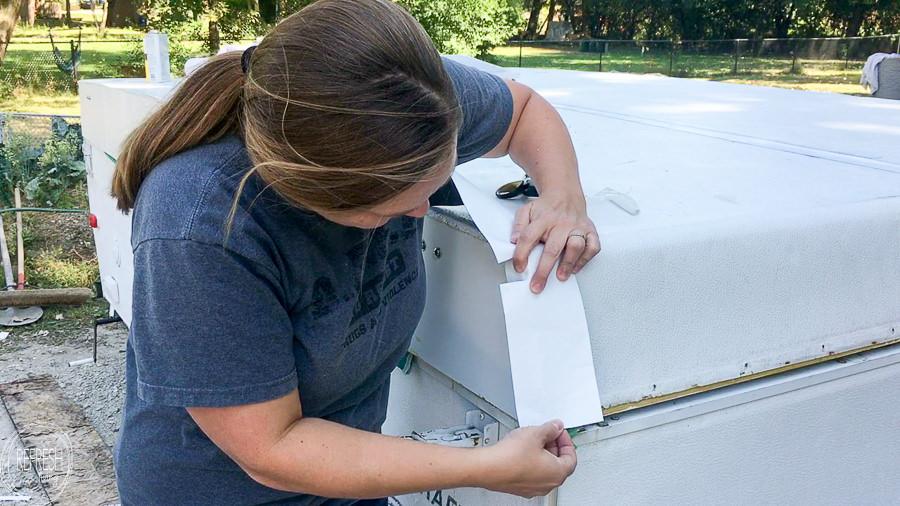
You can now proceed with the replacement and repairs in that region. Measure the damaged roof panels and frames that have been removed.
Each and every one of the campers is a one-of-a-kind individual The easiest way to ensure that the replacement parts you buy are an exact fit is to take measurements of each one. It would be helpful if you considered the appropriate distance between the placement of screws.
The only remaining step is to reinstall the replacement parts. Replacing the wooden panels and frames is a simple matter of screwing them back into place. Additional support can be added with wood glue.
After that, reinstall your roof. Aluminum roofing can be adhered with contact cement, which is a common household adhesive. If you have a canvas roof, you can screw it in place.
Putty or a utility knife and wood filler can be used for simple repairs both inside and outside. You should remove all of the soft, powdery areas of your wood panels until only the firm edges remain.
In order to repair the damaged region, you might use wood fillers. As soon as the wood filler has cured and hardened, it can be sanded to match the surrounding surface.
Your wood panels and frames, along with your replacement canvas, should be waterproofed to avoid any more damage.
Butyl synthetic rubber adhesive should be used to seal the roof seams when everything has been put back in place. Your camper will be ready to be painted once the repairs are completed.
Can You Replace The Ceiling Of a Pop-up Camper?
You can, but you’ll have to deal with the challenge of adhering the new ceiling material to the foam roof. Depending on the model, the ceiling may be made of luan plywood, which is vulnerable to water damage in the event of a roof leak.
Remove the plywood from the foam and install whichever ceiling material you like. You may not be able to use nails or screws since you are attaching fresh material to foam.
An adhesive that works with both foam and the new ceiling material would be required. Both in terms of ceiling materials and adhesive, there should be a wide variety to pick from. In addition, you may wish to add some wood and plastic molding to the new design.
Xem thêm : How To Dye A Tula Blanket? Comprehensive Guide
Do-it-yourself repairs should not cost much if you have a small camper’s ceiling. To add to the savings, you can find cheaper supplies at discount stores.
How Much Does It Cost To Repair a Pop-up Camper Roof?
When it comes to this game, it’s not just about being big. Your bill will be increased by the amount of damage caused by the leaky roof. To remedy simply a small leak, you may be able to spend $200-$300, depending on the materials and other variables.
All of the harm that you don’t see right away is where the extra money will come from. Your pop-up camper’s components might be damaged by water as it passes through the vehicle.
Mold and mildew will be one of the problems. These bacteria agents can be lurking in your camper if you remove molding and other pieces. Costly in terms of money, yet time-consuming in terms of effort.
In addition, rotten woodwork and perhaps damaged cables require repair work that might be rather costly. If you notice the leak right away, the hidden damage may not be as bad as you think. You could be down a few hundred bucks at most.
A camper roof repair will also cost you a lot of money in labor if you don’t do it yourself. Afterwards, you’ll have to fork over another $500-$700 to hire a professional to perform the job.
Pop Up Camper Roof Replacement Cost
Material costs and the time it takes to apply those materials will determine how much money you spend on the repair of your roof. While some individuals choose to use fiberglass roof tape or a leak-stopping solution, others prefer an ABS Powder and Methyl Ethyl Ketone Powder mixture. The choice of materials you make to replace your camper’s current roofing materials will have an impact on this. If you hire a professional, you may expect to pay anywhere from $1,000 to $2,000 for a new canvas, plus an additional $500 for work.
Most folks don’t bother with the metal roof at all. If you own a Coleman pop-up camper, you can see the price of the roof components here.
What you need to replace is what determines what parts you need to acquire. The roof can be restored to its former glory with the simple application of a rubber roof compound or a comparable product.
Since the materials are all priced differently at various retailers and prices can vary without warning, it’s difficult to place a figure on these efforts. For a typical RV, the price per linear foot is around $300, but with a pop-up camper, you won’t pay nearly as much.
How Do You Repair a Roof on a Pop-up Camper?
The first step is to gather the necessary materials, and then to begin dismantling the existing components. Moving on to the third phase and starting to install the new materials is possible if there is no significant interior damage, rotten wood, or corroded metal. The initial step is to find out what components and resources you’ll need to repair the damage. Rubber roof coating products, trim, molding, roof seals, and so on are examples of these materials. If the previous air conditioning system is damaged, you may also need to replace it.
Apply the product or items you intend to use to fill the cracks on the roof first. After that, it’s time to install the new parts you purchased to replace the old ones.
Just follow these instructions if the leak has not caused any additional harm to the camper. If the interior of the vehicle has been damaged, you’re in for a real challenge.
You must first eliminate any mold or mildew that may have started developing in the hidden regions after removing the old components. You’ll need to repair the wood if it’s rotted out, and so on.
If the camper’s interior has suffered extensive damage, it may be preferable to simply buy a new one rather than attempt the repairs.
Finding a New Roof For a Pop-up Camper
Many people choose pop-up campers because they may be repaired rather than replaced if they get damaged. Shop secondhand pop-up camper parts and supplies stores to see if they have anything in stock. Unfortunately, many homeowners just re-roof their existing homes instead of replacing them entirely. Not only do they not look for a substitute, but they also don’t talk about where you may find one.
You might also try contacting the company who made your pop-up camper to see if they can assist you. There are wrecking yards and other firms that trade in used pop-up campers if you can’t find a new one.
It is difficult to discover places that offer new roofs for pop-ups unless they create and sell their own bespoke roofs. It’s possible to find a used roof on Craigslist, but if it’s tied to another camper, you’ll have to pay a lot of money.
Coleman Pop Up Camper Roof Replacement
Coleman/pop-up Fleetwood’s camper business went out of business, and it is now hard to get your roof replaced, to shorten a long story. You’re stuck with using sun-resistant products to fix it. The following is the information that we were able to get. When it came to roofing, Coleman decided on an ABS-style roof because it could be built without seams. With no seams, there are no leaks. The sun, on the other hand, was something they hadn’t budgeted for. Cracks and other damage were caused by the ABS drying out in the sun.
An ABS MEK patch and a UV-protectant bedliner were the methods of choice for one owner after much investigation. These repairs have been successful and it is claimed that they are better than a complete roof replacement.
A variety of issues developed once Coleman switched to AlumiTite Krystal Kote Composite Roofing on the GT and GTE models, and replacement was out of the question. If the problem is just a few cracks and no sagging, the repair can be done.
13 Tips on how to maintain a pop up camper (checklist)
1. Clean and Maintain the pop up canvas
When it comes to pop up campers, nothing is more critical than the pop up canvas. You’ll have to replace it if you don’t clean and maintain it periodically.
If you don’t clean your canvas regularly, it can become a breeding ground for mildew and mold. As a result, use the cleaner advised by the manufacturer on a regular basis. It’s better to heed the advice of the manufacturer than to experiment with new things on your own.
Products that best fit the canvas should be sought out if you don’t know what’s advised. Dishwasher detergent is another option. However, make sure the detergent isn’t too harsh, and choose for a softer one. To clean the canvas, combine it with a proportionate amount of water and utilize the mixture.
Make sure you don’t damage the canvas while cleaning it by using a harsh method. Additionally, it may lose its capacity to withstand the elements. Take care not to over-scrub.
Xem thêm : What Is The Issue With K-Love? How To Cancel K Love Donation?
Before it becomes a significant issue, use mildew spray if you notice mildew on the canvas. If left untreated, mildew and mold can worsen and become tough to eradicate. In the case of mold or mildew, the expression “ignorance is bliss” doesn’t apply.
2. Interior Cleaning
It’s easier to clean and maintain the interior of a pop-up camper than it is to clean and maintain the canvas. However, you still need to take precautionary measures to avoid mildew from forming in your home.
Molds can grow in the camper if there is any condensation, so you need to keep an eye out for that. When the pop-up camper is in use, make sure it has adequate ventilation. Because of the large temperature disparity between the interior and exterior, condensation occurs. Condensation can be avoided with sufficient air movement.
Keep in mind that aggressive cleaning agents should not be used to clean the interior. There are mildew sprays that you can use to get rid of mildew or mold.
3. Allow the camper to completely dry
Oftentimes, when you clean the camper, it gets damp and needs to be properly dried before you put it away for the winter. Allow it to dry out entirely before moving on to the next step. Be patient; it may take some time. The canvas of the camper might become moldy if it is kept moist.
4. Use vinyl cleaner for windows
Make sure you’re using the correct cleaning product for vinyl, and use a vinyl spray to restore it to its original condition. Using the wrong one here can result in the loss of its waterproofing properties, so be certain of this.
5. Do preventive maintenance
This is an excellent piece of advice that everyone should heed. Make sure you’re taking care of the pop-up camper before it gets damaged. Preventative maintenance can save you a lot of money and keep your camping vacation from turning into a disaster.. No, I don’t want a tent with a leaking canvas.
6. Battery needs to be properly stored
Dry camping is where pop up campers excel. In dry camping, you won’t have access to electricity, therefore you’ll need a generator or a DC battery as your power source. Dry camping necessitates the use of batteries. As a result, the camper’s batteries will be the subject of my next maintenance visit.
If you don’t take proper care of the batteries, they may fail at the worst possible time. Keeping the batteries in good condition and charging them properly are two of the most important things to remember.
However, you should never overpay them. Even if your battery has a built-in overcharging protection system, you should still pay attention to the warning signs. Make sure the battery isn’t drained below 50%-60% when it’s in storage.
Batteries lose their charge when left unused for a long period of time. In other cases, this can rise to as much as 5% to 8% per month. Check the batteries’ charge regularly while they are in storage.
7. Drain the tanks before storage
Both fresh water and gray/black water storage tanks will be included in the pop up camper design. Make sure the tanks are empty before storing the camper. Algae and bacteria can begin to grow in water that has been stored for an extended period of time.
So, if you won’t be camping for a while, be sure to empty all the tanks. If you’re a regular camper, it may make sense to keep bringing water along with you. Once in a while, the tanks should be cleaned or sanitized. As a result, make certain you’re on top of it.
8. Checking on tires
Pop up tents are compact, with smaller wheels and tires. However, you still need to keep an eye on them. It’s imperative that you keep them adequately inflated. Make sure you have a tire pressure regulator and check the pressure before you leave.
It is possible for a tire to burst if it is under- or over-inflated. Make that the tires are not under or over-inflated.
The tires of a pop-up camper can be put under strain if the vehicle is too heavy. Because of this, be sure to pack the camper correctly and not exceed its weight restriction. Tires can be damaged by uneven weight, so be sure to distribute it as evenly as possible.
9. Air circulation while storing the pop up camper
Pop-up campers require proper air circulation, therefore covering them with a tarp or cover might be detrimental. As a result, keep the camper in the garage during the winter and rainy seasons. With a pop-up camper, you don’t need as much space as you would with a traditional RV.
10. Maintain Towing hitches
Every time the RV is towed, it must be thoroughly checked or inspected before the trip begins. There should be no question about the condition of the towing equipment. Every time you return from a journey, you should thoroughly clean your towing hitch.
11. Check on Air conditioner
Due to their compact size, pop-up campers may not necessarily be equipped with air conditioners. Installing one is also an option for many of them. Having one on top of your pop-up camper necessitates a higher level of caution.
Even mold can form on a leaking AC, therefore it’s important to fix it as soon as possible. Preventive maintenance on the air conditioner should begin as soon as possible if there are any signs of leaks.
Regular air conditioner maintenance includes cleaning, oiling, and inspecting, as well as doing any other necessary repairs. You should check the drain, filter, and pipes of your air conditioner on a regular basis to ensure they are not clogged.
12. Clean Floor and look for water leakage
It’s not just the canvas that has to be taken care of; the camper’s floor is just as vulnerable to damage. If you notice soft places on the floor, you should investigate the source of the leak and remedy it as soon as possible.
You should use caution when exerting pressure on a soft floor because of its high traffic. This happens over time as the floor wears down. The floor of an old camper should be in good shape before you buy a used one. Work on camper floors can be time-consuming and expensive.
13. Check interior electrical operation
Keep an eye on all of the electrical outlets and lights to make sure they are working properly. Surge protectors can also be quite helpful in preventing costly damage to your equipment.
Tips for putting the camper for long storage
If an RV is not properly stored in the winter, it can be severely damaged. Before putting it in the storage, you should make a checklist.
- Disconnect and store the battery in a separate location.
- Remove all electrical and gas appliances from use
- Do not store any food in the interiors until they have been fully cleaned.
- Refrigerators should be sanitized and food removed from them.
- Make sure the camper is positioned correctly and that adequate air flow is available.
- Before storing anything for an extended period of time, make sure all water systems, including pipelines and tanks, are winterized.
What to do after the storage is over
When winter is gone, you’ll be ready to take your pop-up camper out again, but remember to observe a few rules first.
- Make sure the water tank is clean.
- All electrical devices should be inspected
- Check for rat or insect damage after cleaning the camper.
- The roof needs to be checked and cleaned.
- Slides and hitches should be lubricated.
- Inspect LP gas appliances for damage or leakage.
Conclusion
Although they can survive for decades, pop-up tent trailers and campers continue to be subject to normal wear and tear over that time. Repairing a water-damaged pop-up tent trailer can be as simple as following four steps: inspection, disassembly, cleaning, and repair.
Nguồn: https://spasifikmag.com
Danh mục: Blog