This service will run you somewhere in the range of $150-$200. This is how much it will cost to replace the wood that was damaged by water under the sink.
- How To Replaster A Water Damaged Ceiling? Step-By-Step Guide
- How To Replace Water Damaged Framing Plate Behind Toilet? 14 Framing Mistakes to Avoid at All Costs
- How To Replace Water Damaged Underlayment? Easy Step-by-step Guide
- How To Fix Water Damaged Swollen Wood Table? Step-By-Step Guide
- How Long Before Baseboard Gets Damaged From Water? Tips And Tricks To Avoid Water Damage
Most water damage is caused by plumbing issues, such as a leaking faucet or a drain that is not completely plugged. Maintaining your pipes regularly is essential.
Bạn đang xem: How Much To Replace Water Damaged Wood Under Sink Easily? Perfect Information For You!
Got Water Damage Under Your Sink?
You’re not the only one going through this, and you certainly aren’t the only one that feels the way you do. If it is not protected by a layer of plastic, vinyl, or tile, wood and wood flooring are vulnerable to water damage. Without adequate treatment after water damage, mold can grow on the wood and could cause health problems.
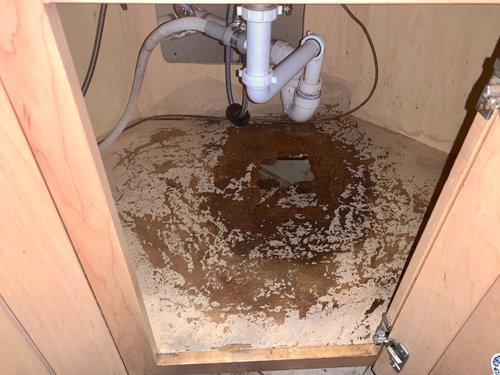
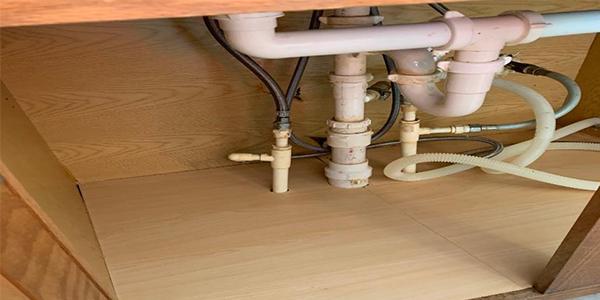
Wood under the kitchen sink can deteriorate over time, but it can be replaced with a few inexpensive tools and a little elbow grease.
How to Replace the Wood Under Your Kitchen Sink
Minor mold damage found early in the mold cleanup process may only require wood hardener to be used to fill in.
If the mold has spread across more than half of the floor, you may need to replace the wood behind the sink. You can pay a handyman $150 to do it, or you can do it yourself for less than $50.
Tools and Materials for Replacing a Board Underneath a Sink
These tools and materials will allow you to repair the rotted wood under your sink on your own.
- Because of Power’s vantage point,
- A hand saw’s cutting edge
- Electric Chisel
- For use with bars as a clamping device
- Hammer
- Flashlight
- A dustpan with a broom
- Safety glasses
- Put on a mask if there’s dust around.
- A suitable sized plank of wood
- Two-by-fours
- Screws
- Nails
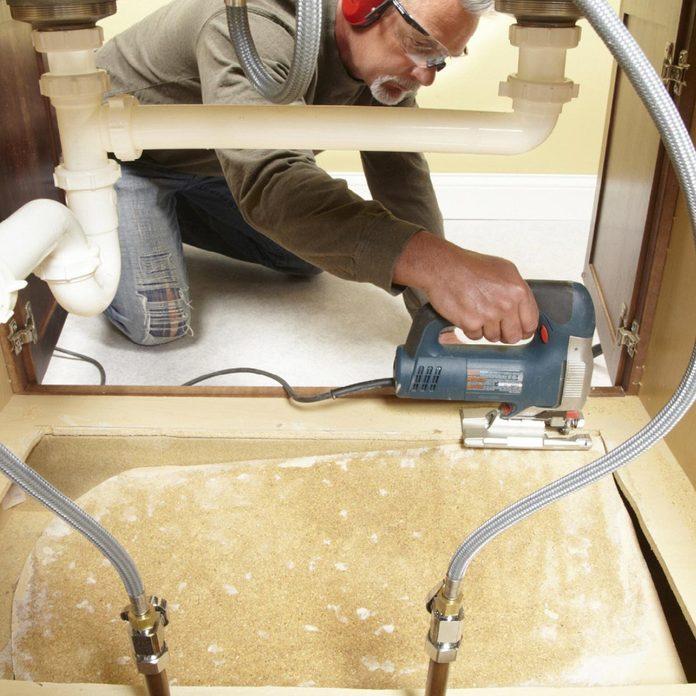
Step-by-Step Guide for Replacing the Wood Under Your Sink
- You should get rid of the trash can and anything else that’s under the sink.
- The dirty, grimy wood board behind the sink needs to be cleaned off.
- Check out the wood up close.
- It’s a good idea to use a pencil to create marks on the wood to help guide your sawing.
- Utilizing a bar clamp to hold the 24 in place facilitates straight cutting.
- For the sake of your eyes and lungs, don a pair of safety glasses and a dust mask.
- If you’re starting a cut with a hand saw, you can make it easy on yourself by drilling a few holes in the blade.
- If you need to use a power tool, look for an electrical socket under the kitchen sink.
- Using an electric saw will save you time, but some of them will malfunction if the engine becomes too hot. Thus, it is prudent to occasionally step away from your power saw.
- Depending on where you’re working on the board, you may need to readjust the position of your bar clamp.
- You can either make a hole big enough to insert your camera and take images, or use your hand to explore the underside of the board you’re cutting to discover if there’s more wood there. This will show you how to cut the board more efficiently.
- Use a torch to improve your visibility while you cut along the inside edges.
- Some power saws are too large to reach into the board’s inner corners without resorting to a hand saw or another smaller power tool.
- When you’re done sawing, take the rotten board out of the way.
- Once you have taken out the rotten board, clean up any debris that may have fallen during the process.
- Construct a base for the new board out of 2x4s.
- Using the appropriate size cut from a new board, replace the old one.
- Use a drill to make holes in the new board for the screws.
How to Prevent Water Damage to Wood Floor Under a Sink
It is recommended that you use plastic or vinyl to cover the wood floor under the kitchen sink to protect it from water damage.
Rather than buying a roll of wide vinyl or plastic and cutting it down to size, consider purchasing a few pieces of vinyl tile instead. Vinyl tiles can be installed using either glue or a special adhesive, so you have options. These are the steps to take when installing self-adhesive vinyl tiles:
- You should clean the whiteboard.
- Lay out the vinyl tiles in the desired pattern to ensure your satisfaction before making a purchase.
- Marking the vinyl tiles with cutting guides ensures that they are trimmed to the right size.
- Use a utility knife or scissors to cut the vinyl tiles to size.
- After the backing paper has been removed, the vinyl tiles can be placed where they belong.
- If you want your self-adhesive vinyl tiles to stick even better to a smooth surface, you can use glue.
- The backs of the vinyl tiles or the board can be glued together.
- The vinyl tiles can be secured with small nails if that’s what the client prefers.
- Once you’ve laid all of the vinyl tiles, you need use a waterproof sealant to make sure no water can seep in around the borders.
Extra Water Proofing Is Always Recommended
After removing and replacing the rotten wood, a coat of waterproofing substance should be applied. Choose plastic or vinyl based on your preference and needs.
Vinyl tiles were utilized because of their versatility and ease of installation. They may be put up quickly, but additional adhesive and nails are required for stability. Additionally, caulk was used to seal the gaps between the wall and the floor. One sheet of vinyl would have sufficed, and we would have saved money.
How to Protect a Cabinet Under a Sink
Xem thêm : How To Fix Water Damaged Paneling? Step-By-Step Process
Sink cabinets frequently suffer water damage. Water will always find its way into the cabinetry, causing the wood to rot and grow mold, even if the sink plumbing is regularly maintained. While no treatment will totally prevent wood from degrading, polyurethane will slow the process somewhat.
Preparing the Cabinet
To begin, wipe off the cabinets with a wood cleaner-bleach to get rid of the grease and grime. After you’ve washed the cabinets and gotten rid of all the grime, grease, and mold, let them air dry for a full day. When the wood is nearly dry, you can finish the process by using a heat lamp. Once the wood has cured completely, sand it down in stages. If you need to use sandpaper, start with a coarse sheet (100 grit) and work your way up to finer grits (150 grit, 200 grit).
Seal the Wood
Remove any sawdust from the hardwood surface so that the sealer can adhere properly. Use the wand attachment on your vacuum to clear out the cabinet. After vacuuming, a tack cloth should be used to remove any remaining dust from the wood. After dusting and wiping down the surfaces, apply the sealer with a paintbrush and let it dry for 24 hours.
Applying the Polyurethane
Water-based polyurethane and oil-based polyurethane are the two main types. Avoid using water-based cleaners, even though rinsing your brushes with soap and water afterwards is an option. Waterproof coatings are best achieved with oil-based polyurethane. For optimal wood protection, use long, even strokes that overlap slightly while applying the oil-based polyurethane finish. In order to stop water from leaking out, caulk should be used to seal any gaps around the pipes. Before applying additional coats of polyurethane, wait at least 24 hours between coats.
Seal All the Openings
To prevent any leaks or water damage, the inside of the kitchen sink cabinet must be sealed around the hot and cold water pipes as well as the drain pipe. An expanding foam insulation aerosol spray, available at any hardware or home center, is the most convenient option.
FAQs
How much does it cost to repair water damage under kitchen sink?
A sheet of plywood or linoleum might be used to conceal minor discoloration or delamination. The total cost of the project will range from $150 to $200, depending on whether or not he needs to buy materials or already has scrap laying around that may be used.
How do you dry a cabinet under a sink?
Pull the drawers apart by unscrewing their hinges. Leave the cabinet door open for 24 hours to let out any remaining moisture. Rytech suggests doing so for the sake of air circulation. Put a fan in front of the sink and turn it on to dry dishes faster.
How do you waterproof a cabinet under a kitchen sink?
Waterproofing Your Under-Sink Cabinets Closing off the sink’s surrounding space. Put caulk around the cabinet joints to make sure they are watertight. Make use of urethane. Be sure there are no cracks or holes near the water lines. Put some mats in the area under the sink.
Can you fix swollen particle board?
These 5 Techniques Will Help You Waterproof Your Kitchen Sink Cabinets Caulk the sink’s perimeter to prevent water damage. The caulking of the cabinets is a must. Use polyurethane. Inspect the areas around the pipes to ensure there are no air leaks. Put some mats in front of the sink.
Does homeowners policy cover water damage?
In the event of an unexpected or accidental water leak, your homeowner’s insurance should cover the damage. This policy will pay for any damage caused by a burst water pipe or a leaking equipment. Your home is protected from water damage that may occur if a hole is made in your roof or walls by hail or high winds.
How much does it cost to replace cabinet under sink?
Modifying the Kitchen by Replacing the Drawer Bottoms It typically costs between $150 and $200 to replace the base of a kitchen cabinet. The most common source of this problem is a dripping pipe or faucet behind the sink.
How much does it cost to replace wood under kitchen sink?
You may need to replace the wood floor under the sink if mold has spread to more than half of the floor. You can pay a handyman $150 to do it, or you can do it yourself for less than $50.
Why is it wet under my sink?
You may need to replace the wood floor under the sink if mold has spread to more than half of the floor. You can pay a handyman $150 to do it, or you can do it yourself for less than $50.
Can you repair swollen MDF?
Xem thêm : How To Hide Water Damaged Particle Board? 5 Easy To Follow Steps For You!
If mold has spread over half of the wood floor under the sink, it may need to be replaced. You can do this for less than $50 if you do it yourself or for $150 if you hire a handyman.
Can you repair laminate cabinets?
Depending on the level of damage, the door may only need to be refaced or repaired instead of replaced entirely. If the laminate is merely peeling, you can try repairing it with glue, but if there are cracks, it’s probably best to replace the whole thing.
How do you fix peeling melamine cabinets?
If the melamine coating is just damaged in a few places, you can fix it with an instant adhesive like Super Glue or Krazy Glue. The melamine finish on a cabinet can be reattached with instant glue if it has peeled off. However, you will need to repaint the cabinets if there are significant areas of loose melamine.
How do you waterproof wood cabinets?
There are three tried-and-true strategies for preserving wood’s moisture content over the long term. Beautiful and durable, a hand-rubbed finish of linseed or Tung oil is a great choice. Cover the wood in polyurethane, varnish, or lacquer. Staining and sealing wood at the same time is conceivable.
How do you weatherproof cabinets?
Ten Pointers for Keeping Water Out of Your Sink Cabinets A Rubberized Finish. Install vinyl floor tiles. Liners for shelves that can withstand water. Get your wooden floors and furniture protected from the rain. Fix the Pipes that are Drips. Put Caulk on It All! Look at the Splashback.
How do I protect the bottom of my kitchen cabinets?
10 Ways to Make Your Sink Mats and Cabinets Waterproof Wrapped with a Rubbery Layer. Utilize Tile Vinyl. Waterproof linings for storage shelves. Ensure that your wooden surfaces are impervious to moisture. Fix the Dripping Pipes. Put caulk around every joint! Examine The Backsplash, etc.
Can water damaged particle board be repaired?
Ten Pointers for Keeping Water Out of Your Sink Cabinets Applying a Rubber Coating Spray. Install vinyl floor tiles. Liners for shelves that can withstand water. Wooden surfaces need to be protected against moisture. Fix the Pipes that are Drips. Put Caulk on It All! Look at the Splashback.
How do you fix swollen wood cabinets?
How to Prevent Water Damage to Your Sink and Cabinets Applying a Rubber Coating Spray. Install vinyl floor tiles. Linings for Waterproof Shelves that are Strong Wooden surfaces need to be protected against moisture. Fix the Pipes that are Drips. Use plenty of insulation. Look at the Splashback.
What should you not say to an insurance adjuster?
Advice on Sealing Cupboards and Putting Down Mats to Prevent Water Damage. Rubberized Coating Spray. Utilize Tile Vinyl. Waterproof, long-lasting lining for shelves The wood surfaces in your home need to be protected from water. Fix the Dripping Pipes. Just insulate everything. Examine The Backsplash, etc.
How do I make a successful water leak claim?
The Top Ten Ways to Make Your Under-Sink Mats More Waterproof Cabinets. Rubberized Coating that is Applied by Spray. You can utilize vinyl tiles. Line your shelves with these watertight shelf liners. You need to protect your wooden surfaces from water. Leaking Pipes Should Be Replaced. Every seam and crack must be caulked. Be sure the splash back is correct.
What is covered under water damage?
Coverage under this policy typically includes repairs for water damage caused by a broken appliance, a leaking fixture, or a burst or overflowing pipe. A liquid spill must be accidental or sudden for most insurance companies to cover the damage.
Conclusion
When you know how much it will cost to replace water-damaged wood under the sink, you can plan your repairs more effectively. Prior to beginning any repairs, it is important to determine the nature of the damage. Don’t forget to insulate your pipes so that you don’t have to deal with costly repairs if one leaks.
Nguồn: https://spasifikmag.com
Danh mục: Damaged


